-
Notifications
You must be signed in to change notification settings - Fork 0
Week 2_1(en): Adding Images to a Web Page
- Due to unstable network, we will not use C9. Instead, we will use VS code from now.
If you would like to keep your files, I recommend you to bring a USB from home and save your files or send them to your own email.
You can download VS code to practice or modify your codes at home.
VS code is a text editor that helps you with writing codes!
It provides useful features like syntax highlighting, indentation, and a lot more.
- I will introduce how to host your web page using GitHub Pages later throughout this course.
Let's start adding images our page!
Before starting, let's make a folder named date-your name in your computer (or your USB if you have one).
Open VS code and create a new file named index.html and save it in that folder.
Now we are ready to start!
We can add images using the <img> tag.
Let's try adding the following image to our page!

First, let's copy and paste the following code to your index.html file.
<!DOCTYPE html>
<html>
  <head>
    <meta charset="utf-8">
      <title>My Blog!</title>
  </head>
  <body>
    <img src="seoul.jpg">
    Seoul is a truly fascinating and interesting city.
  </body>
</html>
If you view the file using the browser, you will not be able to see the image because we did not save the image file yet!
Go ahead and save the file by right clicking on the image above.
Save the file as seoul.jpg in your date-your name folder.
Now let's refresh the browser. Do you see the image?
You will notice that the image is too big that you have to scroll through the image!
Add the width and height attributes to your <img> element like below.
<img src="seoul.jpg" width="300" height="200">Much better!
The width and height attributes have values as pixels.
Note that it's safe to have a width less than 800 pixels in most browsers.
You can check the ratio of width and height of your image and resize your image according to it.
Alternatively, you can indicate the width and height of your image using %.
<img src="seoul.jpg" width="100%">This way the image will change its size as you resize the browser.
You would have noticed that the <img> element is an empty element.
We write the source of the image as the src attribute, and we can use width and height attributes to resize the image.
Another attribute is the alt attribute.
Modify your code like below.
<img src="seoul.jpg" width="80%" alt="Seoul City">The alt attribute is used to add text description to the image.
This is read by screen reading software, and also it is shown when there is a problem on the page and the image is not able to be shown.
I recommend you to always use this attribute because it makes web pages far more accessible.
Another thing you can notice is that the text Seoul is a truly fascinating and interesting city. does not come below the image, but starts right beside the right side of the image.
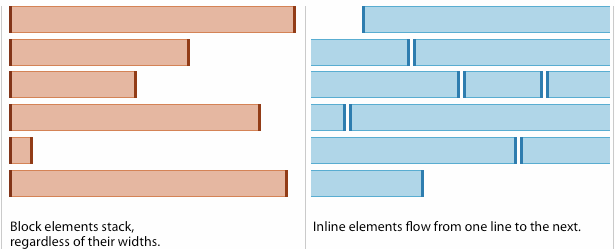
This is because the <img> element is an inline element.

Headings, <p>, <ul>, <ol> elements are block elements,
while <a>, <img>, <strong>, <em> are inline elements.
This is why we need to use <br> to break line when using inline elements, while block elements themselves contain a line break after the element.
By using the <p> tag, we can fix our page so that the text always goes below the image.
<p>Seoul is a truly fascinating and interesting city.</p>As your web site gets complex, you might want to organize your images.
A common practice is to keep your images in a separate folder.
Let's make a folder named img in your date-your name folder and move seoul.jpg to that folder. (Ctrl + X, Ctrl + V cuts and pastes the file.)
You will notice that the image does not show on the browser now.
Try changing the value of the src attribute to "img/seoul.jpg". Now it shows!
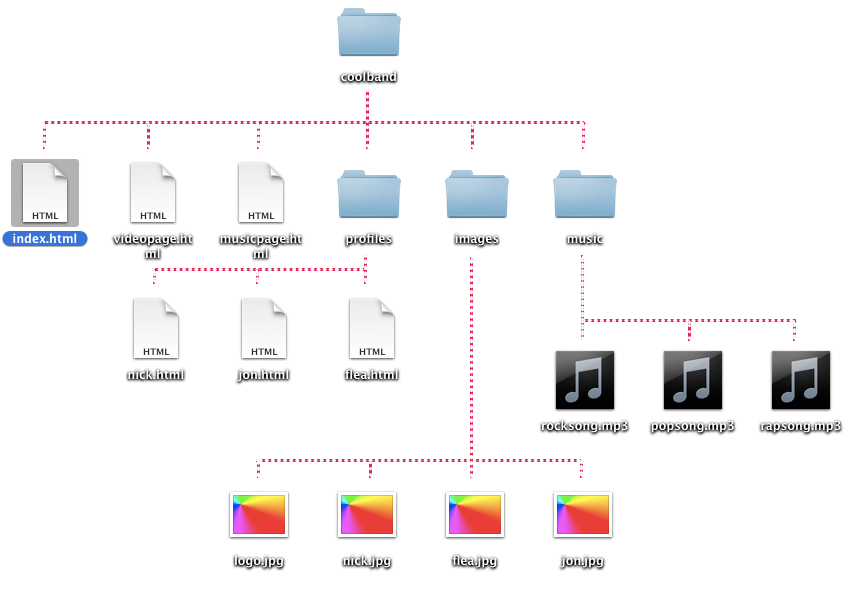
This is how to indicate file paths relatively to the location of index.html.
Let's try making another folder named cities inside the img folder and move seoul.jpg to that folder.
Now you will have to change the file address to "img/cities/seoul.jpg".
What if your image is on a higher directory than the current directory?
We indicate a higher directory using .. (dot dot).
Try moving your file in the same level where your date-your name folder is located.
Change the src attribute to "../seoul.jpg".
You can freely go through file paths to find your file!

For example, let's say we want to access logo.jpg from nick.html.
The file path would be ../images/logo.jpg.
-
Images are not directly a part of a page like we use them in Word or Powerpoint. Remember that HTML stands for HyperText Markup Language?
HTML is consisted of pure text.
The browser needs to collect the image from somewhere when encountering the<img>tag. -
By nesting the
<img>tag inside<a>tags, you can make the image itself a link to another page!