-
Notifications
You must be signed in to change notification settings - Fork 0
Week 1_4(en): Linking Pages and Understanding Attributes
Now let's try making links between pages to fully exploit HTML (HyperText Markup Language)!
Your index.html file will look like this now.
<!DOCTYPE html>
<html>
  <head>
    <meta charset="utf-8">
      <title>Yuri's Page!</title>
  </head>
  <body>
    <h1>This is my first page.</h1>
    <p>I am very proud of it.</p>
  </body>
</html>
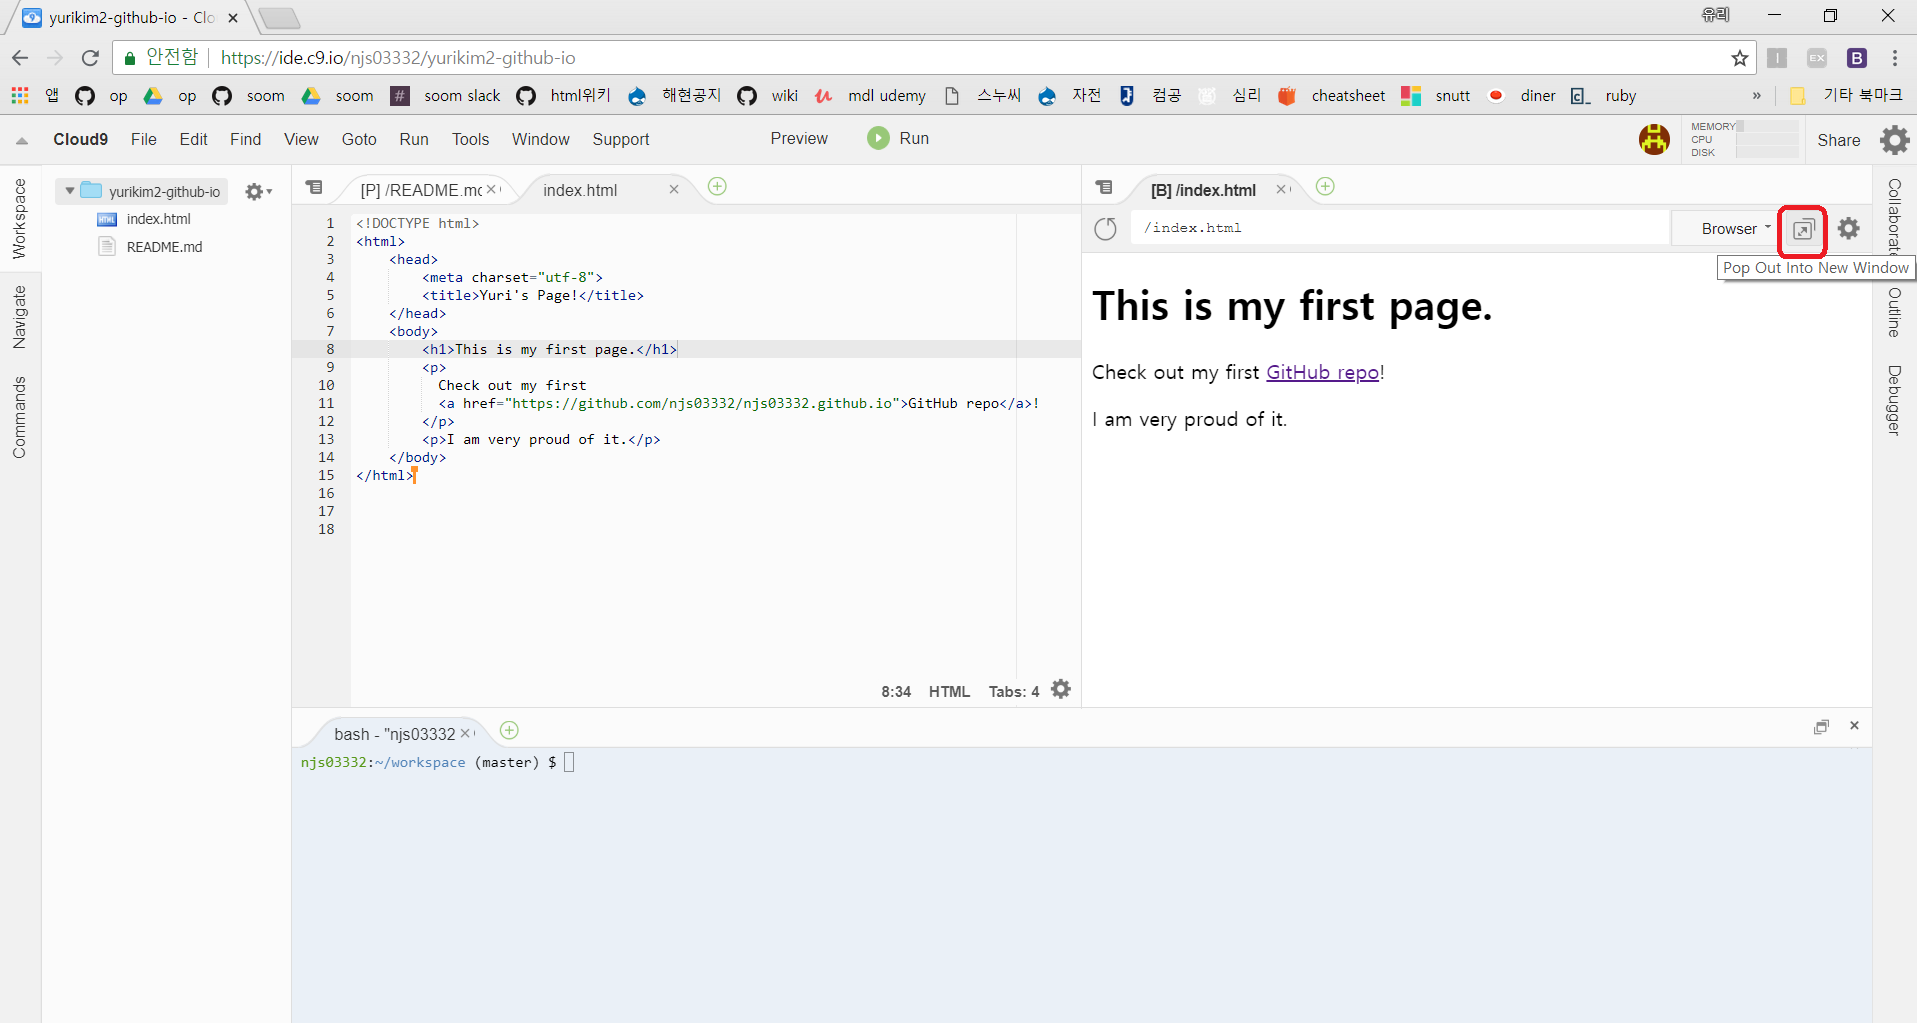
Let's try adding the sentence 'Check out my GitHub repo!' and make the word 'GitHub repo' contain a link to your GitHub repository (named <username>.github.io).
This means that if you click the word GitHub, you will be led to the main page of your GitHub repository.
To do this, we use the <a> tag.
Try modifying your code like below. (Fill in your GitHub account username in <username>.)
...
    <h1>This is my first page.</h1>
    <p>
      Check out my first
      <a href="https://github.com/<username>/<username>.github.io">GitHub repo</a>!
    </p>
...
Run Preview and preview on your browser to check the result.

As seen above, the <a> tag makes the content into HyperText.
When using an <a> tag, the attribute href is required.
We indicate the destination address of the link as the value of the attribute like in the above code.
- All HTML elements can have attributes
- Attributes provide additional information about an element
- Attributes are always specified in the start tag
- Attributes usually come in name/value pairs like: name="value"
There are many different kind of attributes and different kinds of tags require different attributes.
First, let's create a new page.
Add a new file named details.html in your workspace.
Type in the following code and save the file. (Feel free to modify the content of the code!)
<!DOCTYPE html>
<html>
  <head>
    <meta charset="utf-8">
      <title>Details</title>
  </head>
  <body>
    <h1>Details about me</h1>
    <ol>
      <li>I live in Seoul.</li>
      <li>I love dogs.</li>
      <li>I have two sisters.</li>
    </ol>
  </body>
</html>
Now add the following code right after the <h1> element in your index.html file.
<p>
  <a href="details.html">Learn more about me.</a>
</p>
Run preview to check that the link works properly.
Finally, let's go back to your details.html file and add the code below.
...
    </ol>
    <a href="index.html">Go back to Yuri's page.</a>
  </body>
...
Run preview on your browser and link through your pages!
The
<a>tag can have other attributes. Let's check some of them!
Try modifying a part of your index.html code as below.
...
<p>
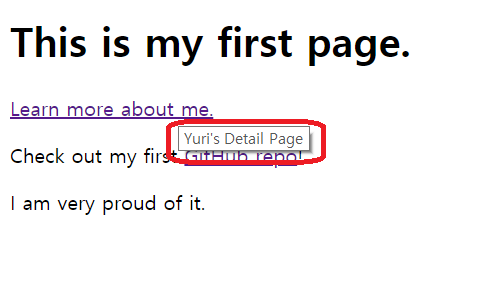
  <a href="details.html" title="Yuri's Detail Page">Learn more about me.</a>
</p>
...
Run preview and try moving your mouse over the text 'Learn more about me.'

As seen above, the value of a title attribute is shown as a tooltip text when the mouse moves over the element in the browser.
By using the id attribute, lead the user to a specific point in a page.
To test this, change your details.html content as below. (Copy and paste by using Ctrl + v, Ctrl + z)
<!DOCTYPE html>
<html>
  <head>
    <meta charset="utf-8">
      <title>Details</title>
  </head>
  <body>
    <h1>Details about me</h1>
    <ol>
      <li>I live in Seoul.</li>
        <p>Hey do you ? I do to !</p>
        <p>Me Too</p>
        <p>Me three</p>
        <p>Me four</p>
      <li>I love dogs.</li>
        <p>Hey do you ? I do to !</p>
        <p>Me Too</p>
        <p>Me three</p>
        <p>Me four</p>
      <li>I have two sisters.</li>
        <p>Hey do you ? I do to !</p>
        <p>Me Too</p>
        <p>Me three</p>
        <p>Me four</p>
      <li>detail4</li>
        <p>Hey do you ? I do to !</p>
        <p>Me Too</p>
        <p>Me three</p>
        <p>Me four</p>
      <li id="detail5">detail5</li>
        <p>Hey do you ? I do to !</p>
        <p>Me Too</p>
        <p>Me three</p>
        <p>Me four</p>
      <li>detail6</li>
        <p>Hey do you ? I do to !</p>
        <p>Me Too</p>
        <p>Me three</p>
        <p>Me four</p>
      <li>detail7</li>
        <p>Hey do you ? I do to !</p>
        <p>Me Too</p>
        <p>Me three</p>
        <p>Me four</p>
      <li>detail8</li>
        <p>Hey do you ? I do to !</p>
        <p>Me Too</p>
        <p>Me three</p>
        <p>Me four</p>
      <li>detail9</li>
        <p>Hey do you ? I do to !</p>
        <p>Me Too</p>
        <p>Me three</p>
        <p>Me four</p>
      <li>detail10</li>
        <p>Hey do you ? I do to !</p>
        <p>Me Too</p>
        <p>Me three</p>
        <p>Me four</p>
    </ol>
  </body>
</html>
Notice that the 5th <li> element has the attribute id set as detail5.
Then modify a part of your index.html file like below.
...
<p>
  <a href="details.html" title="Yuri's Detail Page">Learn more about me.</a>
  I am especially proud of my <a href="details.html#detail5">5th detail.</a>
</p>
...
By putting id value of a specific element after # in the end of the link address, you can let the user move to a specific location in a page.
What if you wanted to open a new tab to link to a new page?
If you set the target attribute as "_blank" in your <a> tag, the browser will always open up a new tab with the linked page.
Try adding a target attribute anywhere in your code to make the browser behave in this way!