-
Notifications
You must be signed in to change notification settings - Fork 52
Joints
Joints are used to connect and constrain entity-bodies to each other. They can be used to create more complex systems such as ragdolls, teeters and pulleys. Some may provide limits so we can control the range of motion, some provide motors which can be used to drive the joint at a prescribed speed until a prescribed force or torque is exceeded.
Box2D has several joint types that allow creating virtually anything. Until this moment, Ethanon Engine supports only the most common and most widely used type: revolute joints.
It is not yet supported to declare and configure joints through UI in the Ethanon Editor, however, declaring them in the entity XML declaration is pretty straight forward.
Joints can be created following three steps:
- Declare joints in the
.entfile - Add connect entities to scene
- Resolve joints
These steps are described below.
To add a joint into an entity-body, open the entity .ent file as a text file with your favorite text editing app.
Warnings
- Remember that .ent files are encoded with UTF-16 (with BOM) in the Little-endian type, so make sure you're a using a good text editor such as Notepad++, Sublime or TextMate.
- For safety reasons, close the entity you're editing if you left it open in the Ethanon Editor.
- If the entity you are editing is already in a scene, don't forget to use the "Update scene" feature in the Scene editor after your editing is done.
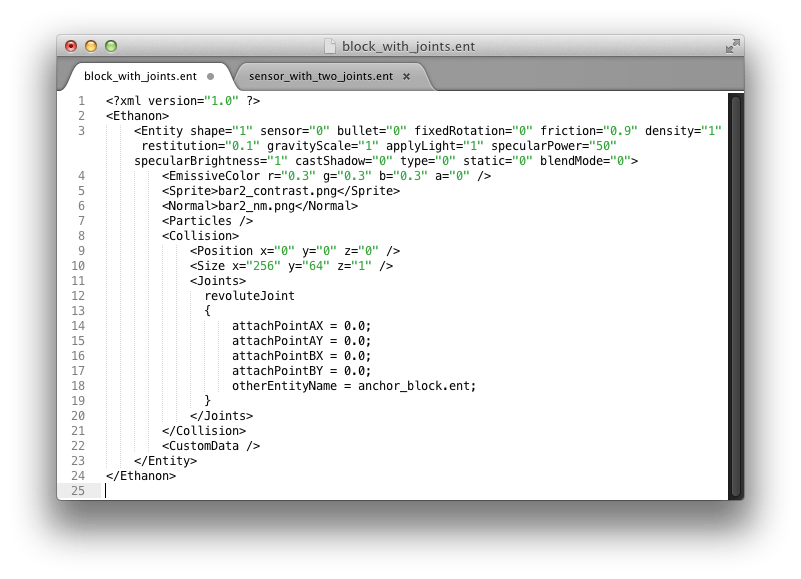
Joints are declared as ENML data inside the XML <Joints> tag, which is placed into the <Collision> tag. Example:
<?xml version="1.0" ?>
<Ethanon>
    <Entity shape="1" sensor="0" bullet="0" fixedRotation="0" friction="0.9" density="1" restitution="0.1" gravityScale="1" castShadow="0" type="0" static="0" blendMode="0">
        <EmissiveColor r="0.3" g="0.3" b="0.3" a="0" />
        <Sprite>bar2_contrast.png</Sprite>
        <Particles />
        <Collision>
            <Position x="0" y="0" z="0" />
            <Size x="256" y="64" z="1" />
            <Joints>
**// joint declaractions here**
            </Joints>
        </Collision>
        <CustomData />
    </Entity>
</Ethanon>
One or more joints can be declared inside the <Joints> tag. Each joint will normally make reference to another entity that will be connect to this entity in some way.
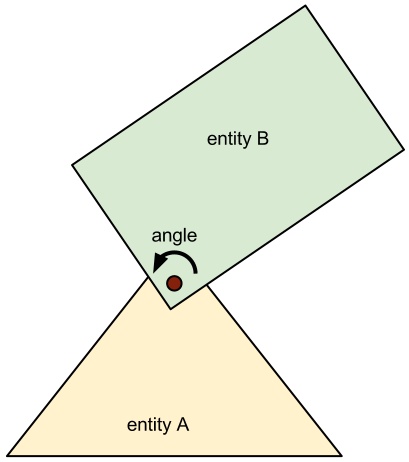
A revolute joint forces two bodies to share a common anchor point. The revolute joint has a single degree of freedom: the relative rotation of the two bodies. This is called the joint angle. To specify a revolute you need to provide another entity and the relative position for the two anchor points, for A and B (also called the other entity).

The enml-entity name that identifies a revolute joint is revoluteJoint:
        <Collision>
            <Position x="0" y="0" z="0" />
            <Size x="256" y="64" z="1" />
            <Joints>**
            revoluteJoint
            {
              // places the anchor point at the top of this entity...
              attachPointAX = 0.0;
              attachPointAY =-1.0;

              // and in the bottom-left corner of the other entity
              attachPointBX =-1.0;
              attachPointBY = 1.0;
              otherEntityName = anchor_block.ent;
            }**
            </Joints>
        </Collision>
The declaration above will attach this entity and the other entity with a revolute joint.
Some other joint properties can be set inside the ENML declaration, example:
revoluteJoint
{
  // places the anchor point at the top of this entity...
  attachPointAX = 0.0;
  attachPointAY =-1.0;

  // and in the bottom-left corner of the other entity
  attachPointBX =-1.0;
  attachPointBY = 1.0;
  otherEntityName = anchor_block.ent;
  **
  enableLimit = true;
  lowerAngle =-1.5;
  upperAngle = 1.5;

  enableMotor = true;
  motorSpeed = 1.0;
  maxMotorTorque = 10.0;
**}
More about them:
Angle limits
Forces the joint angle to remain between a lower and upper bound. The limit will apply as much torque as needed to make this happen. The limit range should include zero, otherwise the joint will lurch when the simulation begins.
Enable angle limits by setting the enableLimits attribute to true and set the real angle bounds as real number values to upperAngle to lowerAngle in radians.
Motor speed
A joint motor allows you to specify the joint speed (the time derivative of the angle). The speed can be negative or positive. You can provide a maximum torque for the joint motor. The joint motor will maintain the specified speed unless the required torque exceeds the specified maximum. The joint motor can be used to simulate friction. Just set the joint speed to zero, and set the maximum torque to some small, but significant value. The motor will try to prevent the joint from rotating, but will yield to a significant load.
Enable motor features in the current joint by setting the enableMotor flag to true and set motorSpeed and maxMotorTorque properties as real number values.
Check out our joints sample for a more practical approach.
It is also possible to declare multiple joints for a single entity by simply appending the joint number to the revoluteJoint enml-entity name:
// car wheels declaration

// left wheel
revoluteJoint0
{
  // places the first wheel at the left-bottom
  attachPointAX =-1.0;
  attachPointAY = 1.0;

  // the anchor point in the wheel will be its center point
  attachPointBX = 0.0;
  attachPointBY = 0.0;
  otherEntityName = vehicle_wheel0;
}

// right wheel
revoluteJoint1
{
  // places the second wheel at the right-bottom
  attachPointAX = 1.0;
  attachPointAY = 1.0;

  // the anchor point in the wheel will be its center point
  attachPointBX = 0.0;
  attachPointBY = 0.0;
  otherEntityName = vehicle_wheel1;
}
Notice that joint indexes for multiple joint declarations must start from `` and progress its value in an one-by-one basis.
A joint is considered resolved as soon as the engine finds the other entity and creates the b2Joint object that will attach them. As soon as a new scene is loaded and before the onSceneUpdate function is called, Ethanon Engine scans all entities and resolves all their joints automatically.
If the engine can't find the entity named after otherEntityName in its bucket or in any bucket around it, the b2Joint object is not created and the joint will be considered unresolved.
When adding entities with joints dynamically, make sure you insert entity B into scene as well (the other entity, preferably near entity A), and then call the ETHEntity::ResolveJoints method:
ETHEntity@ entityA;
AddEntity("car_skin.ent", carPos, entityA);
AddEntity("wheel.ent", carPos, "vehicle_wheel0");
AddEntity("wheel.ent", carPos, "vehicle_wheel1");
entityA.ResolveJoints();
Notice that placing other entities in the same bucket as entity A makes the resolution process faster.
It is also possible to select the other entity which will connect the holder of the joint by omitting the "otherEntityName" value in the joint declaration and setting as custom entity variable instead.
Consider the following joint declared in ship.ent:
revoluteJoint
{
  // places the thruster joint on the center-bottom side of the ship
  attachPointAX = 0.0;
  attachPointAY = 1.0;

  attachPointBX = 0.0;
  attachPointBY = 0.0;
}
Now, once the ship.ent entity is dynamically added to scene, set an int custom variable containing the ID of the other entity to be connected (make sure it is in the scene as well):
ETHEntity@ ship;
AddEntity("ship.ent", pos, ship);

ETHEntity@ thruster;
AddEntity("thruster.ent", pos, thruster);

// considering you've named your joint as "revoluteJoint", it could also be "revoluteJoint0/1/2..."
// the line below tells the engine to connect the ship to the entity of a given ID
ship.SetInt("revoluteJoint", thruster.GetID());

ship.ResolveJoints();
The variable name must match the joint name declared in the enml content.
The ETHRevoluteJoint handle object allows dynamic control of joint properties. This object may be retrieved using the ETHPhysicsController::GetRevoluteJoint method. Sample:
void ETHCallback_sensor_with_two_joints(ETHEntity@ thisEntity)
{
	ETHPhysicsController@ controller = thisEntity.GetPhysicsController();
	ETHRevoluteJoint@ joint0 = controller.GetRevoluteJoint(0);

	ETHInput@ input = GetInputHandle();

	// on right key press, increase motor speed by 5
	if (input.GetKeyState(K_RIGHT) == KS_HIT)
		joint0.SetMotorSpeed(joint0.GetJointSpeed() + 5.0f);

	// on left key press, decrease motor speed by 5
	if (input.GetKeyState(K_LEFT) == KS_HIT)
		joint0.SetMotorSpeed(joint0.GetJointSpeed() - 5.0f);
}
Check the ETHRevoluteJoint page in the API reference for the full list of methods.
Parts of this section were adapted from the Box2D User Manual.
