-
Notifications
You must be signed in to change notification settings - Fork 0
Lab 4.1 ‐ Enabling and using Dependabot on your repository
This lab has the goal to teach you about supply chain security particularly focused on dependency management. You will learn about depency management in GitHub and about Dependabot. How to enable this and practice with Dependabot's ability to update your dependencies automatically. First, you will enable the Dependency Management features, and then you will dive into Dependabot alerts, gaining insights into their crucial role in software security and updates. For those with extra time and dedication to thorough dependency management, there's an optional step about assigning Dependabot alerts to a person for review.
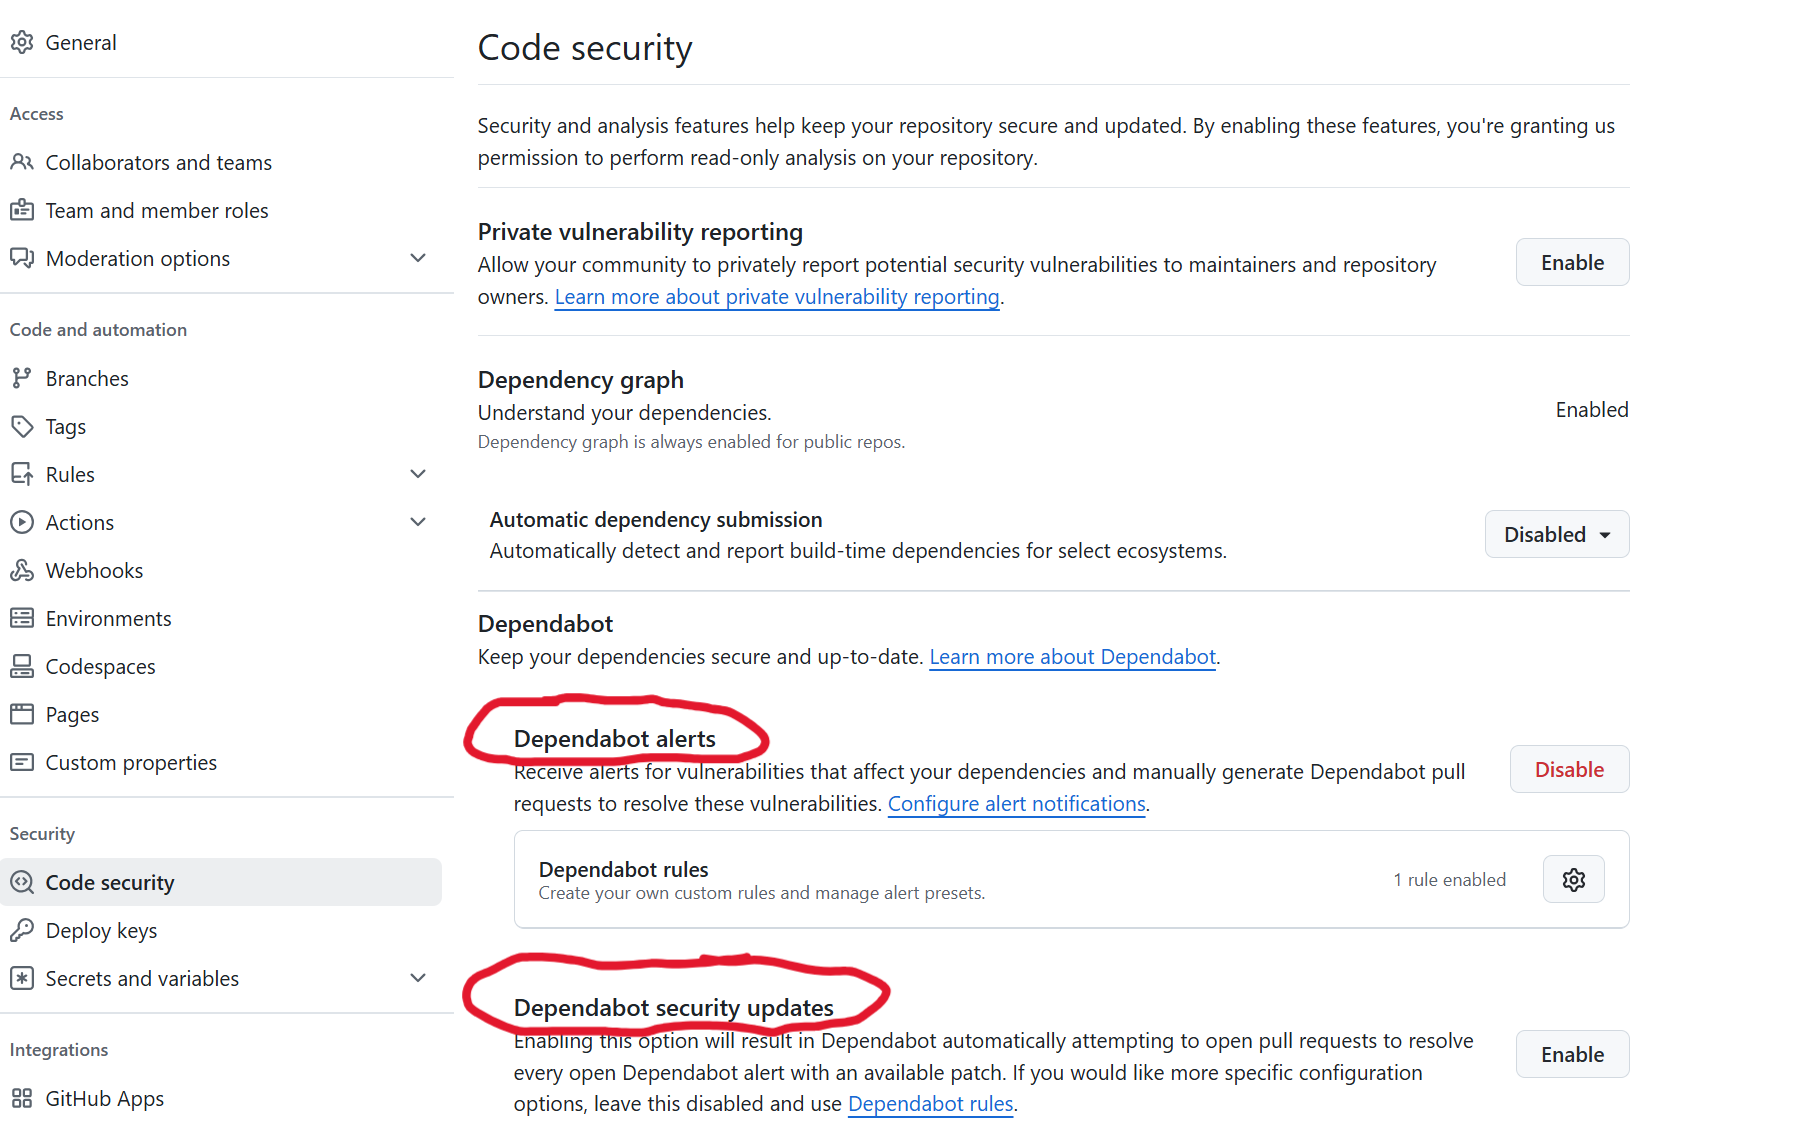
Let's start with enabling the Dependency Scanning features in your repository. These features are available in the code security settings in your repository.
- Navigate to the
Settingstab on your repository - Under the
Code Securitycategory in the menu, find the sectionDependabot. - Click
Enablefor each of these features:- Dependabot alerts
- Dependabot security updates

Now you have enabled the Dependecy Management features.
Dependabot alerts tracks security vulnerabilities that apply to your repository’s dependencies. Dependebot proactively scans your repository manifes files for dependencies youcode has on other libraries. For example NuGet, NPM or Ruby packages. Becuase the security experts at GitHub continuously scan and update the vulnerabilities and put this in a database, Dependabot can recognize vulnerable packages and alert on this. It also adds Pull Requests for the found vulnerability with a proposed fix.
- Navigate to the
Securitytab on your repository, and clickDependabot alerts. Now you can see the active alerts generated by Dependabot. - Click on an alert. You can see the details on that alert. Dependabot will show you details on the vulnerability and a suggested remediation.
- Review the details of the vulnerability and, if available, the pull request containing the automated security update.
- Optionally, if there isn't already a Dependabot security updates update for the alert, to create a pull request to resolve the vulnerability, click
Create Dependabot security update.
Note: If no vulnerabilities are found in the packages, add the following package to your application:
<PackageReference Include="Newtonsoft.Json" Version="12.0.3" />and commit this to the repository. This should trigger Dependabot, since we now deliberately inject a package that we know is vulnerable. (see reference here)
After pusing the changes to the gitHub repository, you will see a security warning pop up in the security center.
Navigate to the security tab and look at Vulnerability alerts here you will see at least one dependabot alert.

A pull request with regards to a security update will be generated by the Dependabot bot user when it knows there is a fix for the specific issue. Generating the pullrequest might take a while, sometimes several minutes. Navigate to the pull request that was generated by the Dependabot bot user.
- Navigate to the
Pull RequestTab - Open a Pull Request and view the suggested changes
- When you are happy with the changes and ready to update your dependency and resolve the vulnerability, merge the pull request.
- Check out what you can do with Dependabot by opening the commands an options section in the PR. With some
@dependabotcommands you can quickly interact with the dependabot features. You can find more about these commands here
By default, Dependabot raises pull requests without any reviewers or assignees. Let's make use of the ability to configure Dependabot to always assign Dependabot alerts to a person. You can perform this kind of configuration using the dependabot.yml file. You must store this file in the .github directory of your repository. When you add or update the dependabot.yml file, this triggers an immediate check for version updates.
You can use reviewers and assignees to specify reviewers and assignees for all pull requests raised. You can also specify a team but when you specify a team, you must use the full team name, as if you were @mentioning the team (including the organization).
The example dependabot.yml file below changes the npm configuration so that all pull requests opened with version and security updates for npm will have two reviewers and one assignee.
# dependabot.yml file with
# reviews and an assignee for all npm pull requests

version: 2
updates:
  # Keep npm dependencies up to date
  - package-ecosystem: "nuget"
    directory: "/"
    schedule:
      interval: "daily"
    # Raise all nuget pull requests with reviewers
    reviewers:
      - "my-org/team-name"
      - "octocat"
    # Raise all npm pull requests with an assignee
    assignees:
- "user-name"- Create a file that always assigns Dependabot alerts to yourself using configuration via the
dependabot.ymlfile.
For more information, please refer to: