-
Notifications
You must be signed in to change notification settings - Fork 0
Lab 3.2 ‐ Migrating forms
In this Hands on Lab you are going to migrate the existing Windows Forms application to a Blazor application.
For each form we have in the exisitng Forms application, we are going to use chat GPT4-o Large Language Model to help us with the conversion. For this, you need to have access to the OpenAI playground. If you do not have this, revisit Lab 1.3 Access OpenAI Proxy.
We need to create a system prompt to instruct the Large Language Model to help us with the conversion. Use the following prompt for the system prompt:
You are an AI programming assistant. Follow the user's requirements carefully and to the letter. First, think step-by-step and describe your plan for what to build in pseudocode, written out in great detail. Then, output the code in a single code block. Minimize any other prose. You specialize in converting Windows Forms 4.8 files to Blazor .NET 8.0 pages with rendermode InteractiveServer. The data access code that is in the source files is kept the same and the data access class is injected using dependency injection.
Each user prompt contains the Windows Forms file to convert and the output is C# and .NET 8, no markdown and no explanation.
You are only allowed to use standard controls and the Blazor Bootstrap controls.
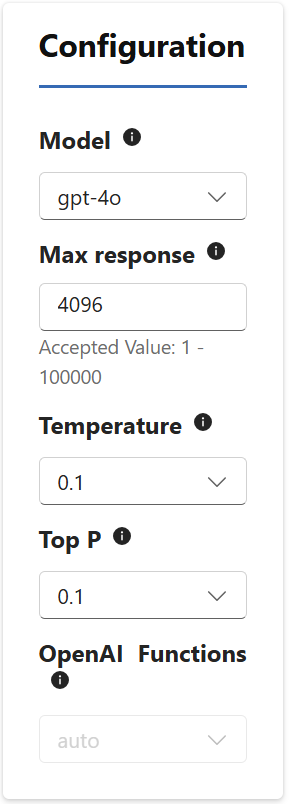
When we are using the Large Language Model we need to set a couple of parameters. You can find these parameters on the right hand side of the Playground page. Set the parameters as shown in the following screenshot:

Select the Model to be gpt-4o, Max Response to 4096, Temperature to 0.1 and Top P also to 0.1
Setting the Max response higher than 4096 will result in an error, since the gpt-4o model can not handle more tokens than this amount. By setting the Temperature to a low value, we limit the randomness of the response we will get. The same goes for the Top P parameter. We keep these values low, so we get somewhat predictable outcomes. Feel free during the lab to experiment with various values.
- Select all the code that is in the file
AddRoom.csin the Windows Forms project. - Paste this code in the user prompt in the playground environment.
- Hit enter, so you feed the request to the model and wait for the output response. The result of the response is what we are going to add to our newly created Server project. We will add the generated pages as server side components in the components folder.
- Copy the output and paste this in a new file with the name
addroom.razorand place this in the components folder in the server project.
The code that gets generated will contain some minor things that we still need to fix. First of all we need inject the DataAccess class, so all data access code that is in the code will be able to compile. Add to the top of the file the following statement: @inject Project_HMS.DataAccess Da
Next we need to add a reference System.Data so we can resolve types like DataTableand DataSet which are used in the data access code. This is by adding the @using System.Data directive to the page.
Depending on how the model generated the code you will find that it created buttons using a css class. For each button ensure there is a class='btn btn-primary' stylesheet reference. This ensures the buttons are shown using the default blazor css markup that is available in the project.
Compile the Server project and the moment you see the Home screen of the application, type on the url the name of the navigatable component you created. You can see how you can navigate to the page, by looking at the @page <name of the page> directive. Now on the URL add the <name of the page> at the end of the URL and see if you can view the page.
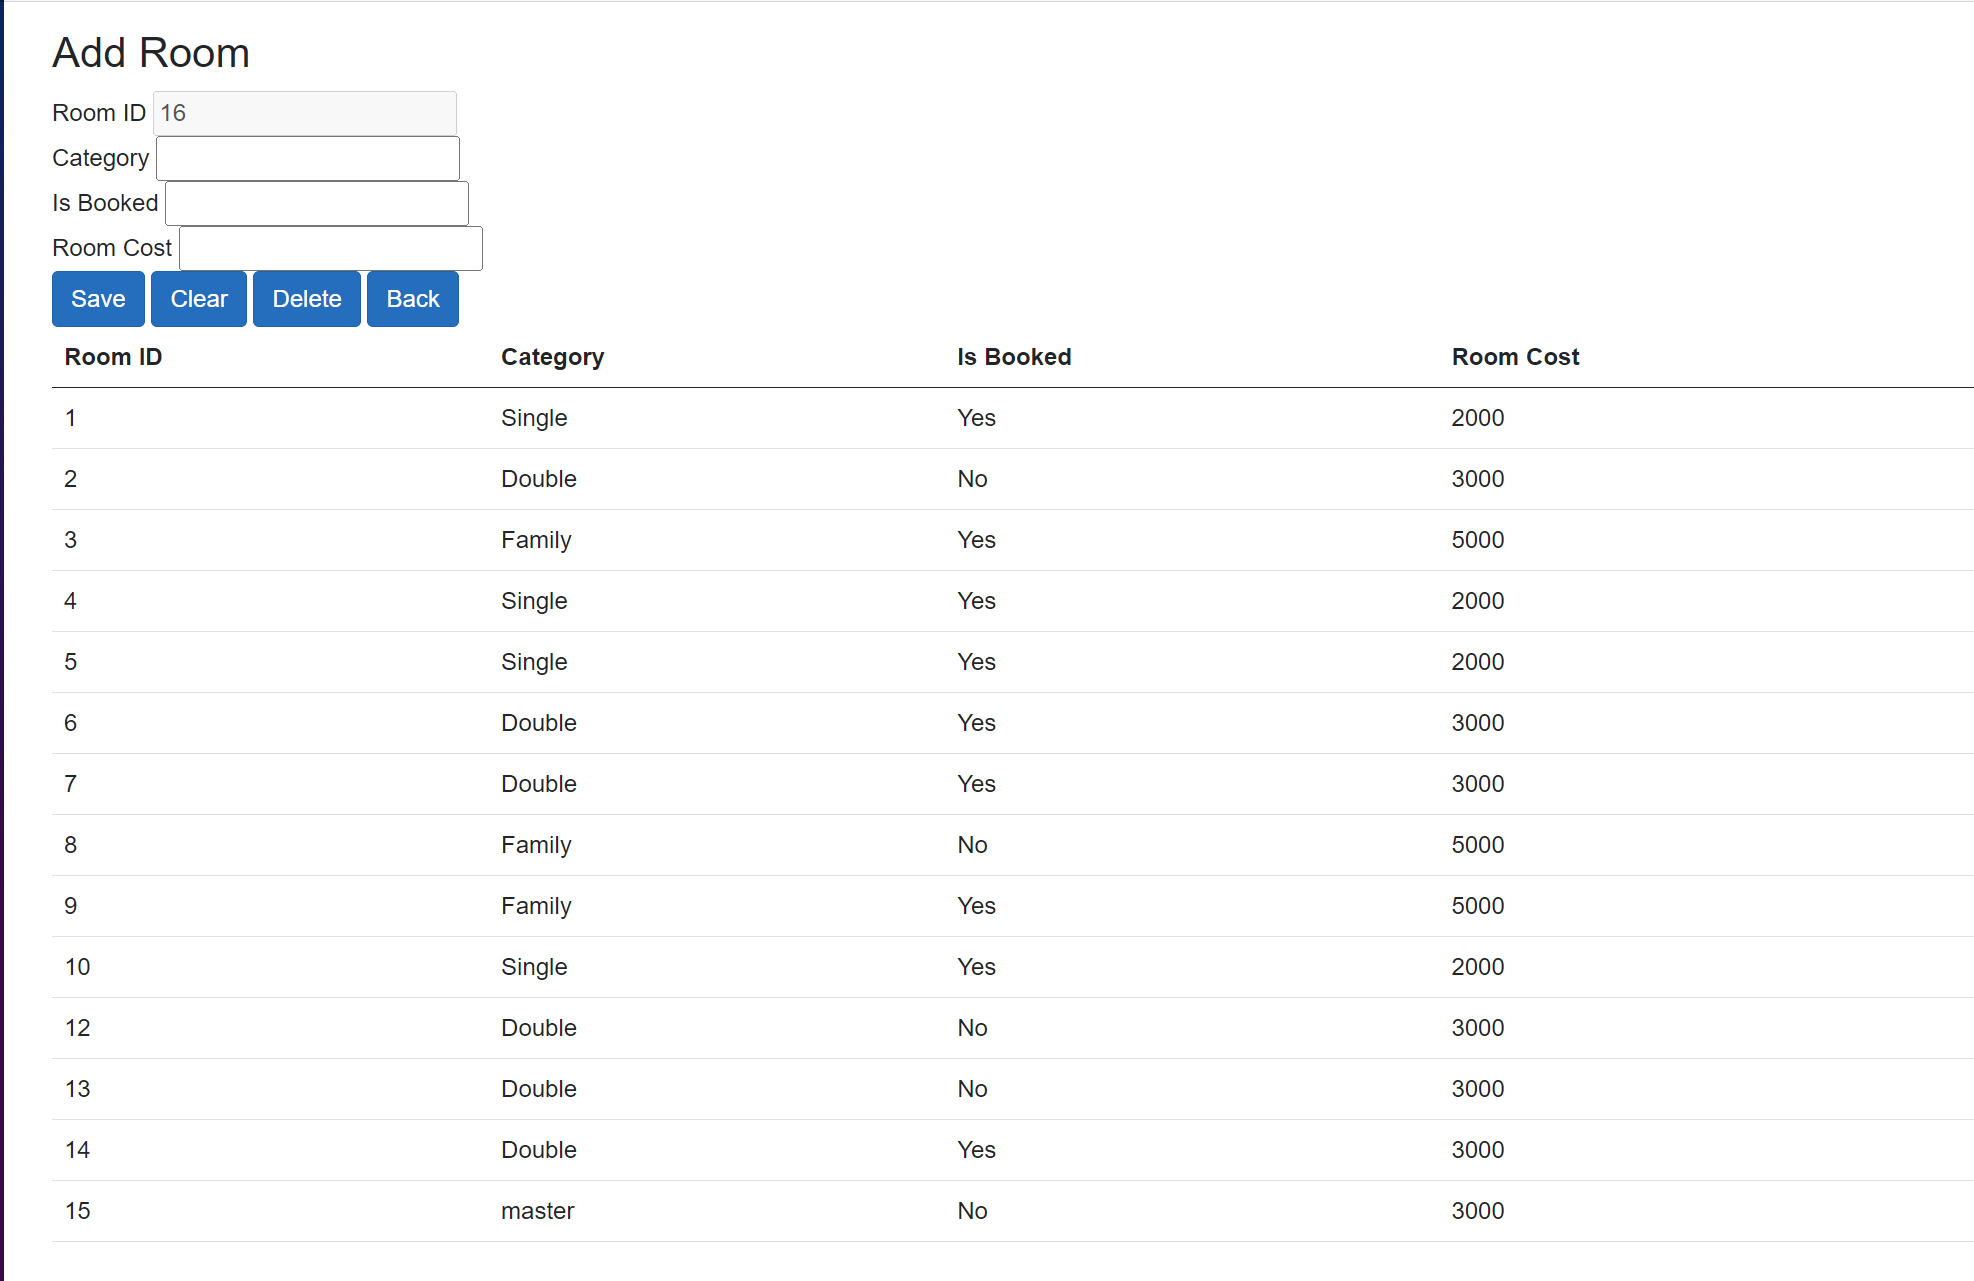
The result of the page should be something like the following:

When you double click one of the rows in the table, you will see the text fields are populated and when you click the Clear button, the fields will be made empty. The moment you double click a row of a room that has not been booked, you can click Delete and it will be removed from the database. When you fill in the Category, Is Booked and Room Cost fields and press Save, the room will be added to the database.
Here we take the exact same approach, we copy all the Windows Forms code we find in the BillHistory.cs file of the source application and we paste it in the user prompt in our AI Playground. Since we already set the parameters and the system prompt, the only thing we need to do is after pasting is to hit enter and wait for the result.
Copy the results into a new file called BillHistory.razor and put it in the Server project in the Components folder.
We need to do the similar fixup of the code after generation. You add the @inject Project_HMS.DataAccess Da after the page directive, so we can use the DataAccess class. Next we add the @using System.Data directive so we can use the types for data access. See if you can add some css classes to the generated buttons so they look nice.
Here you do the same: you compile the project, start it and then navigate to the page by adding the page name as stated in the @page directive.
You do exactly the same steps for all subsequent Forms you have in the Project_HMS project we provided. After generating the output, you create a corresponding Razor page in the Server project and you fix some minor things so that the code compiles. After converting each page, test it, so you end with all pages working.
If time permits, perhaps you can make the pages look a little bit better. For example, you can apply some Bootstrap CSS styles to controls:
    <div class="form-group">
        <label>Bill Id:</label>
        <input @bind="txtBId" class="form-control" />
    </div>
This will wrap the txtBId in a container with a certain spacing and styling, as well as applying a nice style to the input box.
Also, you can diversify the buttons a bit by applying different styles to make them look more distinctive. For example:
<div class="button-group">
    <button @onclick="PopulateGridView" class="btn btn-primary">Load Data</button>
    <button @onclick="ClearContent" class="btn btn-danger">Clear</button>
    <button @onclick="btnCalculate_Click" class="btn btn-success">Calculate</button>
    <button @onclick="btnPrint_Click" class="btn btn-secondary">Print</button>
    <button @onclick="btnUpdate_Click" class="btn btn-success">Update</button>
    <button @onclick="btnBack_Click" class="btn btn-secondary">Back</button>
</div>
Here we use different button styles such as btn-primary, btn-success or btn-danger to indicate the nature of their action.
If you're a real CSS wizard, you can probably make your app look even better.