-
Notifications
You must be signed in to change notification settings - Fork 4
Anthos On Prem Apigee Hybrid Hard Way 1.2
After you have prepared your Anthos on-prem environment, you can install Apigee hybrid the-hard-way(tm).
We are going to define environment variables that will help us manage the installation process and reuse copy-and-paste commands with minimal editing.
- Log into your netservicesvm.
https://netservices-XXX.YYY.ZZZ.<domain>.net/
- For your GCP project, verify that you set up your project name.
$ gcloud config get-value project

qwiklabs-gcp-cf7594636f66aa8a
- Setup PROJECT variable and Hybrid attributes
export PROJECT=$(gcloud config get-value project)

export GCP_REGION=$(gcloud config get-value compute/region)


export HYBRID_VERSION=1.2.0
export HYBRID_TARBALL=apigeectl_linux_64.tar.gz
export HYBRID_HOME=~/apigee-hybrid-$HYBRID_VERSION-install
- Describe cluster properties
export CLUSTER=user-cluster1
export CLUSTER_REGION=on-prem

export AX_REGION=$GCP_REGION
- Describe hybrid organization and environment
export CLUSTER=user-cluster1
export CLUSTER_REGION=on-prem
- Create working directory for Hybrid installation
mkdir -p $HYBRID_HOME
- Download hybrid installation tarball and untar it.
cd $HYBRID_HOME

curl -LO https://storage.googleapis.com/apigee-public/apigee-hybrid-setup/$HYBRID_VERSION/$HYBRID_TARBALL

tar -xvf $HYBRID_HOME/$HYBRID_TARBALL
- Add bin directory where apigeectl utility is located to the $PATH
export APIGEECTL_HOME=$HYBRID_HOME/$(tar tf $HYBRID_HOME/$HYBRID_TARBALL | grep VERSION.txt | cut -d "/" -f 1)

export PATH=$APIGEECTL_HOME:$PATH
It is a good security practice to define a separate Service Account (SA) for specific components and activities. We are going to define GCP IAM Service Account for Apigee Hybrid components.
For each component we will define an environment variable that contains name of the json key of its SA. Then we will use a tools/create-service-account utility to: define SA; assign required role; create and download a json key that we will refer to in a runtime config yaml file that drives Hybrid installation.
- Define directory where service account keys will be stored.
export SA_DIR=$HYBRID_HOME/service-accounts
- Create service account for apigee-cassandra
The runtime datastore that provides Core Persistence Services (CPS) for the runtime plane. The Cassandra database stores information about the following entities: Key management system (KMS); Key Value Map (KVM); Response cache; OAuth; Quotas.
export CASSANDRA_SA=$SA_DIR/$PROJECT-apigee-cassandra.json
echo y | $APIGEECTL_HOME/tools/create-service-account apigee-cassandra $SA_DIR
- Create service account for apigee-logger
Contains an Apigee logger agent that sends application logs to Stackdriver.
export LOGGER_SA=$SA_DIR/$PROJECT-apigee-logger.json
echo y | $APIGEECTL_HOME/tools/create-service-account apigee-logger $SA_DIR
- Create service account for apigee-mart
Contains the Apigee administrative API endpoint. MART stands for Management API for Runtime
export MART_SA=$SA_DIR/$PROJECT-apigee-mart.json
echo y | $APIGEECTL_HOME/tools/create-service-account apigee-mart $SA_DIR
- Create service account for apigee-metrics
Contains an Apigee metrics agent that sends application logs to Stackdriver.
export METRICS_SA=$SA_DIR/$PROJECT-apigee-metrics.json
echo y | $APIGEECTL_HOME/tools/create-service-account apigee-metrics $SA_DIR
- Create service account for apigee-synchronizer
Fetches configuration data about an API environment from the management plane and propagates it across the runtime plane.
export SYNCHRONIZER_SA=$SA_DIR/$PROJECT-apigee-synchronizer.json
echo y | $APIGEECTL_HOME/tools/create-service-account apigee-synchronizer $SA_DIR
- Create service account for apigee-synchronizer apigee-udca
Allows transfer of analytics and tracing data to the management plane.
export UDCA_SA=$SA_DIR/$PROJECT-apigee-udca.json
echo y | $APIGEECTL_HOME/tools/create-service-account apigee-udca $SA_DIR
- To verify success of the step, list keys directory contents
ls -ls $SA_DIR

total 24
4 -rw------- 1 gkeadmin gkeadmin 2378 Jul 30 15:25 qwiklabs-gcp-cf7594636f66aa8a-apigee-cassandra.json
4 -rw------- 1 gkeadmin gkeadmin 2368 Jul 30 15:27 qwiklabs-gcp-cf7594636f66aa8a-apigee-logger.json
4 -rw------- 1 gkeadmin gkeadmin 2364 Jul 30 15:27 qwiklabs-gcp-cf7594636f66aa8a-apigee-mart.json
4 -rw------- 1 gkeadmin gkeadmin 2370 Jul 30 15:27 qwiklabs-gcp-cf7594636f66aa8a-apigee-metrics.json
4 -rw------- 1 gkeadmin gkeadmin 2384 Jul 30 15:27 qwiklabs-gcp-cf7594636f66aa8a-apigee-synchronizer.json
4 -rw------- 1 gkeadmin gkeadmin 2364 Jul 30 15:27 qwiklabs-gcp-cf7594636f66aa8a-apigee-udca.json
- To verify that variable references for SA keys functions correctly, list UDCA key file using its variable:
ls -ls $UDCA_SA

4 -rw------- 1 gkeadmin gkeadmin 2364 Jul 30 15:27 /home/gkeadmin/apigee-hybrid-1.2.0-install/service-accounts/qwiklabs-gcp-cf7594636f66aa8a-apigee-udca.json
- You can verify service accounts and their keys in the IAM & Admin/Service Accounts page of the console.cloud.google.com.

- Apigee Hybrid v1.2 that we are installing contains Apigee Connect Agent component. As it is currently beta, a manual step to assign apigeeconnect.Agent rols to the mart SA account is required.
gcloud projects add-iam-policy-binding $PROJECT --member serviceAccount:apigee-mart@$PROJECT.iam.gserviceaccount.com --role roles/apigeeconnect.Agent
NOTE: If you want to change a load balancer ip address, you can use following commands to redefine it:
export RUNTIME_IP=10.0.10.7
(cd $APIGEECTL_HOME; apigeectl init -c istio  -f $HYBRID_HOME/runtime-config.yaml)
- Define environment variables that hold information about Runtime IP and TLS key and certificate.
export RUNTIME_IP=10.0.10.13

export RUNTIME_HOST_ALIAS=api.gkeonprem.com
export RUNTIME_SSL_CERT=$HYBRID_HOME/api.gkeonprem-com-crt.pem
export RUNTIME_SSL_KEY=$HYBRID_HOME/api.gkeonprem-com-key.pem
- Using openssl, generate a key and a self-signed server certificate.
This is a one-liner command that does a lot. It generates a key and a certificate.
It also inlines a configuration file that defines certificate extensions sections.
As we are using a single certificate, we are specifying CA: TRUE property so that our certificate can be trusted. We also define subject Alternative Name extension, without which certificate would not be accepted as valid nowadays. It specifies certificate usages as digitalSignature (required to define certificate as CA) and serverAuth (required for the certificate server role).
openssl req -x509 -out $RUNTIME_SSL_CERT -keyout $RUNTIME_SSL_KEY -newkey rsa:2048 -nodes -sha256 -subj '/CN=api.gkeonprem.com' -extensions EXT -config <( printf "[dn]\nCN=api.gkeonprem.com\n[req]\ndistinguished_name=dn\n[EXT]\nbasicConstraints=critical,CA:TRUE,pathlen:1\nsubjectAltName=DNS:api.gkeonprem.com\nkeyUsage=digitalSignature,keyCertSign\nextendedKeyUsage=serverAuth")
- Validate contents of the certificate and identify its key elements.
openssl x509 -in $RUNTIME_SSL_CERT -text -noout


Certificate:
    Data:
        Version: 3 (0x2)
        Serial Number:
            a3:0a:42:32:c0:2f:43:e1
    Signature Algorithm: sha256WithRSAEncryption
        Issuer: CN = api.gkeonprem.com
        Validity
            Not Before: Jul 31 10:44:06 2020 GMT
            Not After : Aug 30 10:44:06 2020 GMT
        Subject: CN = api.gkeonprem.com
        Subject Public Key Info:
            Public Key Algorithm: rsaEncryption
                Public-Key: (2048 bit)
                Modulus:
                    00:b9:05:93:61:74:93:2b:a5:ad:7d:6b:93:6c:74:
                    <snip>
                    92:a7
                Exponent: 65537 (0x10001)
        X509v3 extensions:
            X509v3 Basic Constraints: critical
                CA:TRUE, pathlen:1
            X509v3 Subject Alternative Name:
                DNS:api.gkeonprem.com
            X509v3 Key Usage:
                Digital Signature, Certificate Sign
            X509v3 Extended Key Usage:
                TLS Web Server Authentication
    Signature Algorithm: sha256WithRSAEncryption
         86:c2:f7:85:9d:7b:43:f0:87:ed:d3:21:93:a3:00:f6:ac:54:
         <snip>
         ad:be:1c:0d
gkeadmin@netservicesvm:~/apigee-hybrid-1.2.0-instal
Technically we are going to use Apigee Connect and therefore, MART IP and certificate are not used. In this version Apigee Connect is Beta in the next, 1.3 (Release: 20200931), Apigee Connect is GA and MART/IP is deprecated.
Formally we still need some [any] ip and throw-away certificate to populate Apigee Hybrid config yaml.
- Define dummy values for MART IP and certificates.
export MART_IP=$RUNTIME_IP
export MART_HOST_ALIAS=mart.gkeonprem.com
export MART_SSL_CERT=$RUNTIME_SSL_CERT
export MART_SSL_KEY=$RUNTIME_SSL_KEY
- Verify that your kubectl is authenticated into your user-cluster1
kubectl get pods
- Define token function
GCP Token expires in 60 minutes. When you run gcloud command or kubectl with gcloud auth helper, a new token will be created automatically for you. As we are executing curl commands to Apigee Hybrid google api, we need to fetch and provide a token. To make sure that token is always valid, we define a bash helper function that does this for us.
Execute in your Bash session.
function token { echo -n "$(gcloud config config-helper --force-auth-refresh | grep access_token | grep -o -E '[^ ]+$')" ; }
export -f token
- Enable apigee api as well as a number of Google APIs that Hybrid runtime requires.
gcloud services enable compute.googleapis.com container.googleapis.com apigee.googleapis.com apigeeconnect.googleapis.com cloudresourcemanager.googleapis.com
- Configure our student account to have an Apigee Organization Adminstrator role
NOTE: you can of course use Cloud Console IAM to do this alternatively. We will use command line for the same.
# function that extracts our type and Account identifier, i.e.: email.
function get_account() {
  ACCOUNT=$(gcloud config list --format='value(core.account)')
  gcloud iam service-accounts describe $ACCOUNT &> /dev/null
  if [ $? -eq 0 ] ; then
    echo "serviceAccount:$ACCOUNT"
    return
  fi
  echo "user:$ACCOUNT"
}

# assign role to the member account.
gcloud projects add-iam-policy-binding $PROJECT --member $(get_account) --role roles/apigee.admin
- Create an Apigee Hybrid organization in our GCP project.
curl -H "Authorization: Bearer $(token)" -H "Content-Type:application/json"  "https://apigee.googleapis.com/v1/organizations?parent=projects/$PROJECT" --data-binary @- <<EOT
{
    "name": "$PROJECT",
    "display_name": "$PROJECT",
    "description": "GCP organization for project $PROJECT",
    "analyticsRegion": "$AX_REGION"
}
EOT
- Create hybrid environment
curl -H "Authorization: Bearer $(token)" -H "Content-Type: application/json" https://apigee.googleapis.com/v1/organizations/$PROJECT/environments --data-binary @- <<EOT { "name": "$ENV", "description": "$ENV environment", "displayName": "$ENV" } EOT
- Set $SYNCHRONIZER_SA_ID as synchronizer Service Account
curl -X POST -H "Authorization: Bearer $(token)" -H "Content-Type:application/json" "https://apigee.googleapis.com/v1/organizations/$ORG:setSyncAuthorization" --data-binary @- <<EOF
{
    "identities": [  "serviceAccount:apigee-synchronizer@$PROJECT.iam.gserviceaccount.com" ]
}
EOF
- Configure apigeeConnect agent
sudo apt install jq -y

ORG_PROPERTIES=$( curl --silent -X GET -H "Content-Type: application/json" -H "Authorization: Bearer $(token)" https://apigee.googleapis.com/v1/organizations/$ORG )

ORG_PROPERTIES=$( echo $ORG_PROPERTIES | jq ".properties.property |= (map(.name) | index(\"$PROPERTY\") ) as \$ix | if \$ix then .[\$ix][\"value\"]=\"$VALUE\" else . + [{name: \"features.mart.apigee.connect.enabled\", value:\"true\"}] end" )

curl --silent -X PUT -H "Content-Type: application/json" -H "Authorization: Bearer $(token)" https://apigee.googleapis.com/v1/organizations/$ORG --data-binary @- <<EOF
$ORG_PROPERTIES
EOF
Output:
{
  "name": "qwiklabs-gcp-cf7594636f66aa8a",
  "displayName": "qwiklabs-gcp-cf7594636f66aa8a",
  "description": "Qwiklab student org qwiklabs-gcp-cf7594636f66aa8a",
  "createdAt": "1596145099549",
  "lastModifiedAt": "1596145568161",
  "environments": [
    "test"
  ],
  "properties": {
    "property": [
      {
        "name": "features.hybrid.enabled",
        "value": "true"
      },
      {
        "name": "features.mart.connect.enabled",
        "value": "true"
      },
      {
        "name": "features.mart.apigee.connect.enabled",
        "value": "true"
      }
    ]
  },
  "analyticsRegion": "europe-west1",
  "runtimeType": "HYBRID",
  "subscriptionType": "TRIAL"
}
The apigeectl utility is the way to install Hybrid runtime. It uses runtime configuration as its input.
The hybrid installation consists of two operations: init and apply. apigeectl init defines Hybrid prerequisites, ie., Istio and auxiliary pods/containers. apigee apply configures Hybrid components.
NOTE: You must be located in the apigeectl home directory during utility execution. To fix this inconvenience, we are going to use subshell bash syntax. ( cd ; ). This syntax lets us to stay at a desired current directory and do not lose this location.
- Define Hybrid runtime configuration yaml
cat <<EOT > $HYBRID_HOME/runtime-config.yaml
gcp:
  region: $GCP_REGION
  projectID: $PROJECT
k8sCluster:
  name: $CLUSTER
  region: $CLUSTER_REGION
org: $ORG
virtualhosts:
  - name: default
    hostAliases:
      - "$RUNTIME_HOST_ALIAS"
    sslCertPath: $RUNTIME_SSL_CERT
    sslKeyPath: $RUNTIME_SSL_KEY
    routingRules:
      - paths:
        - /
        env: $ENV
envs:
  - name: $ENV
    serviceAccountPaths:
      synchronizer: $SYNCHRONIZER_SA
      udca: $UDCA_SA
mart:
  hostAlias: "$MART_HOST_ALIAS"
  serviceAccountPath: $MART_SA
  sslCertPath: $MART_SSL_CERT
  sslKeyPath: $MART_SSL_KEY
connectAgent:
  enabled: true
  serviceAccountPath: $MART_SA
metrics:
  serviceAccountPath: $METRICS_SA
ingress:
  enableAccesslog: true
  runtime:
    loadBalancerIP: $RUNTIME_IP
  mart:
    loadBalancerIP: $MART_IP
EOT
- Set up init-type components of the Apigee Hybrid runtime
(cd $APIGEECTL_HOME; apigeectl init -f $HYBRID_HOME/runtime-config.yaml)
- Check if all components are ready. You will see list of pods which are not completed or not in a ready state yet as an output.
(cd $APIGEECTL_HOME; apigeectl check-ready -f $HYBRID_HOME/runtime-config.yaml)
- Alternatively, use kubectl to display installation progress.
kubectl get pods -n apigee-system
NAME                                         READY   STATUS      RESTARTS   AGE
apigee-controller-manager-656ddc6b75-4tmft   2/2     Running     0          6m15s
apigee-resources-install-6vcdl               0/2     Completed   0          7m18s
- Alternatively, use Kubernetes Engine/Workloads page to observe the progress.

- Open Kubernetes Engine/Services and Ingress page to check pod installation progress and state.

IMPORTANT WARNING: You need to verify that
cert-manager-cainjectorhas a green tickbox. It might experience pod CrashLoopBackOff state due to a bug. See this link for details.https://github.com/jetstack/cert-manager/issues/2362
If it does, please use this workaround to fix the problem. Edit
cert-manager-cainjectordeployment manifest to add extra argument.- --leader-elect=false
-
Verify using any method above that all prerequisite components are ready.
-
Deploy Apigee-specific runtime components into the cluster
(cd $APIGEECTL_HOME; apigeectl apply -f $HYBRID_HOME/runtime-config.yaml)
- Workloads

- Services and Ingress

NOTE: if there is a situation that you need to wipe out hybrid setup in your cluster,, use:
(cd $APIGEECTL_HOME; apigeectl delete -f $HYBRID_HOME/runtime-config.yaml --all)
If you have reached so far: Well done!
We have now installed Apigee Hybrid in Anthos On-Prem environment.
We can now create a test proxy, called ping that will return a message, pong. We want to then trace a test request, first by sending it to the Cluster IP from inside a cluster. Then by sending it to the F5 Load Balancer.
-
Open https://apigee.google.com/ and make sure that you are in a correct Hybrid Organization.

-
Click on Develop/API Proxy. Click on the +Proxy button.

-
Position mouse at the No target link and click on it.

-
In the proxy details wizard, enter
pingas the name of the proxy.

Base path /ping will be populated automatically.
Click Next.
- In the Policies wizard step, verify that Pass through Security: Authorization radio-button default value is selected.

Click Next.
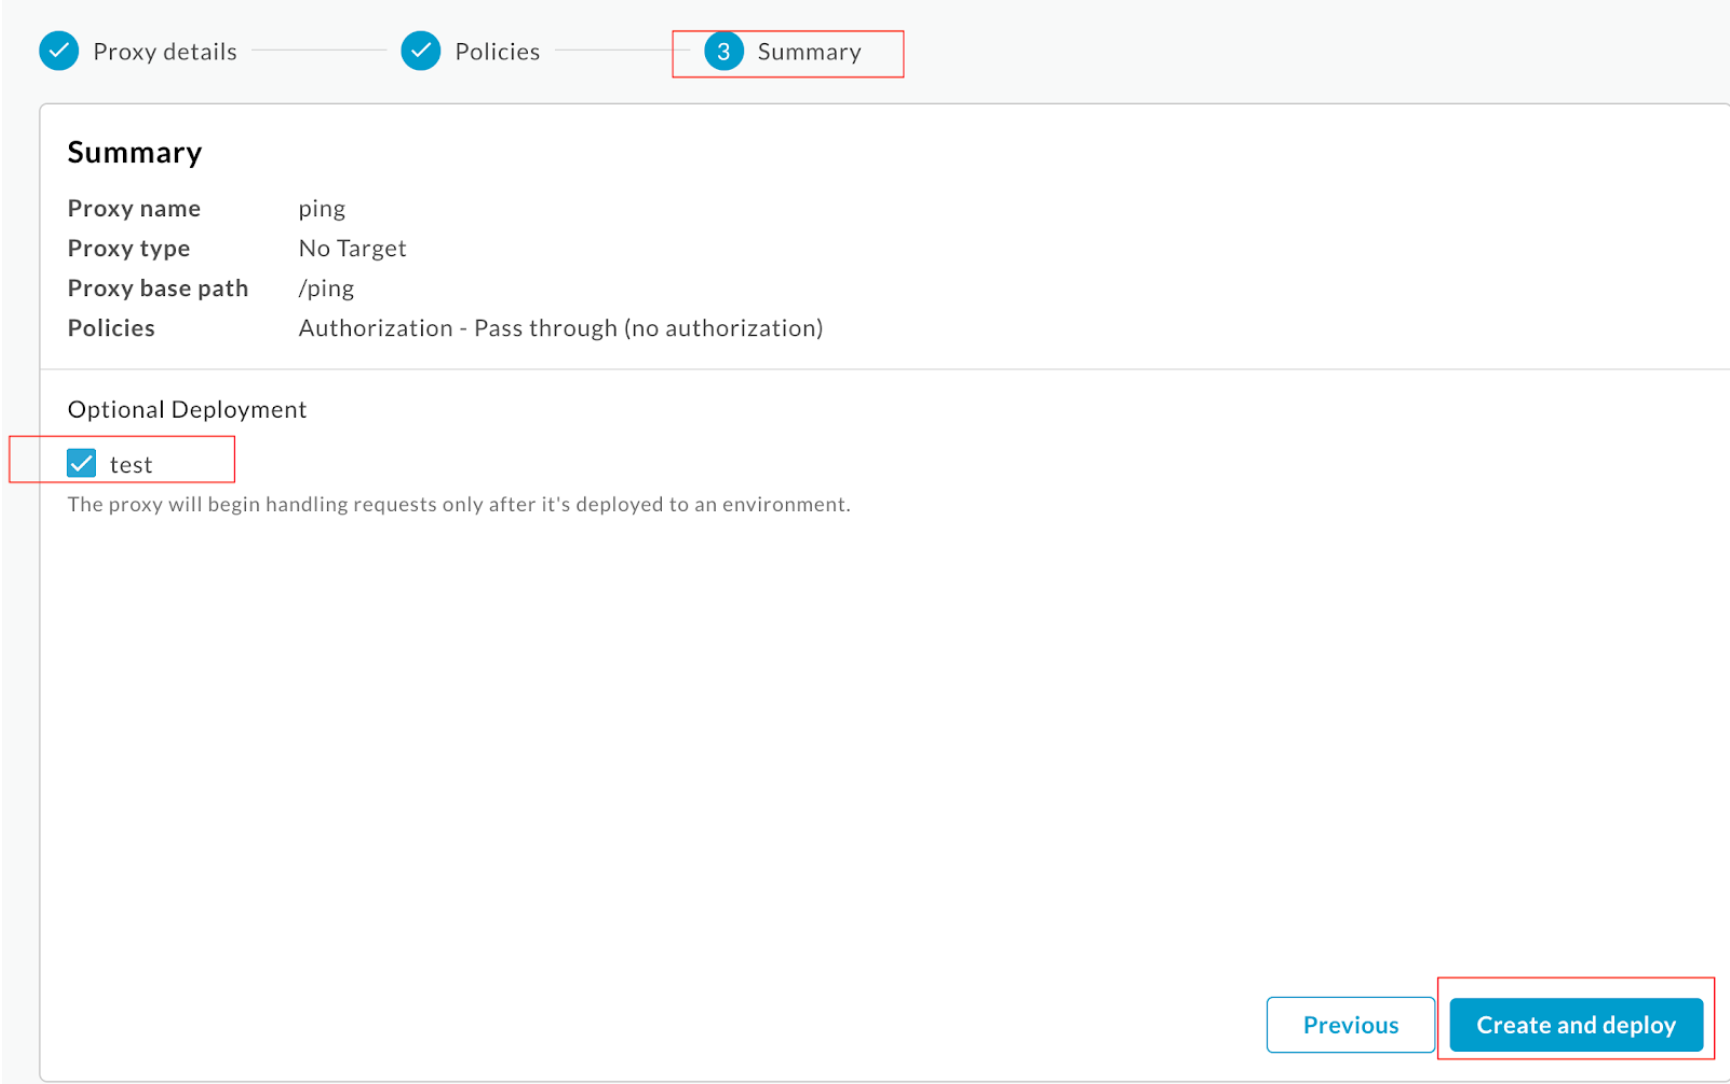
- At the Summary wizard step, tick Optional Deployment test environment.

Click Create and deploy button.
- After successful creation and deployment, click at the Edit proxy button.
The overview page opens.

Position your mouse on the Details link. Verify that the revision 1 of the proxy is fully deployed.
- To open Proxy Editor, click at the DEVELOP tab name next to the OVERVIEW.

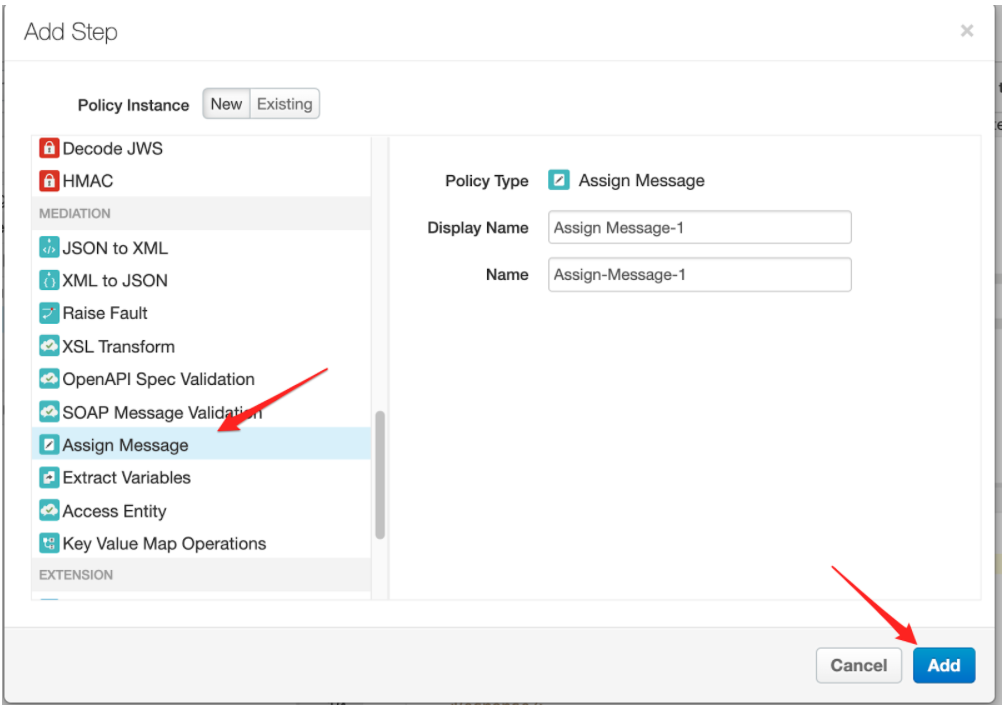
- We are currently in the selected PreFlow event. Click at the +Step button in the RESPONSE part of the Proxy editor, as per above snapshot. In the Add Step dialog, select Assign Message Policy.
 Click on Add button.
- Edit the Policy text to correspond to the following XML datagram.
This will define a response message with Payload set as pong text.
<?xml version="1.0" encoding="UTF-8" standalone="yes"?>
<AssignMessage async="false" continueOnError="false" enabled="true" name="Assign-Message-1">
    <Set>
        <Payload>pong</Payload>
    </Set>
    <AssignTo createNew="true" transport="http" type="response"/>
</AssignMessage>
Click at the Save button. Confirm Revision Saved Message box.
- The current revision of the proxy is 2. It is not currently deployed.
To deploy it, click the Deploy to: test button.

Deploy ping to test? Message box will appear. Press Deploy button to confirm.
The spinner will start.

After some time, the successful deployment will be reflected.

- Switch to the TRACE tab of the Proxy Editor.
Select environment and revision of the proxy we are going to debug.

Click at the Start Trace Session button.
- in your on-prem vm's ssh session, use kubectl to discover apigee runtime service Cluster IP
$ kubectl get svc -n apigee

NAME                                                     TYPE        CLUSTER-IP      EXTERNAL-IP   PORT(S)             AGE
apigee-cassandra                                         ClusterIP   None            <none>        9042/TCP,7199/TCP   2d
apigee-mart-qwiklabs-gcp-cf7594636f66aa8a                ClusterIP   10.103.3.112    <none>        8843/TCP            47h
apigee-runtime-qwiklabs-gcp-cf7594636f66aa8a-test        ClusterIP   10.109.134.14   <none>        8443/TCP            37h
apigee-synchronizer-qwiklabs-gcp-cf7594636f66aa8a-test   ClusterIP   10.109.37.84    <none>        8843/TCP            47h
apigee-udca-qwiklabs-gcp-cf7594636f66aa8a-test           ClusterIP   10.99.7.207     <none>        20001/TCP           47h
gkeadmin@netservicesvm:~$
It is 10.109.134.14 in our example.
- Create a busyboxplus container with a curl command.
kubectl run curl --generator=run-pod/v1 -it --image=radial/busyboxplus:curl
- After shell prompt appear, execute curl request to Cluster IP as the destination.
curl https://10.110.232.66:8443/ping -v -k

Flag --generator has been deprecated, has no effect and will be removed in the future.
If you don't see a command prompt, try pressing enter.
[ root@curl:/ ]$
- Execute curl command.
$ curl https://10.109.134.14:8443/ping -v -k
* SSLv3, TLS handshake, Client hello (1):
* SSLv3, TLS handshake, Server hello (2):
* SSLv3, TLS handshake, CERT (11):
* SSLv3, TLS handshake, Server finished (14):
* SSLv3, TLS handshake, Client key exchange (16):
* SSLv3, TLS change cipher, Client hello (1):
* SSLv3, TLS handshake, Finished (20):
* SSLv3, TLS change cipher, Client hello (1):
* SSLv3, TLS handshake, Finished (20):
> GET /ping HTTP/1.1
> User-Agent: curl/7.35.0
> Host: 10.109.134.14:8443
> Accept: */*
>
< HTTP/1.1 200 OK
< X-Apigee.Message-ID: cb234607-2991-4c82-a587-a478caeb88401
< X-Apigee.dp.color: v120
< X-Apigee.proxy: /organizations/qwiklabs-gcp-cf7594636f66aa8a/environments/test/apiproxies/ping/revisions/2
< X-Apigee.proxy.basepath: /ping
< Content-Length: 4
<
pong[ root@curl:/ ]$
Observe 200 OK http status and pong
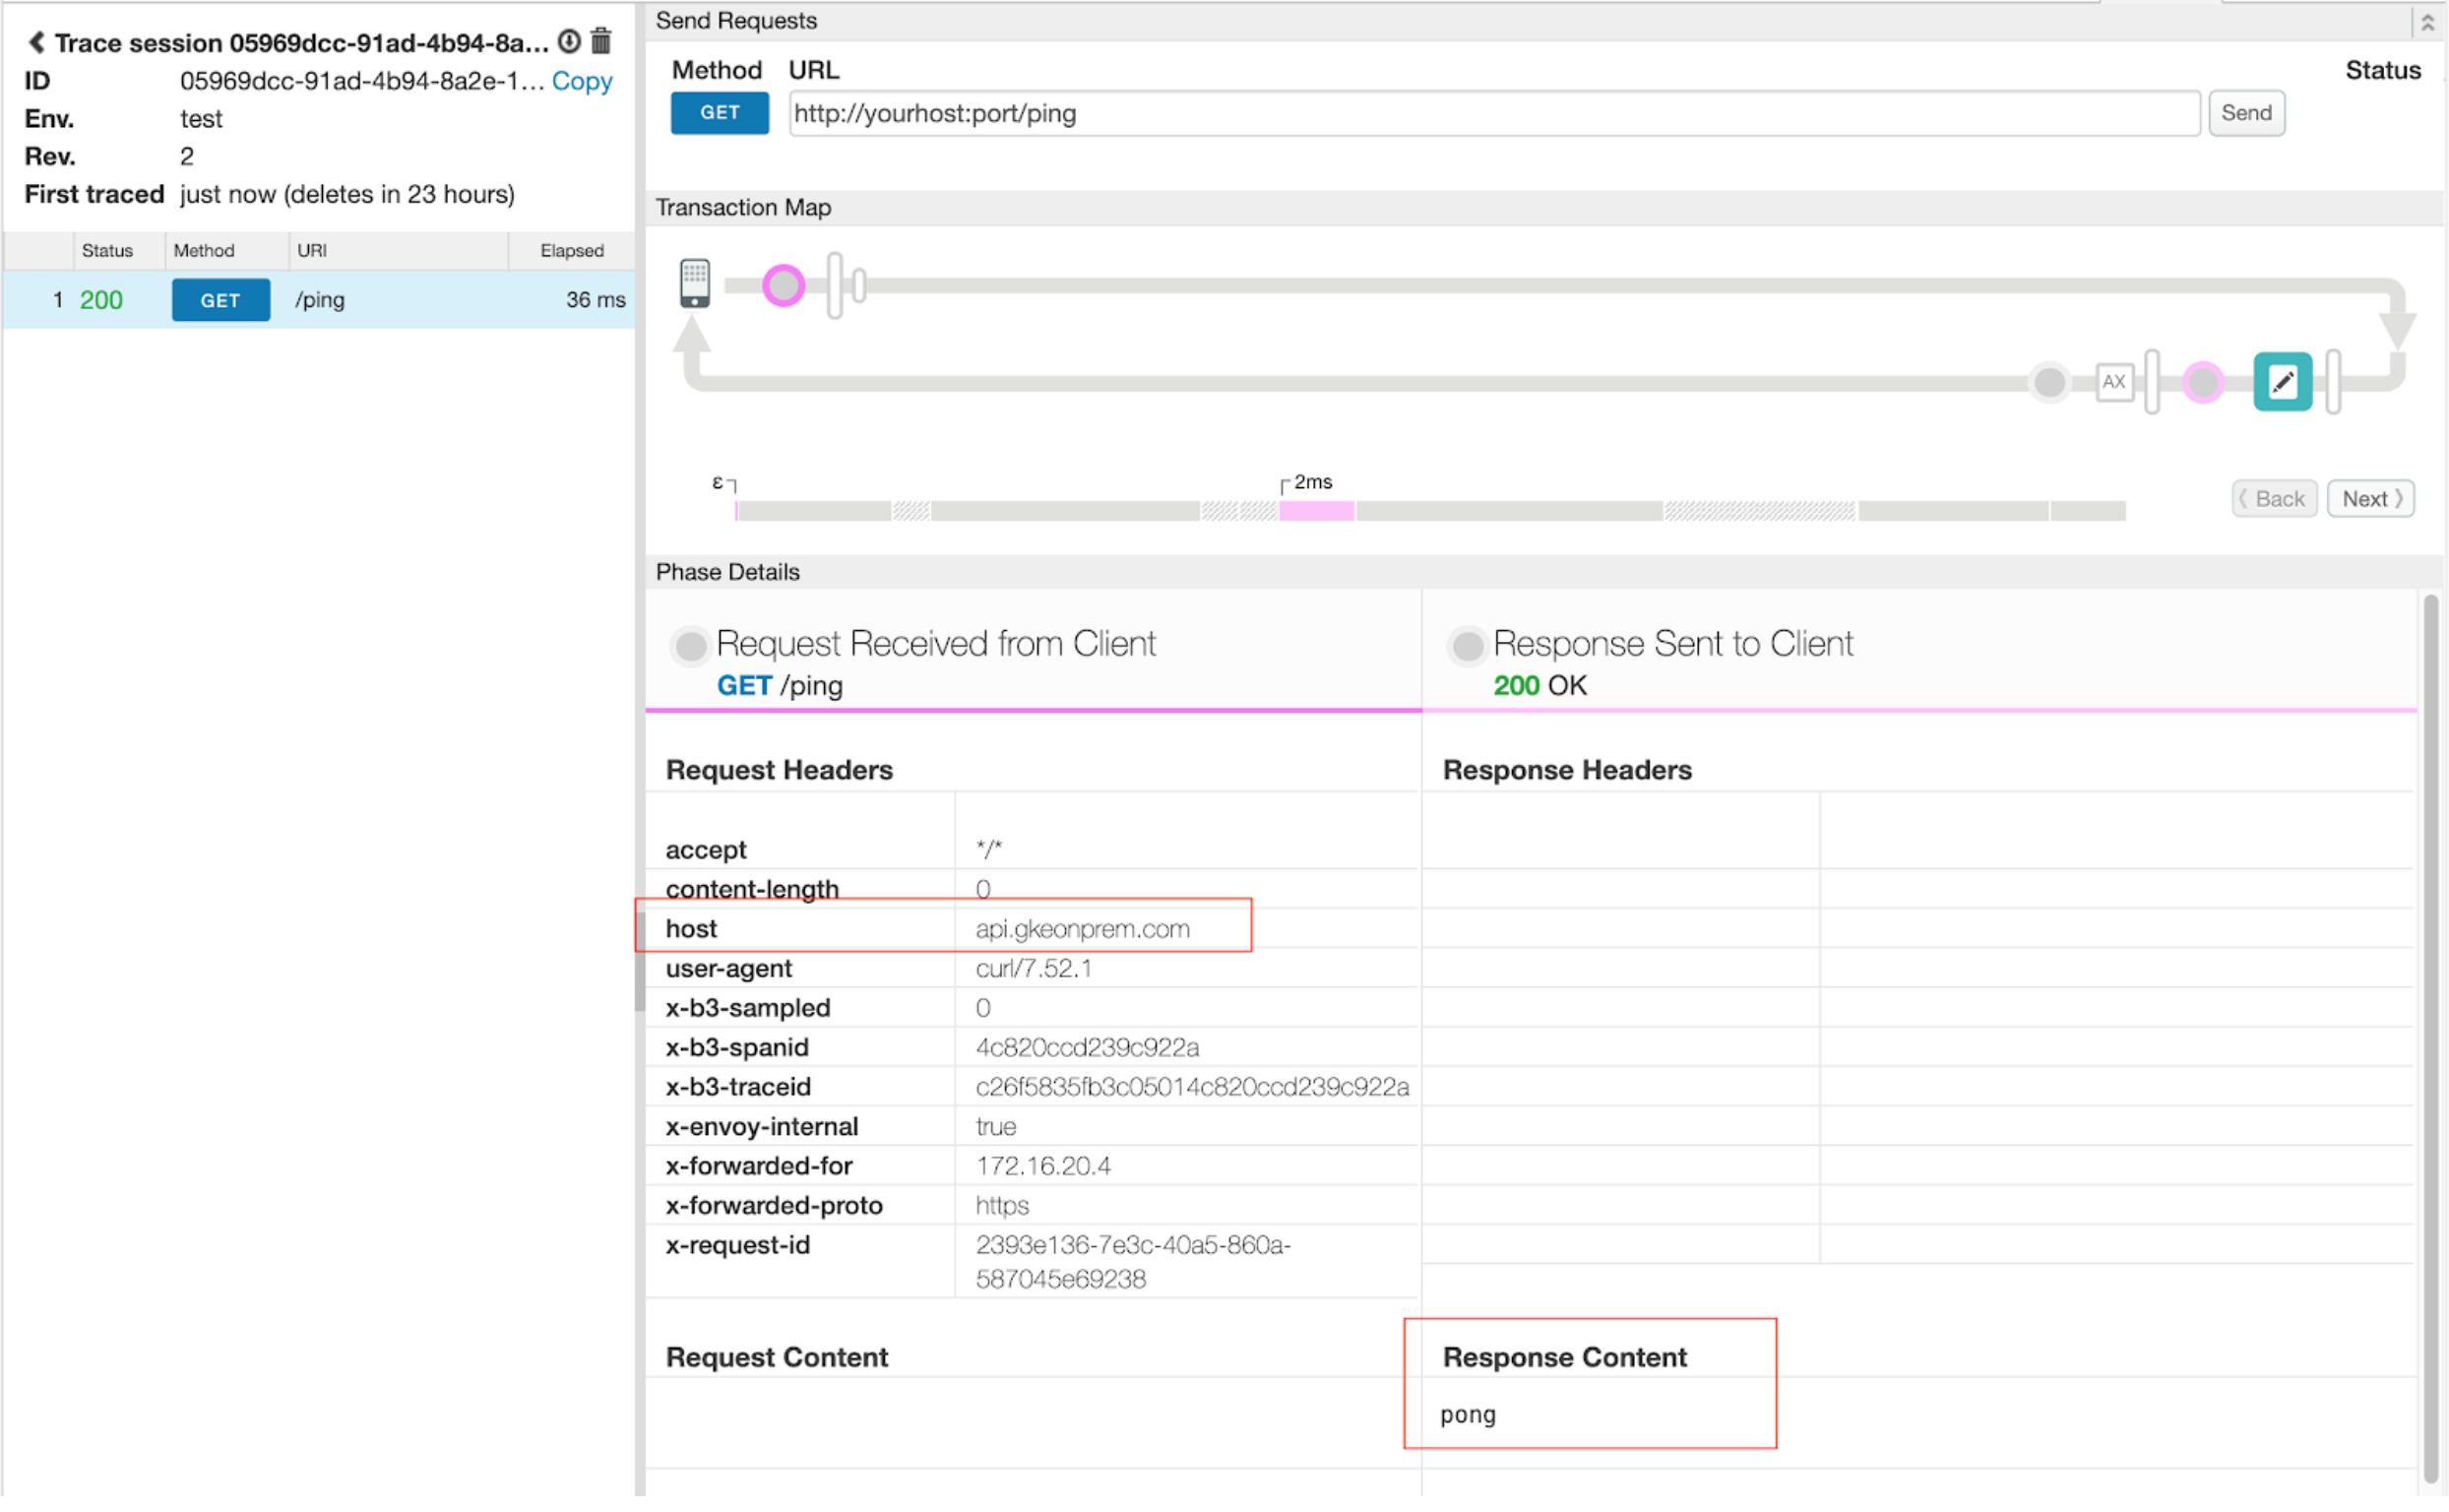
- In the apigee.google.com browser page, observe Trace output of the sent request.

- Execute request to hit F5 load balancer.
NOTE: We are using --resolve curl option to compensate for the incorrect DNS entry configuration.
curl --cacert $RUNTIME_SSL_CERT https://$RUNTIME_HOST_ALIAS/ping -v --resolve "$RUNTIME_HOST_ALIAS:443:$RUNTIME_IP" --http1.1

* Added api.gkeonprem.com:443:10.0.10.13 to DNS cache
* Hostname api.gkeonprem.com was found in DNS cache
*   Trying 10.0.10.13...
* TCP_NODELAY set
* Connected to api.gkeonprem.com (10.0.10.13) port 443 (#0)
* ALPN, offering http/1.1
* Cipher selection: ALL:!EXPORT:!EXPORT40:!EXPORT56:!aNULL:!LOW:!RC4:@STRENGTH
* successfully set certificate verify locations:
*   CAfile: /home/gkeadmin/apigee-hybrid-1.2.0-install/api.gkeonprem-com-crt.pem
  CApath: /etc/ssl/certs
* TLSv1.2 (OUT), TLS header, Certificate Status (22):
* TLSv1.2 (OUT), TLS handshake, Client hello (1):
* TLSv1.2 (IN), TLS handshake, Server hello (2):
* TLSv1.2 (IN), TLS handshake, Certificate (11):
* TLSv1.2 (IN), TLS handshake, Server key exchange (12):
* TLSv1.2 (IN), TLS handshake, Server finished (14):
* TLSv1.2 (OUT), TLS handshake, Client key exchange (16):
* TLSv1.2 (OUT), TLS change cipher, Client hello (1):
* TLSv1.2 (OUT), TLS handshake, Finished (20):
* TLSv1.2 (IN), TLS change cipher, Client hello (1):
* TLSv1.2 (IN), TLS handshake, Finished (20):
* SSL connection using TLSv1.2 / ECDHE-RSA-AES128-GCM-SHA256
* ALPN, server accepted to use http/1.1
* Server certificate:
*  subject: CN=api.gkeonprem.com
*  start date: Jul 31 10:44:06 2020 GMT
*  expire date: Aug 30 10:44:06 2020 GMT
*  subjectAltName: host "api.gkeonprem.com" matched cert's "api.gkeonprem.com"
*  issuer: CN=api.gkeonprem.com
*  SSL certificate verify ok.
> GET /ping HTTP/1.1
> Host: api.gkeonprem.com
> User-Agent: curl/7.52.1
> Accept: */*
>
< HTTP/1.1 200 OK
< content-length: 4
< x-envoy-upstream-service-time: 35
< date: Sun, 02 Aug 2020 00:10:39 GMT
< server: istio-envoy
<
* Curl_http_done: called premature == 0
* Connection #0 to host api.gkeonprem.com left intact
- Observe in the TRACE page.

 AHR-*-CTL
