-
Notifications
You must be signed in to change notification settings - Fork 14
windows
even though it is strongly recommended to use AQUAgpusph on Linux, here you have a guide to install AQUAgpusph on Windows. Errors and some features not working properly can be expected.
Windows installers are not provided for AQUAgpusph, so I am afraid you must compile it yourself.
We are assuming that AQUAgpusph will be installed in the folder "C:\aquagpusph", while the compilation of some dependencies and AQUAgpusph itself will be carried out in the "C:\aquagpusph.tmp" folder. Thus, he following folders should be created:
- C:\aquagpusph
- C:\aquagpusph\bin
- C:\aquagpusph.tmp
Some pieces of software should be installed before addressing the AQUAgpusph compilation process. It is strongly recommended to install them in the same order they are introduced in this guide.
Download the git installer from here. The installation is pretty straightforward. Just remember to check the following options:
- Add git to the PATH for all users
- Enable git GUI here
- Enable git bash here
You can download CMake here. This installation is also quite simple, but be sure again to check the option to add CMake to the PATH for all users.
This would take a bit longer. You can download Visual Studio (Community Edition, which is free) from here.
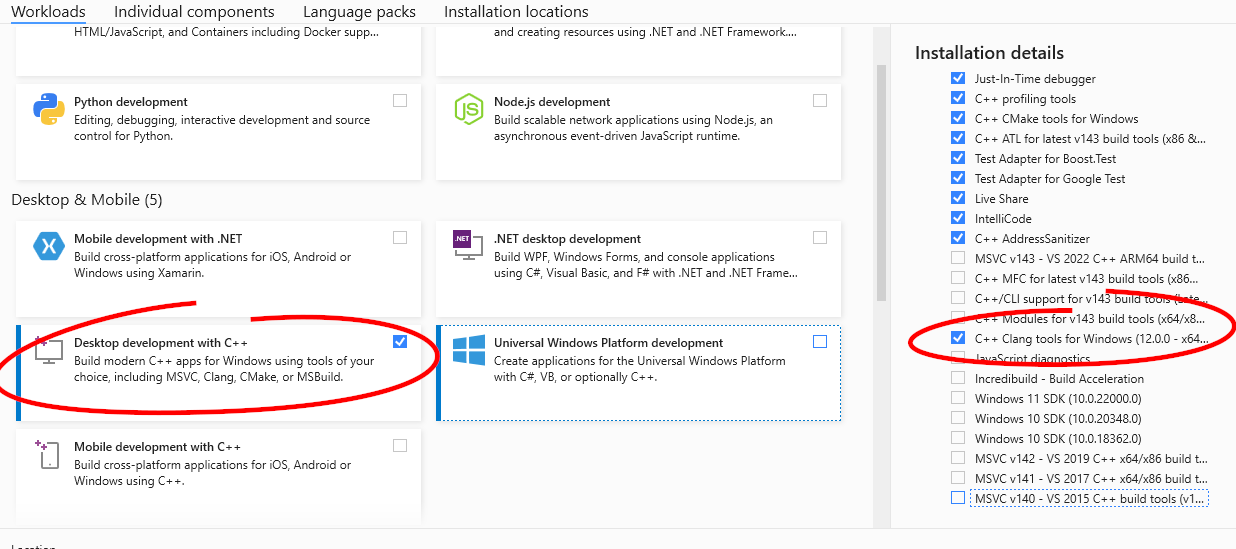
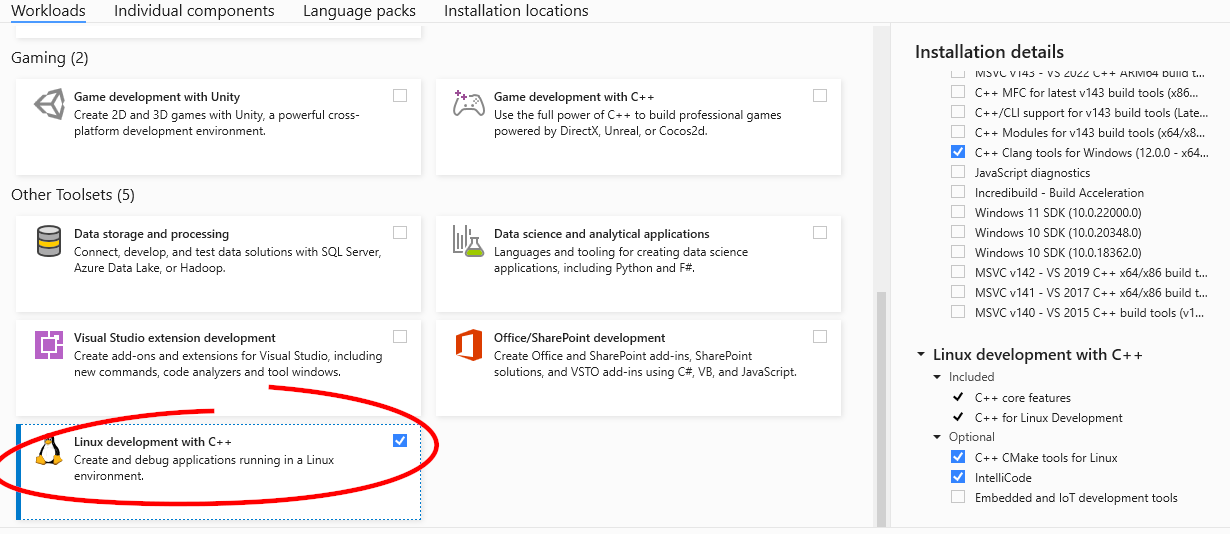
At some point you must select the components to install. We need the "Desktop development with C++" and the "Linux development with C++" workbenches. On top of that, we should add the CLang tools in the panel of the right side.
To install Python just head to the downloads web page and get the latest version. Execute the installer and follow the process, checking the option to add it to the PATH for all users.
To install numpy, we are using pip. Pip is deployed within the most recent versions of Python. Thus you can open a cmd (just type cmd in the bottom-left windows search engine), and then type
python -m pip install --upgrade pip
If you already have pip, it will be upgraded. If you received an error saying "No module named pip", then you need to install it. You can read how to do that here
Finally you can install numpy typing
python -m pip install numpy
xxd is included within the vim package. Thus you can just download the zip file from here, and extract anywhere. Then, inside the extracted folder you will find xxd under the "vimXX" subfolder, with XX the vim version. Copy the xxd.exe to the C:\aquagpusph\bin folder you created before.
Download the latest version ZIP file from here, and extract it in C:\aquagpusph.tmp, in such a way you have a folder named C:\aquagpusph.tmp\xerces-c-X.Y.Z, with X.Y.Z the version of the package.
Besides that folder, create a new one with the .build prefix, i.e. C:\aquagpusph.tmp\xerces-c-X.Y.Z.build (conveniently replace X.Y.Z with your specific downloaded version).
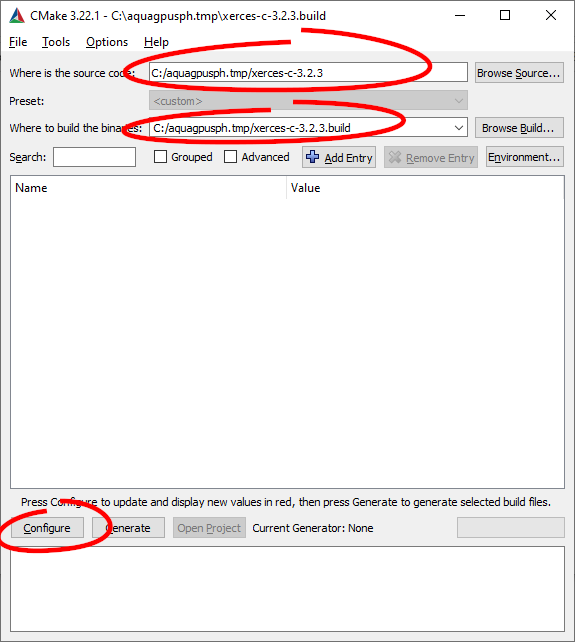
Now run CMake. In the source code path (top box) set C:\aquagpusph.tmp\xerces-c-X.Y.Z, and in the build binaries path (third box) set C:\aquagpusph.tmp\xerces-c-X.Y.Z.build. Then press Configure.
CMake will prompt for the compilation options. Use the following ones:
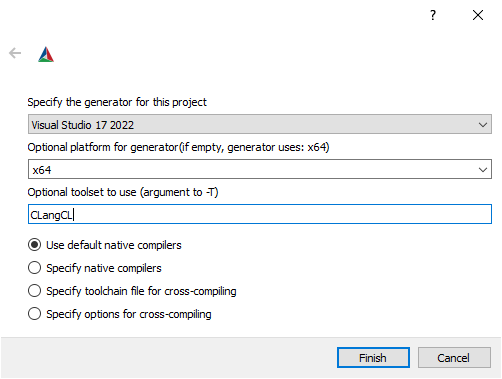
The Visual Studio version may obviously differs. When the configuration process is finished, a lot of new options will be available. We want to set the installation path, i.e. the CMAKE_INSTALL_PREFIX option, to C:\aquagpusph.
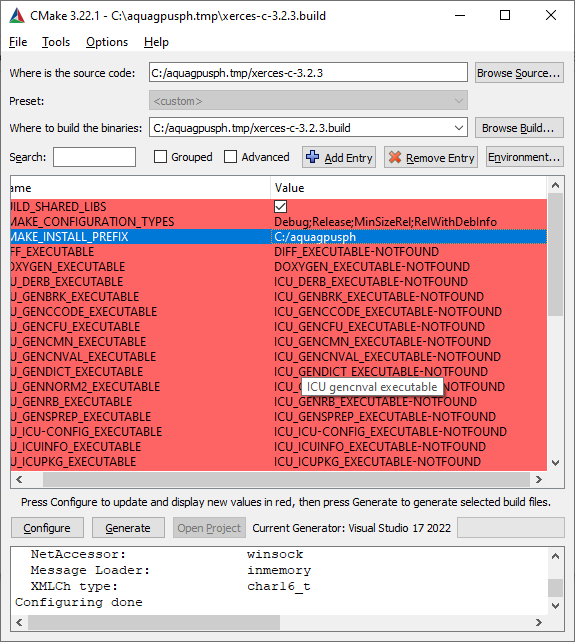
Now you can press Configure once more and after the process is complete, press Generate. If everything works fine, the button Open Project is enabled, so you can press it to open an instance of Visual Studio.
In that Visual Studio instance, deploy the CMakePredefinedTargets on the right side panel, and build the INSTALL LLVM clang-cl target (to this end, you can select it an press Ctrl + B). After a short while you will have xerces-c intalled in C:\aquagpusph.
The process to install MuParser is almost the same described for Xerces-C. You can download the ZIP file from here, and uncompress it into C:\aquagpusph.tmp\muparser-X.Y.Z. Then you can create the empty C:\aquagpusph.tmp\muparser-X.Y.Z.build to run CMake.
However, this time the configuration process might fail the first time, complaining about OpenMP. The most simple way to fix that is disabling the option ENABLE_OPENMP. Remember also to set the CMAKE_INSTALL_PREFIX option as C:\aquagpusph
Aferwards the process is the same, i.e. press Configure, Generate and open the project. Then use Visual Studio to build the INSTALL LLVM clang-cl target.
Even though Visual Studio has installed its own LLVM & CLang tools set, we need some other tools missing in the binary packages. Hence, you are visiting the LLVM downloads page, and downloading the source code ZIP file (at the bottom of each release). Extract it in C:\aquagpusph.tmp (so you have a folder named C:\aquagpusph.tmp\llvm-project-llvmorg-13.0.0), and create the empty folder C:\aquagpusph.tmp\llvm-project-llvmorg-13.0.0.build.
Now you can proceed as before. Use CMake to configure the project (remember to set CMAKE_INSTALL_PREFIX as C:\aquagpusph), and Visual Studio to compile and install it.
This time the whole process would take significantly longer.
The installation of OpenCL depends mainly on the hardware where AQUAgpusph is intended to run on. Documenting the process for each one is completely out of the scope of this tutorial.
As an example we can the AMD lite OpenCL SDK, meant for CPU computations, that you can download and install from here. It is by default installed in C:\Program Files (x86)\OCL_SDK_Light.
First do right click on the C:\aquagpusph.tmp folder, and select Git Bash Here. That is opening a new terminal, where you are typing
git clone "https://gitlab.com/sanguinariojoe/aquagpusph.git"
When the downloading process is finished, you can close that terminal. At that point you have a C:\aquagpusph.tmp\aquagpusph folder with all the sources inside.
Now we are carrying out the same process we already done with Xerces-C and MuParser. First you should create the empty folder C:\aquagpusph.tmp\aquagpusph.build. Then you can open CMake and set the source path as C:\aquagpusph.tmp\aquagpusph, and the building path as C:\aquagpusph.tmp\aquagpusph.build.
After configuring for the first time, errors will be prompted, because some missing dependencies. To fix that, you should start changing the CMAKE_INSTALL_PREFIX option as C:\aquagpusph (then AQUAgpusph will automatically look for dependencies there). You must also disable the following options:
- AQUAGPUSPH_BUIlD_TOOLS
- AQUAGPUSPH_USE_MPI
- AQUAGPUSPH_USE_NCURSES
- AQUAGPUSPH_USE_VTK
Some of that options can be enabled installing some additional dependencies. We are not covering those in this tutorial.
Next time you press Configure, CMake is probably complaining about OpenCL. The way to fix that depends mainly on the OpenCL installed platform, which also depends on the hardware intended to be applied.
In this guide we have considered the AMD lite OpenCL SDK for CPUs. If that is your case, you can set the following options:
- OpenCL_INCLUDE_DIRS: C:/Program Files (x86)/OCL_SDK_Light/include
- OpenCL_LIBRARY: C:/Program Files (x86)/OCL_SDK_Light/lib/x86_64/opencl.lib