-
Notifications
You must be signed in to change notification settings - Fork 32
Pixhawk and Raspberry Pi Setup
The Pixhawk is a piece of hardware that stores Ardupilot, a piece of auto pilot software that directly controls the vehicle. Think of it as a central hub, it has complete control over the vehicle. It can read in data from it's sensors, GPS, compass, and accelerometer, and othe devices can read in said data. It can also read in Mavlink messages and executes the appropriate action. As of now, the Pixhawk runs on Ardupilot v. 3.7.0 (Coptor), however due to the nature of the VTOL, that may change to handle the hover and free-flight mode.

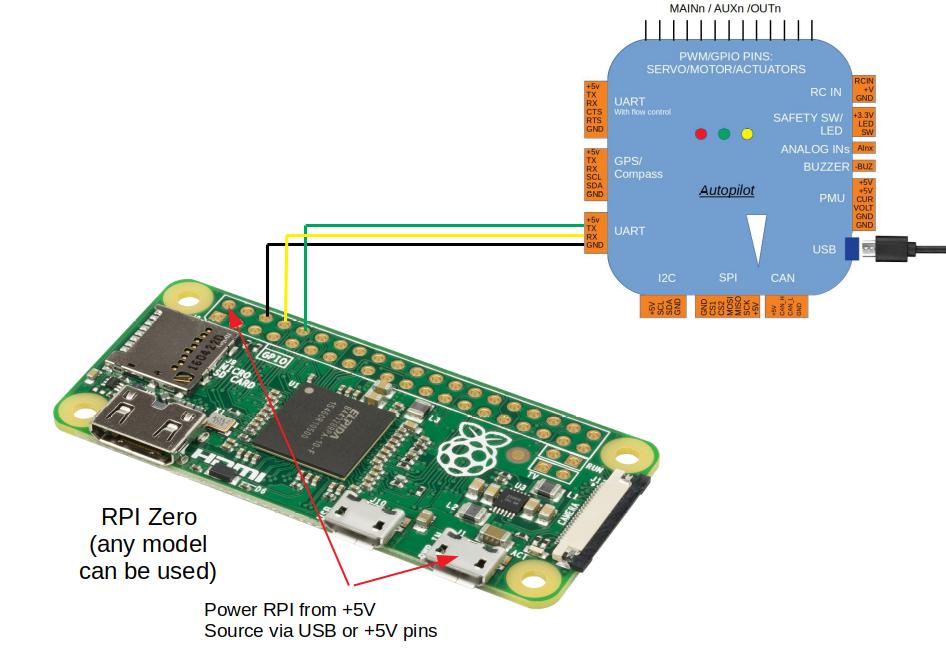
Everything you need to setup the Raspberry Pi will be detailed in this link. You will have to download a ground station in order to access the Pixhawk. We will be using QGroundControl. In order to connect the Pixhawk to the Q Ground Control, use a usb from computer to micro-usb (port is on the side of the Pixhawk). If there are calibration errors for the compass or accelerometer, you can correct them in the ground station by clicking on Vehicle Setup (three gears). To change system variables on the Pixhawk, go to Parameters under Vehicle Setup.
The Raspberry Pi is a miniature computer that acts as a companion vehicle to the vehicle. This is where all of the python scripts that are being developed in this repo will be stored.
If you're on Windows, use Putty. If you're on Mac, use your terminal. In order to connect, connect the Raspberry Pi to the laptop via an ethernet cable. Then, use the address [email protected]. If that doesn't work, connect the Raspberry Pi to a monitor, plug in a keyboard and upon start-up, you should be able to find the ip-address that corresponds to the Raspberry Pi. It will be on the terminal screen, or you can run
sudo -s ifconfig
to find the IP address. Then just connect to it like that. The username is pi and the password is raspberry. Please don't change the credentials.
In order to install the Python modules, you will need to establish an internet connection. That would require you to bridge connections between your laptop and the Raspberry Pi. Here are instructions on connecting your Pi to the internet via a wired Ethernet connection on a PC and Mac. You can also connect the Pi to the internet more simply with a wireless connection by following the instructions here. Note that this method will not work on SecureMustangWireless and you will have to set up a Wifi hotspot on your phone if you are on the Cal Poly campus.
Everything you need to set up the Raspberry Pi OS will be detailed in this link. Make sure that you have the APSync image written into the micro-sd card in your Raspberry Pi. Also, the Disable the OS control of the serial port step is for an outdated version of Raspberry Pi, the setting for OS control will be in Interfacing Options.
To ensure that your environment is set up, make sure that you are running Python 2.7 in the Raspberry Pi. To install the necessary modules, there will be a requirements.txt file (has not yet been made) in this repository, where you will have to run the command
pip install -r requirements.txt
This will install everything you need for python to run VTOL code properly. In addition, add set enable_uart=1 to the end of /boot/config.txt.
Controls the vehicle. Requires that the vehicle is in 'Stabilize Mode' (look at ____ for more information about modes). Contains an offboard switch to change the mode of the vehicle. To change what mode each switch position corresponds to, connect to Q Ground Control and change the settings in Flight Modes under Vehicle State.
- Project Overview
- Dependency List
- GCS JSON Message Formatting
- Dronekit mission_basic.py
- Continuous Integration with Travis
- Engineering Requirements
- Test Hierarchy
- Style Guide
- Glossary