Creating Templates Manually
Firstly, you will need these to start:
-
A text editor
You can use any text editor that you want, even Notepad, however, I recommend a text editor that has auto-complete and scans for the errors, so you can be more comfortable while writing the template. I always use Visual Studio Code and I recommend that to you too. -
JSON knowledge
As templates are just a JSON file, and you will write a JSON file, you need to know about JSON, otherwise, how will you create a template, right? 😁
Just create an empty JSON file on your computer. (add the ".json" extension to it after selecting the New File option).
Open the file, copy the starter template, and paste to your file.
{
    "name": "My Template",
    "metadata-version": 1,
    "author": "(your name)",
    "platforms": [
        "App Inventor"
    ],
    "keys": [],
    "components": []
}
This is your metadata. Metadata informs the extension about which options have been set. Also, it can help people about learning what this template for.
Metadata currently can have these values, of course, you can add other keys (that not included here) to add more information, but as will be ignored by the extension, writing an unknown key is not a good thing to do.
| Key | Type | Required | Example | Description |
|---|---|---|---|---|
name |
string |
✅ | My Template |
Your template name. |
metadata-version |
int |
✅ | 1 |
Specifies the template version that extension will use when parsing. Keep it always 1. |
author |
string |
Yusuf Cihan |
Name of the template author. So people can know who created the template when opening the file. | |
platforms |
string[] |
["Kodular", "App Inventor"] |
As builders have different components, it can be useful to add an indicator about which platforms that supports this template. | |
keys |
string[] |
["1", "2"] |
The template parameter keys. Explained in section 2.1.1 | |
components |
object[] |
✅ | Components that will be created with specified properties. |
You can add parameters to keys in your metadata that will be replaced with the values that you will set in the block.
For example, let's add picture and text to the keys key in the metadata.
{
    "name": "My Template",
    "metadata-version": 1,
    "author": "(your name)",
    "platforms": [
        "App Inventor"
    ],
    "keys": [
        "picture",
        "text"
    ],
    "components": []
}
So, now when you type {picture} in anywhere in your template;
It will be replaced with the first item of the parameters list. (In this case myassset.png) Because "picture" is the first item of the keys in the metadata.
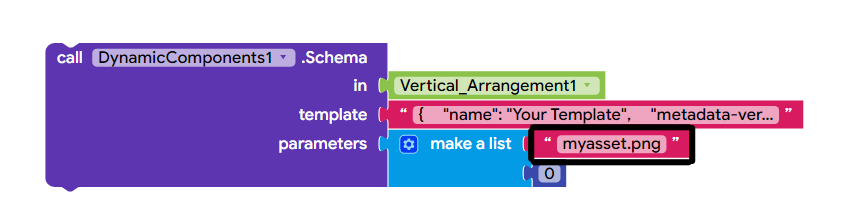
Your template doesn't need to have template parameters always, but if you have values in the template that needs to set with blocks, then you can use this feature.
Now you learned the basics, so it is time to add some components and properties!
To add components go to the components key, and create a JSON object inside in it. You can copy this object and paste between the square brackets of the components key.
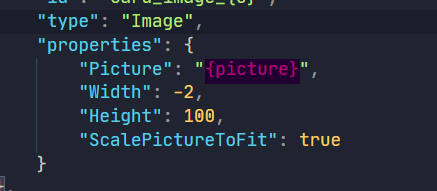
{
    "id": "myImage_{count}",
    "type": "Image",
    "properties": {
        "Picture": "{picture}",
        "Width": -2,
        "Height": 100,
        "ScalePictureToFit": true
    }
}Every component object must contain both an id and type key.
It is recommended to add a template parameter next to the ID, so you can add an auto-increment for ID with blocks. And you won't get duplicate ID errors by executing the template again and again.
Check section 3.2 for adding an auto-increment for your template.
You can also define component properties in the properties key but it is optional.
| Key | Type | Required | Example | Description |
|---|---|---|---|---|
id |
string |
✅ | mycomponent_{count} |
ID of the component that will be created. |
type |
string |
✅ | Button |
Type of the component. You can create builder specific components like CardView too, but your template will only work on the specific builders. |
properties |
object |
{ "Text": "Hello World!" } |
Properties that will be set after creating the component. Keys present the property names, and values present the property values. | |
components |
object[] |
Used to specify the components that will be added inside the root component. Only available if the component is an arrangement. |
If the component is an arrangement or a container that you can add more components inside, you can define another components key and add more components inside.
{
    "id": "myarrangement_{count}",
    "type": "HorizontalArrangement",
    "properties": {
        "Height": 100
    },
    "components": [
        {
            "id": "mybutton_{count}",
            "type": "Button",
            "properties": {
                "Text": "Hello World!"
            },
        }
    ]
}To do that, add a key to the keys section in your metadata. You can use any name for it, like count.
"keys": [
    "count"
]
Then build an auto-increment logic in your blocks.
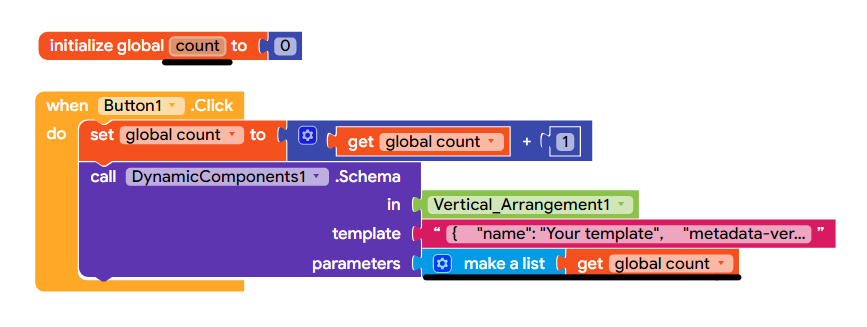
So when you use {count} in your template (or if you gave another name for key), it will replace it to the variable's current value.
For example: "id": "mybutton_{count}" will be replaced to "id": "mybutton_0" and so on.
After writing your template, copy all file content, get the Schema block from the extension, add a text block to the template parameter, then paste the template content in the text block.
If your template requires parameters with keys, fill the values with a list block.
That's it!