-
Notifications
You must be signed in to change notification settings - Fork 1
four_relay
The four_relay module is designed to expose the functionality of the 4 built in relays on the esp32r4v3 development board. It allows the relays to be controlled via anything that can send commands (other modules, mqtt, web ui, home assistant etc).
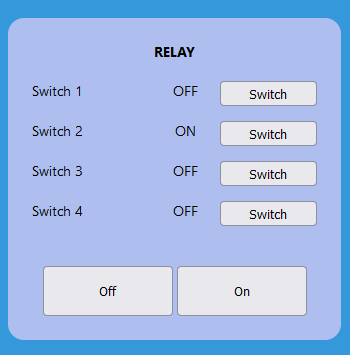
The 4 relays are displayed on the web UI like this:

The hardware is usually already soldered to the main board. This is designed to allow the user to access the relays via ui and command. The pinout is board specific, and can be found in the documentation for the board.
Here is the board I was using for this:

For example the esp32r4 board has the following pinout:
- Relay 1 -> GPIO 25
- Relay 2 -> GPIO 26
- Relay 3 -> GPIO 33
- Relay 4 -> GPIO 32
The relays already have the correct pullup/pulldown resistors on the board.
Currently the pinout (GPIO pins 25, 26, 33, 32) is hardcoded and cannot be changed via configuration.
There are no configuration options provided in either the profile.json or the prefs.json file for this module.
The module does not remember the relay state and starts with all relays OFF on bootup.
This module provides telemetry showing the current state of the relays. It provides this as telemetry on each cycle.
def getTelemetry(self):
    return {
        "relay/S1" : self.States[0],
        "relay/S2" : self.States[1],
        "relay/S3" : self.States[2],
        "relay/S4" : self.States[3]
    }
This module consumes no telemetry from other modules.
This module provides no commands to other modules.
This module allows the relays to be set via commands. The commands are read from the command queue and all modules are able to provide commands to it.
The commands are in the form of a string with the following format:
- "/relay/flip/1" - This will flip (i.e. switch) relay 1, acceptable are relays 1-4.
- "/relay/on/1" - This will turn on relay 1, acceptable are relays 1-4.
- "/relay/off/1" - This will turn off relay 1, acceptable are relays 1-4.
The web ui also is able to flip commands, and these are exposed via routes:
-
/relay/flip?sw=1- This will flip (i.e. switch) relay 1, acceptable are relays 1-4. -
/relay/allon- This will turn on all relays. This is not instant, as the code will cycle through all relays and turn them on one by one. -
/relay/alloff- This will turn off all relays. This is not instant, as the code will cycle through all relays and turn them off one by one.
You can test this by pressing the button on the web ui, or by constructing the url and sending a GET request. For example, to turn on relay 1, you would send a GET request to http://192.168.1.15/relay/flip?sw=1 (assuming the ip address of the board is 192.168.1.15).