This repo is for keeping all the docker knowledge in one place
Docker is a tool that helps you package and run applications in a consistent and isolated environment called a "container." Imagine a container as a lightweight, self-contained box that holds everything your application needs to run, such as the code, dependencies, libraries, and system tools.
Let's say you're building a web application using a specific programming language and some libraries. Without Docker, you'd have to worry about installing the correct version of the programming language, managing the dependencies, and configuring the environment on every machine where you want to run your application. This can be time-consuming and error-prone.
With Docker, you create a container that includes your application and all its dependencies. This container is based on a standardized image, which is like a blueprint for creating containers. You can think of an image as a snapshot of a fully set up and ready-to-run application.
Here's a simple example: Let's say you're developing a Python web application that uses the Flask framework. Instead of installing Python, Flask, and other dependencies on your local machine, you can create a Docker image that includes all those components. Then, you can run that image as a Docker container on any machine that has Docker installed.
This way, you don't have to worry about whether the host machine has the correct versions of Python and Flask. Docker ensures that your application runs consistently and reliably, regardless of the underlying environment. It eliminates the "it works on my machine" problem.
Docker also allows you to easily share your application with others. You can package your Docker image and share it with your team or publish it to a public registry, so that others can download and run your application in the same environment you tested it in.
In summary, Docker simplifies the process of building, deploying, and running applications by providing a standardized and isolated environment. It helps ensure that your application runs consistently across different machines, making it easier to develop, collaborate, and share software.
Lets first understand the OS structure

- Here Any app you run on your computer creates a system call . That is basically saying hey computed i wan this much of memory and these commands to be executed
- Then the system call pass it to the kernel ( which is the controller of resource management in any Operating system)
- Kernel then assign resouces ( memory , CPU , Virtual memory etc to run some app )
Now lets understand what is an image

- There are 2 things here Controlller groups and Namespacing
- Namespacing is basically naming some resource and calling them by these name
- Controller groups are telling some resource that how much any app can use them
- So then an image is a combination of these namespacing and resources . And some extra commands that will execute these tasks
Now lets finally understand what is an container

- So then a image call a startup command that will create an copy of all the instruction of the resources on Your computer
- The running these commands will create seperate resources and start using it
- No other app will be interupted by these Commands and no other app can access these resources
- SO you created a isolated computer inside your computer ( virtual machine) to run some tasks and that is ladies and gentleman called container
Docker HUb: Docker Hub is a cloud-based repository provided by Docker where you can find and share Docker images. It serves as a centralized platform for storing and discovering pre-built Docker images created by the community.
To connect to Docker Hub from the terminal, you can follow these steps:
- Install Docker: First, make sure Docker is installed on your machine. You can download and install Docker according to the instructions for your operating system.
docker --versionto see whether it is installed properly - Open an account in docker hub Remember the username and password
- Open terminal and type
docker login - A prompt will show up to give your username and password. After giving a message will indicate you are connected to docker hub
Let print hello world
Run this on your terminal
docker run hello-world
What this will do?
The docker run hello-world command is used to run a Docker container with the "hello-world" image. This command consists of two parts: the docker run command, which is used to start a container, and the image name hello-world, which refers to the specific Docker image you want to run.
When you execute this command, Docker checks if the "hello-world" image is available on your local machine. If it is not present locally, Docker automatically searches for the image on Docker Hub, which is a public registry for Docker images. Docker Hub is the default registry, but you can also use other registries if needed.
If the "hello-world" image is not found on your local machine, Docker pulls the image from Docker Hub to your local machine. The process of downloading the image is transparent to you, and Docker handles it automatically. Once the image is downloaded, Docker creates a container from that image and runs it.
The "hello-world" image is a simple image that contains a small, self-contained program. When you run the image, it prints a "Hello from Docker!" message to the console. This image is commonly used as a quick test to verify that Docker is correctly installed and running on your machine.
Now we will list all the necessary commands here . You can run them on your terminal and check whether its working like saide here
docker run <container-name> lsReplace conatainer name with you preferable container from docker hub
It will list all the files that this image tells the machine to contain in itself aka all the files in the containerdocker psList all the running container in your machinedocker create <image-id>remove image id with your preferable image id from docker hub This creates all the necessary files but does not execute anythingdocker start -a <container-id>. You can get the container id fromdocker ps --allThis one will start executing the container you created or the containers that are stoppeddocker system pruneRemoves all the containers from your machine . This is very important otherwise you machine will endup losing lots of stuffdocker logs <container-id>Yes this just logs the output of the containerdocker stop <container-id>Yeah this one stops a container but gives it time to finish the current work or sodocker kill <container-id>This one just kills it immediatelydocker exec -it <container-id> <commands>This command will execute any command on that container with input feature enableddocker exec -it <container-id> shlet you dicectly command your container without writing docker in front of them every time . sh is actually shell for that container
- Create a base image
- Run some command on it to install necessary stuff
- Set some startup command
Now what is a base image is ?
When you create a Docker container, you usually start with a base image that provides a certain environment. This image forms the foundation, and you can then customize and layer additional components on top of it by adding your application code, dependencies, and configurations.
Example : Imagine you want to run a python app. Now someone in this world created a image in which there is a command to install necessary files to run python app. So you may want to start from it and install the dependencies using that image. Thats called the base Image
What should I run ?
If your Python application has dependencies, you may need to install them. For example, let's say your application requires some additional Python packages, and you want to use the pip package manager to install them.
What is the startup command ?
You define the command that will be executed when the container starts.
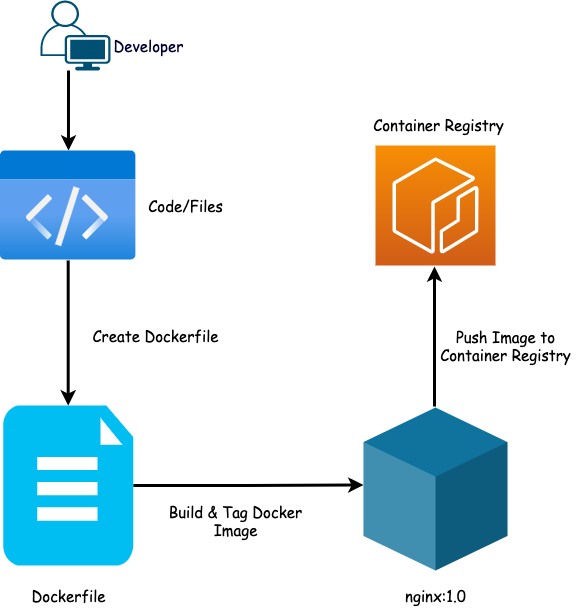
In the below example we can see we have the codes then we write a dockerfile to containarized our code , then if needed we can also Publish our docker image in docker hub as well so can people from anywhere can use our app
So lets code something. If you are too laze like me clone the following repo
git clone https://github.com/docker/getting-started-app.git
You can see the codes inside it or visit the repo
We want to containarize this code or app. Remember this is a functional web app you can run it using npm or other command And you localhost will show a to-do list. But we want it to be containarized so that anyone can run it without the dependencies
So lets creat a Dockerfile in the same directory (cd getting-started-app)
N.B The new file name is Dockerfile with no extension
Write the following command
N.B The order of these commands matter . The reason behind it will be discussed in the last part of this chapter
# syntax=docker/dockerfile:1

FROM node:18-alpine
WORKDIR /app
COPY . .
RUN yarn install --production
CMD ["node", "src/index.js"]
EXPOSE 3000
Lets understand each line
This line specifies the syntax version of the Dockerfile. In this case, it's using version 1 of the experimental BuildKit syntax. The syntax version can affect how Docker interprets the instructions in the Dockerfile.
This line sets the base image for the Dockerfile. It instructs Docker to use the official Node.js image version 18, based on the Alpine Linux distribution. Alpine Linux is a lightweight Linux distribution often used in Docker images to keep the image size minimal.
This line sets the working directory within the container to /app. Any subsequent instructions will be executed in this directory. It helps organize the file structure within the container.
This line copies the contents of the current directory (where the Dockerfile is located) into the /app directory within the container. This includes your application code and any other files present in the same directory as the Dockerfile.
This line executes the yarn install --production command inside the container. It installs the dependencies for the Node.js application. The --production flag ensures that only production dependencies (specified in package.json) are installed, excluding development dependencies.
This line specifies the default command to run when the container starts. In this case, it runs the Node.js application using the node command, with the entry point being src/index.js. Adjust this line based on the structure of your Node.js application.
This line informs Docker that the container will listen on port 3000 at runtime. It doesn't actually publish the port; it's more of a documentation feature. You would still need to use the -p option when running the container to publish the port to the host machine.
So we have contanarized our code or someone else's code , well not yet. We need command it to execute
docker build -t getting-started .
The docker build command uses the Dockerfile to build a new image. You might have noticed that Docker downloaded a lot of "layers". This is because you instructed the builder that you wanted to start from the node:18-alpine image. But, since you didn't have that on your machine, Docker needed to download the image.
After Docker downloaded the image, the instructions from the Dockerfile copied in your application and used yarn to install your application's dependencies. The CMD directive specifies the default command to run when starting a container from this image.
Finally, the -t flag tags your image. Think of this as a human-readable name for the final image. Since you named the image getting-started, you can refer to that image when you run a container.
The . at the end of the docker build command tells Docker that it should look for the Dockerfile in the current directory.
Now any one can run this app with the following
docker run -dp 127.0.0.1:3000:3000 getting-started
The -d flag (short for --detach) runs the container in the background. This means that Docker starts your container and returns you to the terminal prompt. You can verify that a container is running by viewing it in Docker Dashboard under Containers, or by running docker ps in the terminal.
The -p flag (short for --publish) creates a port mapping between the host and the container. The -p flag takes a string value in the format of HOST:CONTAINER, where HOST is the address on the host, and CONTAINER is the port on the container. The command publishes the container's port 3000 to 127.0.0.1:3000 (localhost:3000) on the host. Without the port mapping, you wouldn't be able to access the application from the host.
Now go to localhost:3000 and you have your todo web app running . Congratulations
But how it works actually ? And why the order of commands are important?
Lets go step by step
- The From command get the image either from cache or docker hub
- Generate an image from it
- Run command uses this image to install necessary files . Note that the From command actually gives a container to run the command
- Run command build upon the base image that was provided by From . So now our base image has new files as well as old files as well
- The CMD uses the container generated from RUN command and so on
N.B after each step a new container is created and when next step is running previous container is killed . In this way after all steps only the final app reamins with all the dependencies needed.
Project Directory: Create a dedicated directory for your project. Think of it as your coding oasis, free from distractions and clutter.

docker-compose.yml: This is your blueprint, telling Docker how to build your application. Let's crack it open!
mkdir my-project
cd my-project
Inside the Blueprint :
Version: Choose the right version for your Docker engine, like a trusty compass guiding you through compatibility.
Services: These are the building blocks of your application, like the chefs in your virtual kitchen. Each service gets its own container, specializing in its own task.
Volumes: Think of them as storage pantries, holding onto your data even when containers come and go. Persistent and reliable, just like your favorite grandma's cookie jar.
Step 2: Building Your First Service (with Nginx as Our Culinary Star):
Image: Imagine pre-made pizza dough! We'll use the nginx:latest image, like a base for crafting our web serving masterpiece.
Volumes: Time to mount those pantries! We'll link a named volume called app-data to the container's /usr/share/nginx/html directory, the heart of Nginx's serving domain.
Creating the Pantry (app-data):
Declare your named volume in the volumes section. Think of it as labeling your cookie jar!
Step 3: Let's Bake Some Content (the index.html file):
Write some HTML code, like a delicious recipe. Save it as index.html, ready to be served piping hot!
Step 4: Fire Up the Containers (docker-compose up -d):
Time to get cooking! This command spins up your services (containers) in the background, like efficient kitchen robots.
Step 5: Feast Your Eyes (Accessing the Application):
Open your web browser, point it to http://localhost, and savor the fruits of your labor! The index.html content should proudly greet you.
Step 6: Persistence Test (Updating and Observing):
Modify the index.html file, adding a new ingredient to your recipe.
Refresh the web page. Did the change magically appear? That's the power of volumes! Even when you restart the containers (like washing the dishes), your data stays put.
Step 7: Cleaning Up (docker-compose down):
When you're done, you can stop and remove all containers with this command. Think of it as putting away the leftovers for later.
Step 8: Persistence Checkmate (Rebooting and Verifying):
Run docker-compose up -d again to bring your containers back to life. Visit the web page once more. Is your updated recipe still there? Volumes win the persistence game!
Beyond the Basics:
This is just the beginning of your Docker Compose and volume adventure! Explore different volume types, learn how to manage them like a pro, and unleash the full potential of persistent data in your multi-container applications. Remember, safety and ethical development are always paramount, so keep learning, exploring, and building responsibly!