- Introduction
- Features
- App Walkthrough
- Developer Documentation
- Gotcha's when using the library
- Vaccine schedule not changing after changing the vaccines.json file
OpenSRP Client Immunization Module/App provides access to patients' immunization records which can be either be updated or retrieved.
- It enables the provider to update a patient's immunization records
- It enables the provider to view a patient's immunization records
- It enables the provider to undo an update on a patient's immunization record within 12 hours of updating the record
- It enables the provider to easily update multiple immunization records at the same time
- On openning the app, the patient's vaccine card is displayed.
The vaccine card has:
-
The Patient's basic details
- Name
- Picture
- ID
- Age
- Birthdate
-
Recurring immunization Services
-
Periodic immunization Services eg. At Birth, 6 weeks, 10 weeks
Each of the immunization services are color-coded indicating their status
| Color | Meaning |
|---|---|
| Green | Administered/Given recently |
| Red | Overdue |
| Blue | Due soon (Due today OR Within 10 days after due-date ) |
| Light Blue | Upcoming |
| White | Upcoming but not anytime soon |
-
Updating service status
2.1 Click on any of the service buttons to update the immunization service status
Depending on the service being updated, different options will be available.
2.2 In case, you need to update several service statuses at once, click on the Record all button in the time-respective services box.
The following dialog will be shown:
-
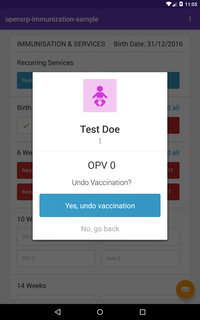
Once a service status has been updated, you can undo the action within 12 hours.
An Undo button as shown below appears beside the service button.
- On clicking the Undo button, the following dialog box will be shown:
- To view the patient's immunization history between birth and 5 years, click on the Patient's Details box at the top of the page:
The following page will be shown:
This page shows all the patient's scheduled immunization services from birth to 5 years of age.
For each immunization service, the following is shown:
- Vaccination abbreviation eg.
OPV 0,BCG,Penta 1 status color- The date
- The service is scheduled to be provided
- The service was provided
- An Edit button in case the service was recorded within the last 12 hours
This section will provide a brief description how to build and install the application from the repository source code.
- Make sure you have Java 1.7 to 1.8 installed
- Make sure you have Android Studio installed or download it from here
- Use a physical Android device to run the app
- Use the Android Emulator that comes with the Android Studio installation (Slow & not advisable)
- Use Genymotion Android Emulator
- Go here and register for genymotion account if none. Free accounts have limitations which are not counter-productive
- Download your OS Version of VirtualBox at here
- Install VirtualBox
- Download Genymotion & Install it
- Sign in to the genymotion app
- Create a new Genymotion Virtual Device
- Preferrable & Stable Choice - API 22(Android 5.1.0), Screen size of around 800 X 1280, 1024 MB Memory --> eg. Google Nexus 7, Google Nexus 5
- Import the project into Android Studio by: Import a gradle project option All the plugins required are explicitly stated, therefore it can work with any Android Studio version - Just enable it to download any packages not available offline
- Open Genymotion and Run the Virtual Device created previously.
- Run the app on Android Studio and chose the Genymotion Emulator as the
Deployment Target
Vaccine names can contain upper and/or lowercase letters , integers, hyphens, forward slash(as a separator for combined vaccines) and commas. e.g. MR - CE, RTS,S 2 , Measles 2 / MR 2
The library supports translated vaccines e.g. in Arabic OPV 0 is called الشلل فموي ۰
In order to use this in your implementation,
- Create translations the corresponding string.xml files
- The key of the resource identifier should be the english key(vaccine name) used in the vaccine configuration for that vaccine converted to lowercase
- For the vaccines with spaces, replace with underscore.
Example: OPV 1 in the vaccine configuration file becomes the key opv_1 in the strings.xml resource file
          English <string name="opv_1">OPV</string>
          French <string name="opv_1">VPO</string>
For Vaccine groups (which usually begin with a number e.g. 6 Weeks) an underscore is automatically appended since strings which start with digits/numbers CANNOT be used to define an android resource key in a strings.xml file
Steps:
- Add key in strings.xml using the lowercase underscore version of the Group name. If none is defined, it will fallback to the vaccine name during render time.
Example: 6 Weeks group name has a name 6 Weeks thus the key in strings.xml should be _6_weeks.
        English <string name="_6_weeks">6 weeks</string>
        French <string name="_6_weeks">6 semaines</string>
You can allow vaccine event generation immediately a vaccine has been submitted as opposed to after a configured time. To enable vaccine-event generation on submission, add this config. (Default is false)
vaccine.sync.immediate=true
You can relax your vaccine schedules and specifies how many days prior to the actual due date of the vaccine one can allow its administration This can be done via the setting below in your implementation's app.properties file
vaccine.relaxation.days=2
By default, once a vaccine has expired you can not administer it when it is in the Expired state e.g. Expired: HepB. You might want alter this behaviour to cater for the
use case where you need to register a child who already has previous vaccines (as shown on their vaccine cards) and entering the earlier dates recorded for those vaccines.
The app can now be used to track the rest of the upcoming vaccines.
This behaviour can be altered via the setting below in your implementation's app.properties file
vaccine.expired.entry.allow=true
The current default color for expired vaccine when back-data entry is enabled is white. However, this is not intuitive and therefore we provide an option to show the expired vaccines as RED only when vaccine back-data entry is enabled.
vaccine.expired.red=true
For vaccines that are dependent on previous ones, set the following property to true to prevent the user from recording a vaccine at a date that is earlier than the previous vaccine's. This property does not work when recording multiple vaccines with the Record All actions for the vaccine group.
vaccine.requisite.date.constraint.enabled=true
Sometimes (maybe all times) you'd like in your implementation to automatically load vaccines from a configuration file without having to specify the category. The vaccineCacheMap is the primary data structure that holds all vaccine configuration data for various vaccine categories e.g. child, mother, some_other_special, category e.t.c
Following the concept of convention over configuration, you can now drop vaccine configuration files in the assets/vaccine folder and have the vaccineCacheMap auto-loaded with configuration data for that special category.
To use this approach, the file name should contain the name of the category as the prefix e.g. over_5_vaccines.json. You can then get vaccines in your implementation using VaccineRepo.getVaccines(some category name>)
Note that you can have any number of underscores and the filename must end in _vaccines.json . By default, only Child and Woman category vaccines are supported by the library
The current default background indication color for overdue vaccines is red and due is blue. Setting the following property to true will disable the indication colors for overdue and due vaccines and will be shown with only white background color.
hide.overdue.vaccine.status=true
- Vaccine schedule not changing after changing the
vaccines.jsonfile!
Some of the vaccine configurations are not dependent on change done to the vaccines.json, in this case you should check the current configuration here
and come-up with the correct configuration. Next step is to add the custom configuration to library. You should loop through the configurations array from VaccineRepo.Vaccine[] ImmunizationLibrary.getInstance().getVaccines(category) and add
modify the properties of the vaccine enum to whatever you need. You should then use ImmunizationLibrary.getInstance().setVaccines(VaccineRepo.Vaccine[], category)
to re-set all the vaccine configs using the configurations array you retrieved.


