Creating a Release
The following are steps to create a release branch for the OPERA PGE repository that triggers the CI/CD pipeline for building, testing and deploying a release.
Using a clone of the PGE repository, make sure the local revision history is up to date with the main branch:
git checkout main
git pull
Next, checkout the "primary" release branch for the PGE(s) to be released. The branch name should be of the form release=R<#>. As an example, we'll be creating a release for the DSWx-HLS PGE, which is part of R1:
git checkout release-R1
git rebase main  # Sync the primary release branch with main, if necessary
From here, you can create a new branch off of the primary release branch, which is where all following updates should occur.
Create and checkout a new branch named release/<semantic version num>, in this example we'll be using release/1.0.0-rc.5.0 branch. <semantic version num> should follow proper semantic versioning rules (see here).
git checkout -b release/1.0.0-rc.5.0
Note that the branch must start with release/ in order for the CI/CD system to pick up the branch and prepare the delivery.
At this point, the any modifications needed to tailor the release branch prior to deployment should be made.
At a minimum, this should include the following:
- Cherry picking any relevant commits from the
mainbranch - Updating the repository version number
- Updating applicable PGE/SAS version numbers
- Updating Artifactory links for container build scripts
- Updating example RunConfigs
Typically a new release branch may need to incorporate some number of commits made to main to ensure up-to-date functionality or bug fixes are available. The necessary cherry picks or branch rebasing should be performed at this time before making any further updates to the release branch.
The version number for the PGE repository is stored within the _package.py module within the src/opera directory:
"""
===========
_package.py
===========
Package information for the OPERA PGE repository.
"""

__version__ = "1.0.0.rc.5.0"
__title__ = "opera-sds-pge"
__summary__ = "OPERA SDS Product Generation Executable (PGE) Repository"
__uri__ = "https://github.com/nasa/opera-sds-pge"
__author__ = "California Institute of Technology"
__copyright__ = f"2021-2022 {__author__}"
This version typically tracks with the latest OPERA Release (for example, R2 releases such as 2.0.0-er.1.0 are considered "later" than R1 releases such as 1.0.0-rc.1.0). The repository version becomes the default version used for all PGE's which do not manually define a version number in their Executor class.
Each PGE module defines the configured SAS version number, and an optional PGE version number, within its specific Executor class. Here is an example from the DSWx-HLS module.
If PGE_VERSION is defined, it overrides the default version stored in _pacakge.py. SAS_VERSION should always be specified. Update one or both of these versions as necessary for the release.
At the top level of the repository within the examples directory we store a representative RunConfig file which should reflect the latest version of the corresponding release. At a minimum, the version number within the file name should be updated, if necessary, to match any updated PGE's in the release. If there have been any changes to either the PGE or SAS schema that affects existing fields or default values, they should also be updated to ensure the sample RunConfig is compatible with the latest release.
Under the .ci/scripts directory of the repository there are a number shell scripts to build the combined PGE/SAS docker images which are delivered to Artifactory. If a release needs to incorporate a new delivered SAS image, the corresponding link needs to be updated in the applicable build script. An example link location for the DSWx-HLS build script is available here.
Once all updates have been made, commit the changes with a message summarizing the changes:
git add src/opera/_package.py
git commit -m "Rolled version numbers to 1.0.0-rc.5.0"
Once all required updates have been made to the release branch, push the branch to origin:
git push --set-upstream origin release/1.0.0-rc.5.0
Once the branch is pushed to origin, the CI system should detect the new release branch and create a build-test-deploy pipeline for it within an hour. Instructions to actually invoke the pipeline follow.
The Jenkins CI/CD pipelines can be found at https://opera-pge-ci.jpl.nasa.gov. Note that accessing this page requires JPL firewall access, as well as a set of JPL credentials to log in with.
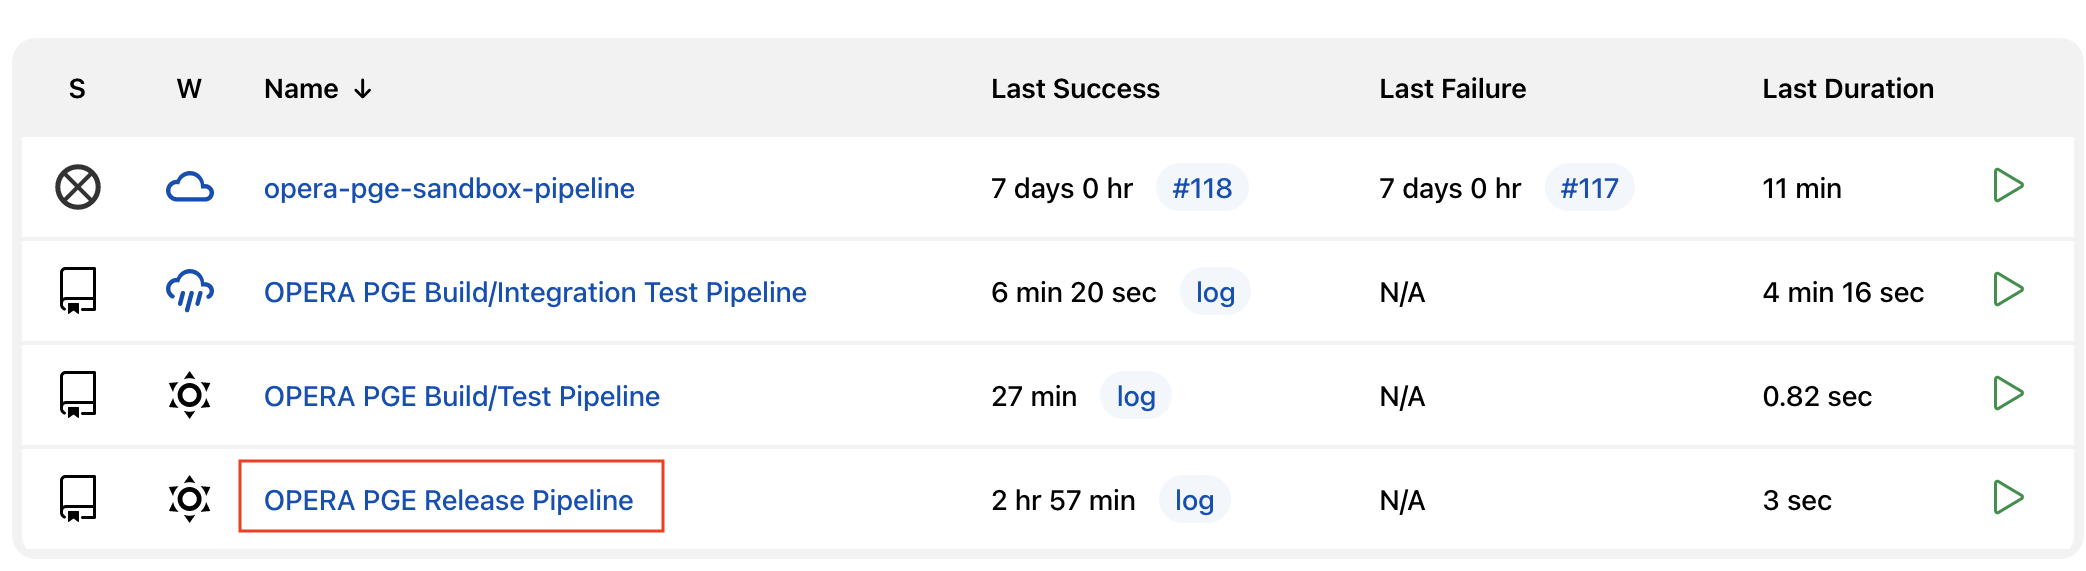
To run the build/test/deploy pipeline for the release branch created earlier, click the OPERA PGE Release Pipeline from the main dashboard.
From here you should see a list of the available release branches found in the last repository scan made by Jenkins. If your branch has not shown up yet, click the Scan Repository Now option from the left-hand menu, and the branch should show up shortly after.
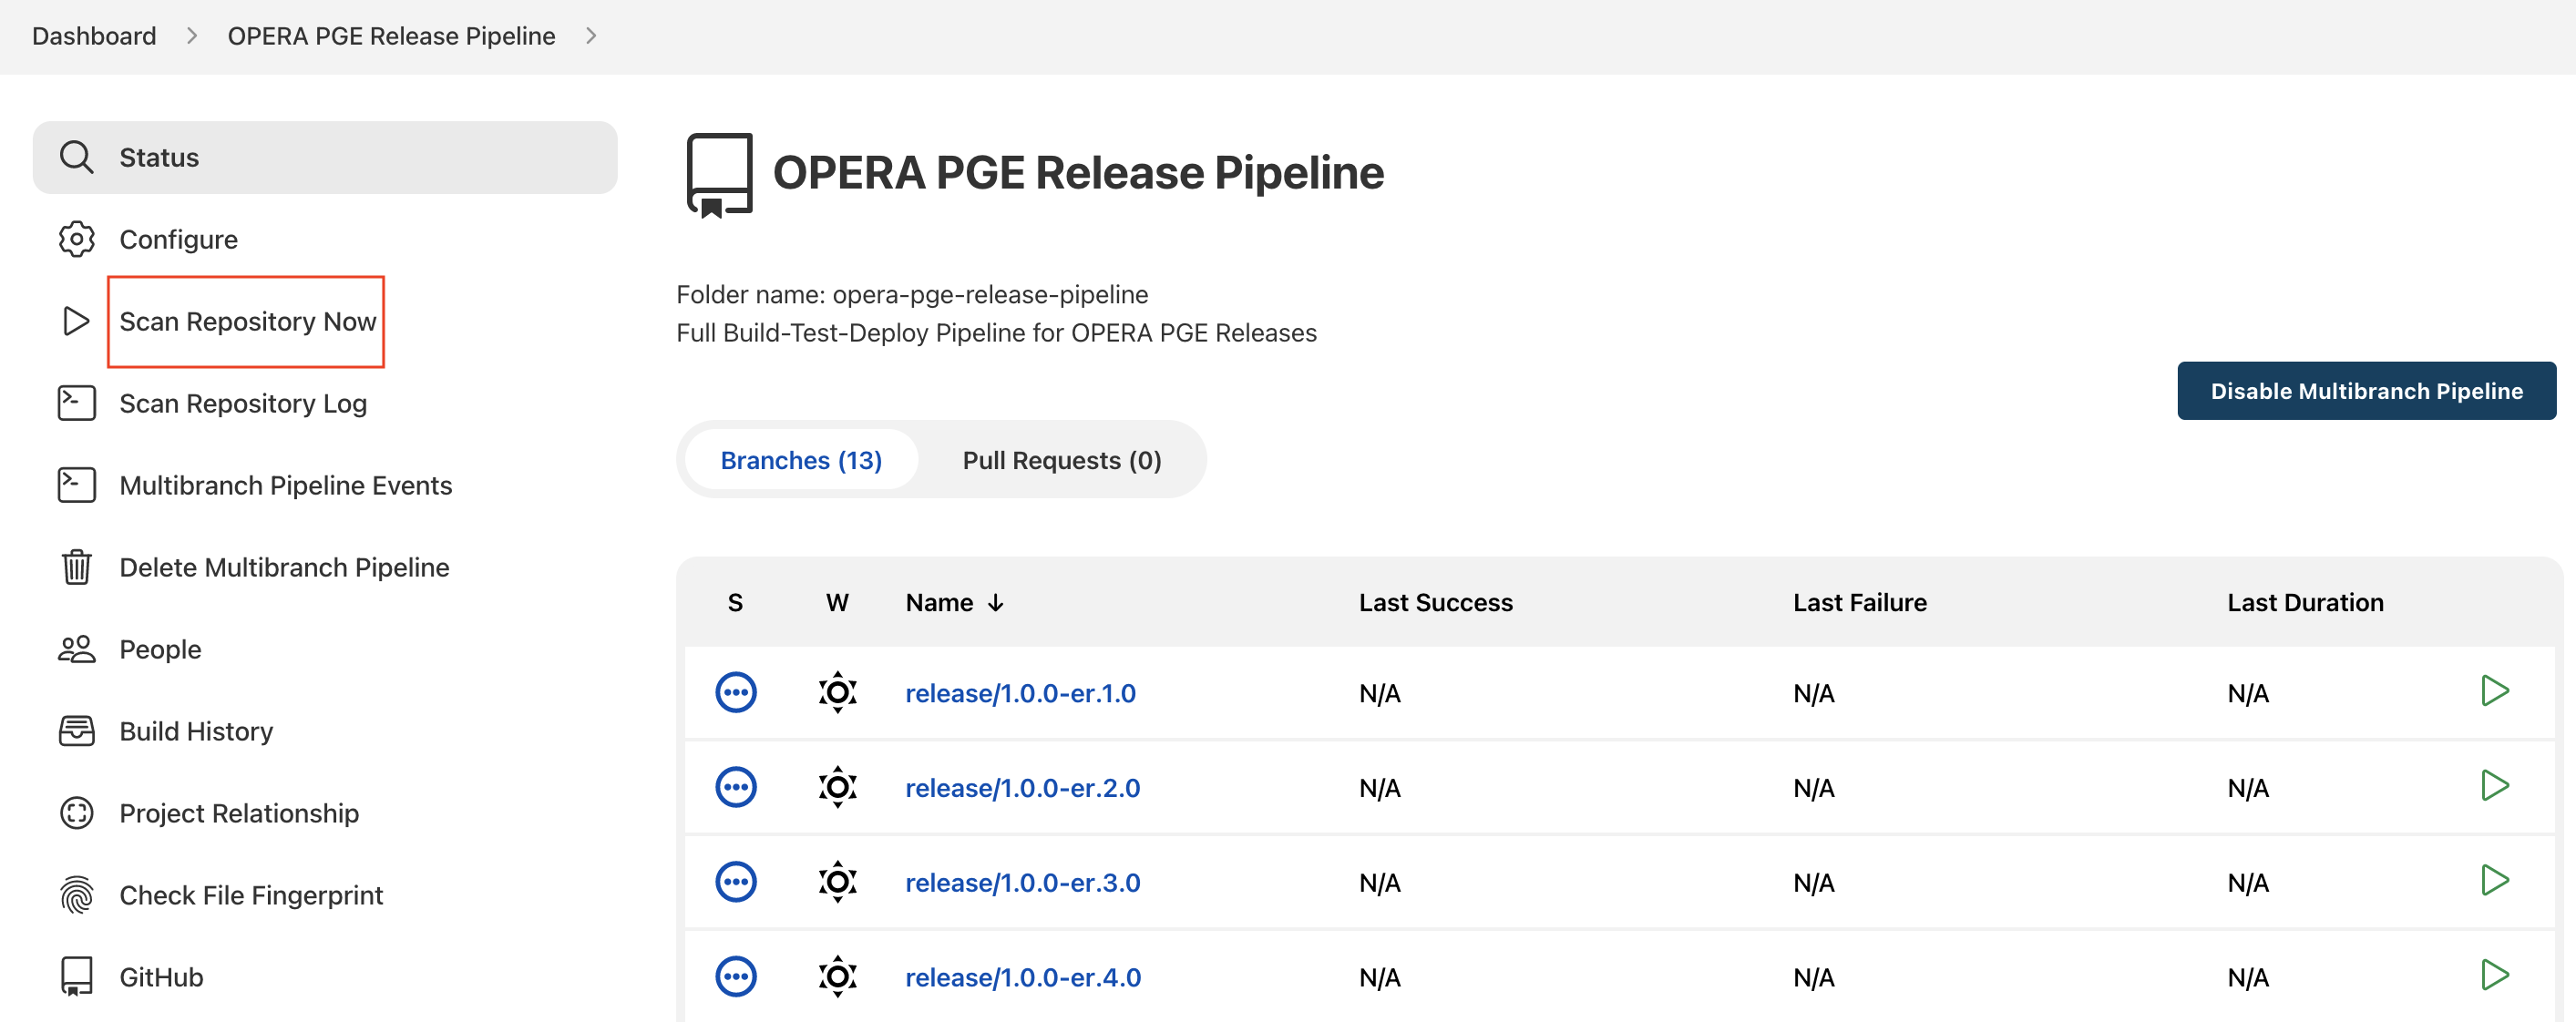
NOTE: Occasionally the repository scan can get hung up due to throttling on the number of API requests Jenkins is allowed to make on the github repository. When this occurs, it can sometimes take up to ~45 minutes before Jenkins is allowed to scan again.
Once you've selected the pipeline for the appropriate release branch (1.0.0-rc.5.0 in this example), the next step is click the Build Now option from the left-hand menu to initialize the pipeline.
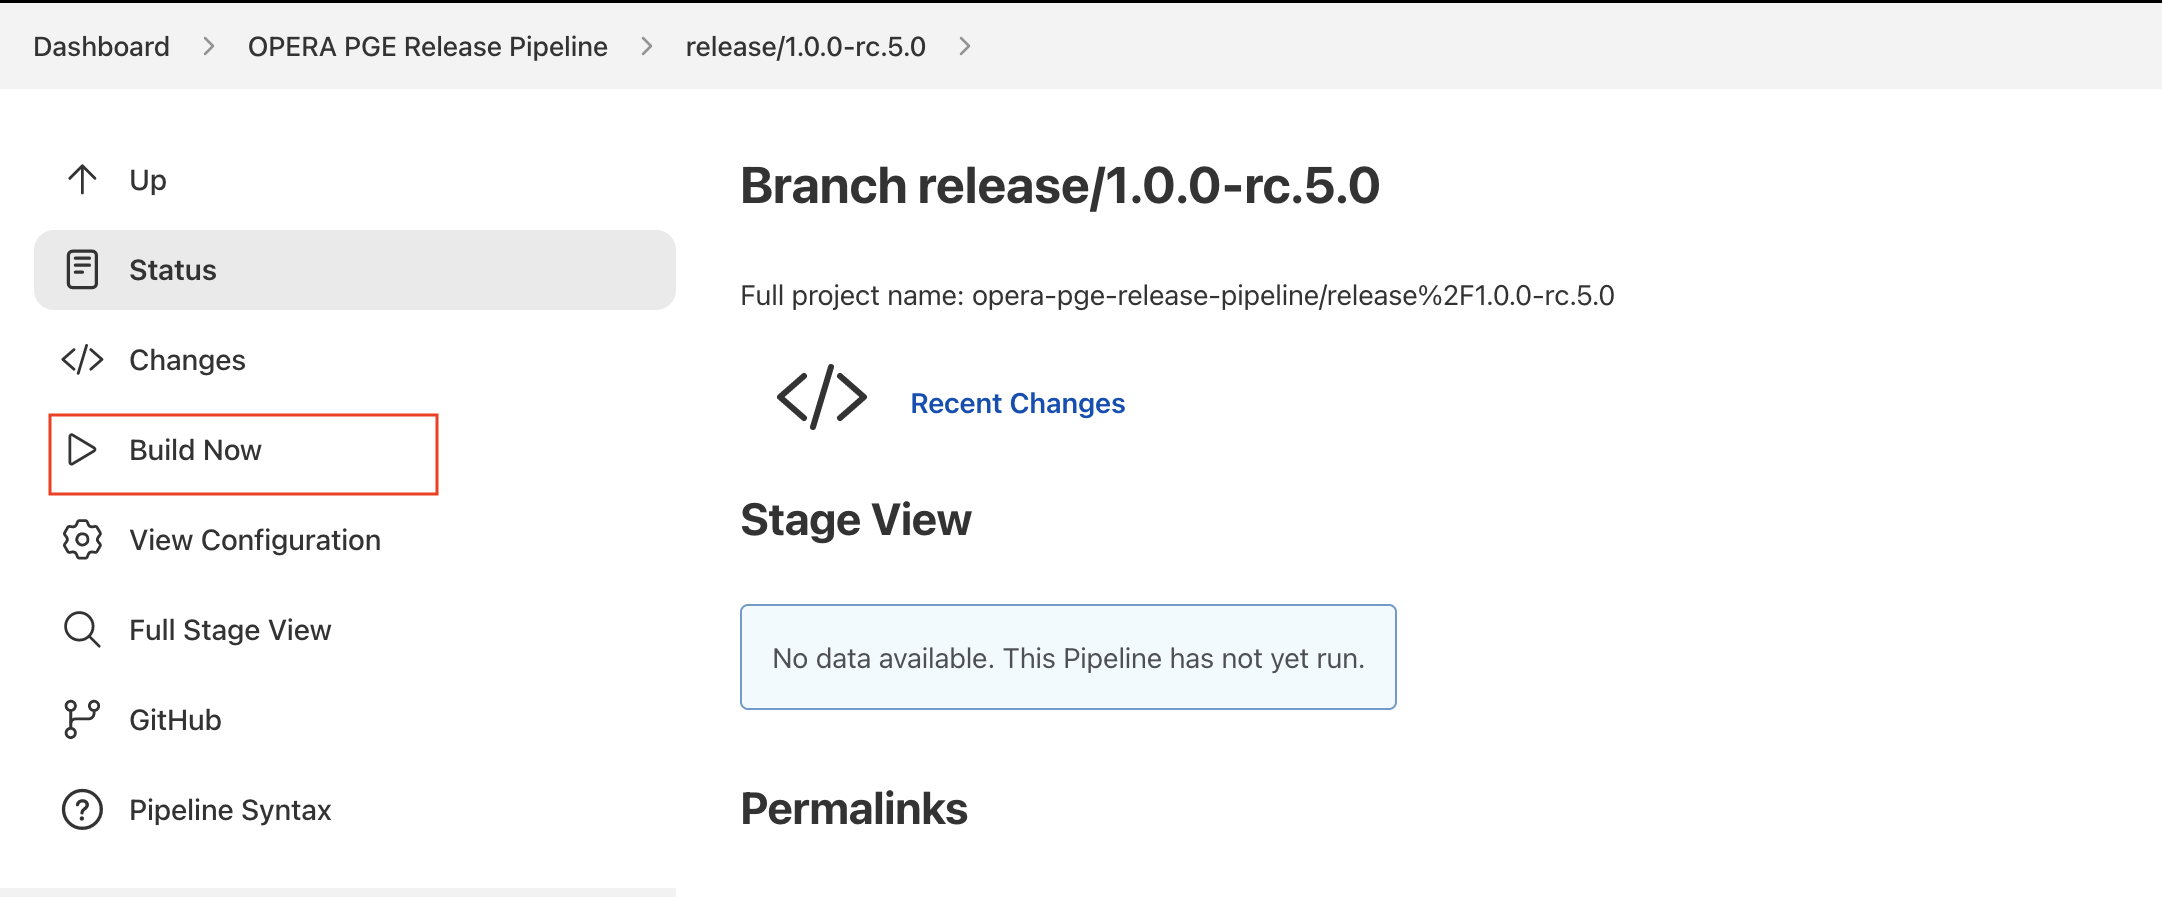
Because a Jenkins pipeline must be run at least once to pull in the corresponding Jenkinsfile from the github repository, the first build attempt for any release pipeline is expected to fail. You should see something similar to the screenshot below shortly after clicking the Build Now option:
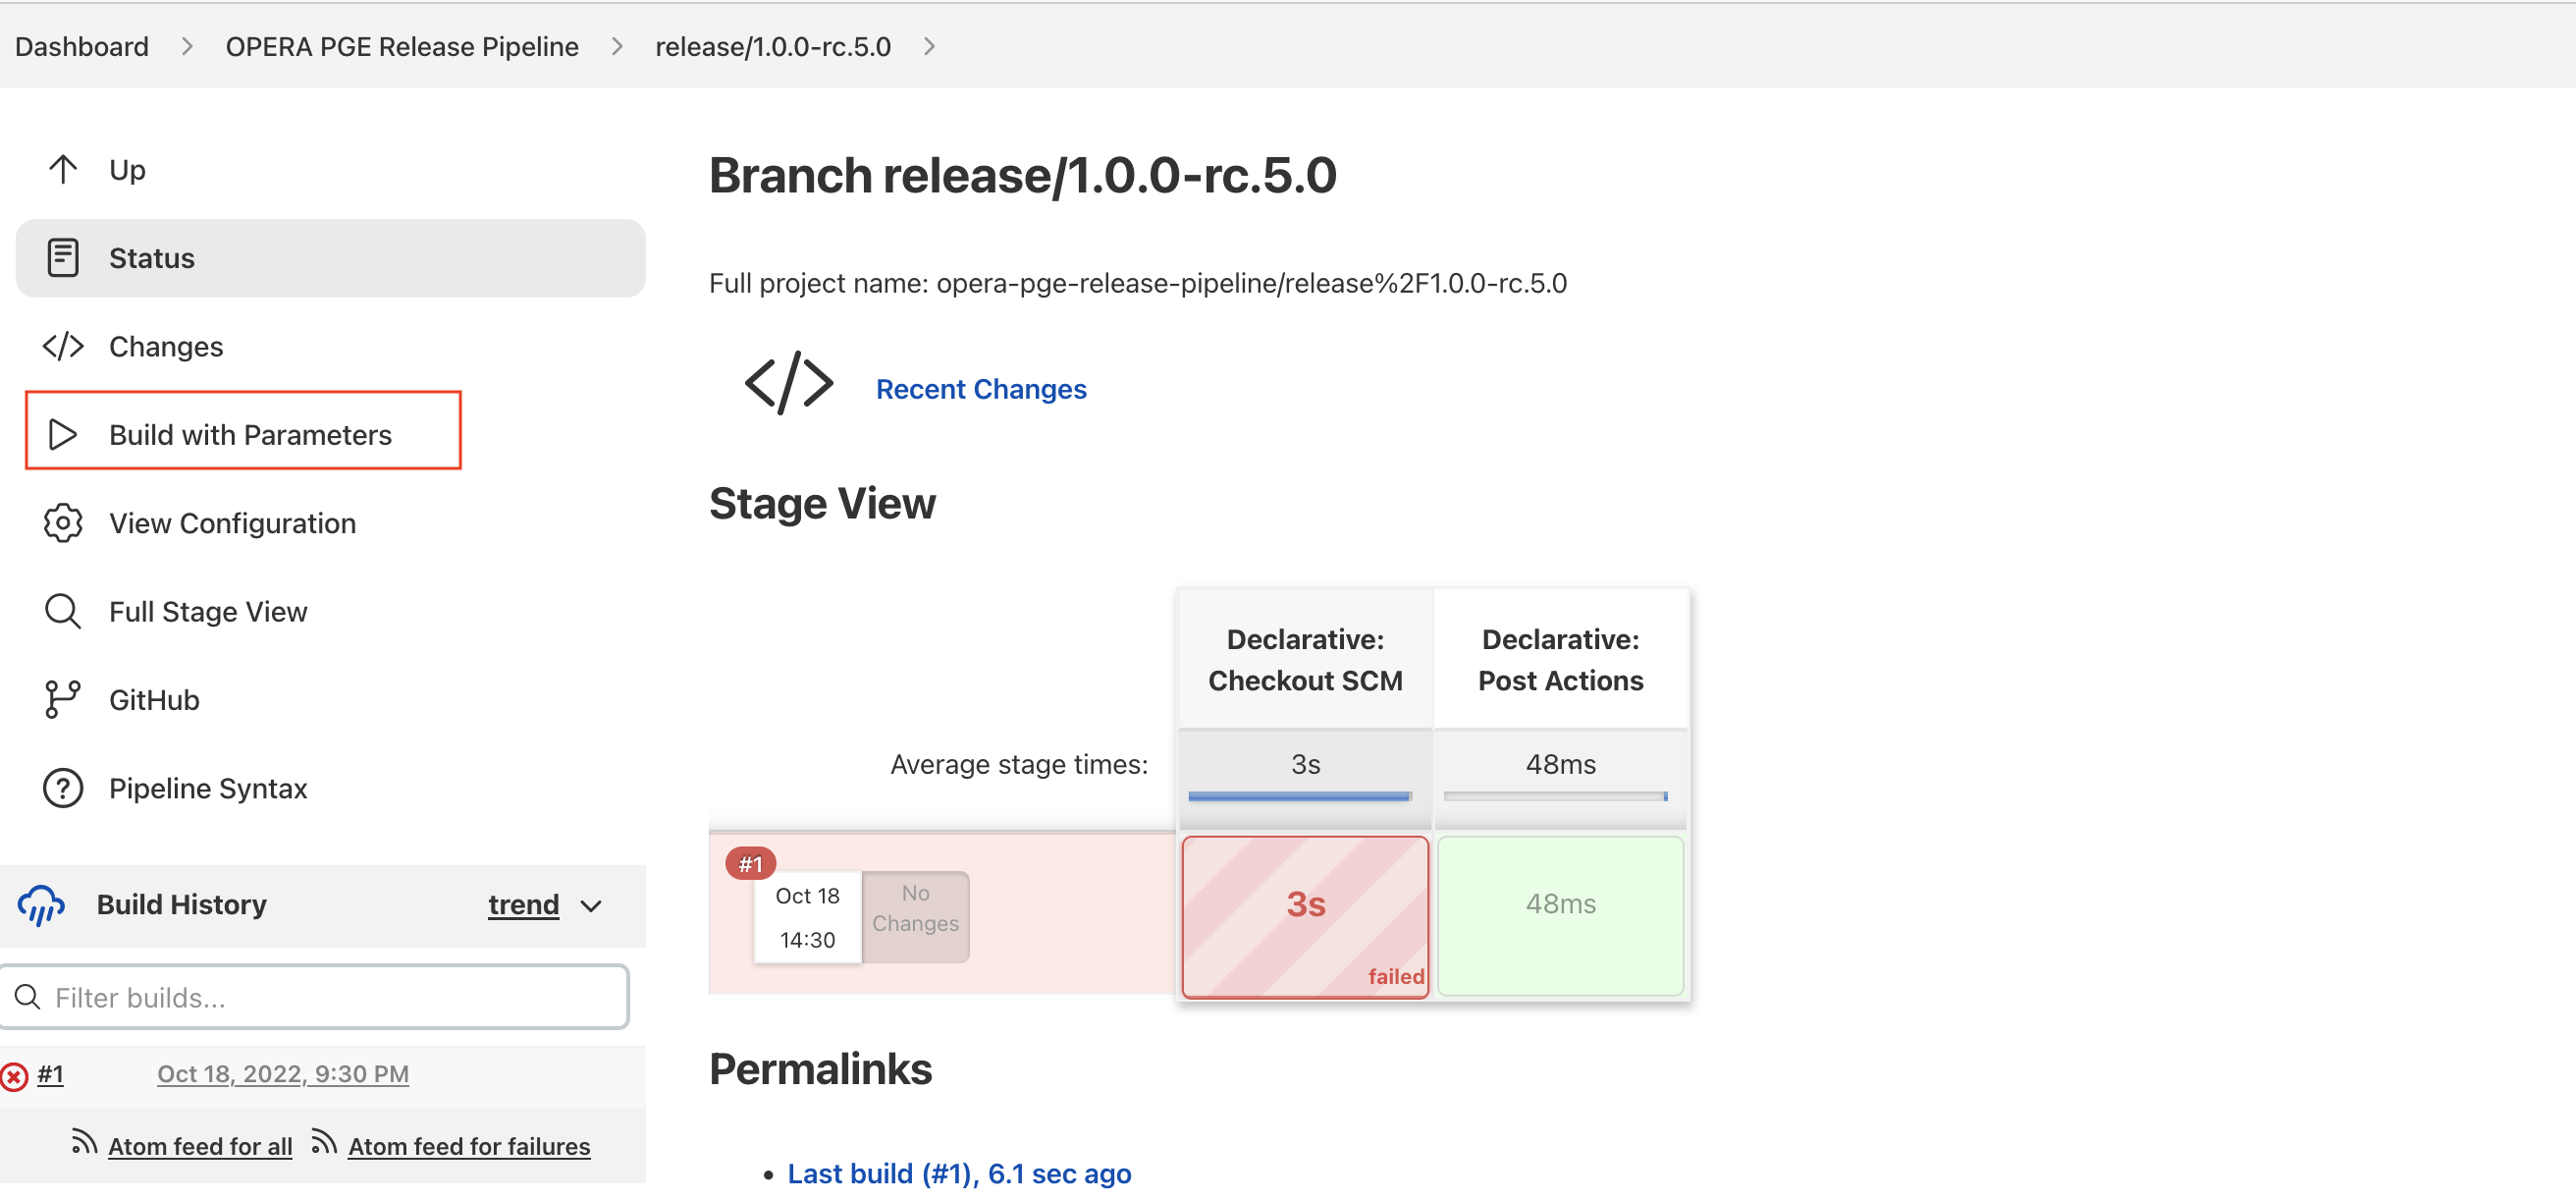
Also take note that the Build Now option has become Build With Parameters, this indicates that Jenkins has now initialize the pipeline according to the Jenkinsfile, so we can now kick off the full pipeline for real. Click the Build With Parameters option to load the following menu:
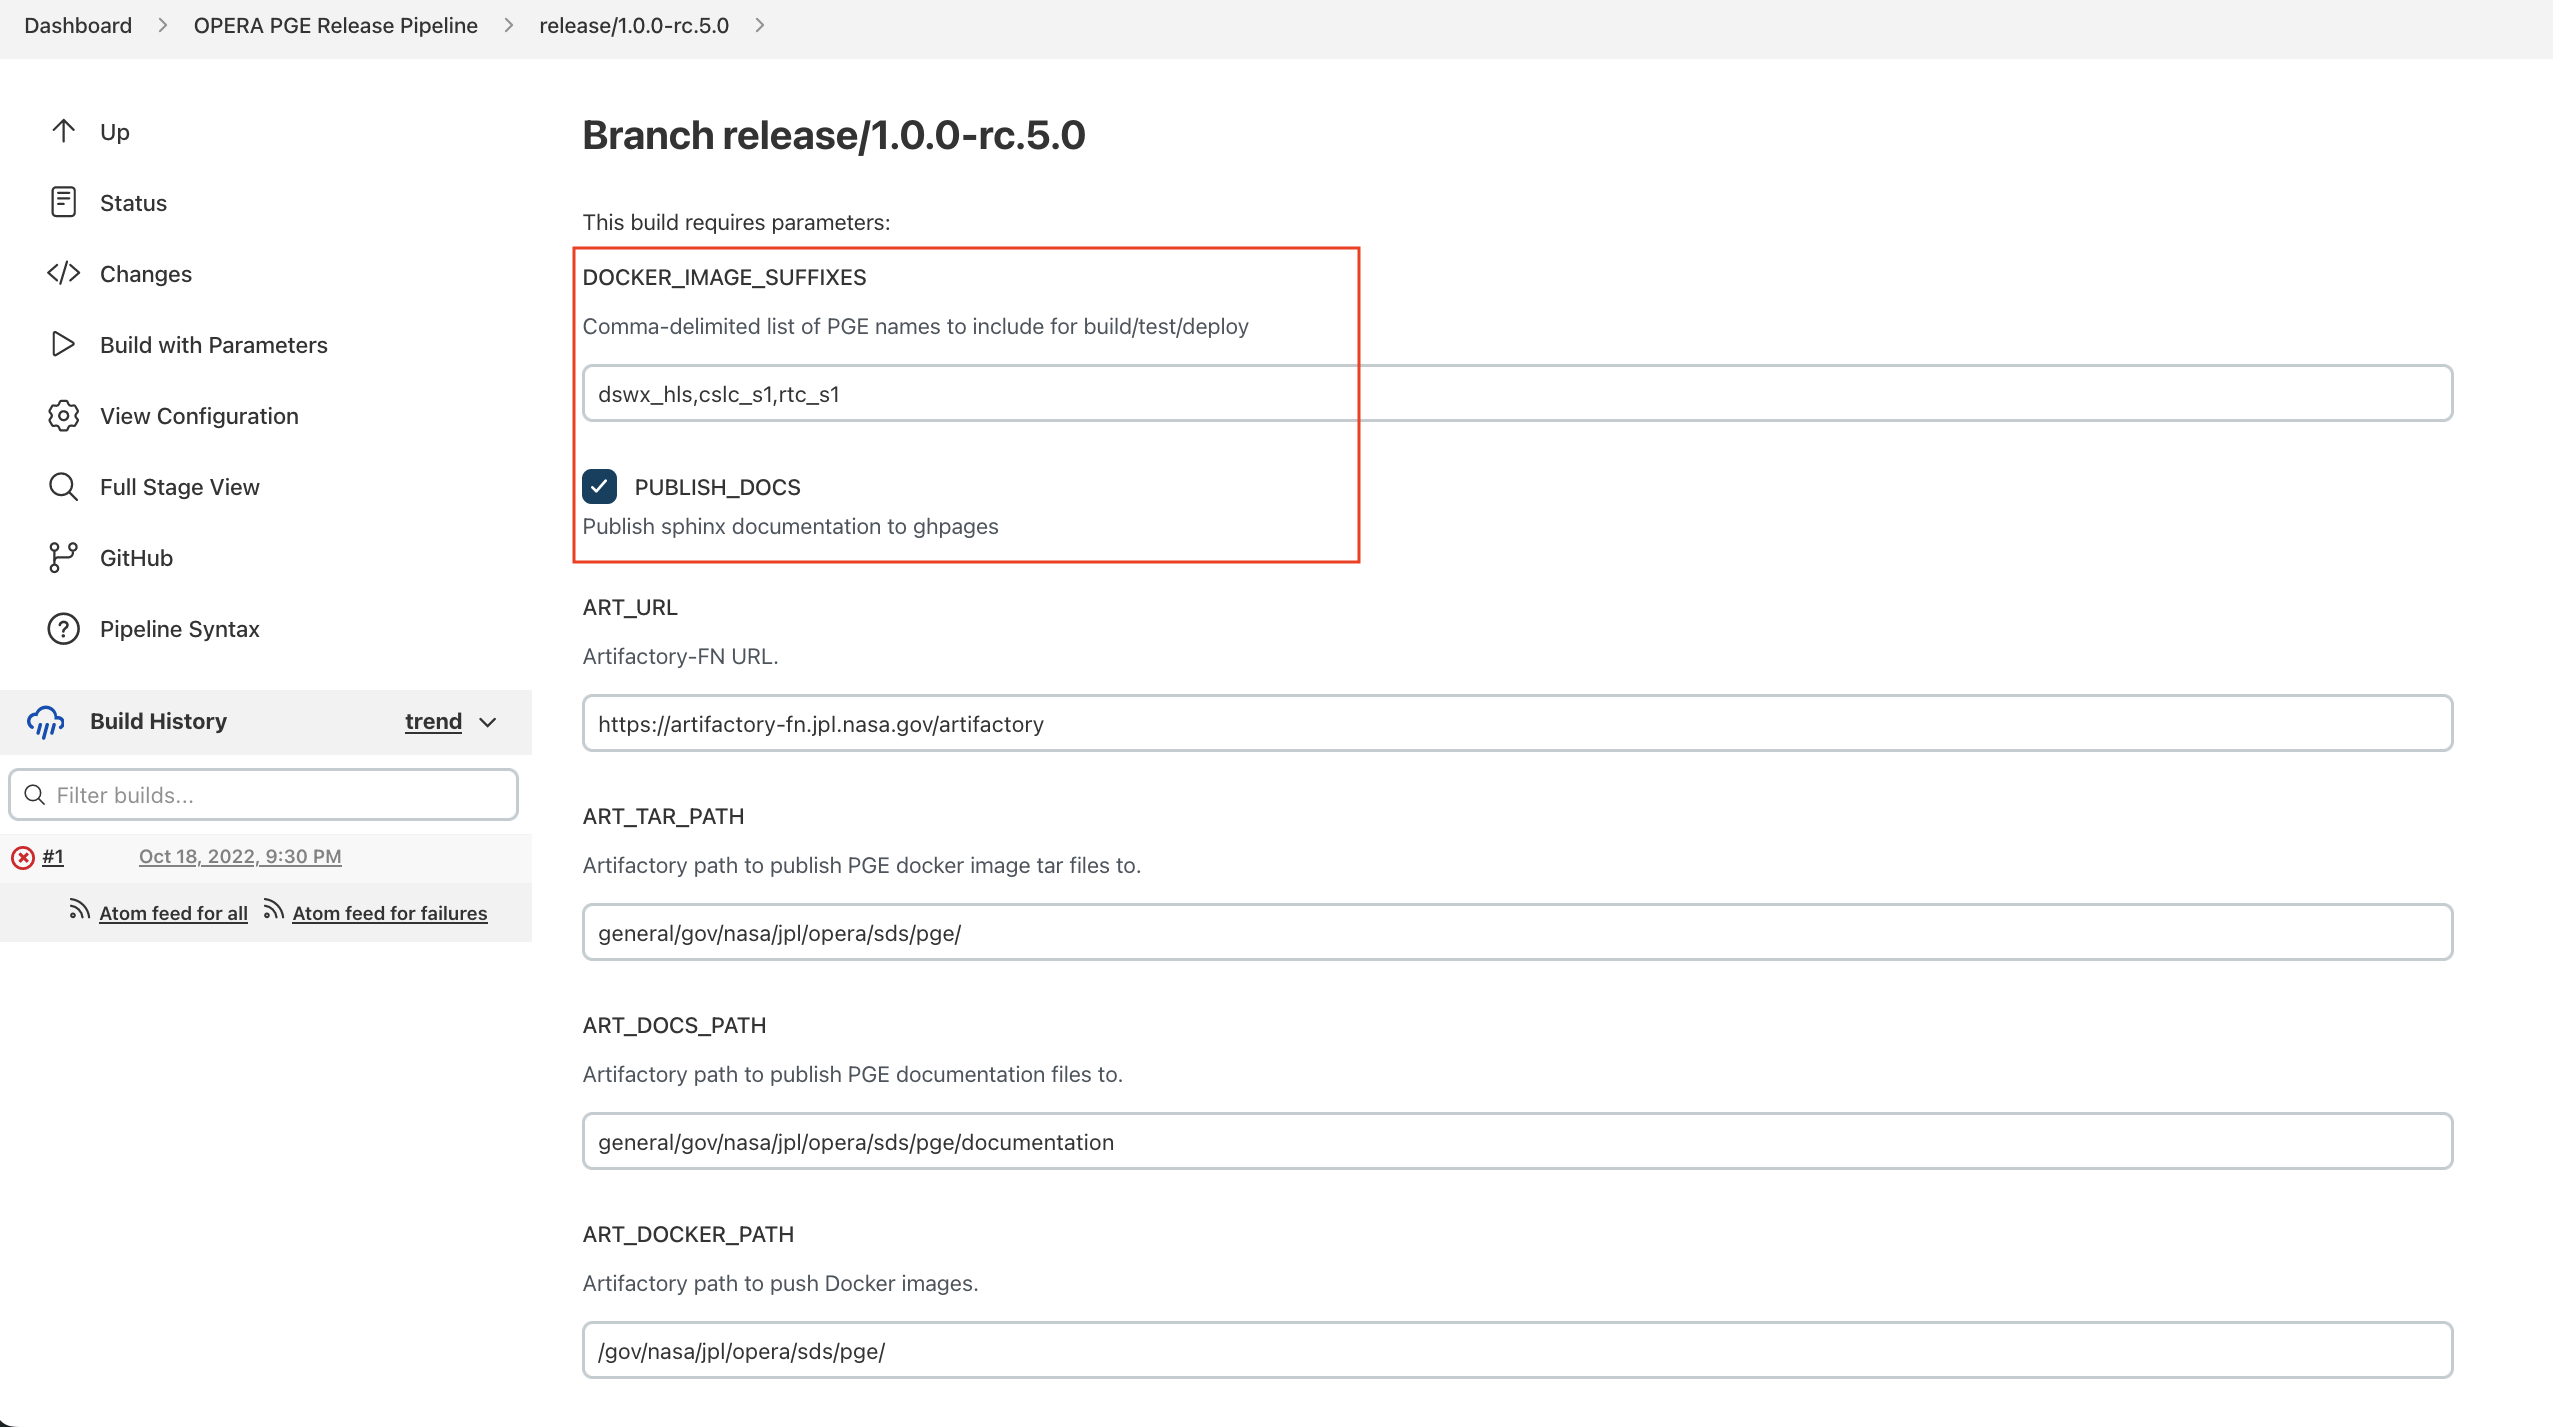
For a typical release, the only parameters that should need modification are DOCKER_IMAGE_SUFFIXES and the Publish docs checkbox. By default, DOCKER_IMAGE_SUFFIXES is populated with suffix identifiers for all available PGE's, meaning all PGE's would be built, released to Artifactory, and tagged with the identifier used for the branch name. This field should be modified to include only those PGE's which are part of the release in question.
The Publish docs checkbox may be unchecked to skip generation of Sphinx code documentation and upload to github pages. Typically, we only publish a new set of docs when the repository version has been incremented.
If all parameters look correct, click the Build button at the bottom of the Parameters menu to kick off the pipeline. The release process usually takes about 15-30 minutes per configured PGE. Once the pipeline has completed successfully, you should see something similar to the screenshot below (Publish docs was disabled for this build):
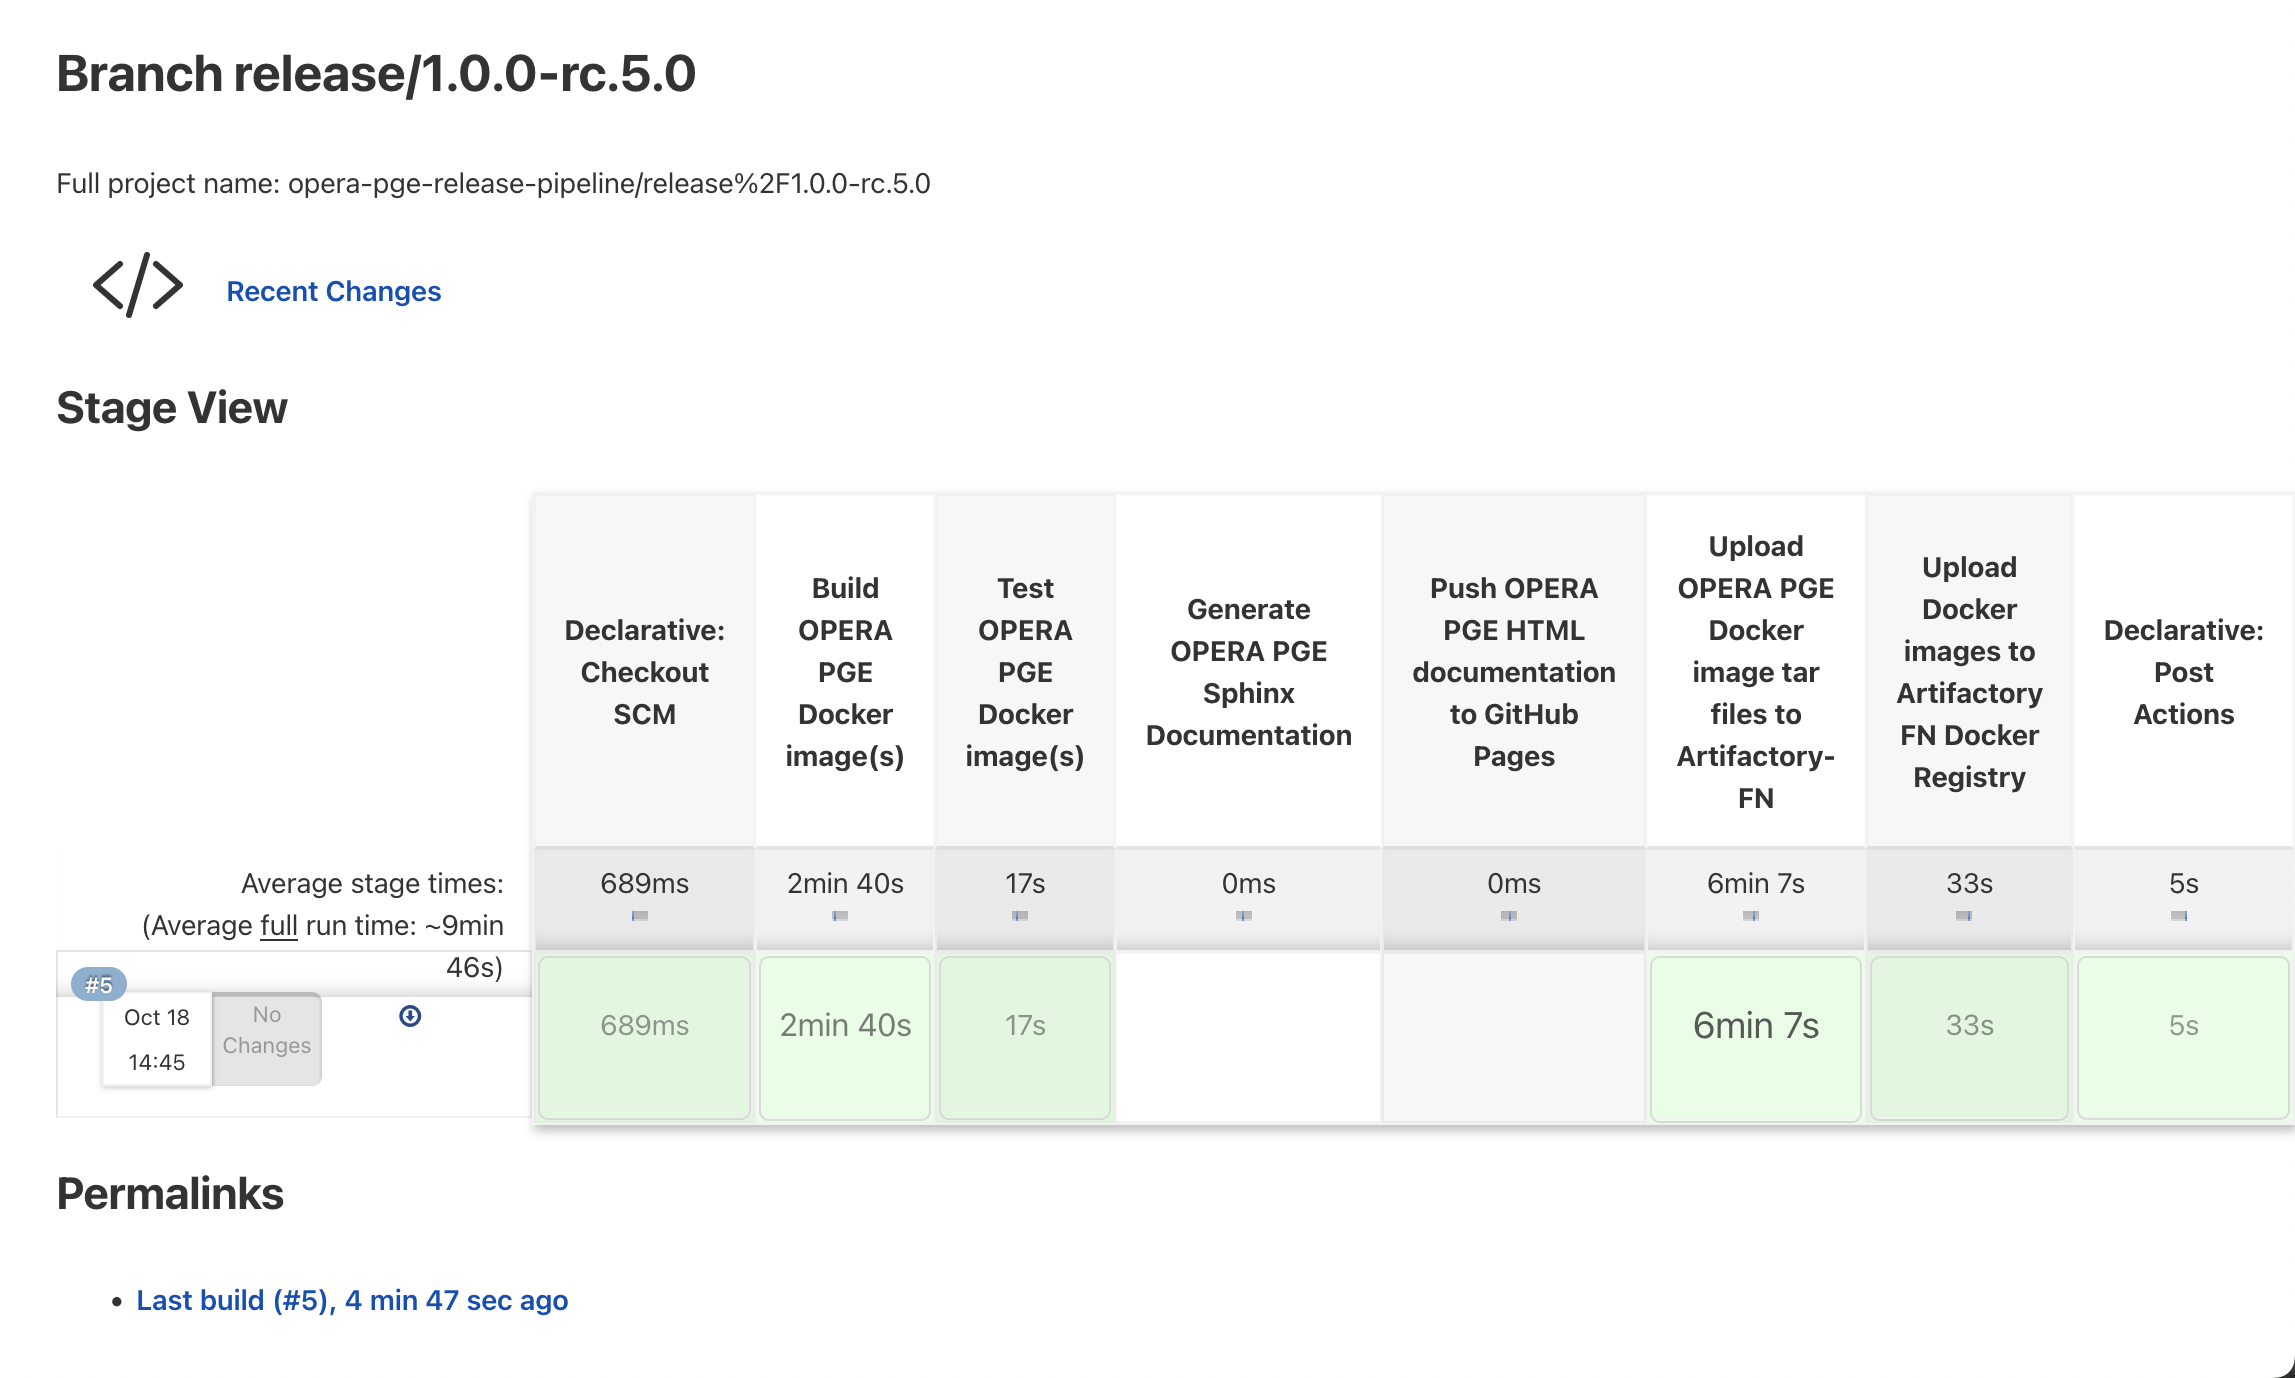
The build artifacts should now be available within Artifactory-FN under the paths configured by the pipeline.
Once the release branch has passed all pipeline steps of the CI/CD system, any changes made to the release branch should be merged back into the main branch. This can be accomplished by opening a Pull Request for the release branch. These PR's are typically merged immediately since the changes are usually trivial. If more complicated updates were made, feel free to request reviews from OPERA PGE developers.
Once the release branch is merged, if there are commits or fixes that should be applied to the main branch, they should be cherry picked onto main as-needed.
With the release branch and its changed merged back into main, we can now create a tag for the version that captures all changes made to support the release:
git tag 1.0.0-rc.5.0
git push origin refs/tags/1.0.0-rc.5.0
The tag must be pushed to origin in order to accomplish the next step.
After the release branch and tag are created and pushed to origin, the final step is to create a release page on GitHub here.
Select the tag created and pushed earlier from the drop down, and give the release an appropriate title and description. Ensure the "Auto-generate release notes" button is selected to add change notes based on commit history for the release. If the release is an Engineering Release (ER) or Release Candidate (RC), makes sure the "This is a pre-release" box is checked.
Usually, once a release has been pushed to origin and tagged, there should be no further changes to the commit history for that branch. In circumstances where changes or fixes are required, ensure that all commits are pushed to the release branch on origin, and that the release tag is reset to the new HEAD commit.
git tag -f -a 1.0.0-rc.5.0 HEAD
git push -f origin refs/tags/1.0.0-rc.5.0