-
Notifications
You must be signed in to change notification settings - Fork 138
Barchart API
The barchart package implements a widget that draws multiple bars displaying values and their relative ratios.
Run the barchartdemo to see the widget in action by executing the following command:
go run github.com/mum4k/termdash/widgets/barchart/barchartdemo/barchartdemo.goA barchart looks like this:
The barchart.New function creates a new barchart instance that can be placed into a container according to the desired layout.
The BarChart.Values method is used to provide the values that will be displayed as bars. Each value ends up in its own bar. Consecutive calls to BarChart.Values overwrite values provided previously.
The argument max specifies a value that is considered as the maximum (or a 100%) when deciding how tall the bars will be.
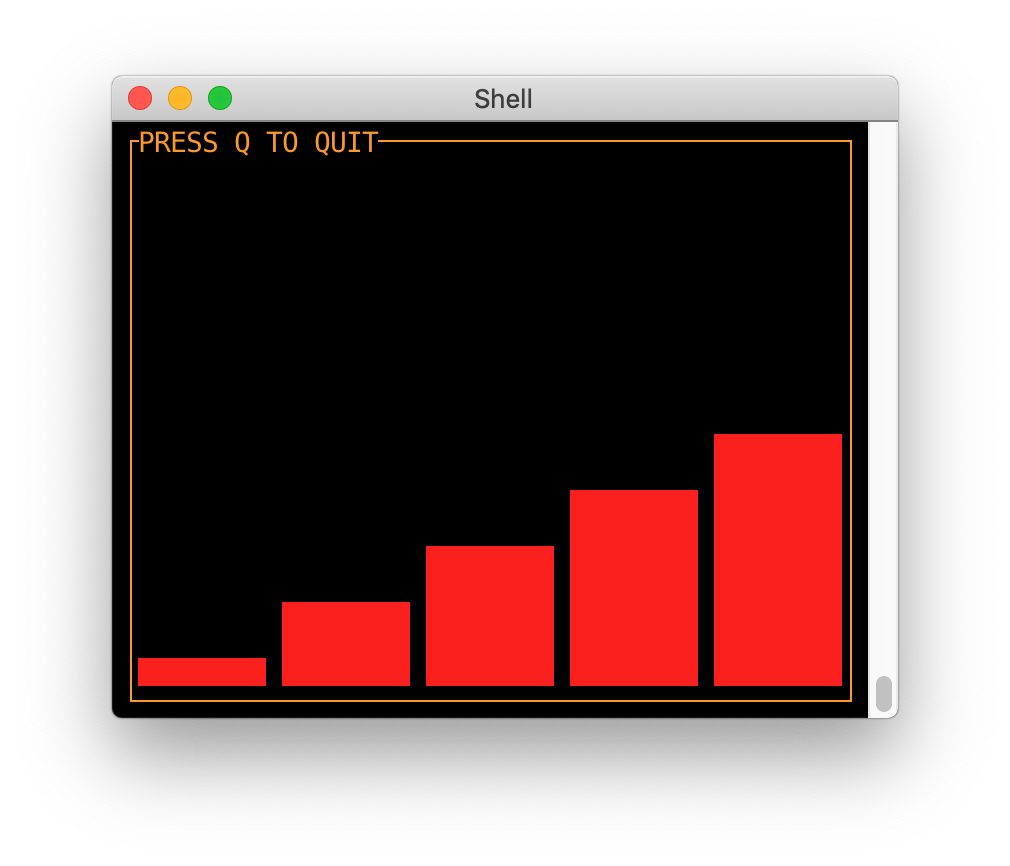
The following code displays five bars with values 1 through 5 and the relative maximum of 10:
func main() {
    t, err := tcell.New()
    if err != nil {
        panic(err)
    }
    defer t.Close()

    ctx, cancel := context.WithCancel(context.Background())
    bc, err := barchart.New()
    if err != nil {
        panic(err)
    }

    c, err := container.New(
        t,
        container.Border(linestyle.Light),
        container.BorderTitle("PRESS Q TO QUIT"),
        container.PlaceWidget(bc),
    )
    if err != nil {
        panic(err)
    }

    values := []int{1, 2, 3, 4, 5}
    max := 10
    if err := bc.Values(values, max); err != nil {
        panic(err)
    }

    quitter := func(k *terminalapi.Keyboard) {
        if k.Key == 'q' || k.Key == 'Q' {
            cancel()
        }
    }

    if err := termdash.Run(ctx, t, c, termdash.KeyboardSubscriber(quitter)); err != nil {
        panic(err)
    }
}
Which results in the following barchart:

The BarChart.ValueCapacity method returns the number of values that can fit the canvas currently available to the widget. This can be useful when the developer desires to completely fill the barchart with values.
Refer to the the barchartdemo which demonstrates the usage of this method. Observe how new bars appear or disappear as you resize the terminal window that contains the barchart.
Both the barchart.New function and the BarChart.Values method accept options that change how the barchart behaves and looks. This section documents the individual options and their behavior.
The barchart.BarColors option is used to set colors of the individual bars.
The following option would configure the first bar to be green and the second to be yellow. This is a partial code snippet, refer to the barchart.New section above for the complete code.
    // snip.
    bc.Values(values, max,
      barchart.BarColors([]cell.Color{
          cell.ColorGreen,
	  cell.ColorYellow,
      }),
    )
    // snip.
Refer to the the barchartdemo which demonstrates the usage of this option.
The barchart.BarGap option sets the widths of spacing between the bars to the provided number of terminal cells.
The following option would configure the bar gap to two cells. This is a partial code snippet, refer to the barchart.New section above for the complete code.
    // snip.
    bc.Values(values, max, barchart.BarGap(2))
    // snip.
Which results in the following barchart:

The barchart widget doesn't support keyboard input.
The barchart widget doesn't support mouse input.
See a typo, something missing or outright wrong? Feel free to edit the Wiki pages directly, alternatively talk to us.


