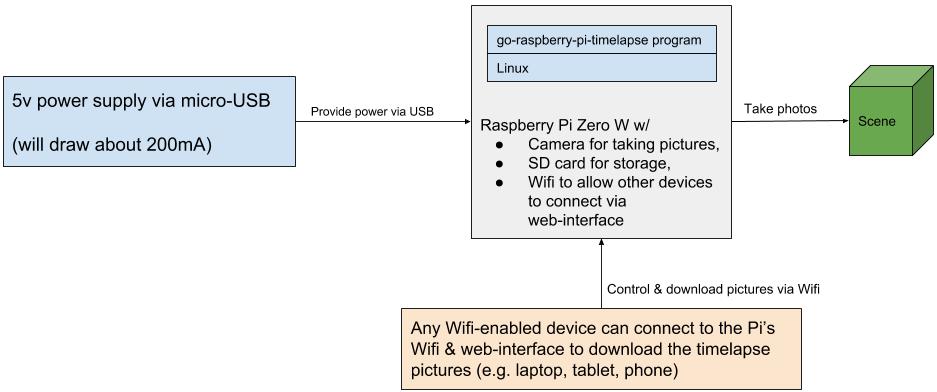
This repository contains documentation and source code to help running a Raspberry Pi Zero based timelapse camera.
This project was created for a timelapse system consisting of the following core components: a Pi Zero W with a camera board, a case, and an SD card. The following sections describe the components in more detail.
- Raspberry Pi Zero W ($10)
- Raspberry Pi Camera Board v2 ($30)
- Raspberry Pi Zero Camera Cable ($6)
- C4Labs Zebra Zero Case ($7)
- microSDHC Card ($12)
- Break-away 0.1" 2x20-pin Strip Dual Male Header ($1)
- CR1220 12mm Diameter - 3V Lithium Coin Cell Battery ($1)
- Adafruit PiRTC - PCF8523 Real Time Clock for Raspberry Pi ($6)
- USB OTG Host Cable - MicroB OTG male to A female ($3)
- Mini HDMI Plug to Standard HDMI Jack Adapter ($3)
- Optional: If you want to use the battery backed clocked start by soldering the 2x20-pin strip on Pi Zero W board (instructions). After the soldering, attach the RTC to the 2x20-pin strip. Don't forget to insert the CR1220 battery into the RTC.
- Connect the Pi Zero W and the Pi Camera Board v2 via the Pi Zero Camera cable.
- Insert the Pi Zero W into the C4Labs Zerbra Zero Case.
- From another computer, download, and decompress the
.imgfile of the most recent go-raspberry-pi-timelapse release. - Install the
.imgfile to an empty SD card using the Raspberry Pi Imager. - Insert the SD card card into the Pi Zero W.
- Turn on the Pi Zero W plugging in a micro USB cable into the PWR IN connector (bottom right corner).
- The Pi Zero W will act as a Wifi access point. Connect to the Pi's Wifi named
timelapse-raspberry-pi, passphrase:InsertTheRealPassword. - Open the Pi's web interface in a browser:
http://192.168.50.1:8080/. This interface will allow you to align the camera, download photos, shutdown the Pi, etc.
- https://learn.adafruit.com/adafruit-pitft-28-inch-resistive-touchscreen-display-raspberry-pi/easy-install-2 - Follow steps and
PiTFT as HDMI Mirror (Best for Raspberry Pi OS with Desktop) - https://learn.adafruit.com/running-opengl-based-games-and-emulators-on-adafruit-pitft-displays/tuning-performance
- https://willhaley.com/blog/power-off-raspberry-pi-adafruit-tft-screen-shutdown/
- Streaming raspivid output via network. (1) on the receiving device:
vlc -vvv udp://@:1234 :demux=h264. (2) on the Pi:raspivid -t 60000 -o udp://192.168.0.123:1234.
