-
Notifications
You must be signed in to change notification settings - Fork 9
Basics
Let's assume you've already built an application in Go that you want to add RESTCONF support to. FreeCONF should not impose any rules on how you design your application.
Your first step is to describe the management functionality in a YANG file. YANG is an interface definition language much like gRPC, Swagger, CORBA or MIBs. You simply describe the object tree, functions and events of your system in YANG notation. See YANG section.
Once you've described you manangement API, you start to build the logic to bridge the YANG file to your application. You write Go code that returns data structures that implement the node.Node interface and provide a way to "browse" your application.
You will be able to write unit test for all your code without starting a web server or any strange mocking libraries.
Lastly, you initialize your new api bridge code along with a RESTCONF protocol server somewhere in your application startup logic and you're done.
As your application and management API grow, you may want to consider code generation for some of the code that starts to be repetative. When that happens, you'll replace your code with Go templates and be in full control of what code you are responsible for.
With YANG you can describe APIs that have:
- Editable objects with
container - Editable list of objects with
list - Objects fields with
leaf - Read-only objects, lists and fields with
config: false - RPCs with input and output parameters with
actionandrpc - Notification with
notificationfor publish and subscribe eventing - Organize everything into a heirarchy and for implementing intuative RESTful APIs
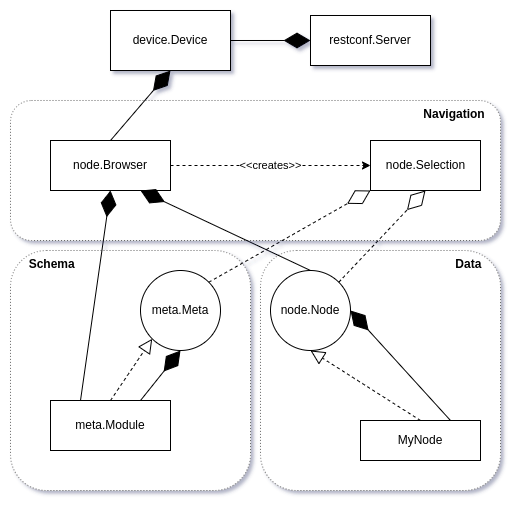
Before we get into how to build the bridge, here are some of the data structuresone might use for using a bridge. This should give you a better picture about how the bridge will be used.
node.Node - a Golang interface that provides access to all operations of your application. If you are familiar with web programing, this is like Element object in the DOM.Nodes are created and returned when navigating the heirarchy and therefore do not exist until requested (unlike web programming).
node.Browser - Root entry point into the hierarchy of nodes. Browser has a reference to root Node and uses the information the YANG file as a map to browse your application upon request.
node.Selection - By passing a data path much like a URL to the browser, you are returned a Selection if data path is valid. Selections are meant to be discarded after their use as underlying data could change.
meta.Meta - Meta is information from the YANG file made available to you as navigate the heirarchy. Very much the informational data about your application data.
device.Device - A collection of one or more browsers. This enables you to host multiple, independent APIs from a single RESTCONF server. For example you could host mongo-app and user-manager in the same application and reuse mongo-app for all applications that use Mongo to configure all mongo based application the same way.

As an application developer impementing an API, you are going to be building a network of data structures that implement node.Node interface as the bridge between your application to the protocols like RESTCONF.
nodeutil.Basic - bare bones implementation of node.Node. Can be thought of as an abstract class so you need to provide all your own implementation.
nodeutil.Reflect - Uses Go's reflect API to align fields and objects with by name. Also handles Go's map data structures using map keys to find data. This is useful when your data structure names generally align with your YANG identity names.
nodeutil.Extend - Allows you to wrap any other node implementation (e.g. Reflect and Basic) and implement just custom operations where maybe identity names differ or custom handling is required.
You are not limited to these implementations, but anything can captured using these three implementations. There are lots of example for using these data structures to build your bridge.
nodeutil.ReadJSON - turn any JSON into a read-only node.Node for passing into API
nodeutil.WriteJSON - export any node directly into JSON
nodeutil.Dump - Wrap any node and see a trace of all interactions with node
Be sure to read code docs for node.Node that goes through all many the roles Node plays.
It would be a good idea to review the Getting Started you see all the pieces to assemble basic API support into your application.