-
Notifications
You must be signed in to change notification settings - Fork 38
6.2 Build and Flash U Boot outside of Yocto
The following instructions are being updated by Andy Shevshenko (0andriy) on the Edison community page https://communities.intel.com/message/432172#432172
The goal is to get Intel Edison supported by U-Boot out-of-the-box.
This work is not yet complete. However Andy is able to build a special version of u-boot with minimal amount of patches (already applied) that is able (and needed) to boot a vanilla Linux kernel (x86 and amd64) from v4.7 and higher. He also provides a kernel with patches applied to run on Edison out of the box.
See:
- https://communities.intel.com/thread/75472 (Intel forum on getting vanilla linux to work on Edison).
- https://communities.intel.com/thread/107935 (Intel forum on updating u-boot)
The status is being tracked here:
- https://edison.internet-share.com/w/index.php?title=Using_a_vanilla_Linux_kernel_with_Intel_Edison&redirect=no. Intructions
-
Clone u-boot from https://github.com/andy-shev/u-boot/tree/edison
-
The current version is edison-v2017.05
git clone [email protected]:andy-shev/u-boot.git cd u-boot git checkout edison-v2017.05 -
To build:
make clean make edison_defconfig make -j8 -
If you never updated U-Boot you are still on v2014.04. In this case, or if you have edison-v2016.11, or edison-v2017.01 you need to do:
truncate -s %4096 u-boot.binotherwise skip this step.
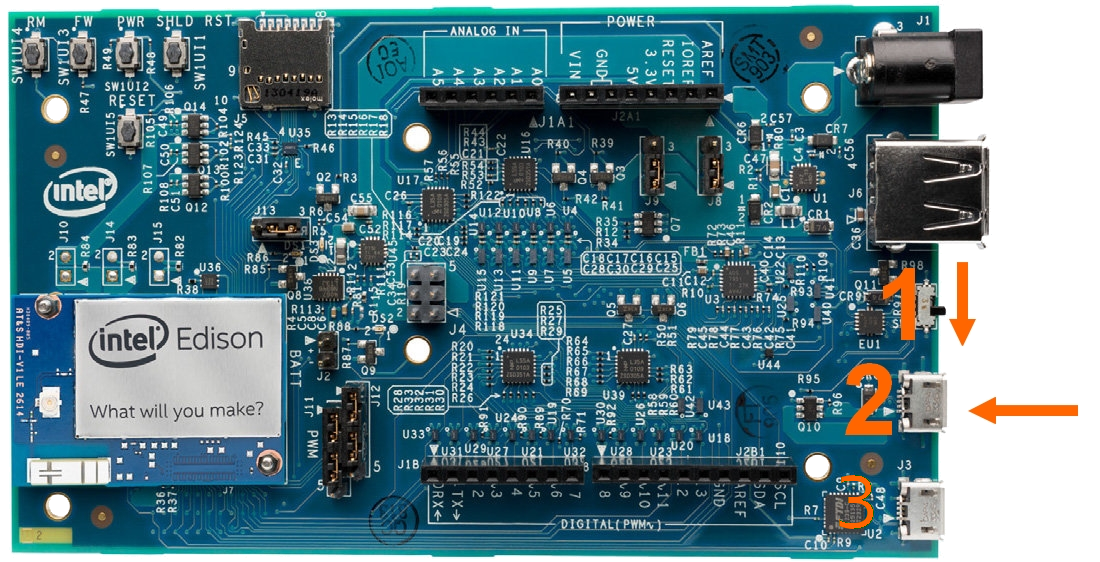
To flash the Edison Arduino board you need 2 USB connections.
- Connect the first USB cable to the USB port marked as 3 in the photograph below.
This cable will be your serial connection to the Edison. To connect to the edison you might use a terminal emulator like gtkterm. The serial port is probably /dev/ttyUSB0 and the baud rate is 115200 with parity none. If you prefer the command line you can use `screen /dev/ttyUSB0 115200`.
-
The second cable to attach goes to the USB port marked as 2 in the photograph below.
This port is a special port that can act as USB host or USB slave of which only one is active at a time. As you will be connecting to a host port of your PC, it needs to be configured as slave on the Edison. Push the switch down in the direction of the micro USB ports so that the port is enabled.

-
On Ubuntu you might need to install the package
dfu-util. -
Press the reset button (under the text RESET in the picture above).
-
In your terminal press the ESC key to interrupt the boot process.
-
You will probably see:
U-Boot 2014.04 (Jun 06 2016 - 14:40:07) Don't forget for 2014.04 you need to apply `truncate` as decribed above. -
In your terminal type at the
boot>prompt:run do_force_flash_os -
In a second terminal window:
sudo dfu-util -v -d 8087:0a99 --alt u-boot0 -D u-boot.binThis will flash u-boot to the u-boot0 partition. In the first terminal window you may watch the flashing to complete.
#
DFU complete CRC32: 0xf340088e
DOWNLOAD ... OK
Ctrl+C to exit ...
boot > reset
resetting ...