Following is the Write up on how to use the Raspbery Pi (Zero W, Zero 2 W, 4 B) to host a Web server, DNS Server and a USB emulator
Things required
- Raspbery Pi Zero W or Pi Zero 2 W or Pi 4 B
- Sd Card minimum of 400 MB
How to Setup
- Restore the image into a SD card (using software like balenaetcher)
- Place SD card into the slot of the Raspbery Pi
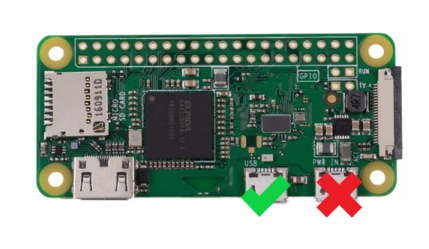
- For Pi Zero W and Pi Zero 2 W (connect from the USB marked Pi USB port to PS4, second cable not needed)

- For Pi 4 B (connect one USB C cable from pi to PS4)
- Power up the PS4
- One Time Setup
- PS4 Network Connection -> Wifi -> Manual setup
- In PS4 find the Wifi Network called PiZero and connect to it using password as password
- For DNS set the primary DNS as 7.7.7.1
- Rest all automatic values
- PS4 -> Browser -> visit http://7.7.7.1 or PS4 -> Settings -> Help
- Click on load jail break and wait
- It will notify WEBKit is sucessfull -> click on ok and wait
- A popup will thrown Say USB emulation staterted and wait for ps4 pop up
- Once the usb message dissaper then click ok
- Hen will load autmatically
How to make the Pi as client in local network
- Main page -> Rasbberry Pi (button)
- Select the desired Wifi Network ID and fill in the password for the network
- Click Connect to WiFi button , wait for 5 sec
- Click Reboot Pi button
- Find the Pi's IP address in your local network (by visisting Router Page , host name would be pizero, for ex 192.168.0.124) and make it static , so that same IP assign always
- PS4 Network Connection -> Wifi -> Manual setup
- Select you local network
- For DNS set the primary DNS as static IP which you used in Router
- Rest all automatic values
- PS4 -> Browser -> visit http://(static IP) or PS4 -> Settings -> Help
- Jailbreak
Gold Hen
- The Goldhen payload come from a file call payload.js, this payload JS file can be updated via
- Place a new GoldHen bin under “Sdcard:/usr/html/Bin/Goldhen/”
- PS4 -> Guide / Help Menu -> GoldHen Update (button)
- After thsi update the new gold hen will be used (even after restarting)
- Note: Once updated the bin file will be deleted and you only have to do this if a new bin come one
How does the bin loading work
- Jailbreak
- We are you the Gold Hen bin listner, first enable the option under , PS4 -> settings -> goldhen -> Binloader
- Then come to PS4 -> settings -> guide -> choose payload button
- Note: The raw bin file is being traansmitted using python code
Other Bin Files The website will form dynamicall based on the bin file placed on the “/usr/html/Bin/”. So if you want a new bin of your choice, Add it using sftp/sdcard update and then visit PS4 -> Guide Menu -> and looks for the new button
How Can i update the bin file With Ver 8 the html folder is opened for update, So we have below choice on updating
- sftp://7.7.7.1 (or static IP on ur local network). username: root and password: password
- If you run a a linux machine() - Using a SD card reader coennec the SD card to PC and chnage it
Pros:
- One Device for both web server, dns server and USB emulation
- you can switch between offline and online mode , without a PC
- One micro usb cable is enough to boot the device
- You can leave the device in the PS4 itself, need not to remove and plug in again
- Smallest size OS and booting before PS4
Changes on V8
- Dynamic web page based on the Bin folder
- Option to load bin via goldhen bin loader
- Option to update GoldHen
- Automatic node discovery added – useful when Pi is connected to local network, we can access the pi using hostname http://pizero.local instead of IP address
- Full support for ssh and sftp, which required to update the payloads
- From RaspberryPi page we can change the default root password
- The network page sorts the wifi list based on signal quality (the more nearer to will appear on top of the list)
- Fixed the issue which took longer load time on Pi4 B due to network discovery
- Fixed the issue which making to enter the password thrice (rng tool was missing in pizw)
- Boot up time of all device in various mode is less than PS4, so no delay at all
- Shutdown option in RaspberryPi page fixed
Discord Server https://discord.gg/58N4Y4KZbB
Video Link https://www.youtube.com/watch?v=2NCoceX7zKU
creedits to
- Sleirsgoevy
- Chendochap