This Microsoft Azure template creates an Apache Mesos cluster with Marathon, and Swarm on a configurable number of machines.

Once your cluster has been created you will have a resource group containing 3 parts:
-
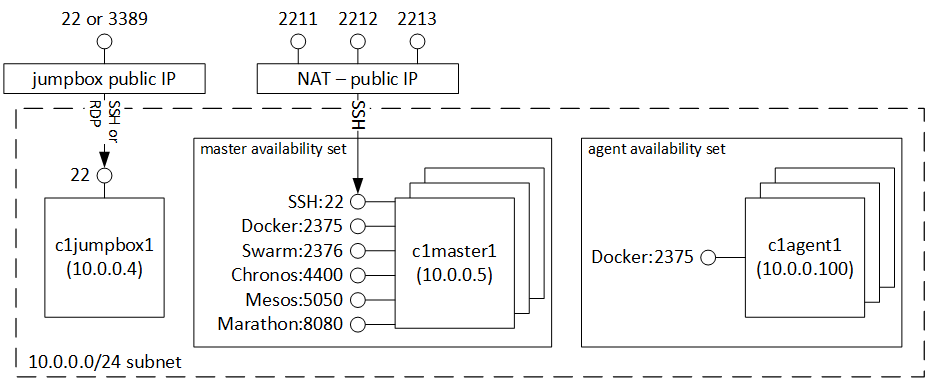
a set of 1,3,5 masters in a master specific availability set. Each master's SSH can be accessed via the public dns address at ports 2211..2215
-
a set of agents behind in an agent specific availability set. The agent VMs must be accessed through the master, or jumpbox
-
if chosen, a windows or linux jumpbox
The following image is an example of a cluster with 1 jumpbox, 3 masters, and 3 agents:
You can see the following parts:
- Mesos on port 5050 - Mesos is the distributed systems kernel that abstracts cpu, memory and other resources, and offers these to services named "frameworks" for scheduling of workloads.
- Marathon on port 8080 - Marathon is a scheduler for Mesos that is equivalent to init on a single linux machine: it schedules long running tasks for the whole cluster.
- Chronos on port 4400 - Chronos is a scheduler for Mesos that is equivalent to cron on a single linux machine: it schedules periodic tasks for the whole cluster.
- Docker on port 2375 - The Docker engine runs containerized workloads and each Master and Agent run the Docker engine. Mesos runs Docker workloads, and examples on how to do this are provided in the Marathon and Chronos walkthrough sections of this readme.
- Swarm on port 2376 - Swarm is an experimental framework from Docker used for scheduling docker style workloads. The Swarm framework is disabled by default because it has a showstopper bug where it grabs all the resources link to Swarm show stopper!. As a workaround, you will notice in the walkthrough below, you can run your Docker workloads in Marathon and Chronos.
All VMs are on the same private subnet, 10.0.0.0/18, and fully accessible to each other.
Here are notes for troubleshooting:
- the installation log for the linux jumpbox, masters, and agents are in /var/log/azure/cluster-bootstrap.log
- event though the VMs finish quickly Mesos can take 5-15 minutes to install, check /var/log/azure/cluster-bootstrap.log for the completion status.
- the linux jumpbox is based on https://github.com/anhowe/ubuntu-devbox and will take 1 hour to configure. Visit https://github.com/anhowe/ubuntu-devbox to learn how to know when setup is completed, and then how to access the desktop via VNC and an SSH tunnel.
When you launch the installation of the cluster, you need to specify the following parameters:
newStorageAccountNamePrefix: make sure this is a unique identifier. Azure Storage's accounts are global so make sure you use a prefix that is unique to your account otherwise there is a good change it will clash with names already in use.adminUsername: self-explanatory. This is the account used on all VMs in the cluster including the jumpboxadminPassword: self-explanatorydnsNameForContainerServicePublicIP: this is the public DNS name for the jumpbox that you will use to connect to the cluster. You just need to specify an unique name, the FQDN will be created by adding the necessary subdomains based on where the cluster is going to be created. Ex. MesosCluster, Azure will add westus.cloudapp.azure.com to create the FQDN for the jumpbox.dnsNameForJumpboxPublicIP: this is the public DNS name for the entrypoint that SWARM is going to use to deploy containers in the cluster.agentCount: the number of Mesos Agents that you want to create in the clustermasterCount: Number of Masters. Currently the template supports 3 configurations: 1, 3 and 5 Masters cluster configuration.jumpboxConfiguration: You can choose if you want the jumpbox to be Windows or Linux. It is recommended that you pick the Jumpbox OS to be the same of the OS that you are using in your dev machine.masterConfiguration: You can specify if you want Masters to be Agents as well. This is a Mesos supported configuration otherwise Masters will not be used to run workloads.agentVMSize: The type of VM that you want to use for each node in the cluster. The default size is D1 (1 core 3.5GB RAM) but you can change that if you expect to run workloads that require more RAM or CPU resources.jumpboxVMSize: size of the jumpbox machine, the default is D2 (2 cores, 7GB RAM)clusterPrefix: this is the prefix that will be used to create all VM names. You can use the prefix to easily identify the machines that belongs to a specific cluster. If, for instance, prefix is 'c1', machines will be created as c1master1, c1master2, ...c1agent1, c1agent5, ...swarmEnabled: you can enable Swarm as a framework in the clustermarathonEnabled: true if you want to enable the Marathon framework in the clusterchronosEnabled: true if you want to enable the Chronos framework in the clustersshRSAPublicKey: Configure all linux machines with the SSH rsa public key string. Use 'disabled' to not configure access with SSH rsa public key.
Before running the walkthrough ensure you have chosen "true" for "marathonEnabled" parameter. This walk through is based the wonderful digital ocean tutorial: https://www.digitalocean.com/community/tutorials/how-to-configure-a-production-ready-mesosphere-cluster-on-ubuntu-14-04
-
Get your endpoints to cluster
-
browse to https://portal.azure.com
-
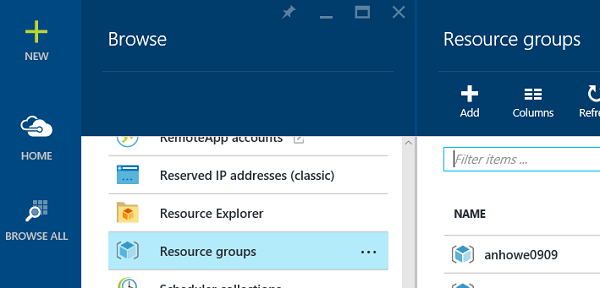
then click browse all, followed by "resource groups", and choose your resource group
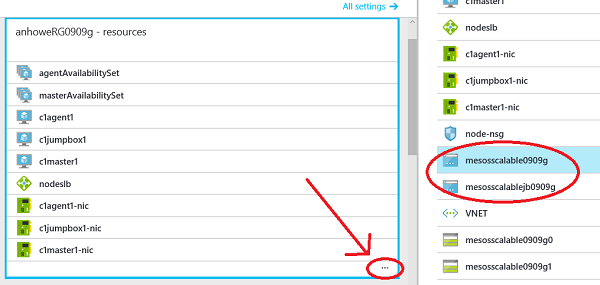
- then expand your resources, and copy the dns names of your jumpbox (if chosen), and your NAT public ip addresses.
-
Connect to your cluster
-
linux jumpbox - start a VNC to the jumpbox using instructions https://github.com/anhowe/ubuntu-devbox. The jumpbox takes an hour to configure. If the desktop is not ready, you can tail /var/log/azure/cluster-bootstrap.log to watach installation.
-
windows jumpbox - remote desktop to the windows jumpbox
-
no jumpbox - SSH to port 2211 on your NAT creating a tunnel to port 5050 and port 8080. Then use the browser of your desktop to browse these ports.
-
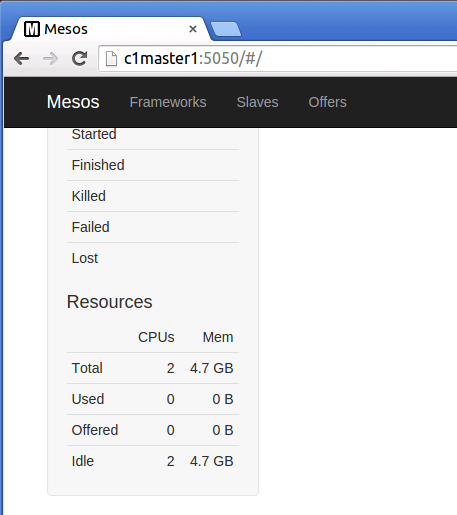
browse to the Mesos UI http://c1master1:5050
-
linux jumpbox - in top right corner choose Applications->Internet->Chrome and browse to http://c1master1:5050
-
windows jumpbox - open browser and browse to http://c1master1:5050
-
no jumpbox - browse to http://localhost:5050
NOTE: if you changed the default prefix while creating the cluster using the ARM template, the name of the cluster is going to be different. The url to use is http://"prefix you used"master1:5050
- Browse Mesos:
- scroll down the page and notice your resources of CPU and memory. These are your agents
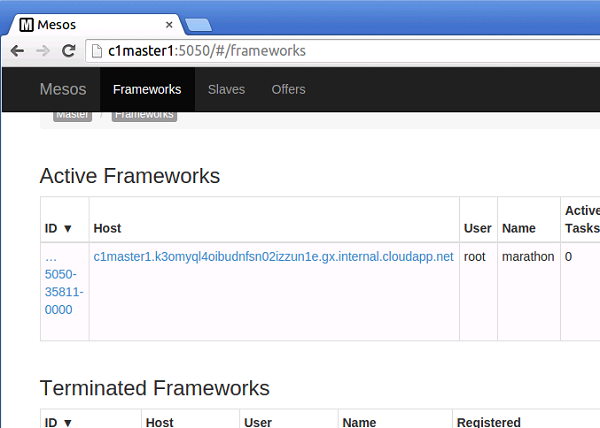
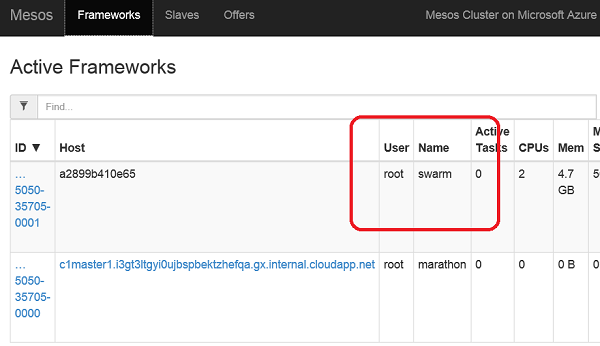
- On top of page, click frameworks and notice your Marathon and Swarm frameworks
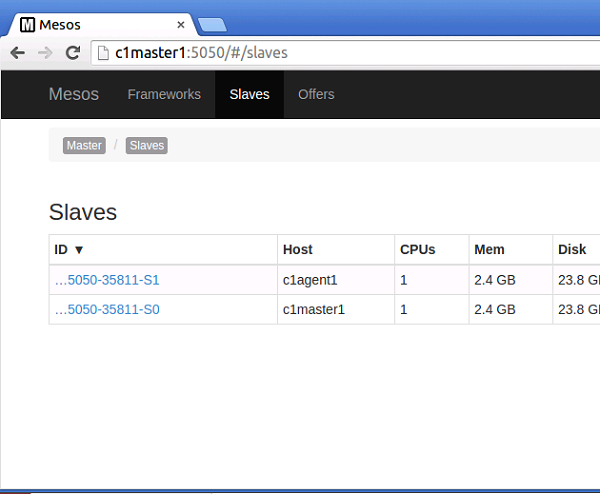
- On top of page, click agents and you can see your agents. On windows or linux jumpbox you can also drill down into the slave and see its logs.
-
browse and explore Marathon UI http://c1master1:8080 (or if using tunnel http://localhost:8080 )
-
start a long running job in Marathon
-
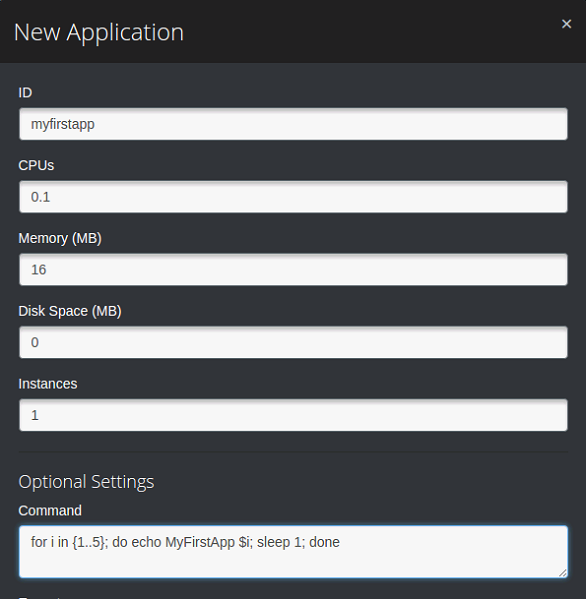
click "+New App"
-
type "myfirstapp" for the id
-
type "/bin/bash "for i in {1..5}; do echo MyFirstApp $i; sleep 1; done" for the command
-
scroll to bottom and click create
- you will notice the new app change state from not running to running
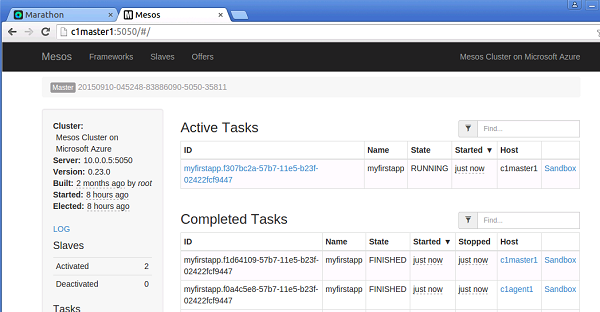
- browse back to Mesos http://c1master1:5050. You will notice the running tasks and the completed tasks. Click on the host of the completed tasks and also look at the sandbox.
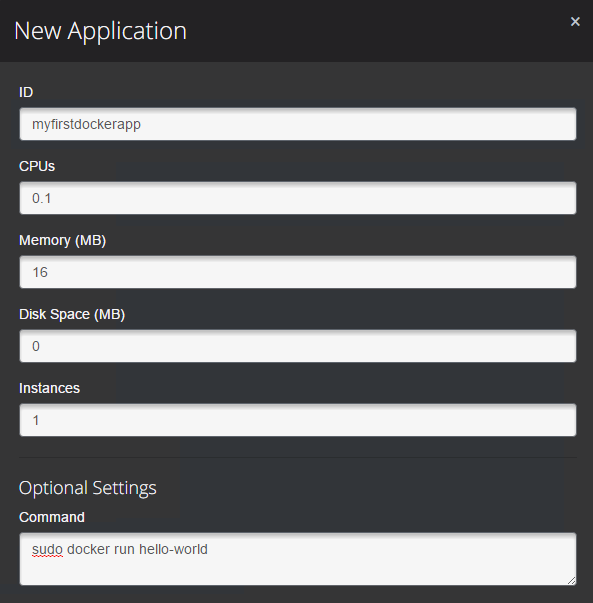
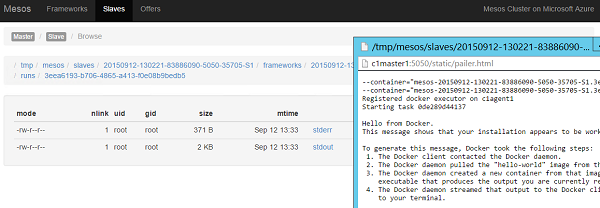
- All nodes are running docker, so to run a docker app browse back to Marathon http://c1master1:8080, and create an application to run "sudo docker run hello-world". Once running browse back to Mesos in a similar fashion to the above instructions to see that it has run:
Before running this walkthrough ensure you have created a cluster choosing "true" for the "marathonEnabled" parameter.
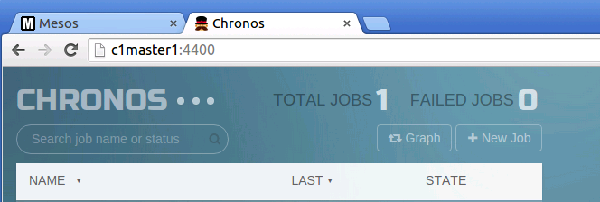
- from the jumpbox browse to http://c1master1:4400/, and verify you see the Marathon Web UI:
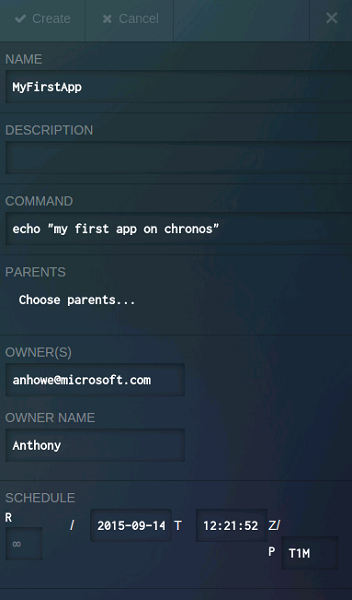
- Click Add and fill in the following details:
- Name - "MyFirstApp"
- Command - "echo "my first app on Chronos""
- Owner, and Owner Name - you can put random information Here
- Schedule - Set to P"T1M" in order to run this every minute
-
Click Create
-
Watch the task run, and then browse back to the Mesos UI http://c1master1:5050 and observe the output in the completed task.
-
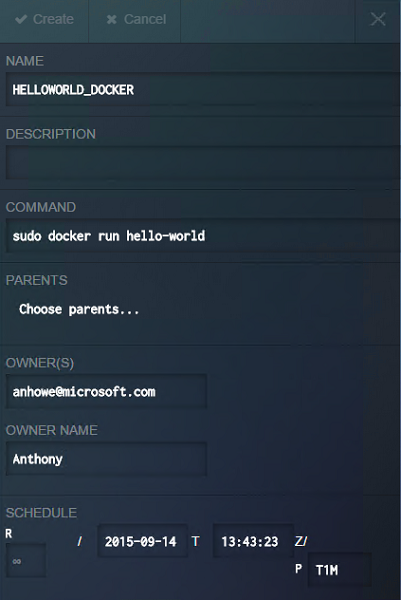
All nodes are running docker, so to run a docker app browse back to Chronos http://c1master1:4400, and create an application to run "sudo docker run hello-world". Once running browse back to Mesos in a similar fashion to the above instructions to verify that it has run:
Before running this walkthrough ensure you have created a cluster choosing "true" for the "swarmEnabled" parameter.
- from the jumpbox browse to http://c1master1:5050/#/frameworks, and verify Swarm is working:
-
SSH to the master from the jumpbox or hitting port 2211 on the public IP
-
Run "sudo docker ps" and observe that Swarm is working
-
Run "sudo docker -H tcp://0.0.0.0:2376 ps" and see there are no jobs
-
Run "sudo docker -H tcp://0.0.0.0:2376 run hello-world" and notice the error about resource contraints. Now add the constraints by running "sudo docker -H tcp://0.0.0.0:2376 run -m 256m hello-world" and watch it run.
-
Run "sudo docker -H tcp://0.0.0.0:2376 ps -a" and see the hello-world that has just run
-
Browse to http://c1master1:5050/, and see the "hello-world" process that has just completed. Browse to Log:
Try the following workloads to test your new mesos cluster. Run these on Marathon using the examples above
-
Folding@Home - docker run rgardler/fah - Folding@Home is searching for a cure for Cancer, Alzheimers, Parkinsons and other such diseases. Donate some compute time to this fantastic effort.
-
Mount Azure Files volume within Docker Container - docker run --privileged anhowe/azure-file-workload STORAGEACCOUNTNAME STORAGEACCOUNTKEY SHARENAME - From each container mount your Azure storage by using Azure files
Q. Why is there a jumpbox?
A. The jumpbox is used for easy troubleshooting on the private subnet. The Mesos Web UI requires access to all machines. Also the web UI. You could also consider using OpenVPN to access the private subnet.
Q. My cluster just completed but Mesos is not up.
A. After your template finishes, your cluster is still running installation. You can run "tail -f /var/log/azure/cluster-bootstrap.log" to verify the status has completed.
