-
-
Notifications
You must be signed in to change notification settings - Fork 25
Dev: Setup on Windows
The best approach to development on Windows is either to use Docker, or a virtualized Linux environment with Docker installed.
If your CPU supports the VT-x extensions (most CPUs since 2010 do), then you can create a virtual Linux environment using, for instance, VirtualBox.
Once you have Docker and/or Linux working you can follow the instructions in Dev: Setup on Linux and OS X using Docker.
The following goes over how to set up the app on native Windows environments.
This is possible, but contributors don't usually work this way, so be ready for unexpected bugs or caveats.
This is a basic github requirement, but maybe worth mentioning. Check out the docs at https://help.github.com/articles/set-up-git/ to walk through it.
We request everyone (even direct contributors) fork the main repo and submit work via pull requests. See https://help.github.com/articles/about-pull-requests/ for more info on pull requests if you're not already familiar.
Install Postgres from https://www.enterprisedb.com/downloads/postgres-postgresql-downloads, download the version listed in Dockerfile.postgres.
Install all components of the main installer and set the superuser password to postgres or something you're sure you'll remember.
Once the main installation finishes, open the "Stack Builder" tool to install the PostGIS 2.5 (under "Spatial Extensions") extension.
Download Elasticsearch from https://www.elastic.co/downloads/elasticsearch, then start the service. This is not required, but some tests will fail without it. More in depth instructions can be found at https://www.elastic.co/guide/en/elasticsearch/reference/current/install-elasticsearch.html
Download the version of Ruby listed in the Gemfile from https://rubyinstaller.org/downloads/.
Install the latest version of NodeJS from https://nodejs.org/en/download/ - rails needs this to compile some javascript code
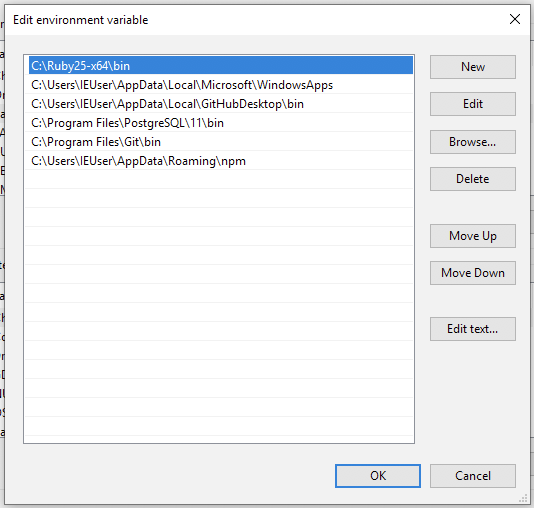
First you'll want to make sure you have all the new tools available in your path. See https://www.howtogeek.com/118594/how-to-edit-your-system-path-for-easy-command-line-access/ for some info on how to edit it.
Ruby and Node should already be added, but you may need to add PostgreSQL and Git. The specific paths will vary a bit depending on what version you installed. When in doubt, try to tab-complete the path in a terminal to verify.

Finally open a new terminal and check that you can run all the tools.
git --version
psql --version
ruby --version
node --version
Check that Elasticsearch is running with the following command in Powershell
Invoke-RestMethod http://localhost:9200
First cd into where you cloned the safecastpi repository.
Then run type Gemfile.lock and note the version under "BUNDLED WITH"
gem install bundler --version (VERSION FROM Gemfile.lock)
bundle install
This will take some time as it downloads and installs all the libraries used in the application.
You'll need to create a database login for the app. You should have a tool called pgAdmin available in your start menu. Use that to add a safecast login, set the password to safecast and enable the Login and Superuser privileges.
Then copy the windows config over to the main location. Note, please don't check this in. At some point database.yml may be ignored but for now we just have to live with the outstanding changes.
copy config\database.yml.windows config\database.yml
Next create the databases and load the schema. If you see errors here, check that PostgreSQL and PostGIS are correctly installed and configured as above.
bundle exec rake db:create
bundle exec rake db:structure:load
bundle exec rake db:structure:load RAILS_ENV=test
bundle exec rake db:bootstrap
# note: skipping rubocop due to some line ending issues
bundle exec rspec
Expect to see one failure involving a /tmp path. We'll fix this eventually but unfortunately the test isn't windows-compatible.
bundle exec rails server
Then open a browser to http://localhost:3000 You can then log in with username [email protected] and password 111111.
There are also 2 non-moderator accounts with username [email protected] and [email protected] both with password 111111
You will probably want some kind of an IDE to work in, for example https://vscodium.com/ (OSS build of https://code.visualstudio.com/).
We won't cover the details in this document, but once you have some IDE set up you should be able to run things like specs and the webserver from the IDE rather than typing the commands.