-
Notifications
You must be signed in to change notification settings - Fork 3
CGUI Getting Started
Welcome to the CGUI 101! This tutorial will walk you through the basic usage of CGUI. After reading this you should be able to start creating cool GUIs in any area including block GUI, HUD display and everything else.
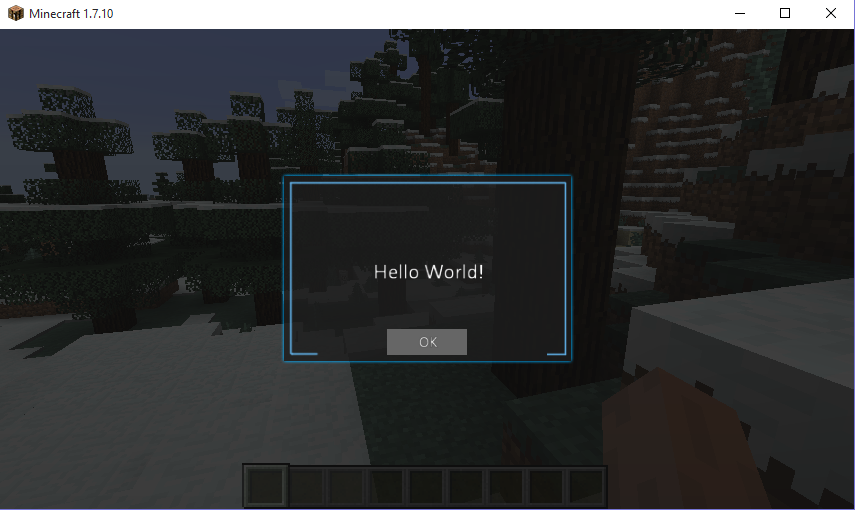
A hello world example for CGUI would be:
public class MyGuiScreen extends CGuiScreen {

    {
            // Setup the window at center of screen and the background texture
            Widget window = new Widget()
                    .size(300, 200)
                    .scale(0.5)
                    .walign(WidthAlign.CENTER)
                    .halign(HeightAlign.CENTER)
                    .addComponent(new DrawTexture().setTex(new ResourceLocation("mymod:textures/window.png")));

            // Setup a button and add it to the window
            Widget button = new Widget()
                    .walign(WidthAlign.CENTER)
                    .pos(0, 160)
                    .size(80, 26)
                    .addComponent(new Tint(Color.mono(0.4), Color.mono(0.6)))
                    .addComponent(new TextBox(new FontOption(18, FontAlign.CENTER)).setContent("OK"));

            // Add Hello World text
            window.addWidget(new Widget()
                    .centered()
                    .size(200, 20)
                    .addComponent(new TextBox(new FontOption(25, FontAlign.CENTER)).setContent("Hello World!")));

            // Add as sub widget
            window.addWidget(button);

            // Add to the GUI and make things alive
            gui.addWidget(window);
    }

}
Note that CGuiScreen extends GuiScreen, so that you can display the gui simply using:
Minecraft.getMinecraft().displayGuiScreen(new MyGui());.
The result would be:

Let's now examine this code bits by bits.
Look at the code of the main window's creation:
Widget window = new Widget()
            .size(300, 200) // 1
            .walign(WidthAlign.CENTER) // 2
            .halign(HeightAlign.CENTER) // 3
            .addComponent(new DrawTexture().setTex("mymod:textures/window.png")); // 4
This is a creation using chain construction. Each property setter does the job and returns the widget itself.
Action 1, 2 and 3 are very intuitive. They set the widget's size to (300, 200), and place it at center of the screen.
Action 4 actually attaches the texture onto it, and make it displayable. In CGUI, such functionality
is achieved by attaching a Component with type DrawTexture onto the widget. In fact, any
functionality that is reusable are almost all implemented as Components. You can think this
relationship as Component is to UnityEngine's GameObject.
In fact, what size, walign and halign do is, under the hood, manipulating the Transform
component. Transform component is automatically created when any Widget is constructed, and it
contains meta information for the Widget such as position, size, scale and many else.
It's so commonly manipulated that quick setters are created in Widget class.
Now onto the button creation code:
    Widget button = new Widget()
        .walign(WidthAlign.CENTER)
        .pos(0, 170)
        .size(40, 20)
        .addComponent(new Tint(Color.mono(0.4), Color.mono(0.6))) // 1
        .addComponent(new TextBox().setContent("OK")) // 2
        .listen(LeftClickEvent.class, (wid, evt) -> { // 3
            player.sendChat("Niconiconi!");
        });
The position part looks identical to window creation, so no more explaination. This widget introduced
two new components: Tint that draws a solid color and changes color when mouse is hovering on it,
and TextBox which draws text(actually also can make then editable).
What's new is that we created an event listener for the button, using the button.listen method.
All it is saying is: When user left-clicks this widget, send a chat message to player.
the listen method's signature as follows:
public <T extends GuiEvent> Widget listen(Class<? extends T> clazz, IGuiEventHandler<T> handler);where IGuiEventHandler is an functional interface:
public interface IGuiEventHandler<T extends GuiEvent> {
    void handleEvent(Widget w, T event);
}
the listen method makes the given event handler be called when a event of given type is triggered,
using Widget#post(event). Most common events, such as mouse clicking, drawing, key-typing are all
handled by CGUI, so you usually don't worry about them. But you can also create your own events and
pass them around Widgets.
And what might be worth stressing is, EVERY action in CGUI is treated as events across Widgets, so event handling is the uniform and the only way to handle things.
If you don't know about lambda expressions in java 8, you should. Quick Link
We now add the button inside the window using:
window.addWidget(button);and add the window to the GUI using the same addWidget method, which finishes the loading progress.
gui.addWidget(window);Widget can live inside a gui screen (strictly speaking, a CGui instance, will explain later),
or another Widget. When it lives in CGui, the widget coordinates are calculated in screen space,
but sub widgets' positions and scales are calculated in local space of the parent widget. This makes
the sub widget share the parent widget's transform, making it able to fast adjusting looks of
the widget and drag things around......
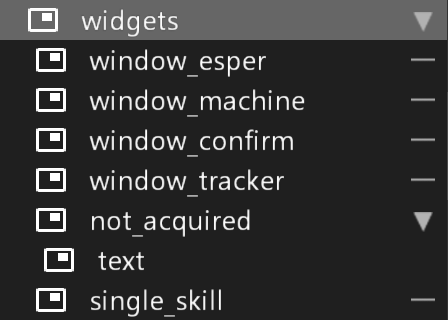
Complex GUIs can be easily represented using this tree approach, here's an example:

Since widgets form a tree, it's very common to query the tree's structure. To make it easy, we force every widget to be named. If you don't provide the name (like the button), a dummy name is generated.
You can use the following to get childs or the parent of a widget:
- getParent
- getWidget(name)
When you create static GUIs, widget's position is calculated only once. But sometimes you want to move
widgets around each frame. Recalculating all widgets' positions is very inefficient, thus it is required
to set widget.dirty to true when you have updated a widget's position. The widget, with all its
childs, will get their positions recalculated next frame.
With above knowledge, you can already start creating GUI whenever you needed a normal UI (a.k.a.
GuiScreen). But you should know that CGUI is designed to handle ANY situation where an GUI-like
logic is required, even under 3d projection and other complex requirements.
To achive the flexibility as claimed, we delegate gui calls to a CGui object, not building everything
under a subclass of GuiScreen or whatever thing it is. To make a CGui work properly, all you need to do is:
- Create a
CGuiinstance - Call
CGui#drawin a draw frame - If you want controls, call
CGui#mouseClicked,CGui#mouseClickedMoveand other appropriate delegates
In a nutshell, CGui provides an intermediate layer for widgets and handles them inside it.
For common usages, call delegations are already wrapped up for you, see:
cn.lambdalib.cgui.CGuiScreencn.lambdalib.cgui.CGuiScreenContainer
Just remember that nothing limits you. Want a cool HUD display effect? Delegate it in your event listener. Want a 3D GUI that floats around an entity? delegate in your entity renderer......
At the beginning, we have mentioned that Components are used for reusing functionalities between widgets. Let's explain this a bit more in depth.
Now, suggest we suddenly forgot everything about Component. All we have in hand is event listeners. What should we do to draw a texture?
Widget widget = ...;
ResourceLocation texture = ...;
widget.listen(FrameEvent.class, (wid, evt) -> {
    Tessellator t = ...;
    Minecraft.getMinecraft().textureManager.bindTexture(texture);
    t.startDrawingQuads();
    ......
    t.draw();
});
So much noise. As a programmer what we should always come in mind is to wrap and reuse code, which is what Component is exactly designed for.
A Component usually contains a series of states and a series of event listeneres. For example, an over simplified version of DrawTexture:
public class DrawTexture extends Component {

    public ResourceLocation texture = ...;
    public Color color = Color.white();

    {
        this.listen(FrameEvent.class, (wid, evt) -> {
            .... // Draw the texture
        });
    }

}
The listeners here are brought into life when the component is attached to any widget, and removed when component is detached. You should notice that each Component instance can only attach to one widget.
The component itself is simple but makes a lot of sense. For example, combine a Tint, a TextBox and a Glow, you get a cool-looking glowing button. Componentizing also makes the functionality available in the editor, so you can visualize it!
Suppose you have a widget, which works as a 'template', like a generic button with name to be assigned. You might want to make lots of duplications of the widget, and forge them into different shapes. In CGUI, this is as simple as:
Widget template = ...;
Widget instance = template.copy(); // Magic!
Yes, as simple as that! Here's what happened under the hood:
- All event handlers are instance-copied.
- All components are value-copied (Using
Component#copy). - All sub widgets are copied recursively.
That saying, the widget hierarchy, components and event handlers are all retained.
This method is really powerful and is used so frequently, but beware that potential danger can come with it. For example when you attached a mouse handler using lambda, and then copied the widget - The new widget contains the mouse handler, though that handler works on the original widget, not the new widget. Also, when the hierarchy tree is deep, it might be costy to copy everything, so judge and plan well.
Note: By means of 'value copying' the component, a new instance of the component is
created (using reflection), and all fields that is serializable are copied
(According the rules of LambdaLib s11n API, but in brief, most public fields
will be copied, plus those fields marked with @SerializeIncluded, minus those
marked with @SerializeExcluded). So just create public states in your Component
and they should copy normally.
We provided utils to serialize and deserialize CGui and Widget. You can check out
the CGUIDocument class to see how it works. Generally, you will be editing GUI
using in-game editor, and read them back at runtime.
Editors are explained in further chapters.
Congratulations! You have walked through the beginner's guide of CGUI and gain adequate knowledge to use CGUI productively and efficiently. Here's some point that help you revise:
- Everything is Widget
- Widget form tree hierarchies
- Every action is represented as events and event handlers across widgets
- Widget lives inside CGui
- CGui is an intermediate layer where you should delegate control and draw calls to
- Component=Event Listeners+States, can be reused and composed creatively
- Widget and Components can be value-copied with a simple
copy()method - Use CGuiDocument to read and write CGui from XML
All in all, CGui is a modular, extensible GUI library with rich in-game editor support. It tries its best not to limit programmer, so you can build complex and (probably) amazing effects out of it.
There are still some topics to be mentioned, including draw ordering and z-level. But since you are at the end this documentation, I believe you are good enough to find that out by yourself! :D
Some directions:
- Get familiar with built-in components (
cn.lambdalib.cgui.gui.component) - Get familiar with default events (
cn.lambdalib.cgui.gui.event) - Know how to use the CGui font API
- Try to use the editor with code combined creatively
Happy hacking!