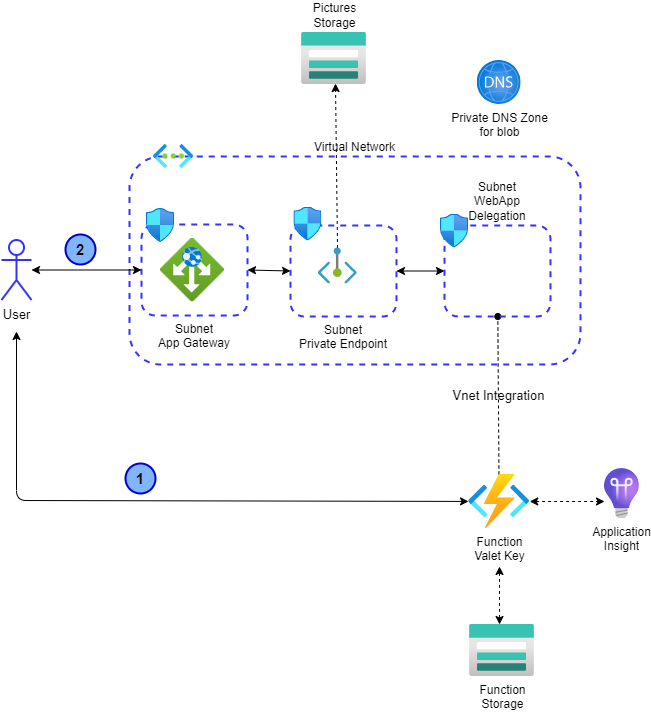
This GitHub repository implement the Valet Key Pattern to retrieve picture from the Azure Storage.
The SAS Token is returned using an Azure Function.
In this example the Azure Function doesn't use a private endpoint and this is for simplicity purpose. In production all traffic should pass in the Application Gateway with a WAF. Using a private endpoint for the Azure Function will mean you will need to have a self hosted runner to deploy the code. This is oen reason why we kept the function public here.
The function will return you a SAS token, you will need to construct the URL to retrieve the picture.
The URL will have this format.
https://<FQDN>/pictures/<imagename>?<sas token>
- The user requests a SAS token for a specific picture
- One the user retrieve the SAS token it can get the picture
First step is to Fork this repository.
Next, you will need to have a public domain name and a wildcard certificate.
If you already own a public domain but you don't have a wild certificate here some step to create one using Azure DNS Public Zone.
Here the tool you need to install on your machine.
-
Install the official Powershell Let's Encrypt client
Here the list of all supported clients if you want to implement your own logic for the Let's Encrypt Certificate.
This demo is using Azure Public DNS Zone, you will need to have a domain that you own from any register. Once it is done, you need to configure your DNS in your domain register with Azure DNS Public Zone entry.
It all explain here.
Be sure you already configured your Azure Public DNS Zone.
First create a service principal running the following command.
$ az ad sp create-for-rbac --name <ServicePrincipalName> --sdk-auth --role contributor --scope '/subscriptions/{subscriptionId}'Take note of the output you will need it to create Github Secrets.
Now go to the folder scripts, there you have a powershell called letsEncrypt.ps1.
This script will connect to your Azure Subscription passed in parameters and create a TXT challenge in your Azure DNS Public Zone.
First run this command in a PowerShell terminal
$ Set-PAServer LE_PRODNow with the information retrieved when you created the service principal you can create your certificate.
Be sure your Service Principal have access to modify your Azure Public DNS Zone. If you want to use least privilege refers to this doc.
Be sure the username, password and certificate password are in double quotes*
$ .\letsEncrypt.ps1 -certNames *.contoso.com -acmeContact [email protected] -aZSubscriptionId <subId> -aZTenantId <tenantId> -aZAppUsername "<sp_clientId>" -aZAppPassword "<sp_password>" -pfxPassword "<pfxPassword>"When the command is finished (it will take a few minutes), a new folder called pa will be created inside the scripts folder.
If you browse in it inside the last child folder of acme-v02.api.letsencrypt.org you will see those files. The important file is called cert.pfx.
You will need to create GitHub secrets to configure this repository. Two of them are related to your certificate and needed when communicating with the Application Gateway.
You will need to find the base64 value of your certificate and save it in a GitHub Secret. To do so run the following command and get the value from the text file generated.
$fileContentBytes = get-content 'cert.pfx' -Encoding Byte
[System.Convert]::ToBase64String($fileContentBytes) | Out-File 'pfx-bytes.txt'
You will need to create some GitHub repository secrets first. Here the list of secrets you will need to create.
| Secret Name | Value | Link |
|---|---|---|
| AZURE_CREDENTIALS | The service principal credentials needed in the Github Action | GitHub Action |
| AZURE_SUBSCRIPTION | The subscription ID where the resources will be created | |
| CERTIFICATE_DATA | The base64 value of your pfx certificate file | |
| CERTIFICATE_PASSWORD | The password of your pfx file | |
| PA_TOKEN | Needed to create GitHub repository secret within the GitHub action | Github Action |
| STORAGE_CUSTOM_DOMAIN | The custom domain associated to the Public IP of the Application Gateway to retrieve the storage blob. | |
| RESOURCE_GROUP_NAME | The name of the resource group where all resources will be created | |
| LOCATION | The location where all the resources will be created |
Now you can go to the Actions tab and Run the Create Azure Resources GitHub Actions.
Now, you need to upload the image in the storage, you will have one that contains a container called pictures
Go to this container and upload the 3 pictures you will find in the GitHub repository under the pictures folder.
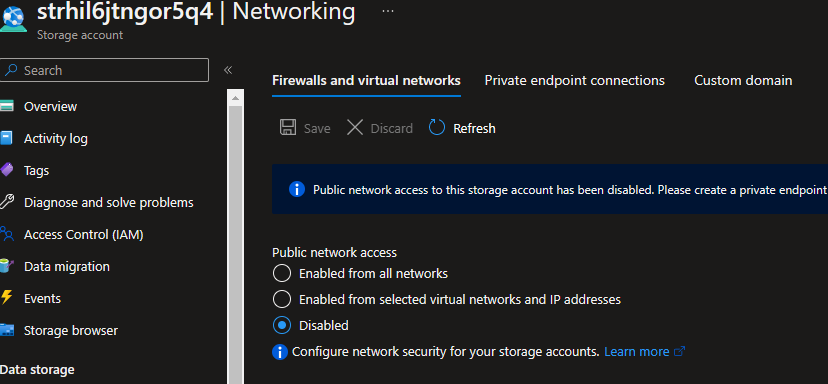
Next, go to the same Azure Storage in the networking tab and disable public network access. You want to communicate with the storage only thru private endpoint.
Once this is done you can deploy the Azure Function, to do so run the Action called Deploy Azure Function
Finally, you need to deploy and configure the Application Gateway. To do so, run the GitHub action called Create and Configure Application Gateway.
In the previous steps you created a secret called STORAGE_CUSTOM_DOMAIN. Use this value and create an A record related to the public IP of the Application Gateway.
Now, go to your deployed Azure Function, and click the Code+Test button. From there you can test to get the SAS token, the possible values for the blobname are
- corgi.jpg
- peki1.jpg
- pek2.jpg
Once you have the SAS token, you can view the picture doing this.
https://<FQDN>/pictures/<imagename>?<sas token>


