-
Notifications
You must be signed in to change notification settings - Fork 158
Cheatsheet Git & GitHub
Note: The tips below are tested under MS Windows.
Here you will find some basic commands and tips for Git usage. If you want to learn more about it, the Pro Git book is your thing.
-
Using HTTPS
With the HTTPS connection, you will be prompted for your GutHub credentials when you clone, pull and push.
git clone https://github.com/telerik/ajax-docs.git -
Using SSH
As for SSH, you should create an SSH key and add it to your GitHub account. More detail are available in this GitHub article—Generating SSH keys.
git clone [email protected]:telerik/ajax-docs.git
Information about that is available in this GitHub article—Generating SSH keys.
If there are complication head to the GitHub troubleshooting article on the matter—Error: Permission denied (public key).
However, you can follow this steps to generate an SSH key:
-
Generate a file with your ssh key (passphrase is optional, although, recommended):
Tip: you should be in the default directory, e.g.:
C:\Users\<YourUserName>\.sshso the file will be generated in that default location.Do NOT provide a file name or passphrase, use the defaults, i.e., simply press
Enterwhen prompted (they are id_rsa for the file name and blank for the passphrase). If you use custom file names or another location, it is likely that Git Bash will lose your identification after you exit it once.ssh-keygen -t rsa -C "[email protected]" -
Add your new key to the ssh-agent:
-
Start ssh agent:
ssh-agent -sor
eval "ssh-agent -s"or
eval "$(ssh-agent)"Tip: On my end, the
eval "ssh-agent -s"andeval "$(ssh-agent)"always do the job. If the command has run successfully, you should receive onlyAgent pid <someInteger>as output from it. -
Add the key to the ssh agent:
The file generated is available in the root folder, where GitBash has been started. Therefore, you need to use this file.
Note: The generated files are two -
[FileName]and[FileName].pub. Usually, they should beid_rsaif you left the default values.ssh-add [FileName]or
eval "ssh-add [FileName]"
-
-
Add your ssh key to your GitHUb account:
-
Remember the generated
[FileName].pubfile? The following command will copy the ssh key to your clipboard:clip < [FileName].pub -
Head to your GitHub account;
-
Go to settings
 ;
; -
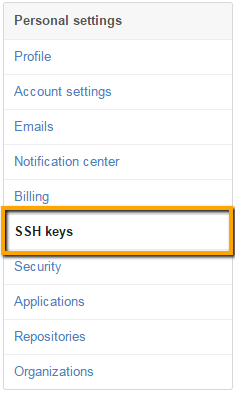
Go to SSH Keys section;

-
Press the Add SSH key button—

-
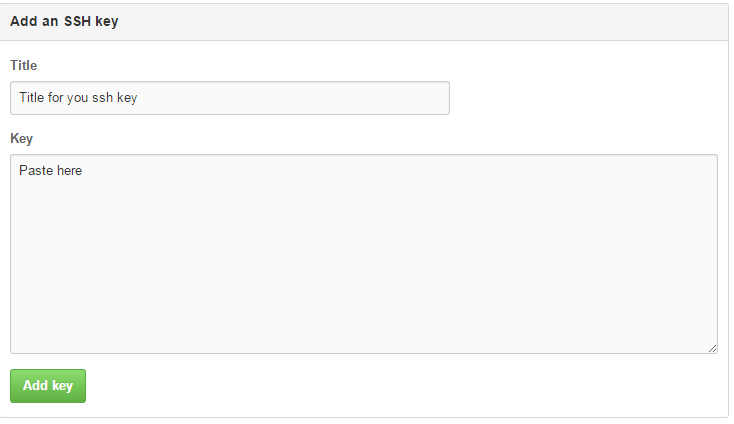
A form will appear below, type a title and paste the key in the textarea below:

-
Add the key by using the green Add key button below.
-
-
Test the connection
ssh -T [email protected]
Staging is used to prepare a commit or a stash.
-
Staging all changes:
git add -Aor
git add --a -
Staging a file:
git add filename.extTip: With
Tabkey GitBash will list all files and folders available for staging. -
Staging an entire folder (and all file within):
git add controls/ajax/
Now, you can either commit or stash the staged files.
When adding a new commit—new pointer is added in the HEAD of the local repository.
git commit -m "description"
Stashing is useful for preserving changes made locally. By using stash, changes are not added neither to a commit, nor to the remote, but they can be restored.
-
Saving files into the
stash:git stash -
Seeing the available stash item:
git stash list -
Showing files in stash
git stash showor
git stash show stash@{0} -
Getting the last saved stash:
git stash popor
git stash apply -
Getting files from a certain stash item:
git stash apply stash@{0}
You can discard changes of modified files by using the checkout command.
-
Discard all changes:
git checkout -
Discard a certain file:
git checkout -- README.md
Pulling from a remote without a --rebase procedure may cause a branch to appear in the history. That happens because the default pull command triggers a merge procedure. See the figures below.
Important: If there are changes that have not been staged, committed or stashed, Git will not let you to
pull. To resolve that you can either commit the changes or stash them.

git pull origin master

git pull --rebase origin master
Pulling from a remote may lead to a conflict when a file changed on your end has been committed by someone else before your push.
Due to that, you are forced to resolve the conflict. When that happens, the rebase is paused. This is indicated in Git Bash— .
.
Start a resolve conflict procedure to merge changes, and eventually, commit them. After that, you should continue the rebase procedure:
git rebase --continue
Resolving a conflict is preferred to be done by using an external diff tool, e.g., meld, tortoise-merge, kdiff3 etc. You can configure globally which tool to be used for resolving conflicts. This option is well explained here—External Merge and Diff Tools.
Here is showcased how to resolve conflict without global configurations:
-
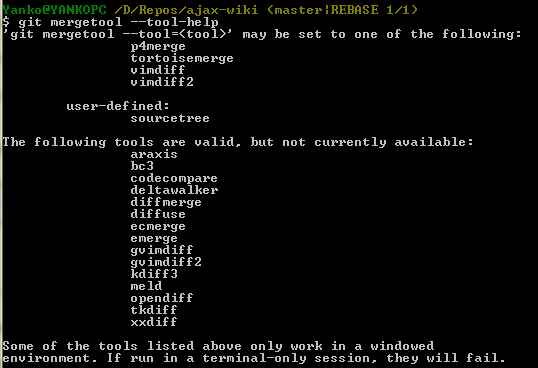
First, see which tools are available (you can update the list by installing more diff tools):
git mergetool --tool-helpA list in Git Bash will appear:

-
For example, you want to use tortoisemerge, you should use the following command
git mergetool --tool=tortoisemerge
-
The procedure will start automatically, and the tool will appear to finalize the file.
Note: A new file may appear in the root of the repository—
[Filename.ext].orig. This file is a backup copy, you can delete it to make sure it is not pushed into the remote. -
Stage the changes again, and if needed add a new commit.
Tip: You can use the VS merge tool as shown in Use VS Diff tool with Git and SourceTree.
When you are ready with the changes, that are committed locally, you can push them to the remote.
Important: Always make sure a
pull --rebaseis done before apush.
git push origin master
Branches in Git and GitHub can be used to work with major changes and new features in the source.
The following command will create a new branch named MyBranch
git branch MyBranch
Important: This command will only create the branch. Any changes will be still applied to master branch. If you want to Create a new branch and checkout it by using one command, use this one:
git checkout -b MyBranch
To checkout, a branch means that your currently used branch will be changed to the new one, in order to start working on it.
git checkout MyBranch
git branch --list
git branch -d MyBranch
Pushing (or publishing) a branch to GitHub is a way to make it public. By doing that:
- Other team members can work on this branch (push, pull and commit changes);
- Pull requests can be made from this branch, in order to add them to the master branch.
git push origin MyBranch
Note: This will create the new branch in GitHub and push all commits to the remote.
Use the same command as [Push Branch to GitHub](#Push Branch to GitHub).
git push origin MyBranch
git pull --rebase origin MyBranch
In order to initiate a pull request that is clean, without possible conflicts, it is best first merge any changes from the base (usually the master) branch.
It is recommended to rebase the history of the base branch into your current branch to make the history more linear. Here is an example that assumes you are currently on MyBranch and its base branch is called master:
git checkout master
git pull --rebase origin master
git checkout MyBranch
git pull --rebase origin MyBranch
git pull --rebase origin master
git push -f origin MyBranch
Important: This will rewrite the history of
MyBranchwith the commits frommastersince the creation ofMyBranchand you must be careful when you perform this operation. It will also push your current commits onMyBranchfor everyone to see.
Tip: You should make sure this happens often enough so you do not have conflicts and you are always working with the latest version of the content.
Another approach is to simply merge the branches. While on the created branch (e.g., MyBranch):
git merge master
This will merge all changes from master to MyBranch without rewriting the history.
Note: Do not use both simultaneously to avoid mix-ups with the history and the HEAD.
Always make sure that changes from the remote (GitHub) are pulled, before merging from master to your branch.
-
Checkout master:
git checkout master -
Pull changes:
git pull --rebase origin master -
Checkout your branch:
git checkout MyBranch -
Merge from master
git merge master
When a feature, change or fix is ready to be live (i.e., pushed into master), initiate a Pull Request from GitHub.
Important: Ensure pull requests are handled quickly, especially if they include branches from a forked repository (i.e., an outside contributor like a copy editor). This will reduce the non-linear history they will cause because in this case the new content cannot be rebased by you.
To do that, make sure to publish the branch with all changes, or if it is already published, make sure that changes are pushed.
After that, open GitHub and press Create Pull Request.
Handling and managing Pull Requests is well explained here—https://help.github.com/articles/using-pull-requests/.
When a change needs to go live with the next scheduled build of the documentation you should cherry-pick the relevant commits to the production branch. The steps for doing this are listed below.
- Find the commit(s) that should be cherry-picked.

-
Make sure that you are working on the production branch.
git checkout production -
Cherry-pick the commit(s) that should go live. You can copy the full commit ID or the first seven characters.
git cherry-pick d2fe72fd6ddb55eeb64f74f53016de1ac97ee35f- If you would like to cherry pick more than one commit you have couple of options:
-
List the commits. Type the commit IDs separated by space:
git cherry-pick d2fe72fd6ddb55eeb64f74f53016de1ac97ee35f 700a54bfa08b766a7a4edf4c10533dfc125f63df -
Define a range of commits that would be cherry-picked. Note that to make the range inclusive you should add the ^ sign after the first commit. (e.g A..B -> A will not be included; A^..B -> A will be included )
git cherry-pick d41bf816eea926648e0e89ce1d1c0c380b284c70^..18551e35eba773c2f133b30299dd9485a2ab3349
-
- If you would like to cherry pick more than one commit you have couple of options:
-
Rebase production
git pull --rebase origin production -
Push the changes to production
git push origin production
- Home
- Getting Started
- Deploying Documentation on IIS
- Git and GitHub Workflow
- Handling Redirects
- Markdown Syntax
- Markdown Nesting
- Using Git and Git Bash
- Troubleshooting
- Use VS Diff tool with Git and SourceTree
- [How to deal with the web.config size limit in order to add URL redirects](./How to deal with the web.config size limit in order to add URL redirects)
