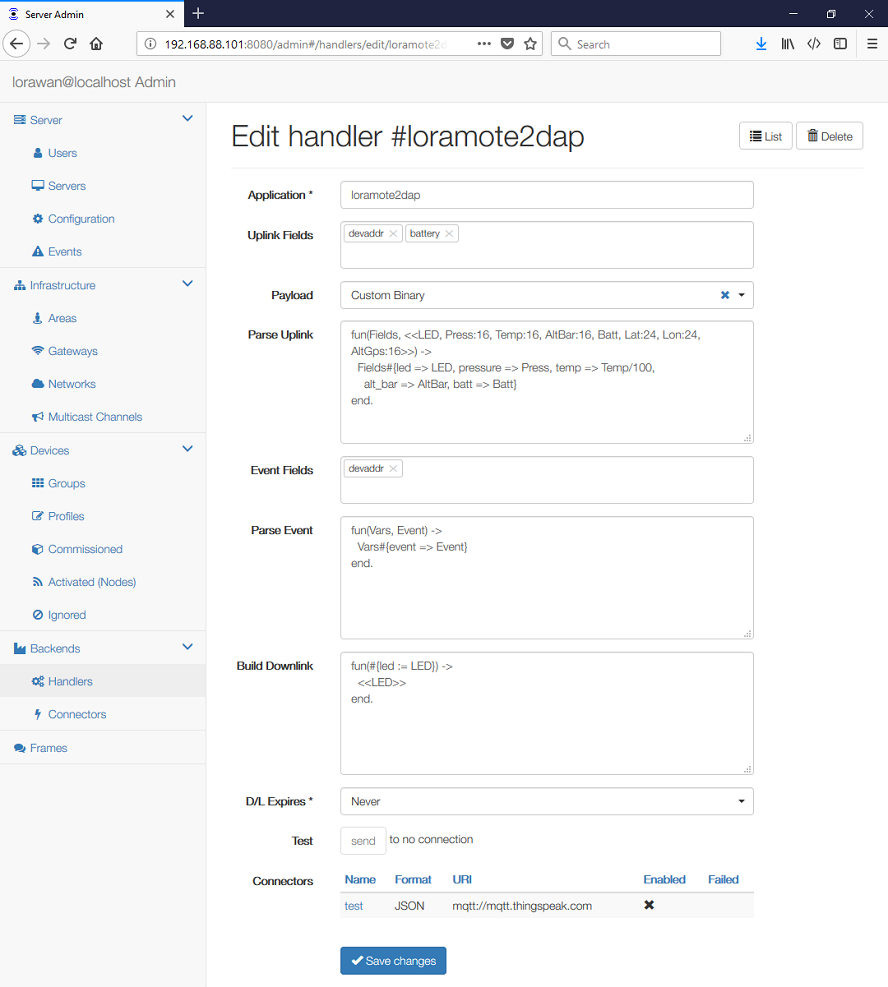
To use this functionality you have to set Device/Node Application to backend and enter some Group name for this device/node. The device/node Group must correspond to the Handler Group name.
To create a new handler you need to set:
- Group name
- Format of the message payload, which can be:
- Raw to receive and send raw application data only, without ant port numbers nor flags.
- JSON to use the JSON structures described in the JSON Payload documentation.
- Web Form to use query strings like
NameOne=ValueOne&NameTwo=ValueTwo.
- Uplink Fields that will be sent in the JSON payload.
- Parse Uplink and Build Downlink functions (for the JSON format only)
- Connector identifier (see the next chapter)
If the Connector is not defined, this Handler will be applied to WebSocket connections only.
The Parse Uplink is an Erlang function that converts a binary to a list that
gets JSON encoded into the fields attribute. It shall be a
Fun Expression
with two parameters, which matches the
binary data
and returns an
Erlang representation of JSON.
For example:
fun(_Port, <<LED, Press:16, Temp:16, AltBar:16, Batt, Lat:24, Lon:24, AltGps:16>>) ->
  #{led => LED, pressure => Press, temp => Temp/100, alt_bar => AltBar, batt => Batt}
end.
The <<A, B, C>> is a binary pattern, where A, B, C are "variables" corresponding
to the values encoded in the binary. Erlang matches the incoming binary data against
this pattern and fills the "variables" with the values in the binary. Here are some
examples:
<<A>>matches 1 value, 1 byte long.<<A, B>>matches 2 values, each 1 byte long.<<A:16>>matches 1 unsigned int value, 2 bytes long in big-endian<<A:16/little-signed-integer>>matches 1 signed int value, 2 byes long in little-endian<<A:2/binary>>matches an array of 2 bytes
To match a variable sized array of bytes you can do:
fun(_Port, <<Count, Data:Count/binary>>) ->
  #{data => binary_to_list(Data)}
end.
Once you have the matched variables, you put them in a structure that gets encoded in JSON.
The #{name1 => A, name2 => B, name3 => C} creates a fields attribute with
the JSON {"name1":A, "name2":B, "name3":C}.
Build Downlink works in the opposite direction. It takes whatever is in the
"fields" attribute and converts that into a binary. It shall be a
Fun Expression
with two parameters, which gets an
Erlang representation of JSON
and returns
binary data.
If you send {"fields":{"led":1}}, you can have a function like this:
fun(_Port, #{led := LED}) ->
  <<LED>>
end.
The #{name1 := A, name2 := B, name3 := C} matches the fields attribute containing
a JSON structure {"name1":A, "name2":B, "name3":C}. The order is not significant,
but all fields are mandatory.
The binary is then built using similar approach as the pattern matching
explained above. For example, <<A, B, C>> builds a binary of three 1-byte integers.
To build a variable sized array you can do:
fun(_Port, #{data := Data}) ->
  <<(length(Data)), (list_to_binary(Data))/binary>>
end.To create a new connector you set:
- Connector Name
- Enabled flag that allows you to temporarily disable an existing connector.
- URI defines the target host, which can be
- For MQTT
mqtt://host:portormqtts://host:portif SSL shall be used - For HTTP POST
http://host:portorhttps://host:port
- For MQTT
- Published Topic, which is a server pattern for constructing the publication
topic, e.g.
out/{devaddr}. This can be used to include the actual DevEUI, DevAddr or device Group in the message topic. - Subscribe, which is a topic to be subscribed. It may include broker specific
wilcards, e.g.
in/#. The MQTT broker will then send messages with a matching topic to this connector. - Received Topic, which is a template for parsing the topic of received
messages, e.g.
in/{devaddr}. This can be used to obtain a DevEUI, DevAddr or a device Group that shall receive a given downlink.
On the Authentication tab:
- Client ID is the MQTT parameter
- Auth identifies the type of authentication:
- Username+Password for common servers
- Shared Access Signature for Microsoft servers
- Name and Password/Key for plain authentication
- User Certificate and Private Key if SSL authentication is needed
To include node-specific attributes the Published and Received Topic may include following patterns:
{deveui}that matches the DevEUI of the node{devaddr}that matches the DevAddr of the node{group}that matches the node group
The Received Topic may also include the # (hash), which matches zero or more
characters, including any '/' delimiters. It can be used to ignore the leading
or training characters in the topic.
If the Connector is Enabled and a Subscribe topic is defined the server will automatically connect to the MQTT broker and subscribe this topic.
You can generate a self-signed User Certificate (cert.pem) and corresponding
Private Key (key.pem) by:
openssl req -x509 -newkey rsa:4096 -keyout privkey.pem -out cert.pem -days 365
openssl rsa -in privkey.pem -out key.pem
Please read the Integration Guide for detailed information on how to connect to a generic MQTT server like RabbitMQ or an IoT Platform like AWS IoT, IBM Watson IoT, MathWorks ThingSpeak, Azure IoT Hub or Adafruit IO.
