On this page, you can find documentation and step-by-step guide on how to install EspoCRM.
* [Install a Virtual Machine for EspoCRM in Azure](#install-a-virtual-machine-for-espocrm-in-azure)
* [Installation of EspoCRM from script](#installation-of-espocrm-from-script)
* [Security](#security)
* [Cloning a VM in Azure](#cloning-a-vm-in-azure)
* [Dump database from the MySQL container](#dump-database-from-the-mysql-container)
* [External MySQL database server for EspoCRM](#external-mysql-database-server-for-espocrm)
# Install a Virtual Machine for EspoCRM in Azure
### Introduction
This guide assumes that you are going to host EspoCRM on a Virtual Machine (VM) in Azure. There are other ways to host EspoCRM as well but these are not supported in these docs. These docs are inspired by this [tutorial](https://rodekruis.sharepoint.com/sites/510-Team/Gedeelde%20%20documenten/Forms/AllItems.aspx?id=%2Fsites%2F510%2DTeam%2FGedeelde%20%20documenten%2F%5BPRJ%5D%20Cash%20Thematic%20Area%2FEspoCRM%20Standardized%20documents%2FCreate%20an%20ESPO%20instance%20in%20Microsoft%20Azure%2Epdf&parent=%2Fsites%2F510%2DTeam%2FGedeelde%20%20documenten%2F%5BPRJ%5D%20Cash%20Thematic%20Area%2FEspoCRM%20Standardized%20documents&p=true&ga=1) and this [training of Azure](https://learn.microsoft.com/en-us/training/modules/describe-azure-compute-networking-services/)
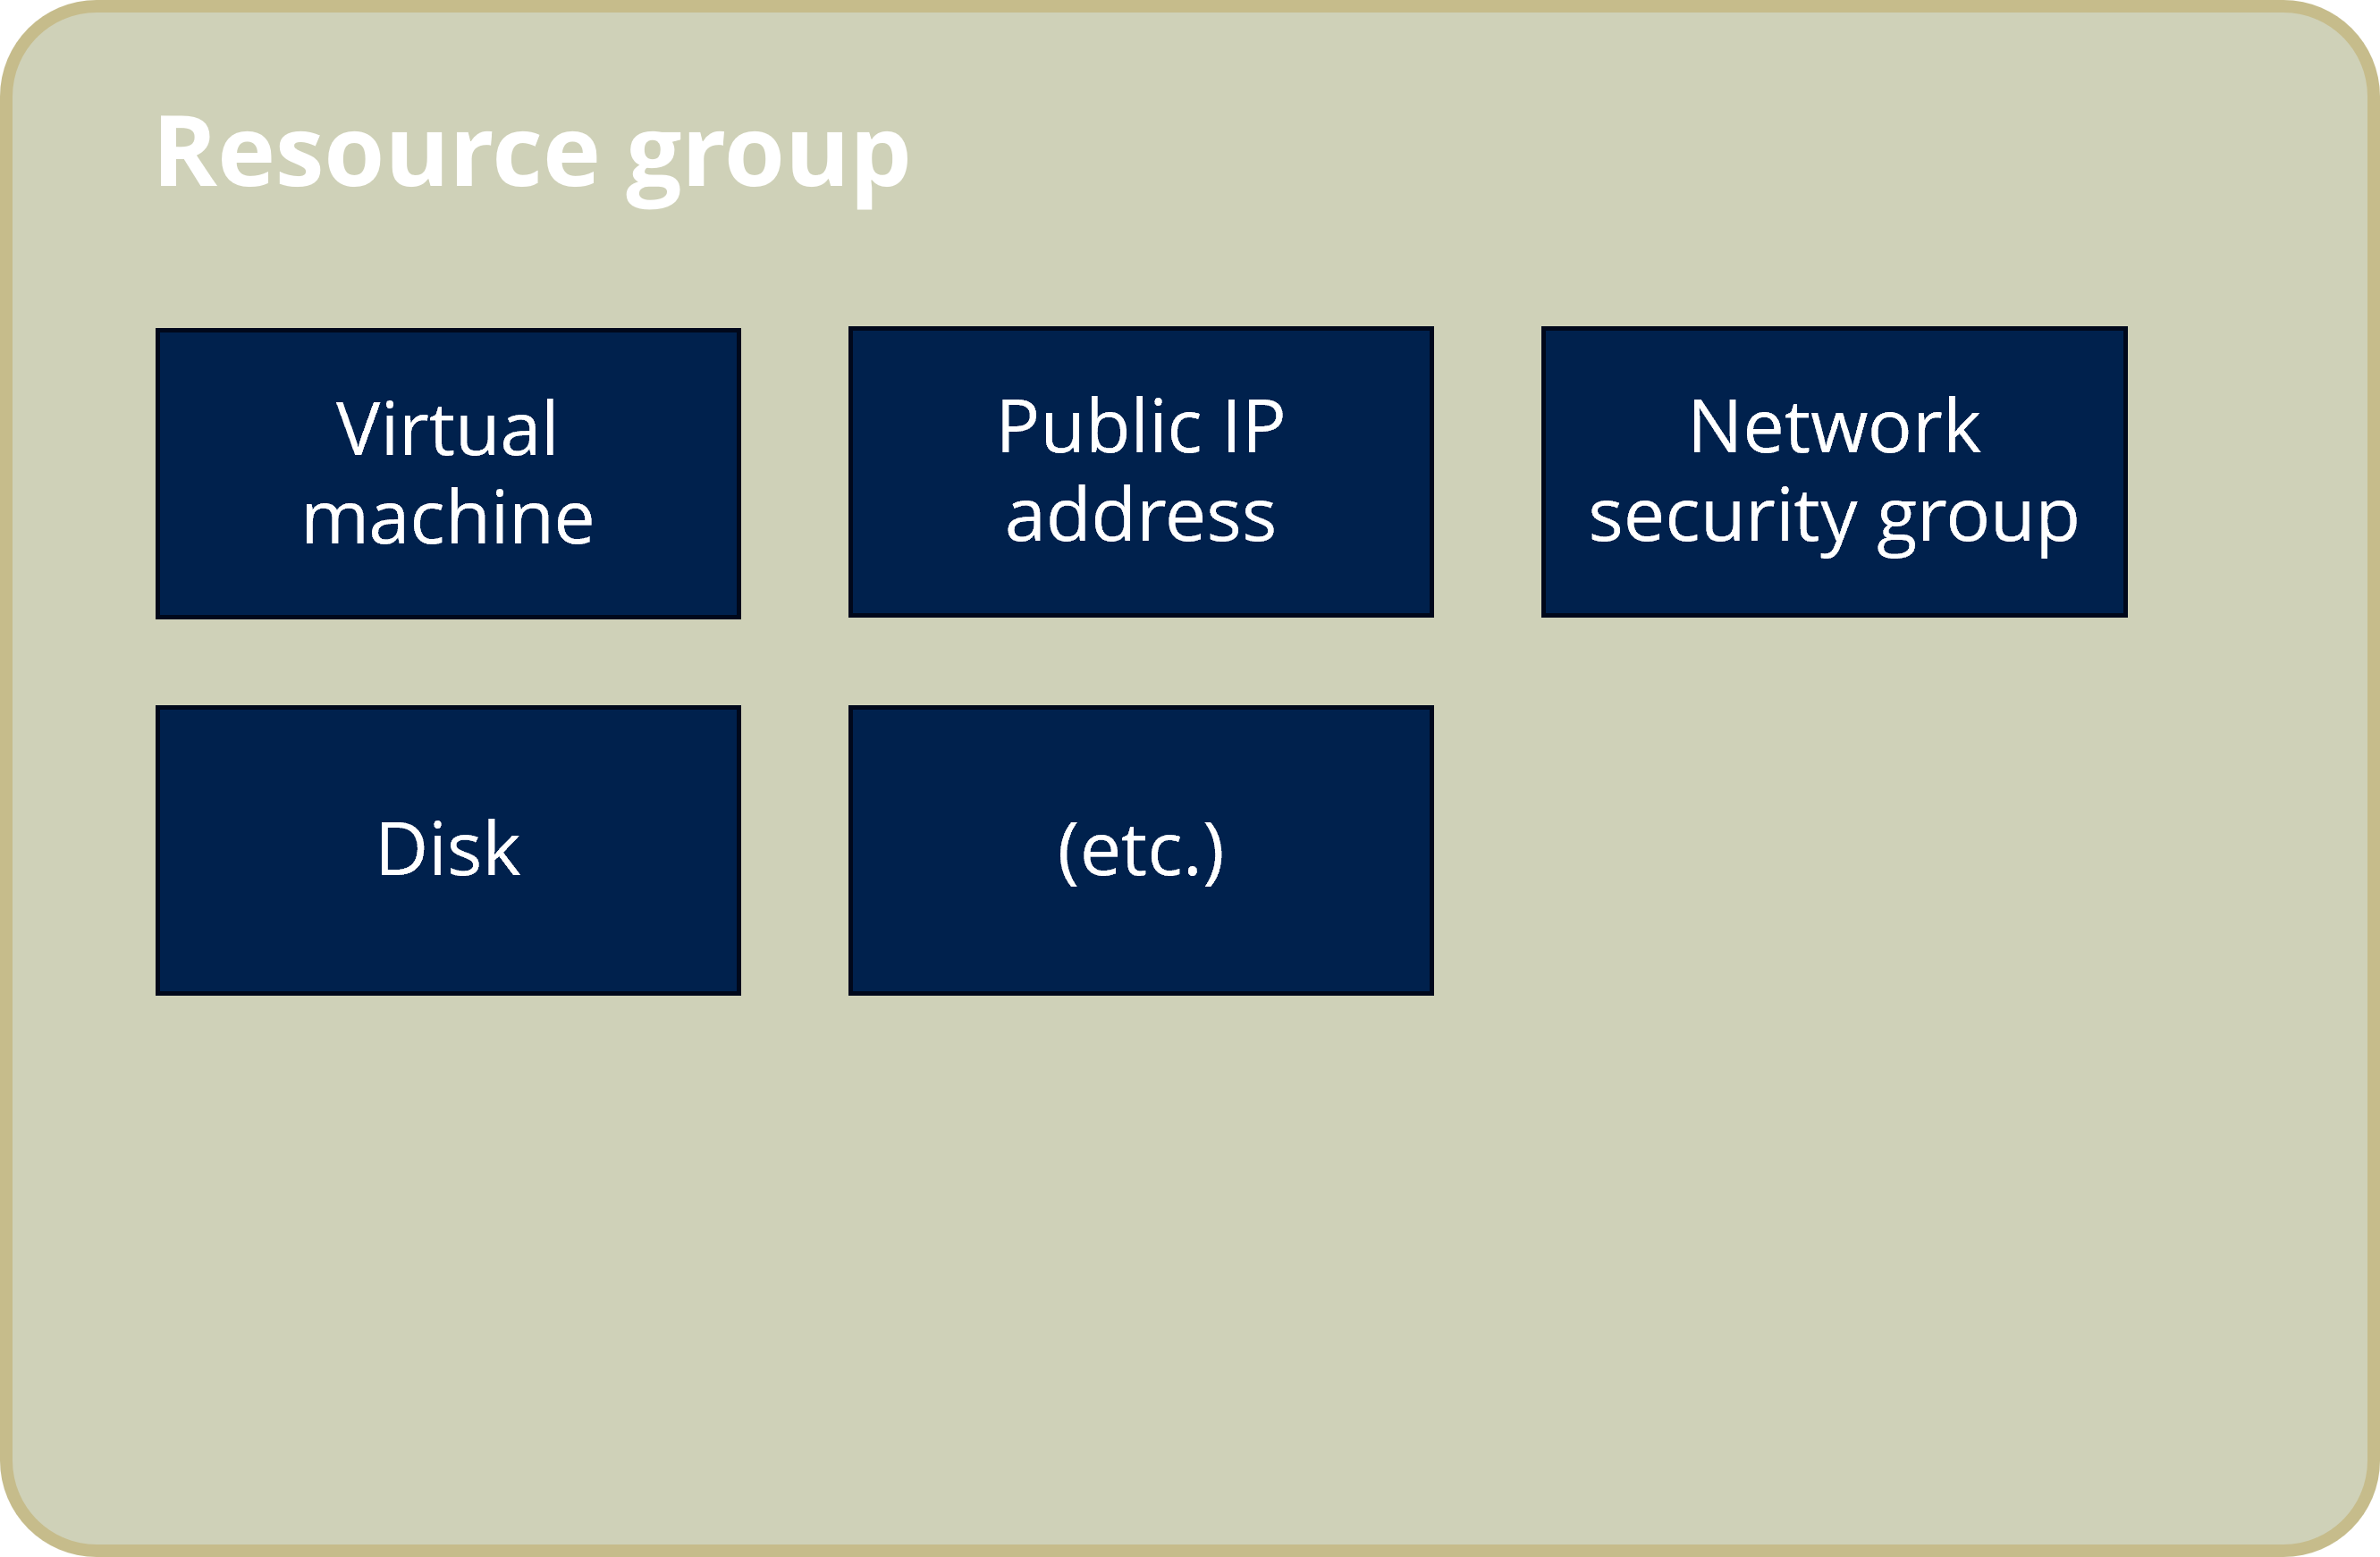
* **Resource Group**: A resource group is a container that stores related resources for an Azure solution. In our case, one of our resources would be a virtual machine for EspoCRM. The resources in the resource group can be managed as a group. Generally, add resources that are part of the same project, share the same lifecycle to the same resource group so you can easily deploy, update, and delete them as a group
* **Virtual Machine**: A Virtual Machine is a compute resource that uses software instead of a physical computer to run programs and deploy apps. EspoCRM can be installed on local computer or laptop. However, we want to ensure that EspoCRM is running non stop. This means your computer would then need to ‘act’ like a server, meaning it should run all the time. This is sometimes not possible if your laptop is out of power, or has an issue. Therefore, it is recommended to install EspoCRM on a cloud based server.
### Steps to create VM specific for hosting EspoCRM:
1. Go to the Azure Resource Group where you want to create the VM
2. Find in the Azure _Market Place_ and create a new resource called 'virtual machine' (you could check which VMs and regions Azure has in offer [here](https://azure.microsoft.com/en-gb/pricing/vm-selector/))
3. Give the following settings for the **Basics** page. If needed, adapt the settings to your own case.
- Subscription: your subscription
- Resource Group: your preferred RG under the selected subscription where the VM will be created within
- Give it a descriptive name. An example for DEH: `deh-espocrm-[country]-[environment]`
- Region should be _West Europe_, unless there are specific data requirements. Warning: related resources to this VM configured with other regions could lead to conflicts.
- Availability options: _Availability zone_
- Availability zone: _Zones 1_
- Security Type: _Trusted launch virtual machines_
- Image: _Ubuntu Server 20.04 LTS - x64 Gen2_ or the latest version
- VM architecture: _x64_
- Size: _Standard_DS1_v2 - 1 vcpu, 3.5 GiB memory_ (should be about 40 euros a month)
- Authentication type: _Password_
- Username: name your admin VM user name
- Password: generate a strong password and save it in a password manager like [Bitwarden](https://bitwarden.com/) Make sure to share this password with colleagues in a Bitwarden collection.
- Public inbound ports: _Allow selected ports_
- Select inbound ports: _SSH (22), HTTP (80), HTTPS (443)_
4. Following settings for the **Disk** page, or adjust them to your needs:
- OS disk size: _Image default (30 GiB)_
- OS disk type: _Premium SSD (locally-redundant storage)_
- Delete with VM: _TRUE_
5. Settings for **Networking** page:
- Create a new virtual network or select an existing one (when would we want to create a new virtual network)
- Subnet: _default_
- Public IP: _default_
- NIC network security group: _Basic_
6. Settings of the next pages **Management**, **Monitoring**, **Advanced**, **Tags** can be kept as default
7. Go to **Review + Create** for final check of the settings and then choose _Create_ to deploy the VM.
**Note:** besides the VM, 5 other resources will also be created. Their names all start with the VM name. They support the VM functions such as disk, IP address, basic network security. In case the VM needs to be removed, those accompanied resources to the VM should be manually removed as well.
# Installation of EspoCRM from script
### Prerequisites:
* Running Ubuntu Server VM with:
* user name
* password (or auth key)
* ip address
* Ports 22 open for jumpbox and 443 opened for any
* Domain with:
* Domain name with A-record pointing towards the IP of the VM
* Email
### Steps to install EspoCRM:
1. Access the VM from a local machine (`ssh [USER NAME]@[IP ADDRESS]`)
2. There are [three ways](https://docs.espocrm.com/administration/installation-by-script/) to install EspCRM. The preferred way is to install with SSL/TLS certificate but this requires that you have run the next step called 'Steps to 'connect' a public IP address to a URL:'. Run the following commands for using this preferred way:
1. `wget https://github.com/espocrm/espocrm-installer/releases/latest/download/install.sh`
2. `sudo bash install.sh -y --ssl --letsencrypt --domain=[YOUR_ESPOCRM_DOMAIN] --email=[YOUR_EMAIL_ADDRESS]`
3. In case you do not have a domain and need to use an IP address to access EspoCRM page, you can run the previous step without the flag `--ssl`. Note that this is not recommended due to security matters with HTTP.
3. When the installation is completed, it will list important details of the Espo instance. Note these down in a password manager (like in a Collection in Bitwarden):
- Public domain IP address/ URL of Espo instance
- Admin username, password of Espo instance
4. Login to the newly created EspoCRM instance via the domain (or IP address) to ensure you have access.
If the public IP address/ URL of the Espo instance is not accessible, make sure the Inbound port rules set/created in VM's Network settings to allow any HTTPS and HTTP. For the latter, it is highly recommended to allow HTTP inbound from specific IP addresses such as (yours, office's) to restrict less secured access.

### Steps to 'connect' a public IP address to a URL: (this is called creating a new DNS rule)
1. Make sure you have access to the Domain Name System (DNS) of the National Society. These docs assume that there is an existing domain. If not, you can buy one via the DNS.
2. Find the page within the DNS where you can add new rule
3. Usually, there are three variables needed when adding an new rule:
1. Record type: A ([most used type](https://en.wikipedia.org/wiki/List_of_DNS_record_types))
2. Name: the URL name including the NS domain (e.g. deh.demo.510.global)
3. Content: the IP address from the VM (e.g. 172.205.203.9)
4. Add this new rule and test it by going to the newly created URL and confirm it leads to the same page as the IP address leads to
### Steps to switch EspoCRM instance from HTTP to secure HTTPS with own SSL certificates ONLY
1. In a directory in the EspoCRM instance, e.g. _~/certs_, create a Certificate Signing Request (CSR) and private key files:
```
openssl req -new -newkey rsa:2048 -nodes -keyout .key -out .csr
```
You might need to fill in information when prompted, particularly when your expected url is a subdomain:
- Country Name
- Org Name e.g. _org-name_
- Common Name (CN): *. e.g. _*.org-name.com_
- Subject Alternative Name (SAN): e.g. _org-name.com_
2. Use the CSR file to request a SSL cert. When downloading the SSL cert, choose _nginx_ as server platform.
3. Reinstall EspoCRM with SSL settings with step 1-2 in this [manual installation](https://docs.espocrm.com/administration/installation-by-script/#manually-advanced-users-only).
4. Replace the command in step 3 of the manual installation with [this command](https://docs.espocrm.com/administration/installation-by-script/#from-http-to-own-ssltls-certificate). Then continue the manual from step 4.
5. Once finished the manual, add the SSL (_.pem_) and the generated private key (_.key_) with [these steps](https://docs.espocrm.com/administration/installation-by-script/#2-own-ssltls-certificate)
6. You might need to add new inbound rule of the EspoCRM VM (in Azure portal) to allow all HTTPS inbound.
7. The EspoCRM should be accessed via the URL in HTTPS. If so, remove all HTTP inbound rules to disabled insecure connection.
# Security
The following recommendations follow two dedicated EspoCRM penetration tests (see [here](https://rodekruis.sharepoint.com/sites/510-Team/_layouts/15/guestaccess.aspx?share=Eeg1Sf1COPREqHhyVOxMOtYBPVHY-WRSW60oUeMhRpXwZg&e=paiyBC) and [here](https://github.com/user-attachments/files/15511591/PRAUDIT_IFRC_Digital_Engagement_Hub_security_test_20240530.xlsx)) and a [server hardening assessment](https://rodekruis.sharepoint.com/sites/510-Team/_layouts/15/guestaccess.aspx?share=EZ6wHkeflb9NhCDzQgRCCb8BfG6pOp5h2f2lIHxNP-ZMrw&e=NEUHrR), see those documents for the rationale and more details.
### Web Application
#### Enforce short session timeout, strong passwords and 2FA
In `Administration` > `Authentication` select
* Auth Token Max Idle Time (hours): 4
* Enable 2-Factor Authentication: yes
* Force regular users to set up 2FA: yes
* Length of generated passwords: 10
* Minimum password length: 10
* Number of letters required in password: 2
* Password must contain letters of both upper and lower case: yes
* Number of digits required in password: 1
##### Set up user roles with no right to disable 2 factor authentication
When setting up roles, make sure that users are not able to disable mandatory 2 factor authentication:
* Within the role
* Under `Field Level`
* Go to entity `Users`
* Set `Type` to Read -> no
Extra information: If this is not done, users can disable 2FA from their user page. If `Force regular users to set up 2FA` is set to `yes` (as above), when the user logs out and logs in again, (s)he is enforced to set up 2FA. Still, this means that in the meanwhile 2FA is disabled for that user.
#### Disable iframe dashlet to prevent XSS attack
```commandline
sudo rm /var/www/espocrm/data/espocrm/application/Espo/Resources/metadata/dashlets/Iframe.json
sudo /var/www/espocrm/command.sh rebuild
```
#### Enable security headers
Enable security headers in `/var/www/espocrm/data/espocrm/data/config-internal.php`
```
sudo nano /var/www/espocrm/data/espocrm/data/config-internal.php
```
Check if the following is already in this file and if not, add the appropriate lines:
```php
'clientSecurityHeadersDisabled' => false,
'clientCspDisabled' => false,
'clientCspScriptSourceList' => [
0 => 'https://maps.googleapis.com'
],
'clientStrictTransportSecurityHeaderDisabled' => false,
'clientXFrameOptionsHeaderDisabled' => false,
```
Press `ctrl+x` to exit. Then, press `y` to save the changes
### Linux Hardening
#### Restrict permissions on server files
```commandline
sudo chmod 600 /etc/ssh/sshd_config
sudo chmod 600 /etc/at.deny
sudo chmod 600 /etc/crontab
sudo chmod 600 /var/log/*
sudo chmod 700 /etc/cron.daily
sudo chmod 700 /etc/cron.hourly
sudo chmod 700 /etc/cron.weekly
sudo chmod 700 /etc/cron.monthly
sudo chmod 750 /home/*
```
#### Install auditd
install `auditd`
```
sudo apt install -y auditd audispd-plugins
sudo systemctl --now enable auditd
```
If the above comments do not work. Run the following (to update apt-get), and then try again:
```
sudo apt-get update
```
edit `/etc/default/grub` for automatic startup and to have enough space for logging
```
sudo nano /etc/default/grub
```
Changing the following (note for later: it seems that this is a duplicate but this was being recommended by security experts anyway)
```commandline
GRUB_CMDLINE_LINUX="audit=1"
GRUB_CMDLINE_LINUX="audit_backlog_limit=8192"
```
Press `ctrl+x` to exit. Then, press `y` to save the change
update grub2 configuration
```commandline
sudo update-grub
```
#### Install Chkrootkit (malware scanner)
```commandline
sudo apt-get install -y chkrootkit
```
Run the malware scan and review the result.
```commandline
sudo chkrootkit
```
#### Restrict SSH config
Edit `/etc/ssh/sshd_config` as follows. Edited lines should also be uncommented (hash removed).
```
sudo nano /etc/ssh/sshd_config
```
```commandline
Ciphers chacha20-poly1305@openssh.com,aes256-gcm@openssh.com,aes128-gcm@openssh.com,aes256-ctr,aes192-ctr,aes128-ctr MACs hmac-sha2-512-etm@openssh.com,hmac-sha2-256-etm@openssh.com,hmac-sha2-512,hmac-sha2-256
KexAlgorithms curve25519-sha256,curve25519-sha256@libssh.org,diffie-hellman-group14-sha256,diffie-hellman-group16-sha512,diffie-hellman-group18-sha512,ecdh-sha2-nistp521,ecdh-sha2-nistp384,ecdh-sha2-nistp256,diffie-hellman-group-exchange-sha256
X11Forwarding no
LogLevel VERBOSE
AllowTcpForwarding no
Compression no
MaxAuthTries 3
TPCKeepAlive no
AllowAgentForwarding no
LoginGraceTime 2m
MaxStartups 10:30:60
```
Press `ctrl+x` to exit. Then, press `y` to save the change
#### Restrict umask setting
Edit `/etc/login.defs` and edit the `UMASK` and `USERGROUPS_ENAB` lines
```
sudo nano /etc/login.defs
```
Search for UMASK or USERGROUPS_ENAB with `ctrl + w` and edit it as follows:
```commandline
UMASK 027
USERGROUPS_ENAB no
```
Press `ctrl+x` to exit. Then, press `y` to save the changes
#### Configure journald
Edit `/etc/systemd/journald.conf` and add the following lines
```
sudo nano /etc/systemd/journald.conf
```
```
Storage=persistent
```
Press `ctrl+x` to exit. Then, press `y` to save the changes
#### [510 only] Setup Access to VM with Jumpbox
A jumpbox for a Virtual Machine is a secure gateway server that provides controlled access to other VMs within a network, often used for administrative tasks and enhanced security.
Assumptions:
* you are using a Virtual Machine in Azure and have the correct permissions to change settings.
* you already have an existing jumpbox
To **setup the Jumpbox for the specific VM:**
1. Go to the VM in Azure
2. Go to the Networking tab
3. Select the 'inbound port rule' with name 'SSH'
4. Change the following settings:
* Source: IP Addresses
* Source IP addresses/CIDR ranges: JUMP_IP_ADDRESS
* Source port ranges: *
* Destination: Any
* Service: SSH
* Action: Allow
* Priority: 300
* Description (optional): Jumpbox
5. You can check if the connection is now blocked by trying to login the VM via SSH with the VMs IP address. This should not be possible.
**Access the VM via Jumpbox**
1. To access the VM with the jumpbox, go to your preferred SSH-client ([PuTTY ](https://www.putty.org/)for example) and login with: @ and port 22 ( is usually your full email address)
2. Go to [https://microsoft.com/devicelogin](https://microsoft.com/devicelogin) and enter to authenticate. Follow the verification process and hit 'enter' in the SSH-client when ready.
3. Now you can enter the VM of your choice by using the command `ssh @` (user is usually `espoadmin`) and the relevant password.
### Azure
####
# Cloning a VM in Azure
## Preparation
- Create backup of the VM in Azure
## Restore backup in a new VM
- Click on restore the VM and in the "Restore type" select "Create new Virtual Machine".
## Configure network access
- For the new VM, if the IP has not been created, create a new and then associate it with the VM interface
- If a Network Security Group has not been created, create it, associate it with the VM and open ports SSH (22) and HTTPS (443)
## Re-configure EspoCRM URL
- Once cloned, the IP will rediret to the original VM. To solve that, you can re-run the installation script with:
```
bash install.sh -y --ssl --letsencrypt --domain= --email=
```
N.B. if you will not use a custom domain - e.g. if the EspoCRM instance is for demo or training - simply do
```
bash install.sh -y
```
## Final configuration
- Pay attention to the URL, it may happen that the new VM keeps redirecting to the original one. In that case go to the page `https:///#Admin/settings` and change the Site URL to the new URL.
- Be sure that none of the test projets is using textit.
- Deactivate the workflows "Send messages" and "Get message status".
## Troubleshooting
### If Apache2 is serving webs from the new VM.
- Log-in through SSH and uninstall Apache2:
`sudo apt remove apache2`
- Reboot the docker containers:
`sudo docker-compose -f /var/www/espocrm/docker-compose.yml restart`
# Dump database from the MySQL container
To get a dump of the database, you will need to get the MySQL root password first from the dockercompose file:
```
cat /var/www/espocrm/docker-compose.yml
```
Then copy the root mysql password to be found as `MYSQL_ROOT_PASSWORD`
Good practice is to create a dir to store the backups:
```
mkdir ~/backups
```
Next, go into the docker container of the mysql and execute bash replacing by the password and by the date:
```
sudo docker exec -ti espocrm-db /usr/bin/mariadb-dump -u root --password= espocrm > ~/backups/mysqldump_.sql
```
# External MySQL database server for EspoCRM
On this page, you can find documentation and step-by-step guide on how to set up an external database for your EspoCRM.
## Introduction
EspoCRM when set up is ready equipped with its internal relational database from [MySQL](https://dev.mysql.com/doc/refman/8.0/en/what-is-mysql.html), or [MariaDB](https://aws.amazon.com/compare/the-difference-between-mariadb-vs-mysql/) on recent versions. The database locates within an installation folder of the EspoCRM, dockerised.
With the increase of data flow and its relationships between each other when operating, we want to ensure that EspoCRM is able to running non stop. This means the database should not be limited by the VM storage size but should be set in secure, scalable way and ensure its performance.
Therefore, it is recommended to set up for the EspoCRM instance an external database preferably in a cloud server as the [Azure VM for EspoCRM](Installation.md#install-a-virtual-machine-for-espocrm-in-azure).
This guide assumes that you have an EspoCRM hosted an Azure Virtual Machine (VM). This guide is inspired by this [detailed tutorial](https://rodekruis.sharepoint.com/sites/510-Team/Gedeelde%20%20documenten/%5BPRJ%5D%20Cash%20Thematic%20Area/EspoCRM%20Standardized%20documents/Create%20an%20external%20database%20for%20ESPO%20instance.pdf?csf=1&web=1&e=aOJGVY).
Note: a preferred method would be to install EspoCRM with an already existing database upon installation. This would mean directly pointing EspoCRM to the right database, instead of first dumping, building and then reconnecting (which is prone to errors). An [issue ](https://github.com/espocrm/espocrm-installer/issues/8)has been created on the EspoCRM Repo regarding this topic.
## Set up
### Step 1: Dump existing EspoCRM database
The goal is to export the current internal EspoCRM database into a file to be copied to the external database server.
From a terminal, enter the VM of the EspoCRM instance which you want to dump its database, with `ssh` for instance:
```
ssh @
```
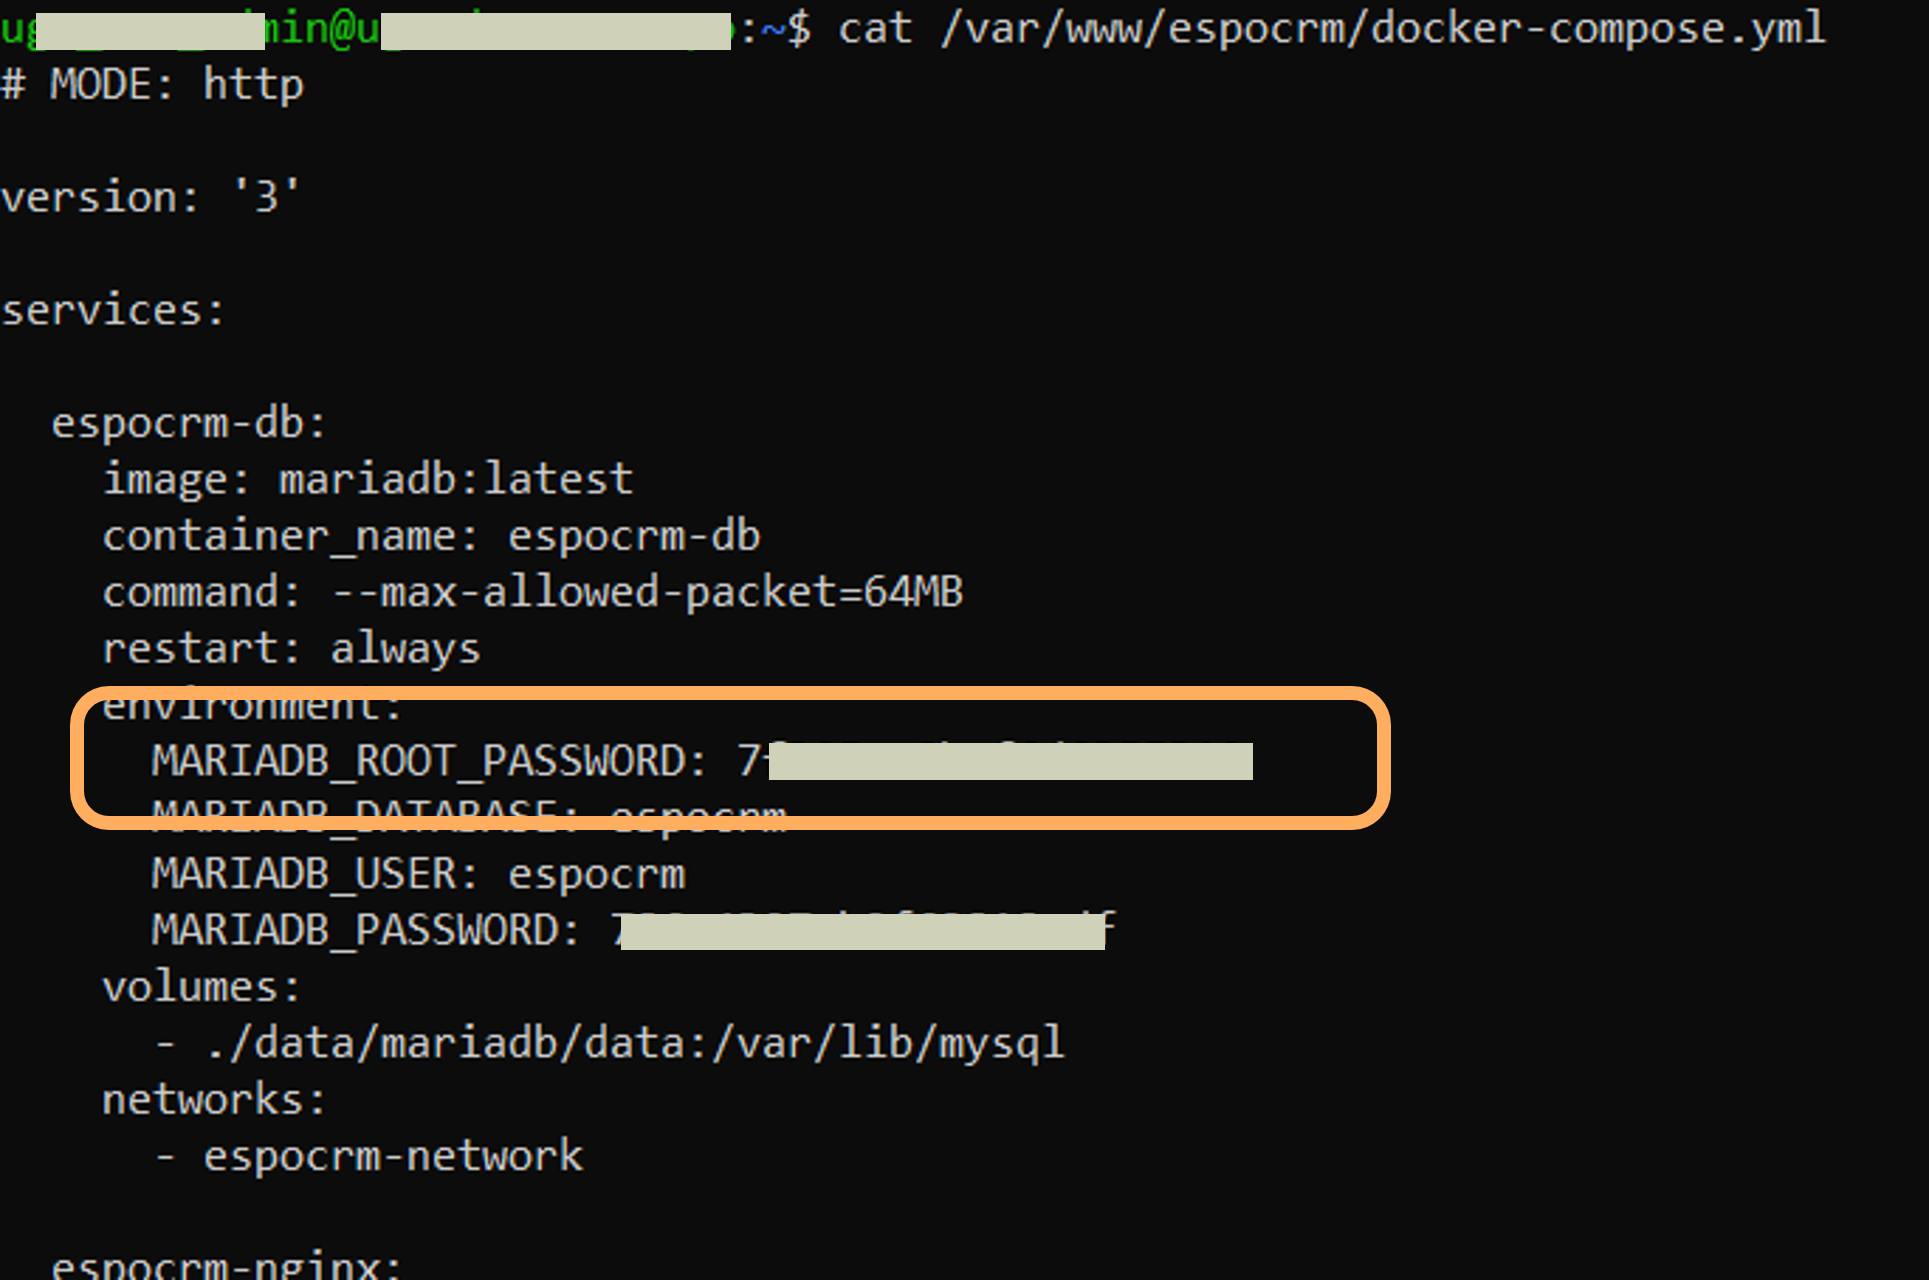
There, open the _docker-compose_ file using the command below, find and note down the root password of the current database (to be found as `MARIADB_ROOT_PASSWORD`) under `espocrm-db` service:
```
cat /var/www/espocrm/docker-compose.yml
```
As a good practice, create a directsory to store data backup copies:
```
mkdir ~/backups
```
Next, export the current EspoCRM database (inside its own docker container) into a .sql file in the _backups_ folder by executing the command below. Use the root password above, and name the sql file with a date for tracking version:
```
sudo docker exec -ti espocrm-db /usr/bin/mariadb-dump -u root --password= espocrm > ~/backups/mysqldump_.sql
```
Once done, the file .sql should be created in the backups folder. The exporting might take long depending on how large the existing database is.
### Step 2: Create a new MySQL database server
1. Go to the Azure Resource Group where you want to create a new database server. It is ideally in the same resource group with the EspoCRM VM
2. Find in the Azure _Market Place_ and create a new resource called 'Azure Database for MySQL Flexible Server'
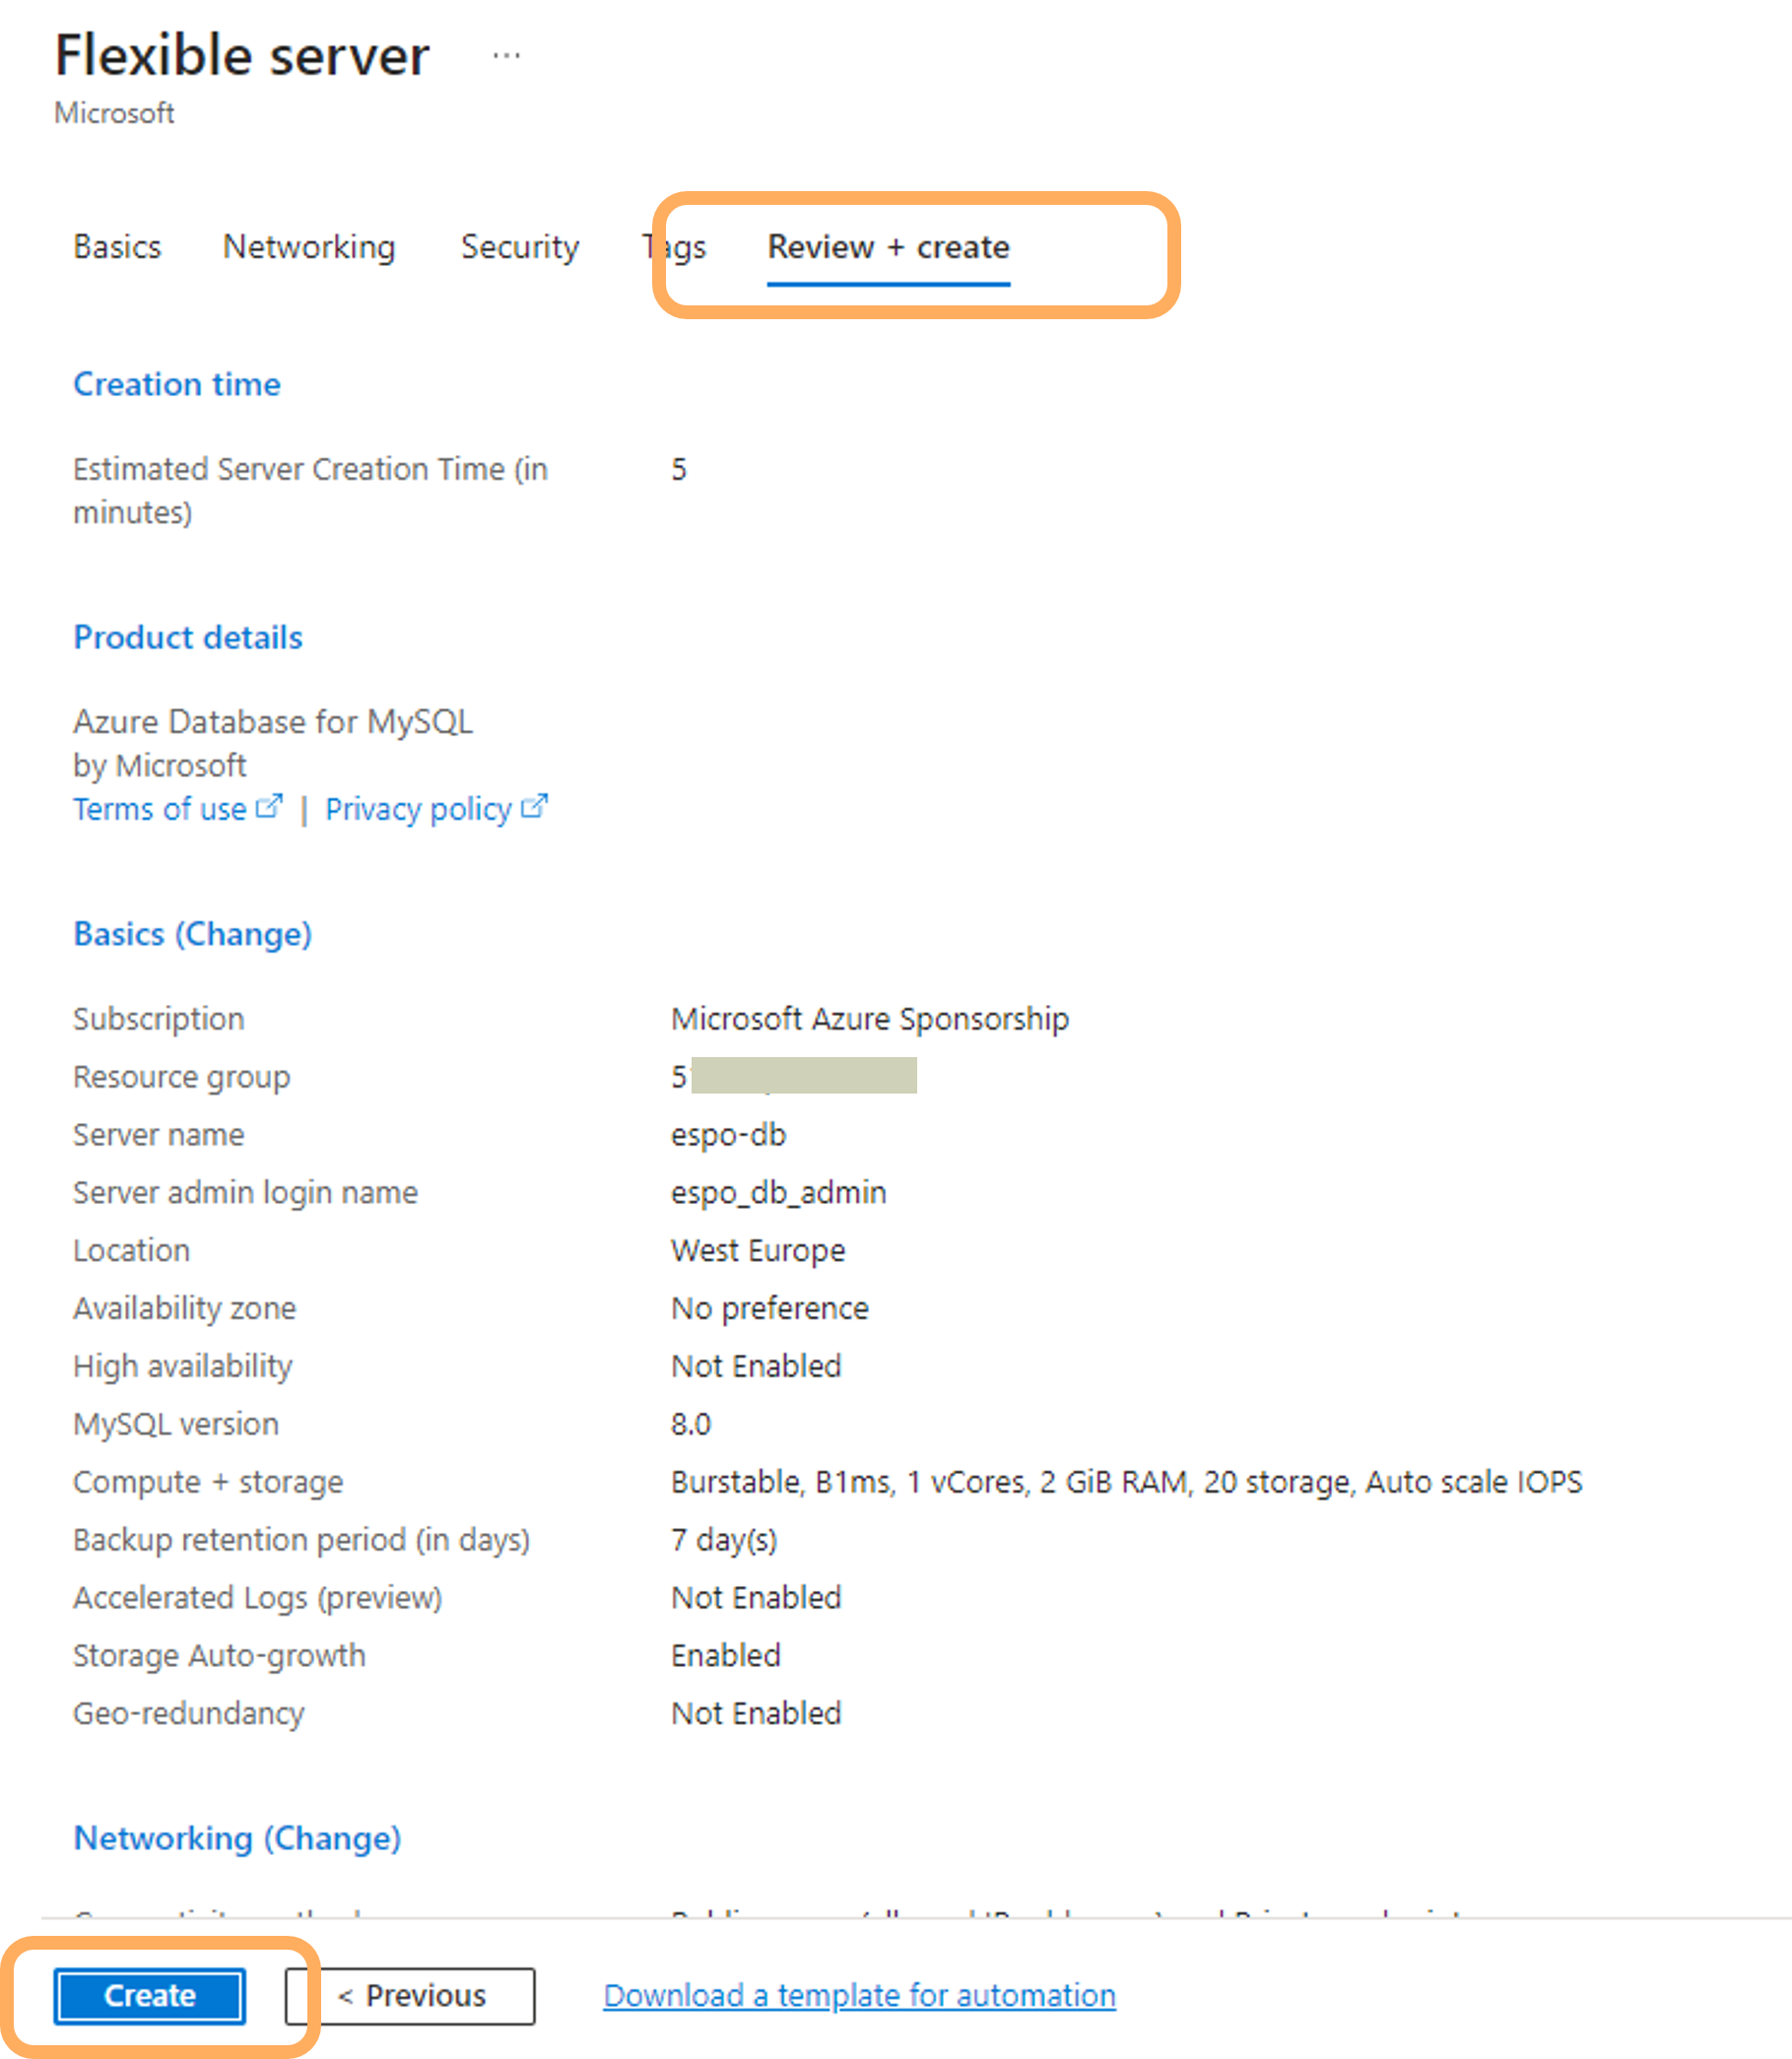
3. Give the following settings for the **Basics** page. If needed, adapt the settings to your own case.
- Subscription: your subscription
- Resource Group: your preferred RG under the selected subscription where the VM will be created within
- Give it a descriptive name. An example for DEH: `[country]-[project]-[environment]`
- Region (region of hosting centre): select the region depending on your country location and data privacy policy
- MySQL version: select the latest version.
- Workload type and Compute+storage accordingly to your plan
- Authentication method: _MySQL authentication only_ and set username and password to enter the server. Generate a strong password and save it in a password manager like [Bitwarden](https://bitwarden.com/)
4. The following settings for the **Networking** page. Adjust to your plan if needed.
- Connectivity method: _Public access and Private endpoint_
- Public access: check _Allow public access ..._
- Firewall rules: when the option above checked, set the firewall rule by adding the EspoCRM instance VM IP address to allow this only IP address to access the server. Your current IP address should also be added to the firewall rules for later setup steps
- Private endpoint: beside the public access setting, this option increases an secure access to the server via an private URL endpoint. Set one up at _Add private endpoint_. The endpoint resource should be in the same resource group and choose the default virtual network/subnet.
5. Settings of the remaining pages can be kept as default
6. Go to **Review + Create** for final check of the settings and then choose _Create_ to deploy the MySQL database server.
### Step 3: Configure the MySQL database
Continue in the VM terminal from step 1.
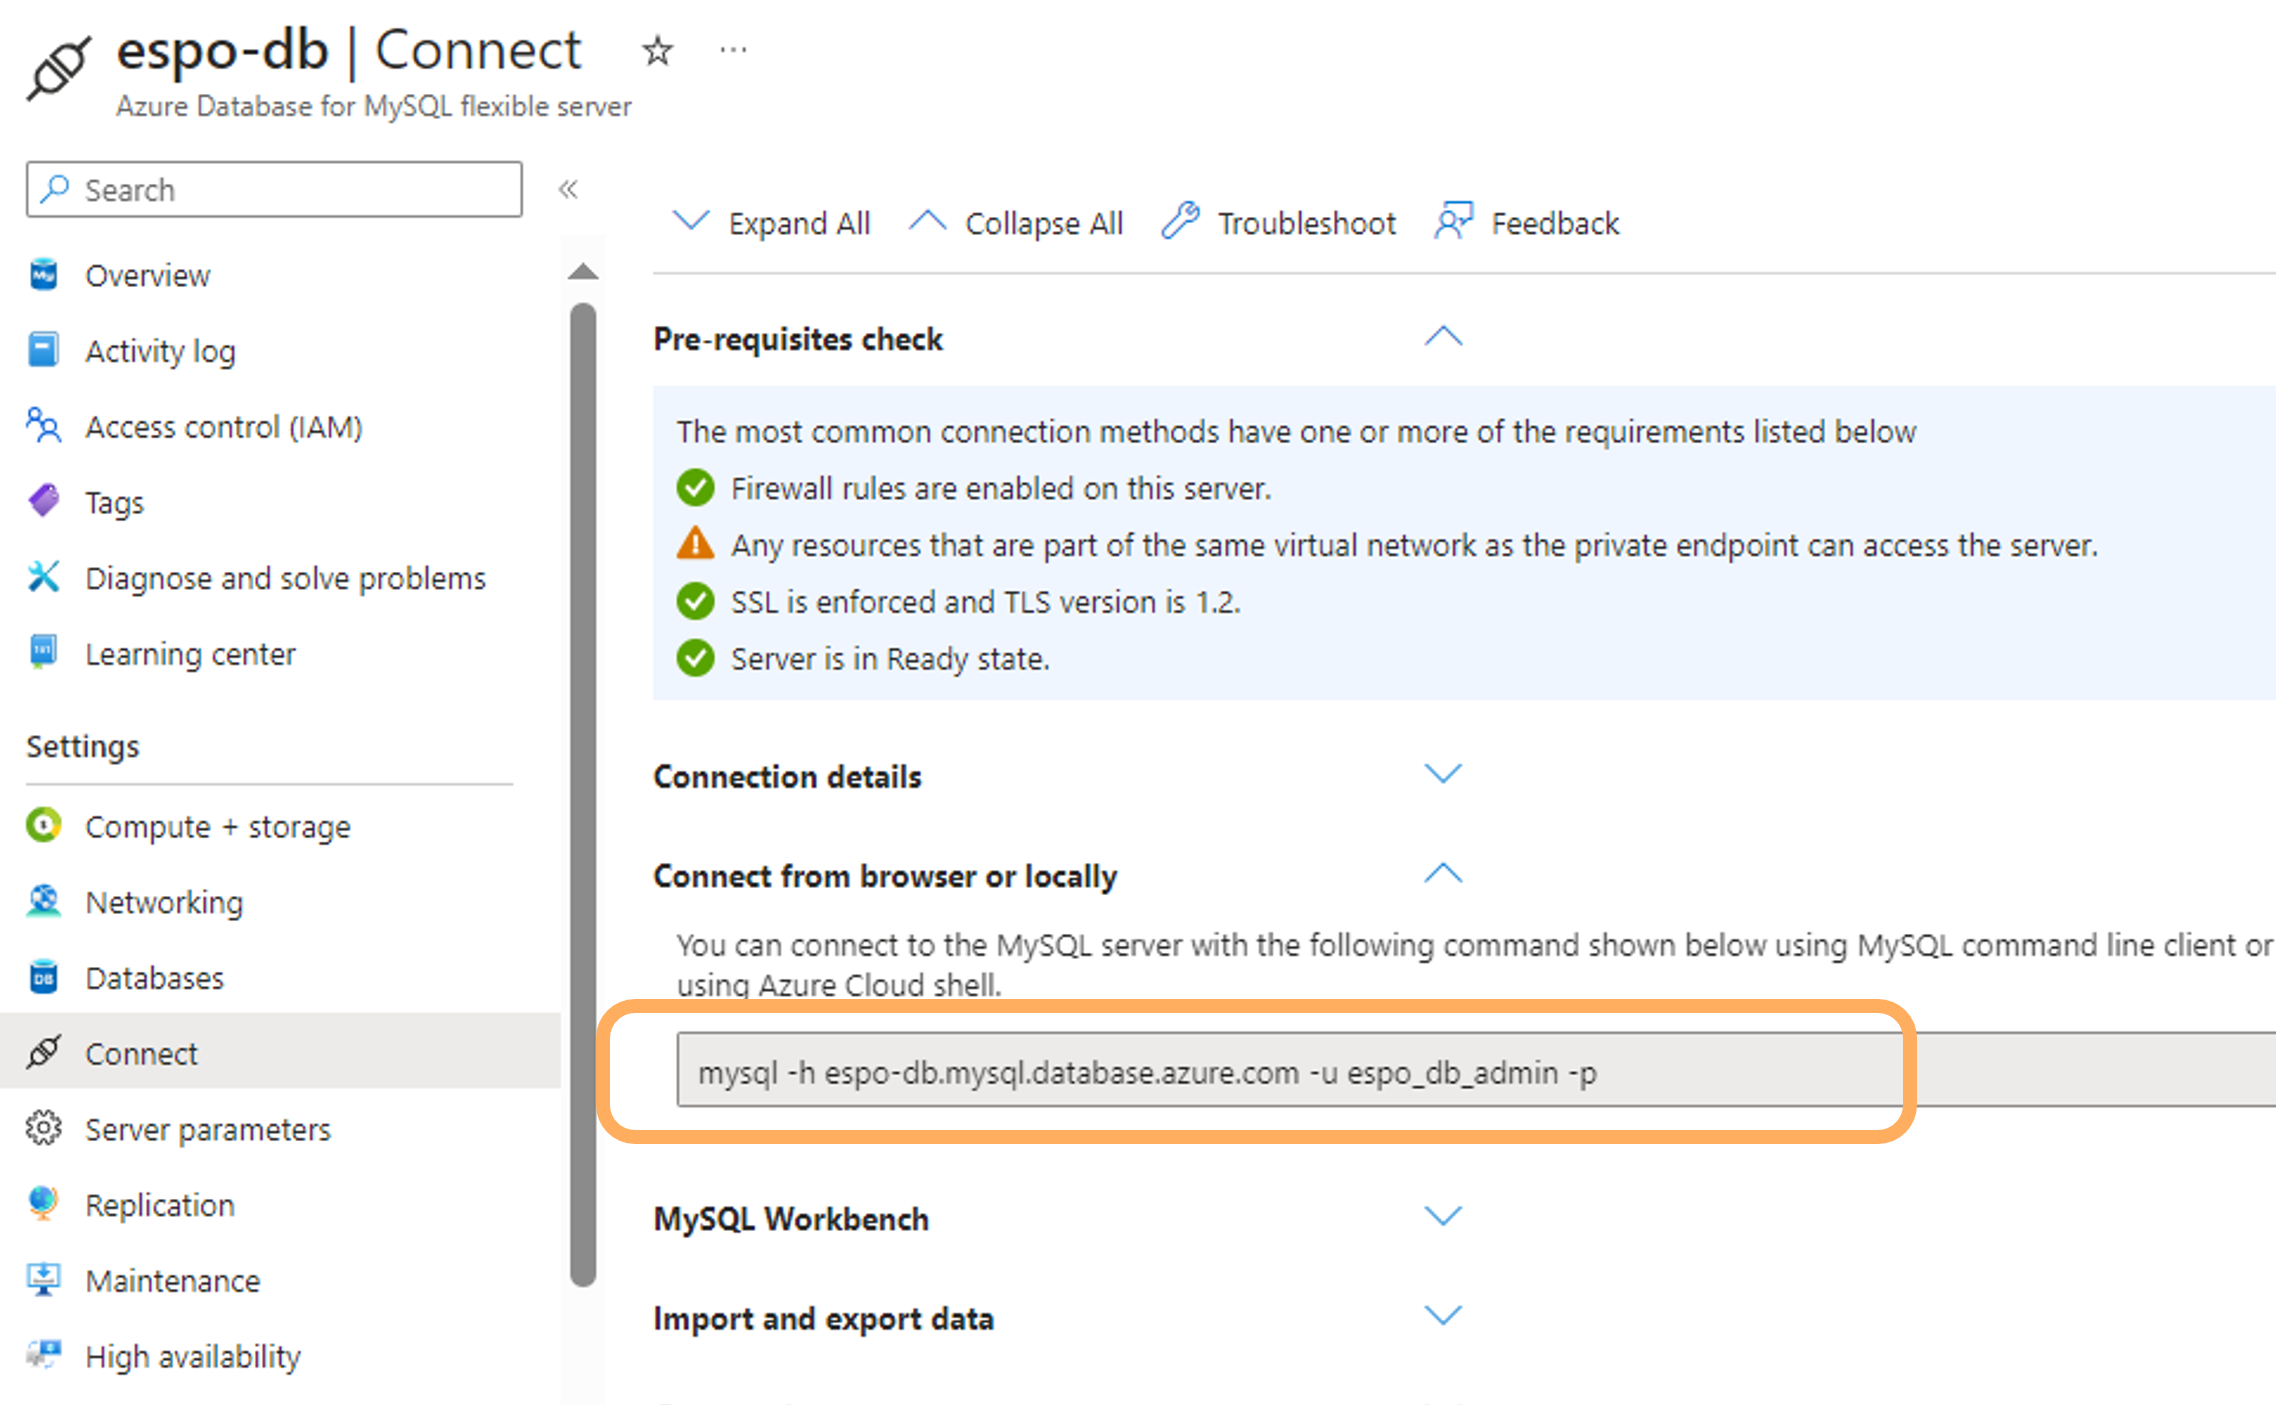
1. Access to the MySQL database server
Go to the created MySQL resource in the resource group, in the Connect tab, copy the sample cmd line _Connect from browser or locally_.
From the terminal, paste the command to enter the mySQL server. Use the password created in step 2 when prompted.
MySQL package should be installed to execute MySQL command lines:
```sudo apt install mysql-client-core-8.0```
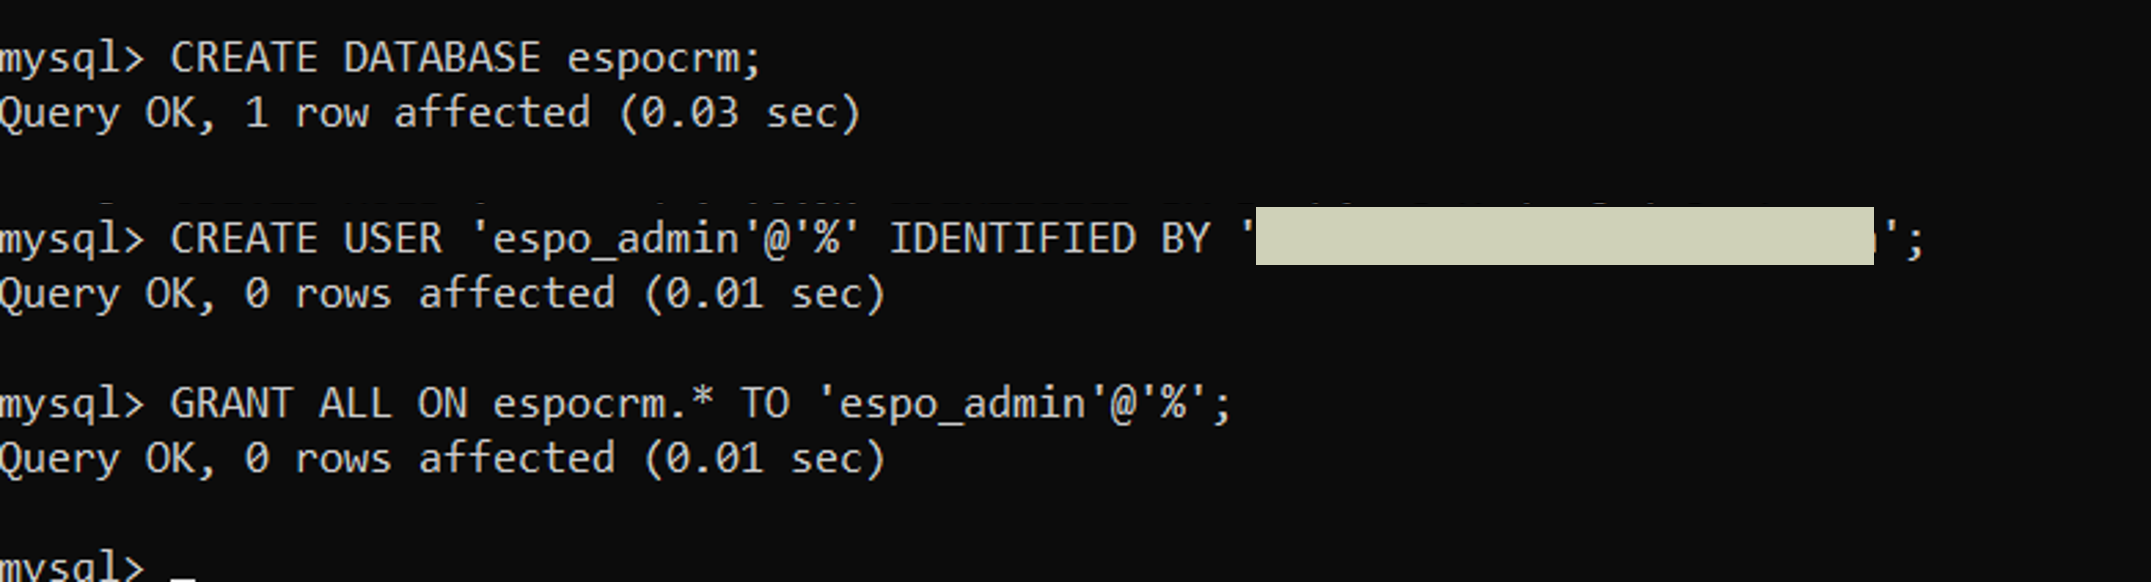
2. Create a database and a database user
You should be accessed to the MySQL server via the CLI. From here, SQL is the main language for communicating with the server.
Create a database container:
```
CREATE DATABASE ;
```
Create a new MySQL user, password and grant the user all permissions to the created database:
```
CREATE USER ''@'%' IDENTIFIED BY '';
GRANT ALL ON .* TO ''@'%';
```
3. Copy data dump to the new database
Exit the connection to the database server and return to the VM. Copy the dump .sql created in step 1 to the created database in the server in the previous step :
```
mysql -h -u -p --database < mysqldump_.sql;
```
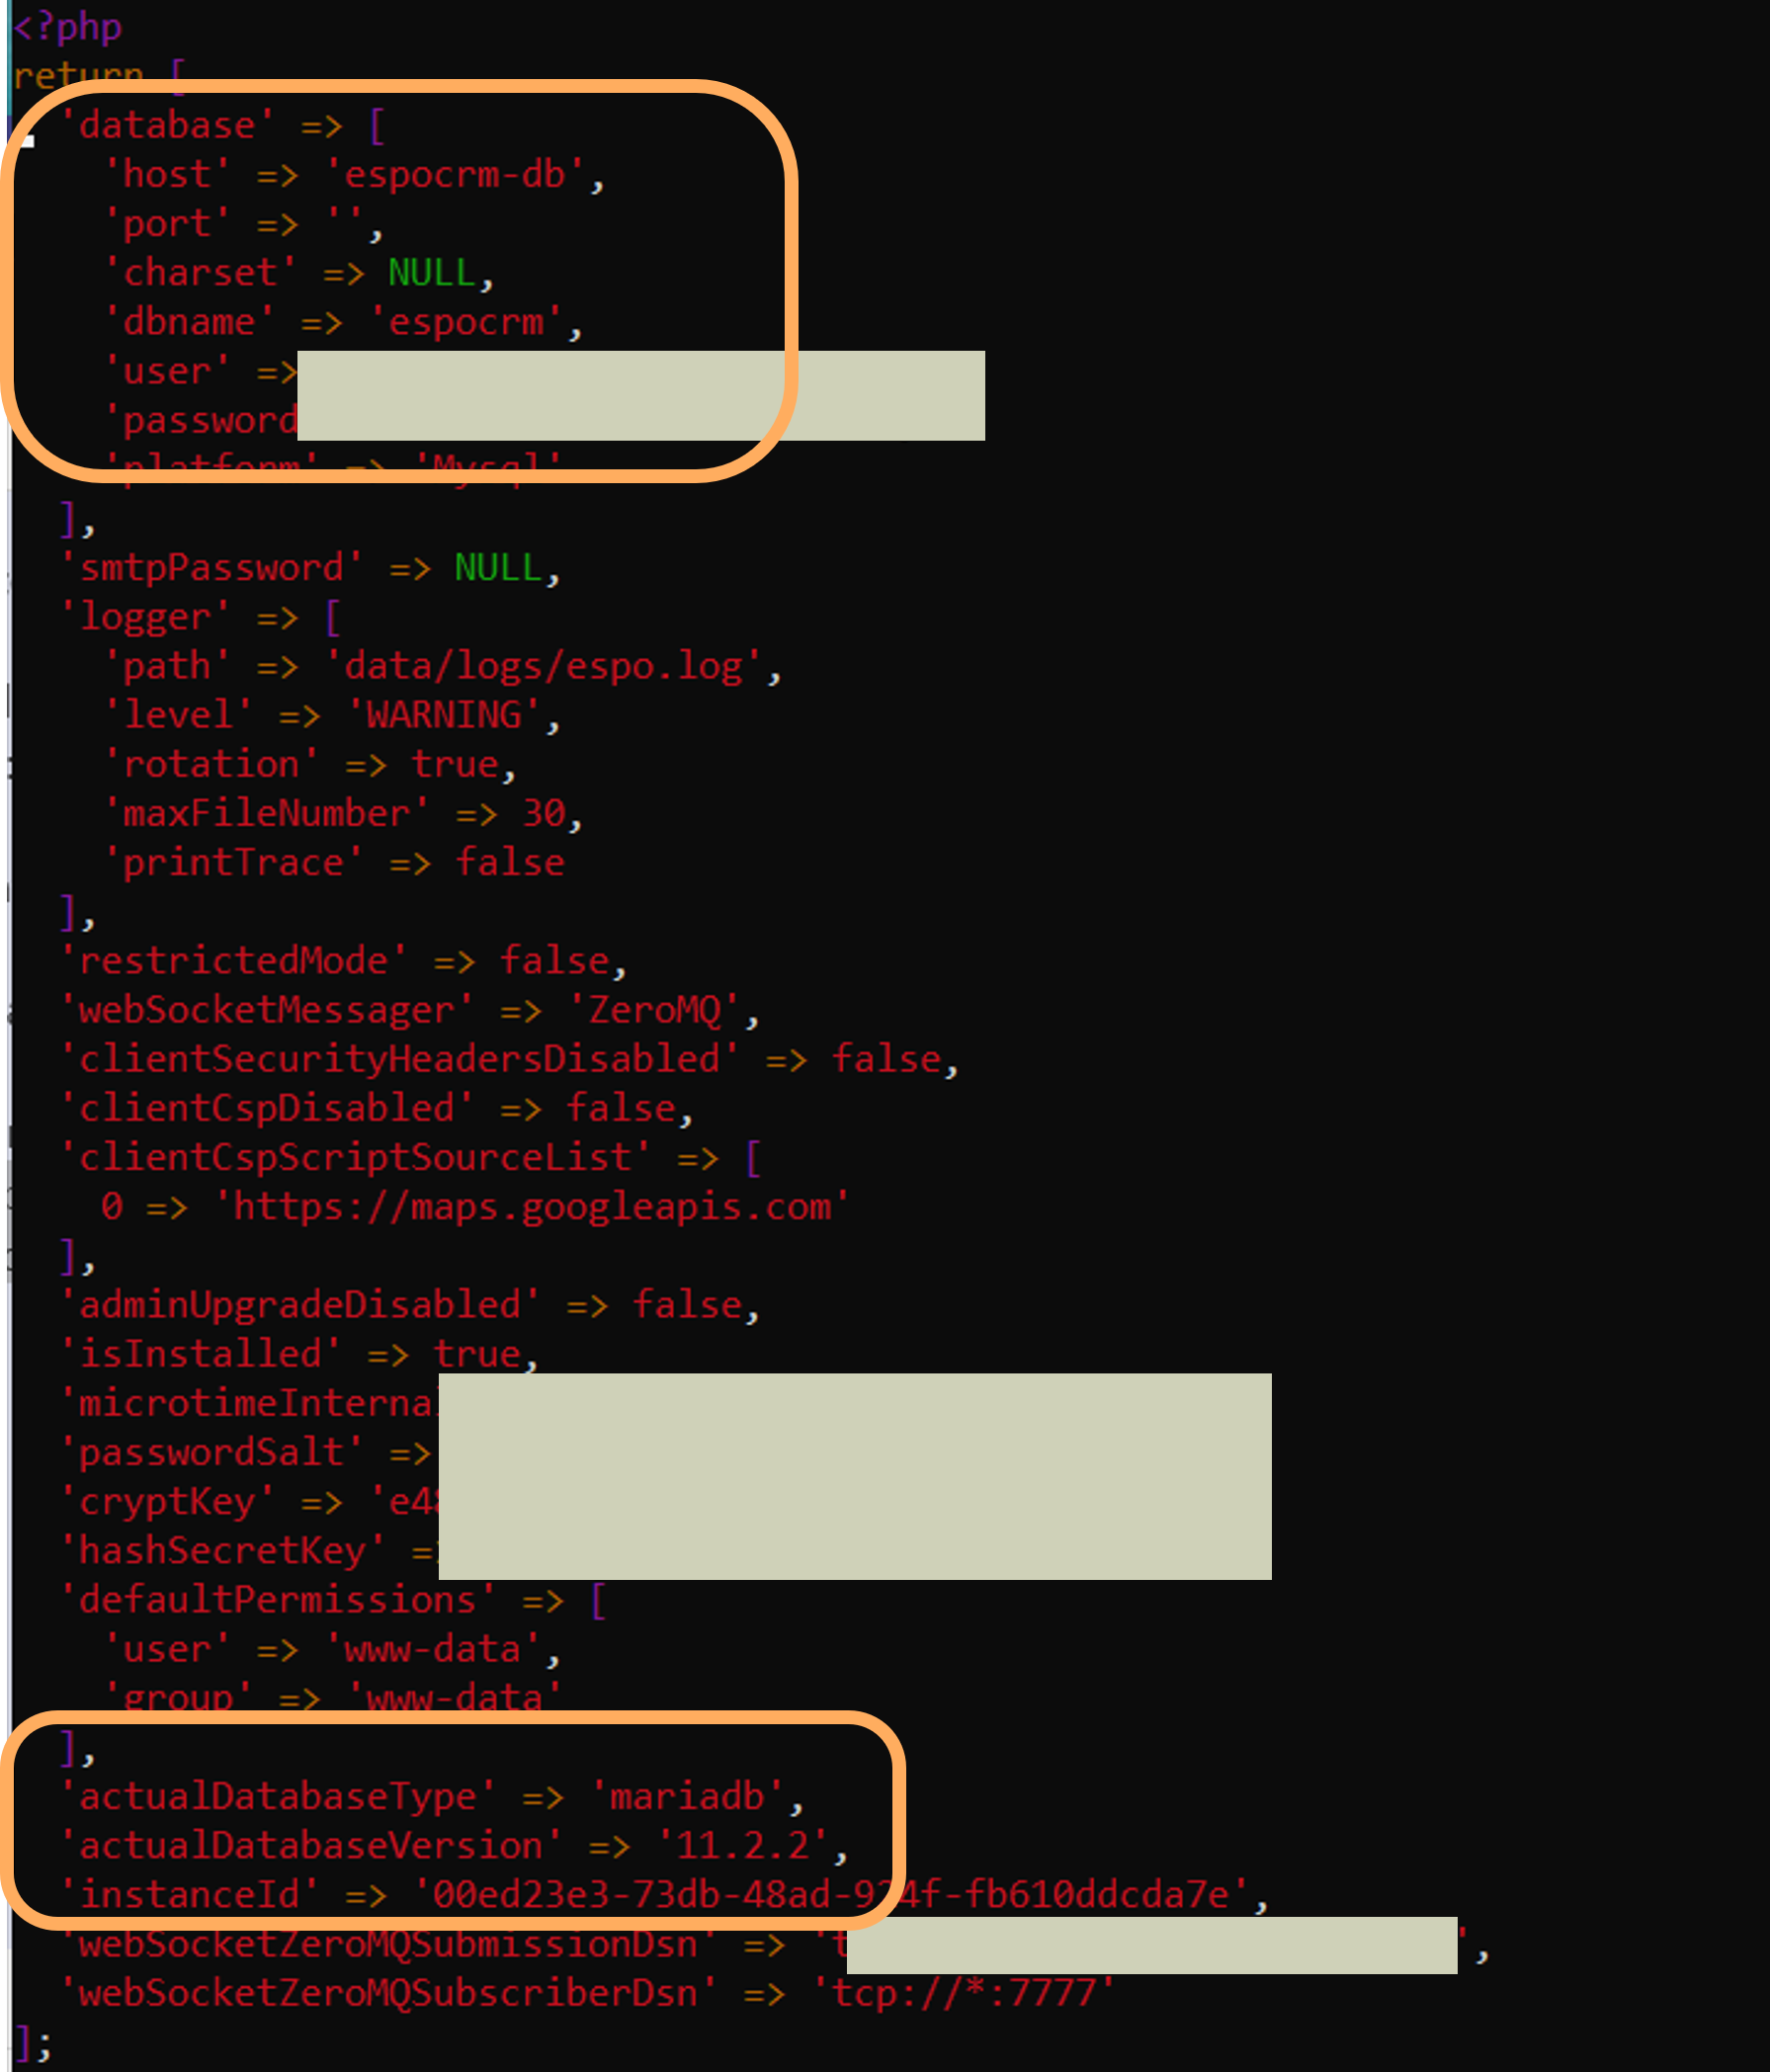
4. Point EspoCRM to the external database
In the VM, go to the EspoCRM data configuration directory :
```
cd /var/www/espocrm/data/espocrm/data
```
Edit the _config-internal.php_ file using your preferred text editor (e.g. [VIM](https://www.linuxfoundation.org/blog/blog/classic-sysadmin-vim-101-a-beginners-guide-to-vim)) by changing :
- _host_, _dbname_, _username_, _password_ of the created user of the database,
- _actualDatabaseType_ to _"mysql"_, _actualDatabaseVersion_ to its version (e.g _8.0_)
Restart the docker container with the command below. The external MySQL database should then be connected to the Espo.
```
sudo /var/www/espocrm/command.sh restart
```
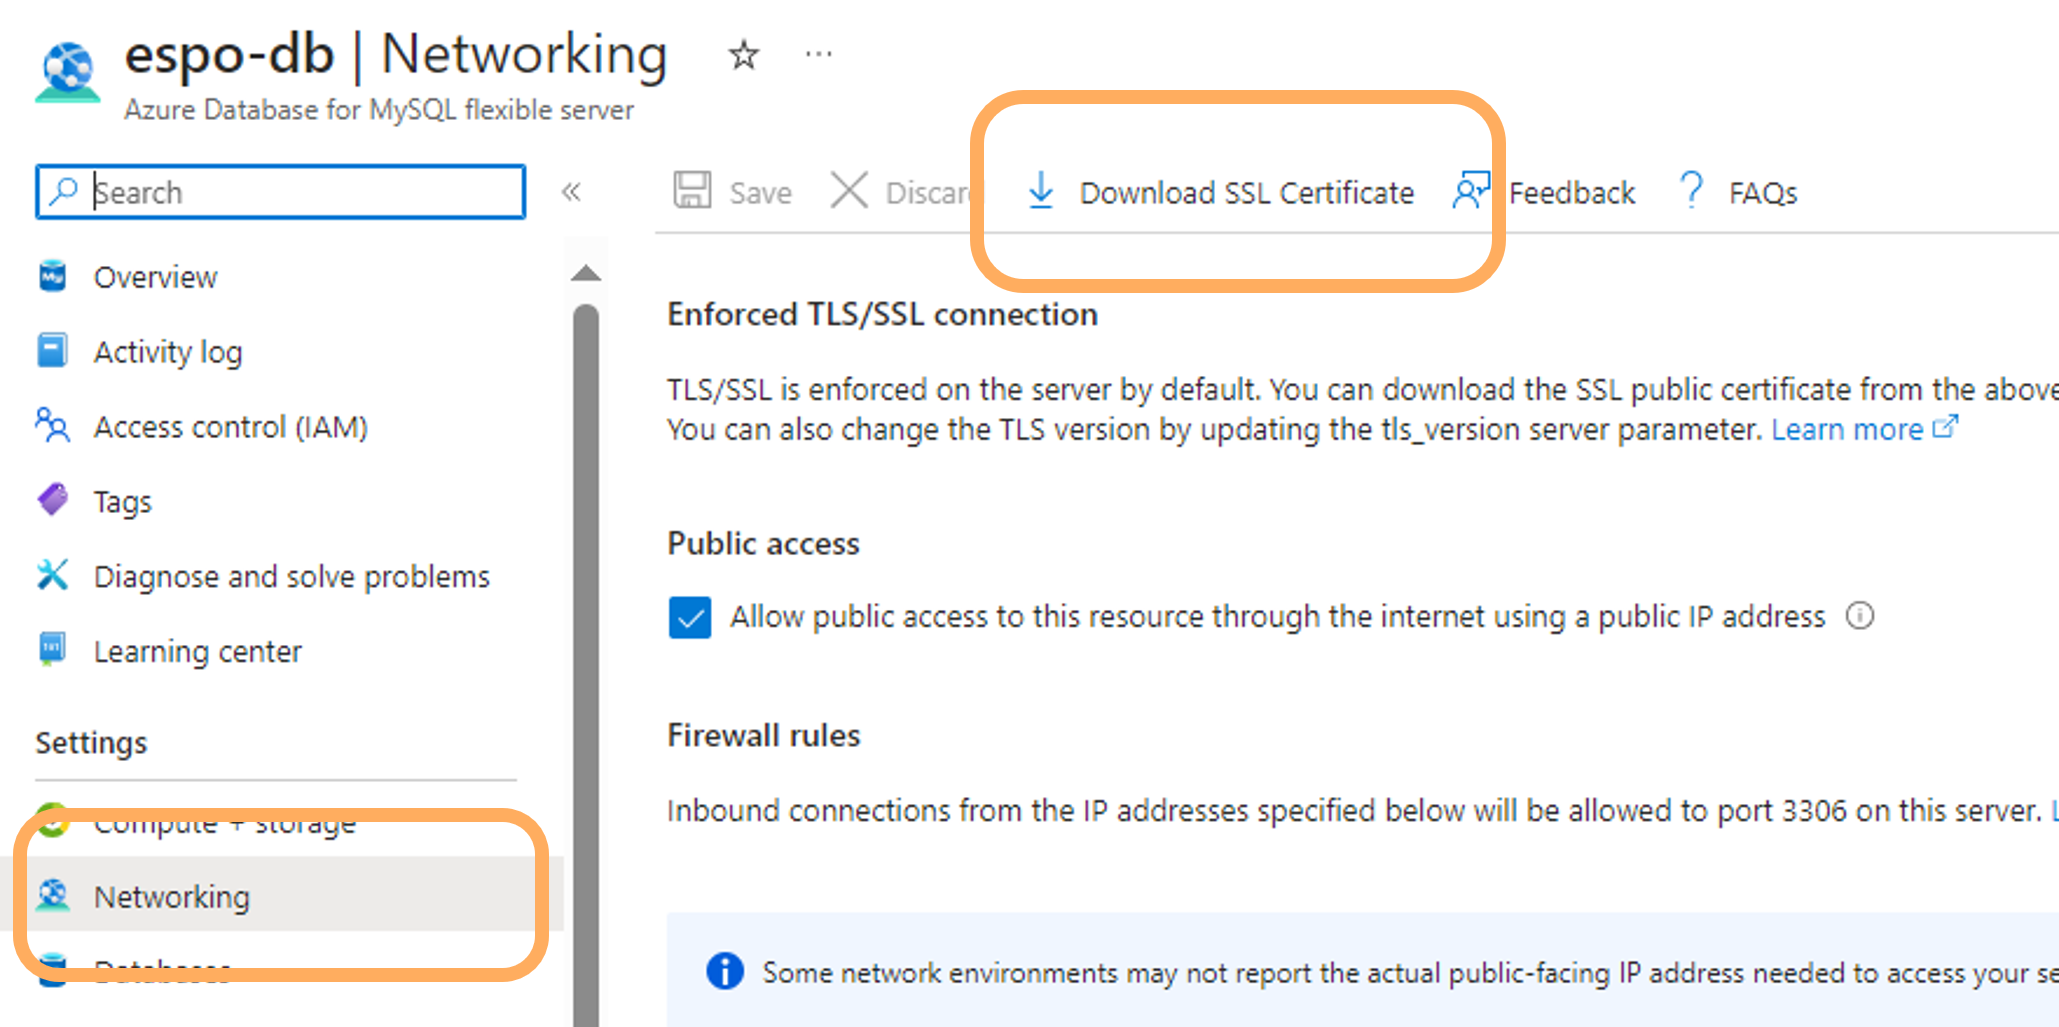
### [Optional] Secure connection to the database server
The secure connection here is done with SSL certificate provided by Azure MySQL.
1. Download the SSL certificate `Digicert Global Root CA` from the _Networking_ of the Azure MySQL database resource. It should be a `.pem` certificate.
2. Copy the certificate to the EspoCRM VM somewhere in its `data` (e.g. `data/certs`) directory using the command below or use (S)FTP client software like [WinSCP](https://winscp.net/eng/index.php):
```
scp .\.pem @:/home/
sudo mv .pem /var/www/espocrm/data/espocrm/data/certs
```
3. Edit the Espo data configuration file config-internal.php by adding file under `database` this line:
```
'sslCA' => '/var/www/espocrm/data/espocrm/data/certs/.pem'
```
4. Restart the docker and SSL should be then used.
```
sudo /var/www/espocrm/command.sh restart
```
5. The cert is successfully installed if accessing the EspoCRM instance returns no error `500`. If error raises, check the EspoCRM log.