It's hard to imagine the Node.JS ecosystem without Express framework. It is not only the one that people use the most, but also as the one that inspired many other frameworks. You can find a flavor that started from Express in almost every modern web-framework nowadays.
If you ever use Express in production, you probably has a need to an authorization and permissions solution into it.
A middleware that can determine what your users can and can't do in your Express endpoints.
While it is always start easy as one line ticket state Add RBAC to the project, it's always end up with a lot of code and annoying bugs coming with it.
In this article, we will explain a new and efficient way to deal with permissions in Express applications. We will demonstrate how to use Permit.io SaaS offer to create a lean and fast authorization middleware for your Express application. By the end of this article, you'll have the knowledge to implement a much better authorization solution to your application with much less code and bugs.
Let's dive in.
One of the main reasons for the authorization mess we describe, is the usage of policy logic inside the middleware. While in the ideal world, the middleware will only enforce the policy, in the real world, it is also responsible for the policy logic. Let's take a classic code example: In the begining, you only have one row that check the user role and verify the DB for the permissions.
    if (user.role === 'admin') {
        next();
    } else {
        res.status(403).send('Forbidden');
    }
But then, you need to add a new role, and you need to add a new row to the middleware.
    if (user.role === 'admin' || user.role === 'manager') {
        next();
    } else {
        res.status(403).send('Forbidden');
    }
And then, you need to add a new permission, and you need to add a new row to the middleware.
    if (user.role === 'admin' || user.role === 'manager' || user.role === 'user' && user.permissions.includes('read')) {
        next();
    } else {
        res.status(403).send('Forbidden');
    }
Continue with this pattern, you end up with a huge middleware that is hard to maintain and hard to test. There are two best practices that can help you to avoid this mess:
- Design your permissions model in a way that not depend on the application implementation. Instead of
Add RBAC to the project, think aboutDesign a Permission Model to an Applicationand only then implement the details that relelvant to you. - Do not use policy logic inside the middleware. Instead of it, use a dedicated service that will be responsible for the policy logic. For the latter, we will show later how Permit.io solves you the problem, but first, let's talk about the first method and learn how to design a permission model.
For the purpose of this article, we will use an Express-based blogging application. The application code is available on Github and we encourage you to clone it and work on this tutorial interactively. The code is consist three files:
app.js- The main application file. Consist the relevant API endpoints for a working blogging application (the real function is just a mock).
...
app.get('/post', mockPublic);
app.get('/post/:id', mockPublic);
app.post('/post', authentication, mockPrivate);
app.put('/post/:id', authentication, mockPrivate);
app.delete('/post/:id', authentication, mockPrivate);

app.get('/author', mockPublic);
app.get('/author/:id', mockPublic);
app.post('/author', authentication, mockPrivate);
app.put('/author/:id', authentication, mockPrivate);
app.delete('/author/:id', authentication, mockPrivate);

app.get('/comment', mockPublic);
app.get('/comment/:id', mockPublic);
app.post('/comment', authentication, mockPrivate);
app.put('/comment/:id', authentication, mockPrivate);
app.delete('/comment/:id', authentication, mockPrivate);
...middleware/authentication.js- The authentication middleware. A simple authentication mock that will add a user object from a JWT token to the request object.
...
const authentication = (req, res, next) => {
    const authHeader = req.headers['authorization'];
    const token = authHeader && authHeader.split(' ')[1];
    if (token == null) return res.sendStatus(401);

    jwt.verify(token, process.env.ACCESS_TOKEN_SECRET, (err, user) => {
        if (err) return res.sendStatus(403);
        req.user = user;
        next();
    });
};
...app.test.js- The test file. A simple test file that will verify that the application is working as expected.
...
// Init a token for authenticared requests
const token = 'Bearer ' + jwt.sign({ username: '[email protected]' }, process.env.ACCESS_TOKEN_SECRET, { expiresIn: '15m' });
...
test('CRUD Posts', async () => {
    await request(app).get('/post').expect(200);
    await request(app).get('/post/1').expect(200);
    await request(app).post('/post').expect(401);
    await request(app).put('/post/1').expect(401);
    await request(app).delete('/post/1').expect(401);

    await request(app).post('/post').set('Authorization', token).expect(200);
    await request(app).put('/post/1').set('Authorization', token).expect(200);
    await request(app).delete('/post/1').set('Authorization', token).expect(200);
});
...
To see it in action, just do the following commands (assuming you have Node.JS and NPM installed on your machine):
- Clone the repository in your desired location
git clone -b tutorial [email protected]:permitio/permit-express.git- Install the dependencies
npm install- Run the tests that will verify that everything is working as expected
npm testAs you can see in the output, the tests are passing and the application is working as expected.
When integrating permissions into an application, it is crucial to carefully design the model and determine which permissions should be granted to users. To achieve this, we consider three key components: the user's identity and role, the resources being accessed, and the actions that can be performed on those resources. The amalgamation of these components is referred to as a "policy."
Keeping these entities in mind, we can translate our application requirements into specific conditions and policies that reflect the desired permissions.
Let's analyze the APIs of our demonstration blog:
-
Roles can be assigned to authenticated users, such as Admin, Writer, and Commenter.
-
Actions can be associated with HTTP methods (Get, Create, Update, Delete, Patch) to simplify the process.
-
Resources represent the various endpoints we need to manage access for, including posts, authors, comments, and so on.
By mapping all these elements, we can create the following table:
TBD - Table from fastify
Having established the foundational roles, resources, and actions, we can now map the desired permissions based on the principle of least privilege:
-
Admins have the ability to perform any action on any resource.
-
Writers can create, update, patch, and delete posts, as well as retrieve comments.
-
Commenters can retrieve and create comments.
By adhering to these defined conditions, we ensure that the permissions model follows the principle of least privilege, granting users only the necessary access required for their respective roles and tasks.
Now that our model is designed, it's time to put it into action! As mentioned before, we don't want to mix the policy code with the API logic. To maintain a clean structure, we'll utilize a separate service specifically designed for defining and configuring policies. This approach allows the service to focus on enforcing permissions while the application code handles critical application logic.
Introducing Permit.io, an authorization-as-a-service product that streamlines permission configuration and enforcement, ensuring your code remains organized and your application access is controlled. The platform offers an extensive free tier and operates on a self-service basis.
To configure the desired application permissions, follow these steps:
-
Log in to Permit.io by visiting app.permit.io.
-
Once logged in, navigate to the Policy page and create the following roles:
-
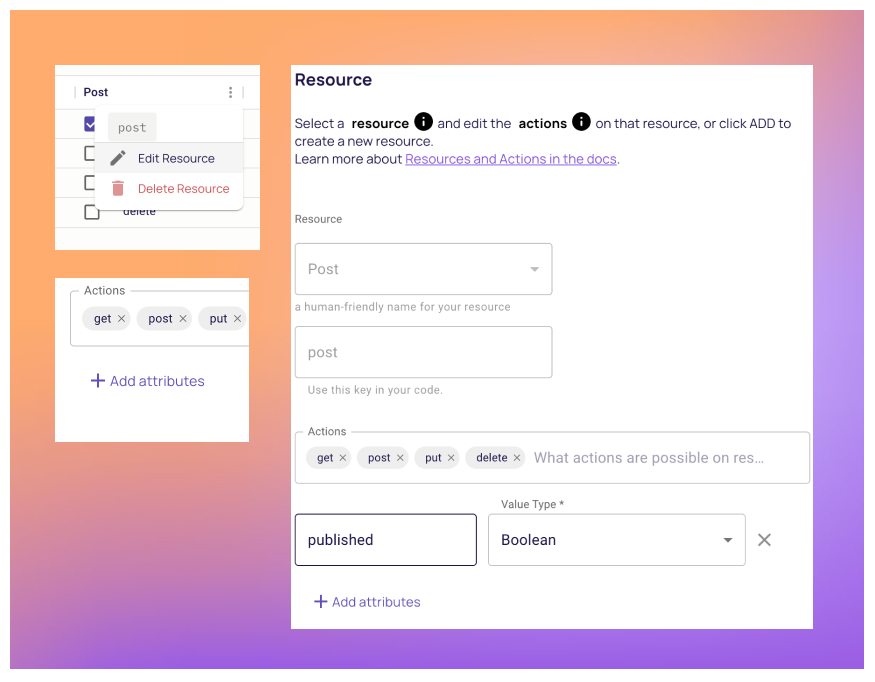
Proceed by creating the necessary resources along with their respective actions:
-
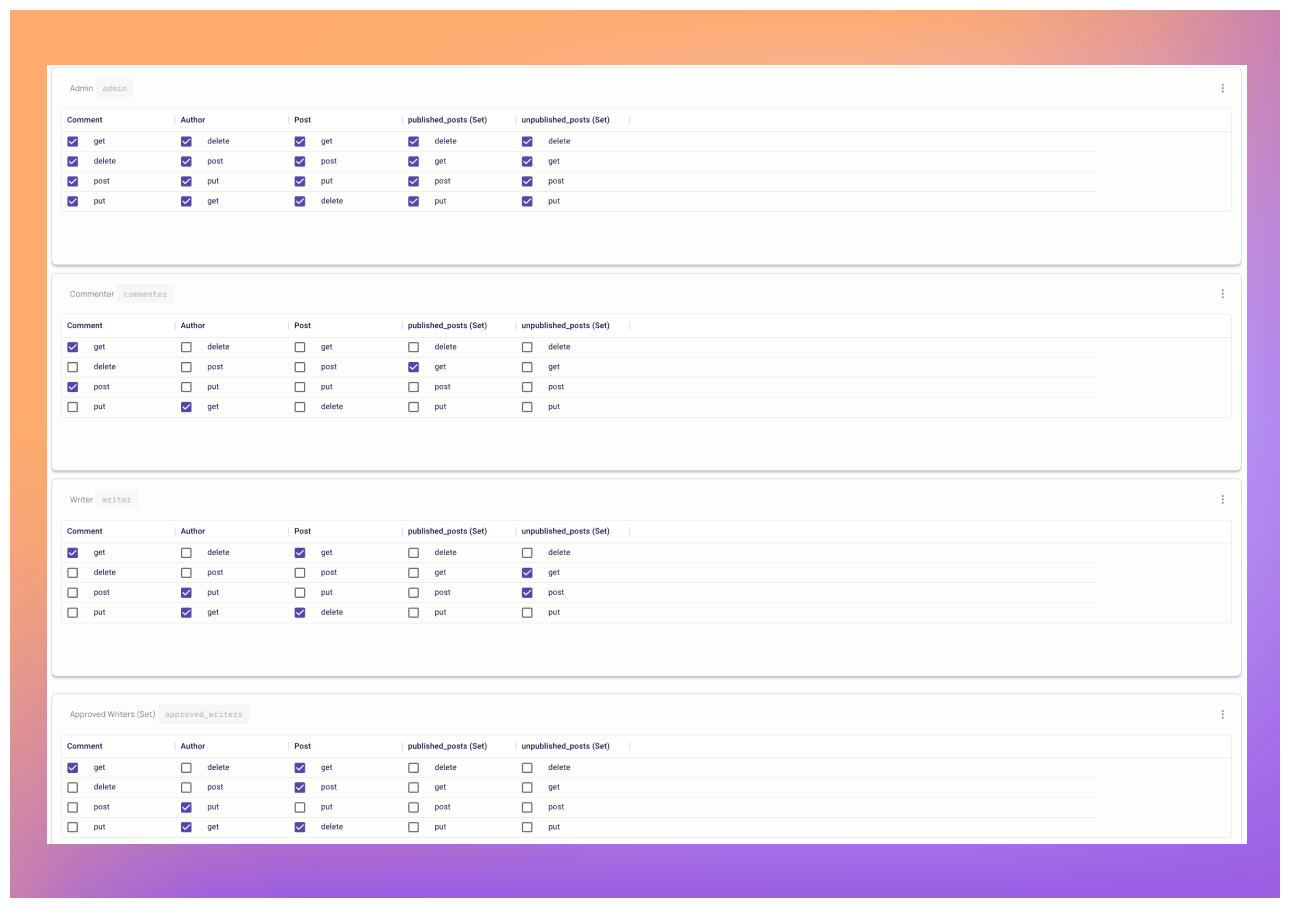
Customize the policy table by implementing the desired conditions through the selection of relevant checkboxes:
-
To complete the configuration, create three user accounts and assign them the appropriate roles using the Users screen:


That's it! Now that we've established our permissions, it's time to integrate them with our Express application.
Now that we configured the permissions model in Permit.io, we can use it in our application. As you remember, our main goal is to keep the middleware as lean as possible. Make it only check and enforce the permissions against the configuration made in Permit.io.
- Before we are starting using Permit.io, we need to install the SDK.
npm install permitio- Now that we install the SDK, we need to get the SDK key from Permit.io.

- Let's save the SDK key in the .env file in the root of the project.
PERMITIO_SDK_KEY=YOUR_SDK_KEY
- With our key configured, let's create a new file called
middleware/authorization.jsand add the following code to it.
const permit = require('permitio');

const permit = new Permit({
    token: process.env.PERMIT_SDK_SECRET,
    pdp: process.env.PDP_URL
});

const authorization = (req, res, next) => {

}

module.exports = authorization;- With empty auhtorization middleware set up, we can add the middleware to the relevant protected rotues in the
app.jsfile.
const authorization = require('./middleware/authorization');

...
app.post('/post', authentication, authorization, mockPrivate);
app.put('/post/:id', authentication, authorization, mockPrivate);
app.delete('/post/:id', authentication, authorization, mockPrivate);
...
app.post('/author', authentication, authorization, mockPrivate);
app.put('/author/:id', authentication, authorization, mockPrivate);
app.delete('/author/:id', authentication, authorization, mockPrivate);
...
app.post('/comment', authentication, authorization, mockPrivate);
app.put('/comment/:id', authentication, authorization, mockPrivate);
app.delete('/comment/:id', authentication, authorization, mockPrivate);
...- Let's run the tests again and see that everything is still passed (remember our authorization logic is still empty).
npm test- Now, let's add the logic to the middleware. In the function, add a call to permit.check with the user, action, and resource we want to call.
...
    const action = method.toLowerCase(),
        url_parts = url.split('/'),
        type = url_parts[1],
        key = url_parts[2] || null;
    const allowed = await permit.check(username, action, {
        type,
        key,
        attributes: body || {}
    });

    if (!allowed) {
        res.sendStatus(403);
        return;
    }
    next();
...- Let's run the tests again and see the failed results as our tests configured user has no admin role.
npm test
#  FAIL  ./app.test.js
#   API Test
#     ✕ CRUD Post (802 ms)
#     ✕ CRUD Author (615 ms)
#     ✕ CRUD Comment (664 ms)

#   ● API Test › CRUD Post

# expected 200 "OK", got 403 "Forbidden"- To fix the tests, let's change the username in our tests to
[email protected]
...
const token = 'Bearer ' + jwt.sign({ username: '[email protected]' }, process.env.ACCESS_TOKEN_SECRET, { expiresIn: '15m' });
...- And.. run the tests again, and their are now PASSED!
npm testAt this point, as we protected all the endpoints, we can test the permissions model.
- Let's add more tokens for different users in the beginning of the test file.
...
    const token = 'Bearer ' + jwt.sign({ username: '[email protected]' }, process.env.ACCESS_TOKEN_SECRET, { expiresIn: '15m' });
    const writer = 'Bearer ' + jwt.sign({ username: '[email protected]' }, process.env.ACCESS_TOKEN_SECRET, { expiresIn: '15m' });
    const commenter = 'Bearer ' + jwt.sign({ username: '[email protected]' }, process.env.ACCESS_TOKEN_SECRET, { expiresIn: '15m' });
...- And add the tests for the writer and commenter users.
...
await request(app).post('/post').set('Authorization', writer).expect(200);
await request(app).put('/post/1').set('Authorization', writer).expect(200);
await request(app).delete('/post/1').set('Authorization', writer).expect(200);
await request(app).post('/post').set('Authorization', commenter).expect(403);
await request(app).put('/post/1').set('Authorization', commenter).expect(403);
await request(app).delete('/post/1').set('Authorization', commenter).expect(403);
...Note: Enforcing ABAC policies requires deploying a local PDP - to get started, follow this guide.
Streamlining our Identity, Resource, and Action into a concise list of Roles, Resource types, and Action names can pose challenges in real-world scenarios, as demonstrated in our previous example.
However, simple Role-Based Access Control (RBAC) may not be sufficient if we encounter more complex requirements. For instance, if we desire an approval flow for blog content, allowing only approved writers to publish articles and restricting comments from specific geolocations or applying other fine-grained limitations, we need to consider Attribute-Based Access Control (ABAC).
Let's delve into the details of these conditions by incorporating attributes:
-
Admin users possess unrestricted access, enabling them to perform any action on any resource.
-
Writers have the ability to edit and delete posts, but they can only create unpublished posts.
-
Approved writers enjoy the freedom to create any type of post.
-
Commenters are permitted to create comments.
Implementing ABAC by introducing attributes to an RBAC model can be a complex task. However, Permit.io simplifies this process by facilitating a configuration change to support the new permission model without requiring modifications to the application code.
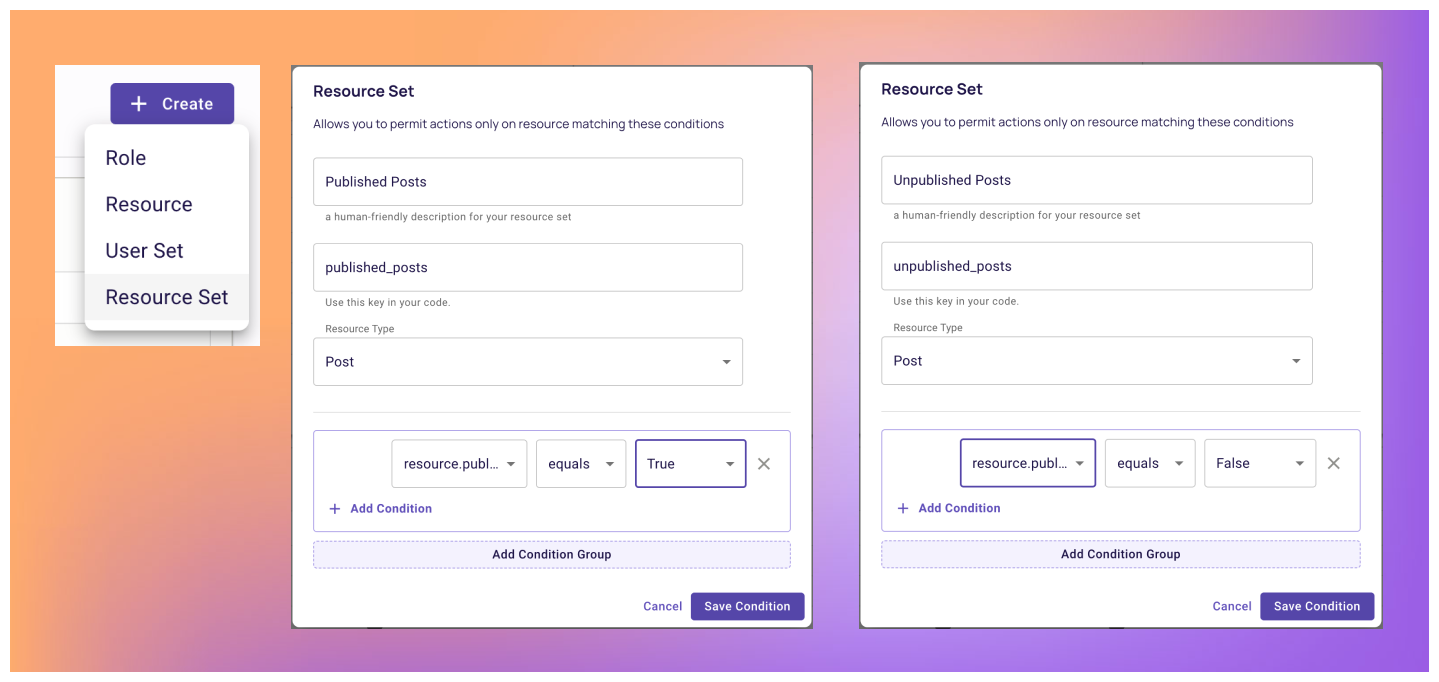
An effective approach to implementing ABAC involves utilizing Resource Sets and User Sets, which are constructed based on conditions that combine user and resource attributes. Let's explore how Permit enables us to configure these policies:
-
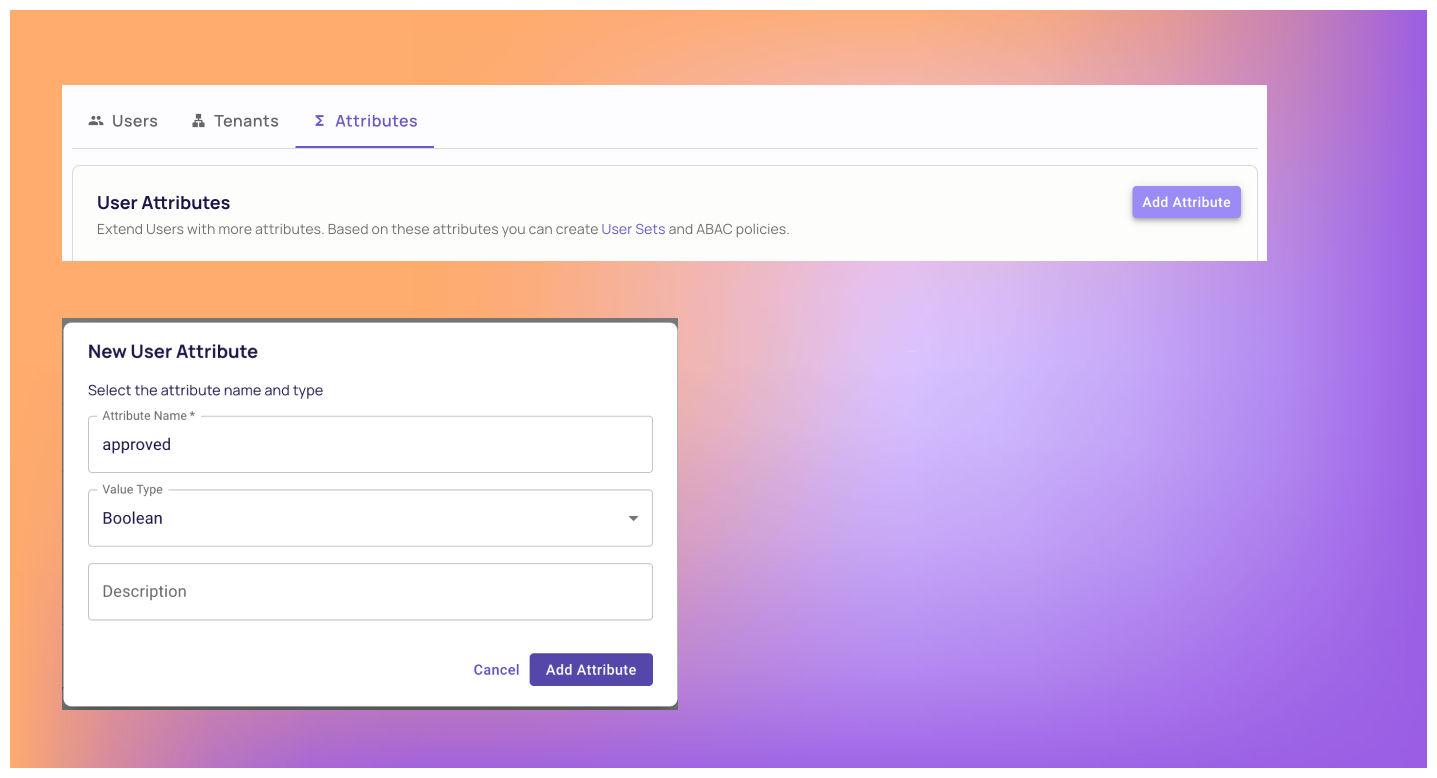
Begin by configuring attributes for the relevant resources. Access the Policy Editor, click the three dots on the resource table, and select "Add Attribute."
-
With the resource attributes defined, create Resource Sets within the Policy Editor to establish the necessary conditions.
-
To match the policy with user attributes, configure user attributes as well. Access the Users screen, navigate to the "Attributes" tab, and create the desired approved attribute.
-
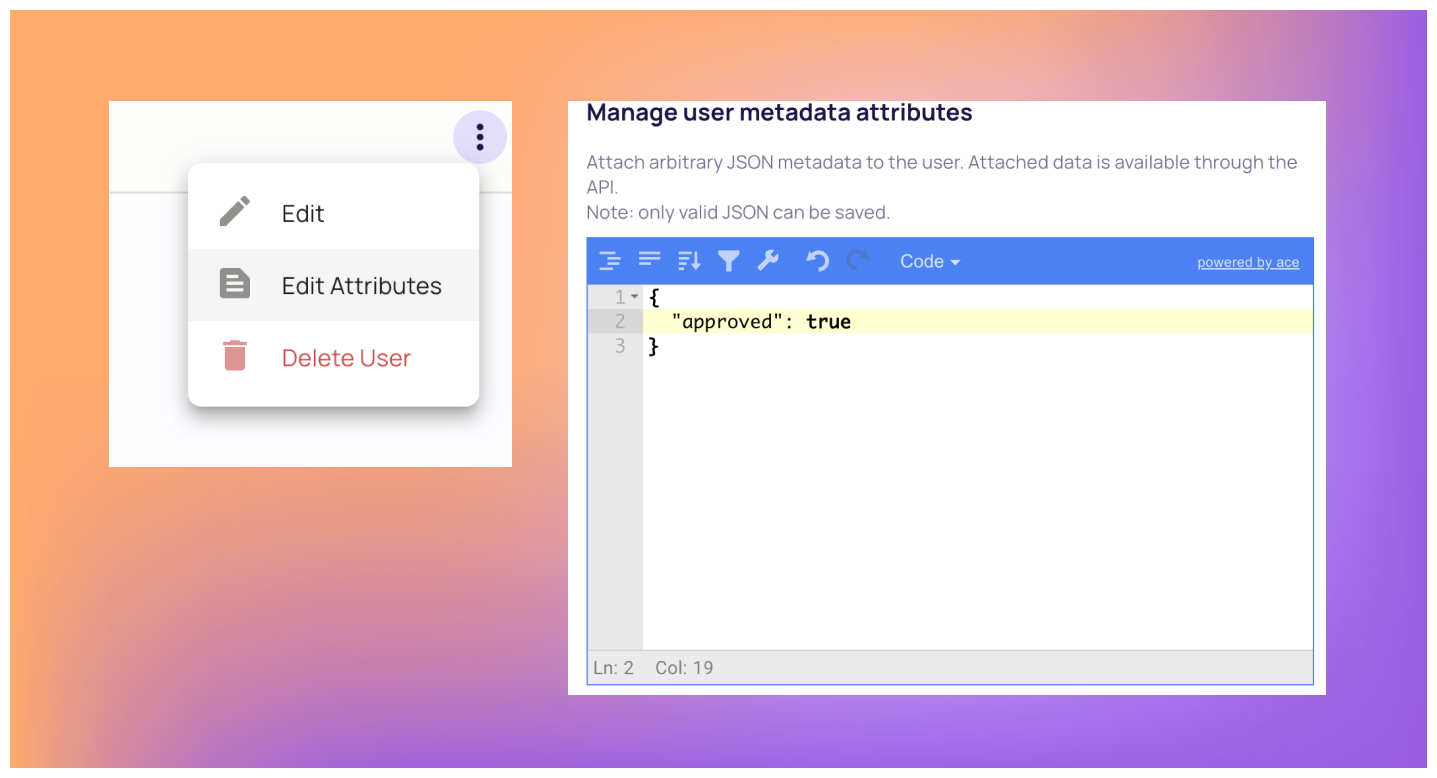
Create a new user in the Writer role and assign them the approved attribute in their profile. This user will serve as a reference for evaluating the ABAC policy later. Let's use the following username
[email protected] -
Now that Permit.io recognizes the custom user attributes, create User Sets in the Policy Editor to accommodate these conditions.
-
With the conditions in place, adapt the policy configuration in the policy table to align with the newly defined conditions.

By adopting this approach, we can enforce permissions without the need to rewrite our application code. The middleware we initially developed for private routes will seamlessly continue its role by enforcing permissions based on the new policy model configuration we assigned.
- By running our current tests, you can see that now our writer can't create a post.
npm test
#  FAIL  ./app.test.js (8.677 s)
#   API Test
#     ✓ CRUD Post (2909 ms)
#     ✕ CRUD Post by writer and commenter (893 ms)
#     ✓ CRUD Author (2146 ms)
#     ✓ CRUD Comment (2256 ms)

#   ● API Test › CRUD Post by writer and commenter

#     expected 200 "OK", got 403 "Forbidden"

#       24 |
#       25 |     test('CRUD Post by writer and commenter', async () => {
# > 26 | await request(app).post('/post').set('Authorization', writer).expect(200);- Let's fix those tests by passing objects with the different published attributes.
await request(app).post('/post').send({
    published: false,
}).set('Authorization', writer).expect(200);
await request(app).put('/post/1').send({
    published: false,
}).set('Authorization', writer).expect(200);- Now, let's run the tests again and see that they are now passed.
npm test
#  PASS  ./app.test.js
#   API Test
#     ✓ CRUD Post (132 ms)
#     ✓ CRUD Post by writer and commenter (212 ms)
#     ✓ CRUD Author (92 ms)
# ✓ CRUD Comment (87 ms)- Now, let's test the approved users. We will add a new test for the approved user.
// Add a new token for the approved user we just created
const approvedWriter = 'Bearer ' + jwt.sign({ username: '[email protected]' }, process.env.ACCESS_TOKEN_SECRET, { expiresIn: '15m' });
...
// Add a test case
    test('CRUD Post by approved writer', async () => {
        await request(app).post('/post').send({
            published: true,
        }).set('Authorization', approved).expect(200);
        await request(app).put('/post/1').send({
            published: true,
        }).set('Authorization', approved).expect(200);
    });
...
As you can see, no application code changes were required to enforce the new policy. Permit.io's ABAC capabilities enable us to implement complex policies without the need to modify our application code.
By now, you should have a basic understanding of how to implement a basic authorization model into your Express application, enforcing permissions with just a single line of code.
The next step would be to analyze the specific requirements of your application and incorporate a dependable permission model into it. As demonstrated in the article, it doesn't have to be overly complicated.
The plugin we developed for this blog is readily available for use. Simply adjust it to accommodate the relevant request fields of your application, and you're good to go.
If your organization has already implemented an authorization model and you're interested in learning more about scaling it effectively, consider joining our Slack community, where numerous developers and authorization experts discuss the process of building and implementing authorization. Join our Slack community.