You signed in with another tab or window. Reload to refresh your session.You signed out in another tab or window. Reload to refresh your session.You switched accounts on another tab or window. Reload to refresh your session.Dismiss alert
Let's see how we can control with eGeoffrey our heater but the same approach can be applied to other use cases like your irrigation system, air conditioning or anything which would require an actuator to be controlled manually or upon specific conditions like, for example, the day of the week or the time of the day.
Step 1: identify which technologies to integrate
If we have to control something, this something has to be connected with eGeoffrey. Install the relevant packages to make this happening. If e.g. the actuator controlling your heater is connected to a MySensors board, install egeoffrey-service-mysensors, if connected directly to your raspberry, install egeoffrey-service-gpio etc.
Step 2: register your actuator
Register a new sensor in "House" / "Sensors" and associated it to the service just installed. In my house I have a MySensors node with a relay connected to the boiler (when the relay is closed the heater is on, when open the heater is off).
The sensor is configured as "Actuator" (under the "Service" configuration) meaning that every value set to the sensor is either stored in the database as well as is dispatched to the remote device via the capabilities of the service, in this case service/mysensors).
Let's call it heater_actuator from now on.
For testing purposes, you can click on "Actions" / "Set Value" and try with 0 and 1 to turn the remote relay on and off.
Step 3: create helper sensors
Here things can be made complex as you like. Let me walk you through a pretty articulated example but you are more than welcome to start simple at first and then add more and more complexity to the system. What I want to achieve in this example is the following:
Ability to turn on and off the heater with a switch through the web interface
Ability to keep track of the heater's status (in my case the remote device is battery powered so there is a delay between me turning the heater on and the relay to actually trigger)
Ability to schedule the heater on specific timeframes
Ability to set a target maximum temperature when, if reached, the heater turns off automatically
To get all this working we need some helper sensors setup and specifically:
heater_switch with an integer format (will store only 0 or 1), not associated to any service. This will be displayed on the web interface with a "control" widget and will be used to turn the heater on or off manually.
heater_status with an integer format (will store only 0 or 1), associated to the MySensors module and reflects the status of the heater (the MySensors board will report 0 or 1 when the relay is closed/open)
heater_calendar: will be stored the calendar for scheduling through the web interface when turning on and off the heater
heater_scheduler_status: this is like heater status, will be stored if the heater has been turned on or off by the scheduler. This is useful because we don't want the recurrent schedule to interfere with the manual switch
heater_max_temperature: format "float", to store the maximum temperature the heater will be turned off automatically when reached, a sort of safeguard
Step 4: add a new page with heater control and scheduler
You want now to build a page displaying all of this information. The logic of when turning the heater on or off will be instead managed with rules.
Let's see what we have in the page:
a "status" widget displaying our heater_status sensor
a "control" widget displaying our heater_switch sensor. Since the sensor is not connected to any service, moving the switch will just change the status and nothing else. Since we also want to trigger the remote relay we need to connect it with the heater_actuator previously created. In the configuration of the widget, set in "Additional Actions to Execute" SET heater_actuator. This means every time you switch on or off, the same value will be also set to the actuator sensor (which eventually will be transmitted to the remote device)
A "value" widget displaying the current temperature (assuming you are measuring it somehow)
An "input" widget displaying heater_max_temperature so you can easily change the value stored in that sensor from the web interface
A "calendar" widget displaying heater_calendar. This will be used for scheduling the heater on and off from the web interface
a "status" widget displaying our heater_scheduler_status sensor
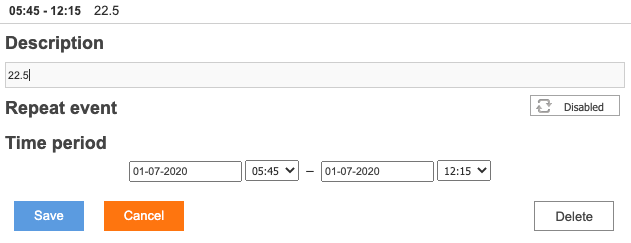
The calendar allows us to set the target temperature for specific timeframes as well as schedule recurrent events:
Step 5: add some rules to control the heater
With the page put together above we can manually control the heater but the real thing is to automate the execution.
First of all let's leverage what we entered in the calendar in the web interface. We need two rules, one for turning it on and the other for turning it off whenever is needed. Let's see the first one:
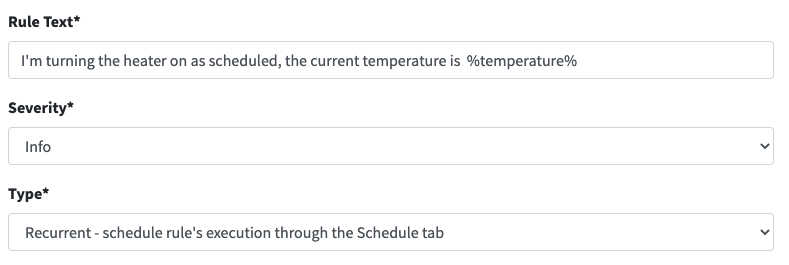
in the "General" tab, give it a name (e.g. heater_schedule_on), provide a text and configure it to be recurrent
in the "Schedule" tab, configure an interval of 1 minute. Every minute this rule will be evaluated to check if it is the time to turn the heater on.
in the "Conditions" tab, let's set when to turn it on. This is when:
There is something scheduled for now (calendar != is_null)
the boiler status is off
The manual switch in off (if already on why turning it on again)
The scheduler status is off (to prevent turning it on every minute the rule is run)
The current temperature is below the scheduled temperature (minus a delta to implement some sort of hysteresis principle)
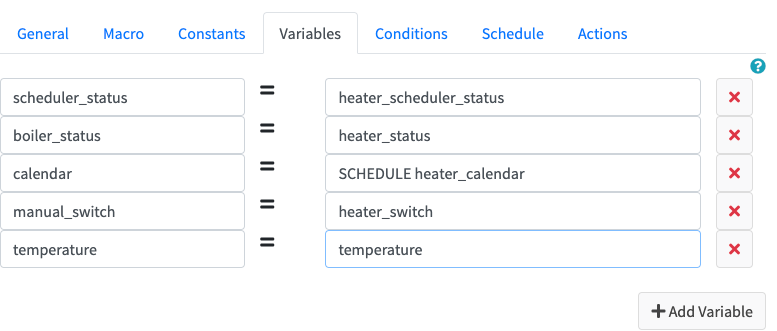
In the "Variables" tab, configure the variables used just above like the following. The only interesting piece is when using the SCHEDULE <sensor_id> command to deal with a "calendar" type of sensor. This will return the value set in the calendar if we are in between a timeframe which is set or an empty string otherwise.
In the "Constants" tab define the few constants we used above:
In the "Actions" tab we need to define what to do if it is the time to turn the heater on. We need to set the heater_scheduler_status to 1 so next time that will be evaluated will not trigger again and ask the actuator heater_actuator to eventually turn the heater on.
What else?
We need now another rule to do something similar but for turning it off of course with a different set of conditions:
We may want to have a rule checking every e.g. 5 minutes if the current temperature is higher than the maximum temperature we set in the web interface and if the heater is on, turning it off
an "on-demand" rule without any conditions which turns the heater on or off. This will never trigger by itself but will be used by the chatbot only. In this way if you tell the chatbot via the web interface or Slack to "turn the heater on" or something similar, it will do the job
What if we forget the heater on for a long time? We can have a recurrent rule which is checking if the heater is on for too long (e.g. more than X minutes) and the temperature is already good enough, to just remind us about it. In this example, heater_on_minutes is defined as ELAPSED heater_status which returns how many minutes ago the value of heater_status has been set
reacted with thumbs up emoji reacted with thumbs down emoji reacted with laugh emoji reacted with hooray emoji reacted with confused emoji reacted with heart emoji reacted with rocket emoji reacted with eyes emoji
-
[This post has been migrated from the old forum, it was originally sent by user2684 on 2020-06-29 16:10:45]
This is a bit more complex use case since there is no package from the marketplace which can help us (similar to https://forum.egeoffrey.com/topic/20/let-egeoffrey-manage-your-alarm-system) but demonstrates how powerful and flexible eGeoffrey could be.
Let's see how we can control with eGeoffrey our heater but the same approach can be applied to other use cases like your irrigation system, air conditioning or anything which would require an actuator to be controlled manually or upon specific conditions like, for example, the day of the week or the time of the day.
Step 1: identify which technologies to integrate
If we have to control something, this something has to be connected with eGeoffrey. Install the relevant packages to make this happening. If e.g. the actuator controlling your heater is connected to a MySensors board, install
egeoffrey-service-mysensors, if connected directly to your raspberry, installegeoffrey-service-gpioetc.Step 2: register your actuator

Register a new sensor in "House" / "Sensors" and associated it to the service just installed. In my house I have a MySensors node with a relay connected to the boiler (when the relay is closed the heater is on, when open the heater is off).
The sensor is configured as "Actuator" (under the "Service" configuration) meaning that every value set to the sensor is either stored in the database as well as is dispatched to the remote device via the capabilities of the service, in this case service/mysensors).
Let's call it
heater_actuatorfrom now on.For testing purposes, you can click on "Actions" / "Set Value" and try with 0 and 1 to turn the remote relay on and off.
Step 3: create helper sensors
Here things can be made complex as you like. Let me walk you through a pretty articulated example but you are more than welcome to start simple at first and then add more and more complexity to the system. What I want to achieve in this example is the following:
To get all this working we need some helper sensors setup and specifically:
heater_switchwith an integer format (will store only 0 or 1), not associated to any service. This will be displayed on the web interface with a "control" widget and will be used to turn the heater on or off manually.heater_statuswith an integer format (will store only 0 or 1), associated to the MySensors module and reflects the status of the heater (the MySensors board will report 0 or 1 when the relay is closed/open)heater_calendar: will be stored the calendar for scheduling through the web interface when turning on and off the heaterheater_scheduler_status: this is like heater status, will be stored if the heater has been turned on or off by the scheduler. This is useful because we don't want the recurrent schedule to interfere with the manual switchheater_max_temperature: format "float", to store the maximum temperature the heater will be turned off automatically when reached, a sort of safeguardStep 4: add a new page with heater control and scheduler
You want now to build a page displaying all of this information. The logic of when turning the heater on or off will be instead managed with rules.
Let's see what we have in the page:
heater_statussensorheater_switchsensor. Since the sensor is not connected to any service, moving the switch will just change the status and nothing else. Since we also want to trigger the remote relay we need to connect it with theheater_actuatorpreviously created. In the configuration of the widget, set in "Additional Actions to Execute"SET heater_actuator. This means every time you switch on or off, the same value will be also set to the actuator sensor (which eventually will be transmitted to the remote device)heater_max_temperatureso you can easily change the value stored in that sensor from the web interfaceheater_calendar. This will be used for scheduling the heater on and off from the web interfaceheater_scheduler_statussensorThe calendar allows us to set the target temperature for specific timeframes as well as schedule recurrent events:

Step 5: add some rules to control the heater
With the page put together above we can manually control the heater but the real thing is to automate the execution.
First of all let's leverage what we entered in the calendar in the web interface. We need two rules, one for turning it on and the other for turning it off whenever is needed. Let's see the first one:
in the "General" tab, give it a name (e.g. heater_schedule_on), provide a text and configure it to be recurrent

in the "Schedule" tab, configure an interval of 1 minute. Every minute this rule will be evaluated to check if it is the time to turn the heater on.
in the "Conditions" tab, let's set when to turn it on. This is when:
calendar != is_null)In the "Variables" tab, configure the variables used just above like the following. The only interesting piece is when using the

SCHEDULE <sensor_id>command to deal with a "calendar" type of sensor. This will return the value set in the calendar if we are in between a timeframe which is set or an empty string otherwise.In the "Constants" tab define the few constants we used above:

In the "Actions" tab we need to define what to do if it is the time to turn the heater on. We need to set the

heater_scheduler_statusto 1 so next time that will be evaluated will not trigger again and ask the actuatorheater_actuatorto eventually turn the heater on.What else?
heater_on_minutesis defined asELAPSED heater_statuswhich returns how many minutes ago the value ofheater_statushas been setEnjoy!
Beta Was this translation helpful? Give feedback.
All reactions