You will find below the instructions to set up you computer for Le Wagon Data Science course
Please read them carefully and execute all commands in the following order. If you get stuck, don't hesitate to ask a teacher for help 🙋
Let's start 🚀
To be able to interact when we are not in the same physical room, we will be using Zoom, a video conferencing tool.
Go to zoom.us/download.
Under Zoom Client click the Download button.
Open the file you have just downloaded to install the app.
Open the Zoom app.
If you already have a Zoom account, sign in using your credentials.
If not, click on the Sign Up Free link:

You will be redirected to Zoom's website to complete a form.
When it's done, go back to the Zoom app and sign in using your credentials.
You should then see a screen like this:

You can now close the Zoom app.
Install the Google Chrome browser if you haven't got it already and set it as a default browser.
Follow the steps for your system from this link 👉 Install Google Chrome
Why Chrome?
We recommend to use it as your default browser as it's most compatible with testing or running your code, as well as working with Google Cloud Platform. Another alternative is Firefox, however we don't recommend using other tools like Opera, Internet Explorer or Safari.
Have you signed up to GitHub? If not, do it right away.
👉 Upload a picture and put your name correctly on your GitHub account. This is important as we'll use an internal dashboard with your avatar. Please do this now, before you continue with this guide.

👉 Enable Two-Factor Authentication (2FA). GitHub will send you text messages with a code when you try to log in. This is important for security and also will soon be required in order to contribute code on GitHub.
We want to safely communicate with your virtual machine using SSH protocol. We need to generate a SSH key to authenticate.
- Open your terminal
💡 Windows tip
We highly recommend installing Windows Terminal from the Windows Store (installed on Windows 11 by default) to perform this operation
- Create a SSH key
Windows
# replace "[email protected]" with your GCP account email
ssh-keygen.exe -t ed25519 -C "[email protected]"
MacOS & Linux
# replace "[email protected]" with your GCP account email
ssh-keygen -t ed25519 -C "[email protected]"
You should get the following message: > Generating public/private algorithm key pair.
- When you are prompted
> Enter a file in which to save the key, press Enter - You should be asked to
Enter a passphrase- this is optional if you want additional security. To continue without a passphrase press enter without typing anything when asked to enter a passphrase.
ℹ️ Don't worry if nothing prompt when you type, that is perfectly normal for security reasons.
- You should be asked to
Enter same passphrase again, do it.
❗️ You must remember this passphrase.
❗️ /home/your_username/.ssh/id_ed25519 already exists.
If you receive this message, you may already have an SSH Key with the same name (if you are a Le Wagon Alumni or are using SSH Authentication with Github).To create a separate SSH key to exclusively use for this bootcamp use the following:
# replace "[email protected]" with your GCP account email
ssh-keygen -t ed25519 -f ~/.ssh/de-bootcamp -C "[email protected]"
Your new SSH Key will be named de-bootcamp. Make sure to remember it for later!
GCP is a cloud solution that you are going to use in order to work on a virtual machine.
👌 Note: Skip to the next section if you already have a GCP project
- Go to Google Cloud and create an account if you do not already have one
- In the Cloud Console, on the project list, select or create a Cloud project

- Give it a name such as
Wagon Bootcampfor example - Notice the
IDautomatically created for the project, e.g.wagon-bootcamp-123456

In order to facilitate the following of the instructions during the bootcamp, open your GCP account preferences:
https://myaccount.google.com/language
If the preferred language is not:
- English
- United States
Then switch the language to english:
- Click on the edit pen logo
- Select English
- Select United States
- Click on Select
👌 Note: Skip to the next section if you already have a valid billing account
You will now link your account to your credit card. This step is required or you will not be able to use the services provided by GCP. Do not worry, you will be able to consume most GCP services through free credits throughout the bootcamp.

- Click on Billing
- Click on MANAGE BILLING ACCOUNTS
- Click on ADD BILLING ACCOUNT
- Give a name to your billing account, e.g.
My Billing Account - Click on "I have read..." and agree the to the terms of service
- Click on CONTINUE
- Select your account type:
Individual - Fill your name and address
You should see that you have a free credit of "$300 credits over the next 90days".
- Click on card details
- Enter your credit card info
- Click on START MY FREE TRIAL
Once this is done, verify that your billing account is linked to your GCP project.
- Select your project
- Go to Billing
- Select LINK A BILLING ACCOUNT
- Select
My Billing Account - Click on SET ACCOUNT
You should now see:
Free trial status: $300 credit and 91 days remaining - with a full account, you'll get unlimited access to all of Google Cloud Platform.
👉 If you do not own a credit card 👈
If you do not own a credit card, an alternative is to setup a Revolut account. Revolut is a financial app that will allow you to create a virtual credit card linked to your mobile phone billing account.
Skip this step if you own a credit card and use your credit card for the setup.
Download the Revolut app, or go to revolut and follow the steps to download the app (enter your mobile phone number and click on Get Started).
- Open the Revolut app
- Enter your mobile phone number
- Enter the verification code received by SMS
- The app will ask for your country, address, first and last name, date of birth, email address
- The app will also ask for a selfie and request your profession
- The app will require a photo of your identification card or passport
Once this is done, select the standard (free) plan. No need to add the card to Apple pay, or ask for a the delivery of a physical card, or add money securely.
You now have a virtual card which we will use for the GCP setup.
In the main view of the Revolut the app
- Click on Ready to use
- Click on the card
- Click on Show card details
- Note down the references of the virtual credit card and use them in order to proceed with the GCP setup
👉 If you receive an email from Google saying "Urgent: your billing account XXXXXX-XXXXXX-XXXXXX has been suspended" 👈
This may happen especially in case you just setup a Revolut account.
- Click on PROCEED TO VERIFICATION
- You will be asked to send a picture of your credit card (only the last 4 digits, no other info)
- In case you used Revolut, you can send a screenshot of your virtual credit card (do not forget to remove the validity date from the screenshot)
- Explain that you are attending the Le Wagon bootcamp, do not own a credit card, and have just created a Revolut account in order to setup GCP for the bootcamp using a virtual credit card
You may receive a validation or requests for more information within 30 minutes.
Once the verification goes through, you should receive an email stating that "Your Google Cloud Platform billing account XXXXXX-XXXXXX-XXXXXX has been fully reinstated and is ready to use.".
You will use different GCP services during the bootcamp which needs to be activated and configured.
Go to your project APIs dashboard, you can see a bunch of APIs are already enabled:

👌 Note: Skip to the next section if you already have Compute Engine enabled
-
In the search bar, type compute and click on the Compute Engine result

-
Click on
ENABLE
-
Compute Engine is now enabled on your project


👌 Note: Skip to the next section if you already have a VM set up
Note: The following section requires you already have a Google Cloud Platform account associated with an active Billing account.
-
Go to console.cloud.google.com > > Compute Engine > VM instances > Create instance
-
Name it
lewagon-data-eng-vm-<github_username>, replace<github_username>with your own, e.g.krokrob -
Region
europe-west1, choose the closest one among the available regions -
In the section
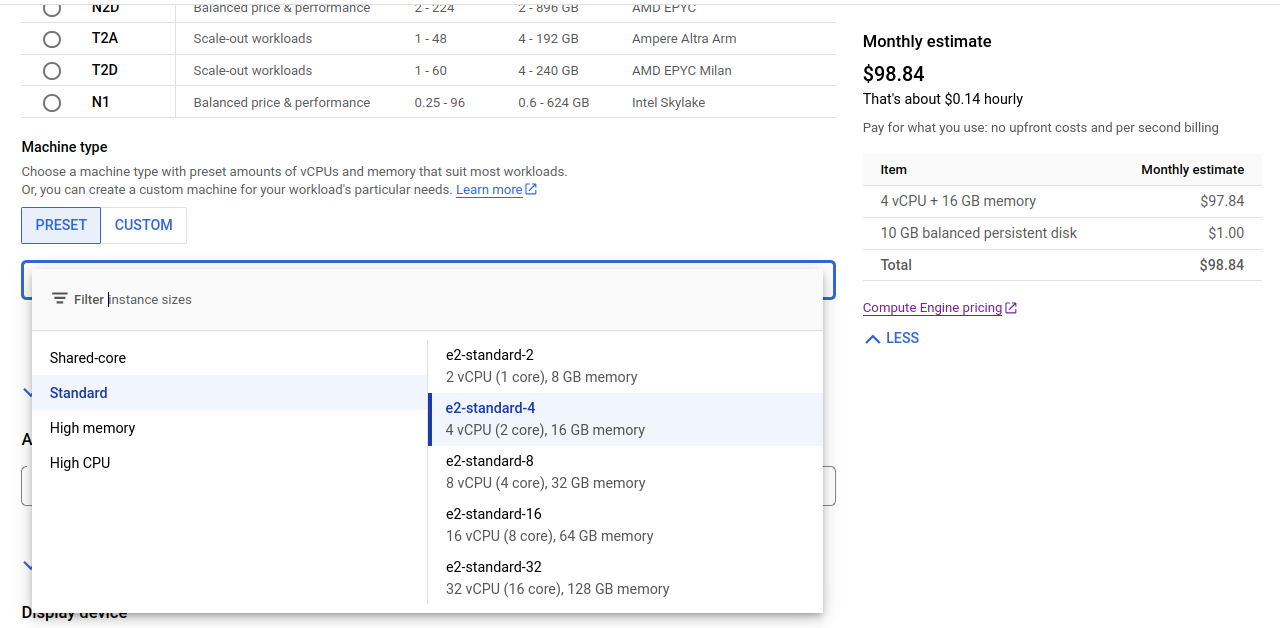
Machine configurationunder the sub-headingMachine type -
Select General purpose > PRESET > e2-standard-4
-
Boot disk > Change
-
Operating system > Ubuntu
-
Version > Ubuntu 22.04 LTS x86/64
-
Boot disk type > Balanced persistent disk
-
Size > upgrade to 150GB
-
-
Open
Networking, Disks, ...underAdvanced options -
Open
Networking -
Go to
Network interfacesand click ondefault default (...)with a downward arrow on the right. -
This opened a box
Edit network interface -
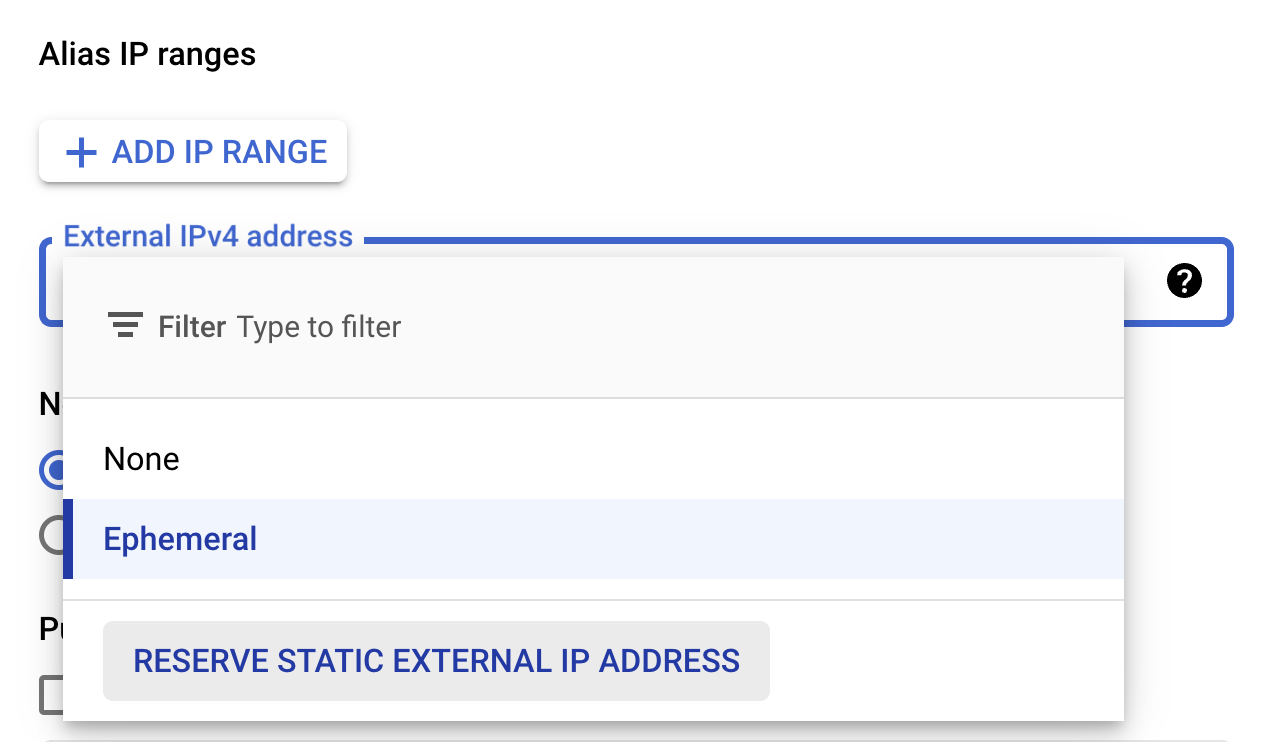
Go to the dropdown
External IPv4 address, click on it, click onRESERVE STATIC EXTERNAL IP ADDRESS -
Give it a name, like "lewagon-data-eng-vm-ip-<github_username>" (replace
<github_username>with your own) and description "Le Wagon - Data Engineering VM IP". This will take a few seconds. -
You will now have a public IP associated with your account, and later to your VM instance. Click on
Doneat the bottom of the sectionEdit network interfaceyou were in.


-
Open the
Securitysection -
Open the
Manage accesssubsection -
Go to
Add manually generated SSH keysand clickAdd item -
In your terminal display your public SSH key:
-
Windows: navigate to where you created your SSH key and open
id_ed25519.pub -
Mac/Linux users can use:
cat ~/.ssh/id_ed25519.pub
# OR cat ~/.ssh/de-bootcamp.pub if you created a unique key
-
-
Copy your public SSH key and paste it:
-
On the right hand side you should see
-
You should be good to go and click
CREATEat the bottom -
It will take a few minutes for your virtual machine (VM) to be created. Your instance will show up like below when ready, with a green circled tick, named
lewagon-data-eng-vm-krokrob(krokrobbeing replaced by your GitHub username). -
Click on your instance
-
Go down to the section
SSH keys, and write down your username (you need it for the next section)


Congrats, your virtual machine is up and running, it is time to connect it with VS Code!
Let's install Visual Studio Code text editor.
- Go to Visual Studio Code download page.
- Click on "Windows" button
- Open the file you have just downloaded.
- Install it with few options:

When the installation is finished, launch VS Code.
We need to connect VS Code to a virtual machine in the cloud so you will only work on that machine during the bootcamp. A pretty useful Remote SSH Extension is available on the VS Code Marketplace.
- Open VS Code > Open the command palette > Type
Extensions: Install Extensions

- Install the extension

That's the only extension you should install on your local machine, we will install additional VS Code extensions on your virtual machine.
- Open VS Code > Open the command palette > Type
Remote-SSH: Connect to Host...

- Click on
Add a new host - Type
ssh -i <path/to/your/private/key> <username>@<ip address>, for instance, my username issomedude, my private SSH key is located at~/.ssh/id_rsaon my local computer, my VM has a public IP of34.77.50.76: I'll typessh -i ~/.ssh/id_rsa [email protected]

- When prompted to
Select SSH configuration file to update, pick the one in your home directory, under the.sshfolder,~/.ssh/configbasically. Usually VS Code will pick automatically the best option, so their default should work.

- You should get a pop-up on the bottom right notifying you the host has been added

- Open again the command palette > Type
Remote-SSH: Connect to Host...> Pick your VM IP address

- The first time, VSCode might ask you for a security permission like below, say yes / continue.

- Open again the command palette > Type
Terminal: Create New Terminal (in active workspace)> You now have a Bash terminal in your virtual machine!


- Still on your local computer, lets create a more readable version of your machine to connect to!
code ~/.ssh/configYou should see something like the following:
Host <machine ip>
  HostName <machine ip>
  IdentityFile <file path for your ssh key>
  User <username>
You can now change Host to whatever you would like to see as the name of your connection or in terminal with ssh <Host>!
❗️ It is important that the Host alias does not contain any whitespaces ❗️
# For instance
Host "de-bootcamp-vm"
  HostName 34.77.50.76 # replace with your VM's public IP address
  IdentityFile <file path for your ssh key>
  User <username>
The setup of your local machine is over. All following commands will be run from within your 🚨 virtual machine🚨 terminal (via VS code for instance)
Let's install some useful extensions to VS Code.
code --install-extension ms-vscode.sublime-keybindings
code --install-extension emmanuelbeziat.vscode-great-icons
code --install-extension MS-vsliveshare.vsliveshare
code --install-extension ms-python.python
code --install-extension KevinRose.vsc-python-indent
code --install-extension ms-python.vscode-pylance
code --install-extension ms-toolsai.jupyter
Here is a list of the extensions you are installing:
- Sublime Text Keymap and Settings Importer
- VSCode Great Icons
- Live Share
- Python
- Python Indent
- Pylance
- Jupyter
Instead of using the default bash shell, we will use zsh.
We will also use git, a command line software used for version control.
Let's install them, along with other useful tools:
- Open an Ubuntu terminal
- Copy and paste the following commands:
sudo apt updatesudo apt install -y curl git imagemagick jq unzip vim zsh treeThese commands will ask for your password: type it in.
Enter.
Let's now install GitHub official CLI (Command Line Interface). It's a software used to interact with your GitHub account via the command line.
In your terminal, copy-paste the following commands and type in your password if asked:
sudo apt remove -y gitsome # gh command can conflict with gitsome if already installed
curl -fsSL https://cli.github.com/packages/githubcli-archive-keyring.gpg | sudo dd of=/usr/share/keyrings/githubcli-archive-keyring.gpg
echo "deb [arch=$(dpkg --print-architecture) signed-by=/usr/share/keyrings/githubcli-archive-keyring.gpg] https://cli.github.com/packages stable main" | sudo tee /etc/apt/sources.list.d/github-cli.list > /dev/nullsudo apt updatesudo apt install -y ghTo check that gh has been successfully installed on your machine, you can run:
gh --version✔️ If you see gh version X.Y.Z (YYYY-MM-DD), you're good to go 👍
❌ Otherwise, please contact a teacher
Let's install the zsh plugin Oh My Zsh.
In a terminal execute the following command:
sh -c "$(curl -fsSL https://raw.github.com/ohmyzsh/ohmyzsh/master/tools/install.sh)"If asked "Do you want to change your default shell to zsh?", press Y
At the end your terminal should look like this:

✔️ If it does, you can continue 👍
❌ Otherwise, please ask for a teacher
direnv is a shell extension. It makes it easy to deal with per project environment variables. This will be useful in order to customize the behavior of your code.
sudo apt-get update; sudo apt-get install direnv
echo 'eval "$(direnv hook zsh)"' >> ~/.zshrcCLI is the acronym of Command-line Interface.
In this section, we will use GitHub CLI to interact with GitHub directly from the terminal.
It should already be installed on your computer from the previous commands.
First in order to login, copy-paste the following command in your terminal:
email
gh auth login -s 'user:email' -wgh will ask you few questions:
What is your preferred protocol for Git operations? With the arrows, choose SSH and press Enter. SSH is a protocol to log in using SSH keys instead of the well known username/password pair.
Generate a new SSH key to add to your GitHub account? Press Enter to ask gh to generate the SSH keys for you.
If you already have SSH keys, you will see instead Upload your SSH public key to your GitHub account? With the arrows, select your public key file path and press Enter.
Enter a passphrase for your new SSH key (Optional). Type something you want and that you'll remember. It's a password to protect your private key stored on your hard drive. Then press Enter.
Title for your SSH key. You can leave it at the proposed "GitHub CLI", press Enter.
You will then get the following output:
! First copy your one-time code: 0EF9-D015
- Press Enter to open github.com in your browser...
Select and copy the code (0EF9-D015 in the example), then press Enter.
Your browser will open and ask you to authorize GitHub CLI to use your GitHub account. Accept and wait a bit.
Come back to the terminal, press Enter again, and that's it.
To check that you are properly connected, type:
gh auth status✔️ If you get Logged in to github.com as <YOUR USERNAME> , then all good 👍
❌ If not, contact a teacher.
Install the gcloud CLI to communicate with Google Cloud Platform through your terminal:
echo "deb [signed-by=/usr/share/keyrings/cloud.google.gpg] https://packages.cloud.google.com/apt cloud-sdk main" | sudo tee -a /etc/apt/sources.list.d/google-cloud-sdk.list
sudo apt-get install apt-transport-https ca-certificates gnupg
curl https://packages.cloud.google.com/apt/doc/apt-key.gpg | sudo apt-key --keyring /usr/share/keyrings/cloud.google.gpg add -
sudo apt-get update && sudo apt-get install google-cloud-sdk
sudo apt-get install google-cloud-sdk-app-engine-python👌 Note: Skip to the next section if you already have a service account key
Now that you have created a GCP account and a project (identified by its PROJECT_ID), we are going to configure the actions (API calls) that you want to allow your code to perform.
🤔 Why do we need a service account key ?
You have created a GCP account linked to your credit card. Your account will be billed according to your usage of the ressources of the Google Cloud Platform. The billing will occur if you consume anything once the free trial is over, or if you exceed the amount of spending allowed during the free trial.
In your GCP account, you have created a single GCP project, identified by its PROJECT_ID. The GCP projects allow you to organize and monitor more precisely how you consume the GCP ressources. For the purpose of the bootcamp, we are only going to create a single project.
Now, we need a way to tell which ressources within a GCP project our code will be allowed to consume. Our code consumes GCP ressources through API calls.
Since API calls are not free, it is important to define with caution how our code will be allowed to use them. During the bootcamp this will not be an issue and we are going to allow our code to use all the API of GCP without any restrictions.
In the same way that there may be several projects associated with a GCP account, a project may be composed of several services (any bundle of code, whatever its form factor, that requires the usage of GCP API calls in order to fulfill its purpose).
GCP requires that the services of the projects using API calls are registered on the platform and their credentials configured through the access granted to a service account.
For the moment we will only need to use a single service and will create the corresponding service account.
Since the service account is what identifies your application (and therefore your GCP billing account and ultimately your credit card), you are going to want to be cautious with the next steps.
- Go to the service accounts page
- Select your project in the list of recent projects if asked to
- Create a service account:
- Click on CREATE SERVICE ACCOUNT:
- Give a
Service account nameto that account - Click on CREATE AND CONTINUE
- Click on Select a role and choose
Quick access/Basicthen Owner, which gives full access to all ressources - Click on CONTINUE
- Click on DONE
- Download the service account json file 🔑:
- Click on the newly created service account
- Click on KEYS
- Click on ADD KEY then Create new key
- Select JSON and click on CREATE

The browser has now saved the service account json file 🔑 in your downloads directory (it is named according to your service account name, something like le-wagon-data-123456789abc.json)
-
Open the service account json file with any text editor and copy the key
# It looks like: { "type": "service_account", "project_id": "kevin-bootcamp", "private_key_id": "1234567890", "private_key": "-----BEGIN PRIVATE KEY-----\nXXXXXXXXXXXXXXXXXXXXXXXXXXXXXXXXXXXXXXXXXXXXXXX\n-----END PRIVATE KEY-----\n", "client_email": "[email protected]", "client_id": "1234567890", "auth_uri": "https://accounts.google.com/o/oauth2/auth", "token_uri": "https://oauth2.googleapis.com/token", "auth_provider_x509_cert_url": "https://www.googleapis.com/oauth2/v1/certs", "client_x509_cert_url": "https://www.googleapis.com/robot/v1/metadata/x509/bootcamp%40kevin-bootcamp.iam.gserviceaccount.com" } -
on your Virtual Machine, create a
~/.gcp_keysdirectory, then create a json file in it:mkdir ~/.gcp_keys touch ~/.gcp_keys/le-wagon-de-bootcamp.json
-
Open the json file then store the service account json file pasting the key:
code ~/.gcp_keys/le-wagon-de-bootcamp.json
❗️Don't forget to save the file with
CMD+sorCTRL+s -
Authenticate the
gcloudCLI with the google account you used for GCP# Replace service_account_name@project_id.iam.gserviceaccount.com with your own SERVICE_ACCOUNT_EMAIL=service_account_name@project_id.iam.gserviceaccount.com KEY_FILE=$HOME/.gcp_keys/le-wagon-de-bootcamp.json gcloud auth activate-service-account $SERVICE_ACCOUNT_EMAIL --key-file=$KEY_FILE
-
List your active account and check your email address you used for GCP is present
gcloud auth list
-
Set your current project
# Replace `PROJECT_ID` with the `ID` of your project, e.g. `wagon-bootcamp-123456`
gcloud config set project PROJECT_ID
-
List your active account and current project and check your project is present
gcloud config list

There are three options, choose one:
I already attended Web Development (FullStack) bootcamp at Le Wagon on the same laptop
This means that you already forked the GitHub repo lewagon/dotfiles, but at that time the configuration was maybe not ready for the new Data Science bootcamp.
Open your terminal and go to your dotfiles project:
cd ~/code/<YOUR_GITHUB_NICKNAME>/dotfiles
code . # Open it in VS Code
In VS Code, open the zshrc file. Replace its content with the newest version of that file that we provide. Save to disk.
Back to the terminal, run a git diff and ask a TA to come and check about this configuration change. You should see stuff about Python and pyenv.
Once this is good, commit and push your changes:
git add zshrc
git commit -m "Update zshrc for Data Science bootcamp"
git push origin master
OR
I did not attend the Web Dev bootcamp at Le Wagon
Hackers love to refine and polish their shell and tools. We'll start with a great default configuration provided by Le Wagon, stored on GitHub. As your configuration is personal, you need your own repository storing it, so you first need to fork it to your GitHub account.
➡️ Click here to fork the lewagon/dotfiles repository to your account (you'll need to click again on your picture to confirm where you do the fork).
Forking means that it will create a new repo in your GitHub account, identical to the original one. You'll have a new repository on your GitHub account, your_github_username/dotfiles. We need to fork because each of you will need to put specific information (e.g. your name) in those
files.
Open your terminal and run the following command:
export GITHUB_USERNAME=`gh api user | jq -r '.login'`
echo $GITHUB_USERNAME
You should see your GitHub username printed. If it's not the case, stop here and ask for help.
There seems to be a problem with the previous step (gh auth).
Time to fork the repo and clone it on your laptop:
mkdir -p ~/code/$GITHUB_USERNAME && cd $_
gh repo fork lewagon/dotfiles --clone
Run the dotfiles installer.
cd ~/code/$GITHUB_USERNAME/dotfiles && zsh install.shCheck the emails registered with your GitHub Account. You'll need to pick one at the next step:
gh api user/emails | jq -r '.[].email'Run the git installer:
cd ~/code/$GITHUB_USERNAME/dotfiles && zsh git_setup.sh☝️ This will prompt you for your name (FirstName LastName) and your email.
:warning: You need to put one of the emails listed above thanks to the previous gh api ... command. If you don't do that, Kitt won't be able to track your progress. 💡 Select the @users.noreply.github.com address if you don't want your email to appear in public repositories you may contribute to.
Please now quit all your opened terminal windows.
OR
I already attended Web Development (FullStack) bootcamp at Le Wagon but I have a new laptop
Open your terminal and run the following command:
export GITHUB_USERNAME=`gh api user | jq -r '.login'`
echo $GITHUB_USERNAME
You should see your GitHub username printed. If it's not the case, stop here and ask for help.
There seems to be a problem with the previous step (gh auth).
Time to fork the repo and clone it on your laptop:
mkdir -p ~/code/$GITHUB_USERNAME && cd $_
gh repo fork lewagon/dotfiles --clone
Run the dotfiles installer.
cd ~/code/$GITHUB_USERNAME/dotfiles && zsh install.shCheck the emails registered with your GitHub Account. You'll need to pick one at the next step:
gh api user/emails | jq -r '.[].email'Run the git installer:
cd ~/code/$GITHUB_USERNAME/dotfiles && zsh git_setup.sh☝️ This will prompt you for your name (FirstName LastName) and your email.
:warning: You need to put one of the emails listed above thanks to the previous gh api ... command. If you don't do that, Kitt won't be able to track your progress. 💡 Select the @users.noreply.github.com address if you don't want your email to appear in public repositories you may contribute to.
Please now quit all your opened terminal windows.
Set zsh as your default VS Code terminal.
-
Open terminal default profile settings

-
Select
zsh /usr/bin/zsh


You don't want to be asked for your passphrase every time you communicate with a distant repository. So, you need to add the plugin ssh-agent to oh my zsh:
First, open the .zshrc file:
code ~/.zshrcThen:
- Spot the line starting with
plugins= - Add
ssh-agentat the end of the plugins list
✔️ Save the .zshrc file with Ctrl + S and close your text editor.
Ubuntu comes with an outdated version of Python that we don't want to use. You might already have installed Anaconda or something else to tinker with Python and Data Science packages. All of this does not really matter as we are going to do a professional setup of Python where you'll be able to switch which version you want to use whenever you type python in the terminal.
First let's install pyenv with the following Terminal command:
git clone https://github.com/pyenv/pyenv.git ~/.pyenv
exec zsh
Let's install some dependencies needed to build Python from pyenv:
sudo apt-get update; sudo apt-get install make build-essential libssl-dev zlib1g-dev \
libbz2-dev libreadline-dev libsqlite3-dev wget curl llvm \
libncursesw5-dev xz-utils tk-dev libxml2-dev libxmlsec1-dev libffi-dev liblzma-dev \
python3-devLet's install the latest stable version of Python supported by Le Wagon's curriculum:
pyenv install 3.10.6This command might take a while, this is perfectly normal. Don't hesitate to help other students seated next to you!
🛠 Troubleshooting `pyenv` not found
If you encounter an error Command 'pyenv' not found: execute the following line:
source ~/.zprofileThen try to install Python again:
pyenv install 3.10.6If pyenv is still not found, contact a teacher.
OK once this command is complete, we are going to tell the system to use this version of Python by default. This is done with:
pyenv global 3.10.6
exec zsh
To check if this worked, run python --version. If you see 3.10.6, perfect! If not, ask a TA that will help you debug the problem thanks to pyenv versions and type -a python (python should be using the .pyenv/shims version first).
Before we start installing relevant Python packages, we will isolate the setup for the Bootcamp into a dedicated virtual environment. We will use a pyenv plugin called pyenv-virtualenv.
First let's install this plugin:
git clone https://github.com/pyenv/pyenv-virtualenv.git $(pyenv root)/plugins/pyenv-virtualenv
exec zsh
Let's create the virtual environment we are going to use during the whole bootcamp:
pyenv virtualenv 3.10.6 lewagonLet's now set the virtual environment with:
pyenv global lewagonGreat! Anytime we'll install Python package, we'll do it in that environment.
Now that we have a pristine lewagon virtual environment, it's time to install some packages in it.
First, let's upgrade pip, the tool to install Python Packages from pypi.org. In the latest terminal where the virtualenv lewagon is activated, run:
pip install --upgrade pipThen let's install some packages for the first weeks of the program:
pip install -r https://raw.githubusercontent.com/lewagon/data-setup/master/specs/releases/linux.txtPimp your jupyter notebooks with awesome extensions:
# install nbextensions
jupyter contrib nbextension install --user
jupyter nbextension enable toc2/main
jupyter nbextension enable collapsible_headings/main
jupyter nbextension enable spellchecker/main
jupyter nbextension enable code_prettify/code_prettifyImprove the display of the details disclosure elements in your notebooks.
Open custom/custom.css in the config directory:
cd $(jupyter --config-dir)
mkdir -p custom
touch custom/custom.css
code custom/custom.css
Edit custom.css with:
summary {
    cursor: pointer;
    display:list-item;
}
summary::marker {
    font-size: 1em;
}
You can close VS Code.
Let's reset your terminal:
exec zshNow, check you can launch a notebook server on your machine:
jupyter notebookYour web browser should open on a jupyter window:

Click on New:

A tab should open on a new notebook:

Perform a sanity check for jupyter notebooks nbextensions. Click on Nbextensions:

Untick "disable configuration for nbextensions without explicit compatibility" then check that at least all nbextensions circled in red are enabled:

You can close your web browser then terminate the jupyter server with CTRL + C.
Check your Python version with the following commands:
zsh -c "$(curl -fsSL https://raw.githubusercontent.com/lewagon/data-setup/master/checks/python_checker.sh)" 3.10.6Run the following command to check if you successfully installed the required packages:
zsh -c "$(curl -fsSL https://raw.githubusercontent.com/lewagon/data-setup/master/checks/pip_check.sh)"Now run the following command to check if you can load these packages:
python -c "$(curl -fsSL https://raw.githubusercontent.com/lewagon/data-setup/master/checks/pip_check.py)"Make sure you can run Jupyter:
jupyter notebookAnd open a Python 3 notebook.
Make sure that you are running the correct python version in the notebook. Open a cell and run :
import sys; sys.versionHere you have it! A complete python virtual env with all the third-party packages you'll need for the whole bootcamp.
Download and install DBeaver, a free and open source powerful tool to connect to any database, explore the schema and even run SQL queries.
Docker is an open platform for developing, shipping, and running applications.
if you already have Docker installed on your machine please update with the latest version
Go to Docker install documentation.
Then follow the tutorial instructions to install Docker using the repository. There are 2 steps:
- Set up Docker's apt repository.
- Install the Docker packages.
Now, let's make sure we can run docker without sudo.
Run the following commands one by one:
sudo groupadd docker
sudo usermod -aG docker $USER
newgrp docker
sudo rm -rf ~/.docker/
When finished, run the following command:
docker run hello-worldThe following message should print:

If you are unsure about what to do, you can follow this link. If you are already logged in, you can safely skip this section. If you are not logged in, click on Enter Kitt as a Student. If you manage to login, you can safely skip this step. Otherwise ask a teacher whether you should have received an email or follow the instructions below.
Register as a Wagon alumni by going to kitt.lewagon.com/onboarding. Select your batch, sign in with GitHub and enter all your information.
Your teacher will then validate that you are indeed part of the batch. You can ask them to do it as soon as you completed the registration form.
Once the teacher has approved your profile, go to your email inbox. You should have 2 emails:
- One from Slack, inviting you to the Le Wagon Alumni slack community (where you'll chat with your buddies and all the previous alumni). Click on Join and fill the information.
- One from GitHub, inviting you to
lewagonteam. Accept it otherwise you won't be able to access the lecture slides.
Slack is a communication platform pretty popular in the tech industry.
Download the Slack app and install it.
Launch the app and sign in to lewagon-alumni organization.
Make sure you upload a profile picture 👇

The idea is that you'll have Slack open all day, so that you can share useful links / ask for help / decide where to go to lunch / etc.
To ensure that everything is working fine for video calls, let's test your camera and microphone:
- Open the Slack app
- Click your profile picture in the top right.
- Select
Preferencesfrom the menu. - Click
Audio & videoin the left-side column. - Below
Troubleshooting, clickRun an audio, video and screensharing test. The test will open in a new window. - Check that your preferred speaker, microphone and camera devices appear in the drop-down menus, then click
Start test.

✔️ When the test is finished, you should see green "Succeed" messages at least for your microphone and camera. 👍
❌ If not, contact a teacher.
You can also install Slack app on your phone and sign in lewagon-alumni!
If you are done with your setup, please ask around if some classmates need some help with theirs (macOS, Linux, Windows). We will have our first lectures at 2pm and will talk about the Setup you just did + onboard you on Kitt.
If you don't have a lot of experience with git and GitHub, please (re-)watch this workshop (1.25 playback speed is fine).
If you do, then you can wait for the first lecture working on this Tic-Tac-Toe Kata