-
Notifications
You must be signed in to change notification settings - Fork 0
/
db.json
1 lines (1 loc) · 228 KB
/
db.json
1
{"Asset":{"vzdudl4kbyqta66a":{"source":"source/favicon.ico","mtime":1405826791000,"modified":true,"_id":"vzdudl4kbyqta66a","full_source":"/home/ziqin/public_html/lingdong/source/favicon.ico","path":"favicon.ico"},"6qilo116kvobudjo":{"source":"source/favicon.png","mtime":1405826791000,"modified":true,"_id":"6qilo116kvobudjo","full_source":"/home/ziqin/public_html/lingdong/source/favicon.png","path":"favicon.png"},"nxam2cqcokzqrfpq":{"source":"source/img/cptsct.png","mtime":1405826791000,"modified":true,"_id":"nxam2cqcokzqrfpq","full_source":"/home/ziqin/public_html/lingdong/source/img/cptsct.png","path":"img/cptsct.png"},"f25s7t4pbfdrouzb":{"source":"themes/ld_landscape/source/js/jquery-2.0.3.min.js","mtime":1405826791000,"modified":true,"_id":"f25s7t4pbfdrouzb","full_source":"/home/ziqin/public_html/lingdong/themes/ld_landscape/source/js/jquery-2.0.3.min.js","path":"js/jquery-2.0.3.min.js"},"31ho4l15zwrz07w7":{"source":"themes/ld_landscape/source/js/jquery-2.0.3.min.map","mtime":1405826791000,"modified":true,"_id":"31ho4l15zwrz07w7","full_source":"/home/ziqin/public_html/lingdong/themes/ld_landscape/source/js/jquery-2.0.3.min.map","path":"js/jquery-2.0.3.min.map"},"cfejtdpew55cv4gv":{"source":"themes/ld_landscape/source/js/jquery.min.js","mtime":1405826791000,"modified":true,"_id":"cfejtdpew55cv4gv","full_source":"/home/ziqin/public_html/lingdong/themes/ld_landscape/source/js/jquery.min.js","path":"js/jquery.min.js"},"noaxfga496eor7bz":{"source":"themes/ld_landscape/source/js/jquery.min.map","mtime":1405826791000,"modified":true,"_id":"noaxfga496eor7bz","full_source":"/home/ziqin/public_html/lingdong/themes/ld_landscape/source/js/jquery.min.map","path":"js/jquery.min.map"},"riwnu9jqyrqp1cau":{"source":"themes/ld_landscape/source/js/script.js","mtime":1405826791000,"modified":true,"_id":"riwnu9jqyrqp1cau","full_source":"/home/ziqin/public_html/lingdong/themes/ld_landscape/source/js/script.js","path":"js/script.js"},"ne8gi4gse6zytc61":{"source":"themes/ld_landscape/source/css/source_code_pro.css","mtime":1405826791000,"modified":true,"_id":"ne8gi4gse6zytc61","full_source":"/home/ziqin/public_html/lingdong/themes/ld_landscape/source/css/source_code_pro.css","path":"css/source_code_pro.css"},"zfa2plzf1kq7z3a4":{"source":"themes/ld_landscape/source/css/style.styl","mtime":1405826791000,"modified":true,"_id":"zfa2plzf1kq7z3a4","full_source":"/home/ziqin/public_html/lingdong/themes/ld_landscape/source/css/style.styl","path":"css/style.styl"},"7pm7tsot91g6y0ak":{"source":"themes/ld_landscape/source/css/fonts/FontAwesome.otf","mtime":1405826791000,"modified":true,"_id":"7pm7tsot91g6y0ak","full_source":"/home/ziqin/public_html/lingdong/themes/ld_landscape/source/css/fonts/FontAwesome.otf","path":"css/fonts/FontAwesome.otf"},"or01xysg3qgzjykn":{"source":"themes/ld_landscape/source/css/fonts/fontawesome-webfont.eot","mtime":1405826791000,"modified":true,"_id":"or01xysg3qgzjykn","full_source":"/home/ziqin/public_html/lingdong/themes/ld_landscape/source/css/fonts/fontawesome-webfont.eot","path":"css/fonts/fontawesome-webfont.eot"},"ob3y2i1i30vyz54i":{"source":"themes/ld_landscape/source/css/fonts/fontawesome-webfont.svg","mtime":1405826791000,"modified":true,"_id":"ob3y2i1i30vyz54i","full_source":"/home/ziqin/public_html/lingdong/themes/ld_landscape/source/css/fonts/fontawesome-webfont.svg","path":"css/fonts/fontawesome-webfont.svg"},"cz84eyidjy19r3ns":{"source":"themes/ld_landscape/source/css/fonts/fontawesome-webfont.ttf","mtime":1405826791000,"modified":true,"_id":"cz84eyidjy19r3ns","full_source":"/home/ziqin/public_html/lingdong/themes/ld_landscape/source/css/fonts/fontawesome-webfont.ttf","path":"css/fonts/fontawesome-webfont.ttf"},"tq3zzy6vo1n4x8ol":{"source":"themes/ld_landscape/source/css/fonts/fontawesome-webfont.woff","mtime":1405826791000,"modified":true,"_id":"tq3zzy6vo1n4x8ol","full_source":"/home/ziqin/public_html/lingdong/themes/ld_landscape/source/css/fonts/fontawesome-webfont.woff","path":"css/fonts/fontawesome-webfont.woff"},"2ww9s2a4w978jwbp":{"source":"themes/ld_landscape/source/css/fonts/sourcecodepro_v4.woff","mtime":1405826791000,"modified":true,"_id":"2ww9s2a4w978jwbp","full_source":"/home/ziqin/public_html/lingdong/themes/ld_landscape/source/css/fonts/sourcecodepro_v4.woff","path":"css/fonts/sourcecodepro_v4.woff"},"csb4b0209b7nr8ui":{"source":"themes/ld_landscape/source/css/images/banner.jpg","mtime":1405826791000,"modified":true,"_id":"csb4b0209b7nr8ui","full_source":"/home/ziqin/public_html/lingdong/themes/ld_landscape/source/css/images/banner.jpg","path":"css/images/banner.jpg"},"30dskfaafs5g1gg1":{"source":"themes/ld_landscape/source/fancybox/blank.gif","mtime":1405826791000,"modified":true,"_id":"30dskfaafs5g1gg1","full_source":"/home/ziqin/public_html/lingdong/themes/ld_landscape/source/fancybox/blank.gif","path":"fancybox/blank.gif"},"qfjk2zs7r6zi06ni":{"source":"themes/ld_landscape/source/fancybox/fancybox_loading.gif","mtime":1405826791000,"modified":true,"_id":"qfjk2zs7r6zi06ni","full_source":"/home/ziqin/public_html/lingdong/themes/ld_landscape/source/fancybox/fancybox_loading.gif","path":"fancybox/fancybox_loading.gif"},"cfsq8nwxx9z7t9yf":{"source":"themes/ld_landscape/source/fancybox/[email protected]","mtime":1405826791000,"modified":true,"_id":"cfsq8nwxx9z7t9yf","full_source":"/home/ziqin/public_html/lingdong/themes/ld_landscape/source/fancybox/[email protected]","path":"fancybox/[email protected]"},"mt1gf548flnwtdhb":{"source":"themes/ld_landscape/source/fancybox/fancybox_overlay.png","mtime":1405826791000,"modified":true,"_id":"mt1gf548flnwtdhb","full_source":"/home/ziqin/public_html/lingdong/themes/ld_landscape/source/fancybox/fancybox_overlay.png","path":"fancybox/fancybox_overlay.png"},"fexhimukcyh7byt3":{"source":"themes/ld_landscape/source/fancybox/fancybox_sprite.png","mtime":1405826791000,"modified":true,"_id":"fexhimukcyh7byt3","full_source":"/home/ziqin/public_html/lingdong/themes/ld_landscape/source/fancybox/fancybox_sprite.png","path":"fancybox/fancybox_sprite.png"},"ux7afjl1jx9dkmud":{"source":"themes/ld_landscape/source/fancybox/[email protected]","mtime":1405826791000,"modified":true,"_id":"ux7afjl1jx9dkmud","full_source":"/home/ziqin/public_html/lingdong/themes/ld_landscape/source/fancybox/[email protected]","path":"fancybox/[email protected]"},"it2zcu8ie8a3n3pp":{"source":"themes/ld_landscape/source/fancybox/jquery.fancybox.css","mtime":1405826791000,"modified":true,"_id":"it2zcu8ie8a3n3pp","full_source":"/home/ziqin/public_html/lingdong/themes/ld_landscape/source/fancybox/jquery.fancybox.css","path":"fancybox/jquery.fancybox.css"},"jswc1k2wd4v5y2q8":{"source":"themes/ld_landscape/source/fancybox/jquery.fancybox.js","mtime":1405826791000,"modified":true,"_id":"jswc1k2wd4v5y2q8","full_source":"/home/ziqin/public_html/lingdong/themes/ld_landscape/source/fancybox/jquery.fancybox.js","path":"fancybox/jquery.fancybox.js"},"c757hrl3ioxfdaa4":{"source":"themes/ld_landscape/source/fancybox/jquery.fancybox.pack.js","mtime":1405826791000,"modified":true,"_id":"c757hrl3ioxfdaa4","full_source":"/home/ziqin/public_html/lingdong/themes/ld_landscape/source/fancybox/jquery.fancybox.pack.js","path":"fancybox/jquery.fancybox.pack.js"},"j3nltkr0q0wpbiwl":{"source":"themes/ld_landscape/source/fancybox/helpers/fancybox_buttons.png","mtime":1405826791000,"modified":true,"_id":"j3nltkr0q0wpbiwl","full_source":"/home/ziqin/public_html/lingdong/themes/ld_landscape/source/fancybox/helpers/fancybox_buttons.png","path":"fancybox/helpers/fancybox_buttons.png"},"dupmr3ytb5rhmovq":{"source":"themes/ld_landscape/source/fancybox/helpers/jquery.fancybox-buttons.css","mtime":1405826791000,"modified":true,"_id":"dupmr3ytb5rhmovq","full_source":"/home/ziqin/public_html/lingdong/themes/ld_landscape/source/fancybox/helpers/jquery.fancybox-buttons.css","path":"fancybox/helpers/jquery.fancybox-buttons.css"},"lhx8h6nrok5f8pgz":{"source":"themes/ld_landscape/source/fancybox/helpers/jquery.fancybox-buttons.js","mtime":1405826791000,"modified":true,"_id":"lhx8h6nrok5f8pgz","full_source":"/home/ziqin/public_html/lingdong/themes/ld_landscape/source/fancybox/helpers/jquery.fancybox-buttons.js","path":"fancybox/helpers/jquery.fancybox-buttons.js"},"zie5hpbfow5j16eg":{"source":"themes/ld_landscape/source/fancybox/helpers/jquery.fancybox-media.js","mtime":1405826791000,"modified":true,"_id":"zie5hpbfow5j16eg","full_source":"/home/ziqin/public_html/lingdong/themes/ld_landscape/source/fancybox/helpers/jquery.fancybox-media.js","path":"fancybox/helpers/jquery.fancybox-media.js"},"lu0r6hz87uhwvojr":{"source":"themes/ld_landscape/source/fancybox/helpers/jquery.fancybox-thumbs.css","mtime":1405826791000,"modified":true,"_id":"lu0r6hz87uhwvojr","full_source":"/home/ziqin/public_html/lingdong/themes/ld_landscape/source/fancybox/helpers/jquery.fancybox-thumbs.css","path":"fancybox/helpers/jquery.fancybox-thumbs.css"},"3pgzyemcll7kbd2b":{"source":"themes/ld_landscape/source/fancybox/helpers/jquery.fancybox-thumbs.js","mtime":1405826791000,"modified":true,"_id":"3pgzyemcll7kbd2b","full_source":"/home/ziqin/public_html/lingdong/themes/ld_landscape/source/fancybox/helpers/jquery.fancybox-thumbs.js","path":"fancybox/helpers/jquery.fancybox-thumbs.js"}},"Cache":{"xh7cm36njg4l511v":{"content":"layout: false\n--------\n<!DOCTYPE html>\n<html>\n<head>\n\t<meta charset=\"utf-8\">\n\t<title>您访问的页面找不回来了,但我们可以一起寻找失踪宝贝 | 灵动</title>\n\t<meta name=\"viewport\" content=\"width=device-width, initial-scale=1, maximum-scale=1\">\n\t<meta name=\"keywords\" content=\"404\">\n\t<meta content=\"website\" property=\"og:type\">\n\t<meta content=\"灵动,关爱常在\" property=\"og:title\">\n\t<meta content=\"http://ld.mmyz.net/404.html\" property=\"og:url\">\n\t<meta property=\"og:image\">\n\t<meta content=\"灵动\" property=\"og:site_name\">\n\t<link rel=\"alternative\" href=\"/atom.xml\" title=\"灵动\" type=\"application/atom+xml\">\n\t<link rel=\"icon\" href=\"/favicon.png\">\n\t<link rel=\"icon\" type=\"image/x-icon\" href=\"/favicon.ico\">\n\t<link href=\"/css/source_code_pro.css\" rel=\"stylesheet\" type=\"text/css\">\n\t<link rel=\"stylesheet\" href=\"/css/style.css\" type=\"text/css\">\n\t<script type=\"text/javascript\">\n\t\tvar _hmt = _hmt || [];\n\t\t(function() {\n\t\t\tvar hm = document.createElement(\"script\");\n\t\t\thm.src = \"//hm.baidu.com/hm.js?9fd77bbfdc55eb614a76ca1c016b0217\";\n\t\t\tvar s = document.getElementsByTagName(\"script\")[0]; \n\t\t\ts.parentNode.insertBefore(hm, s);\n\t\t})();\n\t</script>\n\t<style type=\"text/css\">\n\t\t.lost_child_box {border: none!important; box-shadow: none!important;}\n\t\t.hd, .bd, .ft {background: none!important}\n\t\t.wrong {display: none!important}\n\t\t.other_info {left: 300px!important}\n\t\t.support_company, .baby_back {background: url(http://qzone.qq.com/gy/404/img/ft_bg.png) !important; height: 70px !important;}\n\t\t.support_company {border-radius: 35px 0 0 35px !important; width: 90px}\n\t\t.baby_back {border-radius: 0 35px 35px 0 !important;}\n\t\t.child_pic {background: url(http://cptsct.qiniudn.com/imgbg.png) no-repeat !important;}\n\t</style>\n</head>\n\n<body>\n <div id=\"container\">\n\t<div id=\"wrap\">\n\t\t<header id=\"header\">\n\t\t\t\t<div id=\"banner\"></div>\n\t\t\t\t<div id=\"header-outer\" class=\"outer\">\n\t\t\t\t\t<div id=\"header-title\" class=\"inner\">\n\t\t\t\t\t\t<h1 id=\"logo-wrap\">\n\t\t\t\t\t\t\t<a href=\"/\" id=\"logo\">404 Not Found</a>\n\t\t\t\t\t\t</h1>\n\t\t\t\t\t\t<h2 id=\"subtitle-wrap\">\n\t\t\t\t\t\t\t<a href=\"/\" id=\"subtitle\">灵动,感动常在,关爱常在</a>\n\t\t\t\t\t\t</h2>\n\t\t\t\t\t</div>\n\t\t\t\t\t<div id=\"header-inner\" class=\"inner\">\n\t\t\t\t\t\t<nav id=\"main-nav\">\n\t\t\t\t\t\t\t<a id=\"main-nav-toggle\" class=\"nav-icon\"></a>\n\t\t\t\t\t\t\t<a class=\"main-nav-link\" href=\"/\">首页</a>\n\t\t\t\t\t\t\t<a class=\"main-nav-link\" href=\"/about\">关于</a>\n\t\t\t\t\t\t\t<a class=\"main-nav-link\" href=\"/archives\">存档</a>\n\t\t\t\t\t\t\t<a class=\"main-nav-link\" href=\"http://www.mmyz.net/\">学校网站</a>\n\t\t\t\t\t\t</nav>\n\t\t\t\t\t\t<nav id=\"sub-nav\">\n\t\t\t\t\t\t\t<a id=\"nav-rss-link\" class=\"nav-icon\" href=\"/atom.xml\" title=\"RSS Feed\"></a>\n\t\t\t\t\t\t\t<a id=\"nav-search-btn\" class=\"nav-icon\" title=\"Search\"></a>\n\t\t\t\t\t\t</nav>\n\t\t\t\t\t\t<div id=\"search-form-wrap\">\n\t\t\t\t\t\t\t<form action=\"//google.com/search\" method=\"get\" accept-charset=\"UTF-8\" class=\"search-form\"><input type=\"search\" name=\"q\" results=\"0\" class=\"search-form-input\" placeholder=\"Search\"><input type=\"submit\" value=\"\" class=\"search-form-submit\"><input type=\"hidden\" name=\"q\" value=\"site:http://ld.mmyz.net\"></form>\n\t\t\t\t\t\t</div>\n\t\t\t\t\t</div>\n\t\t\t\t</div>\n\t\t\t</header>\n\n\t\t\t<div class=\"outer\">\n\t\t\t\t<script type=\"text/javascript\" src=\"http://www.qq.com/404/search_children.js\" charset=\"utf-8\"></script>\n\t\t\t</div>\n\n\t\t<footer id=\"footer\">\n\t\t\t\t<div class=\"outer\">\n\t\t\t\t\t<div id=\"footer-info\" class=\"inner\">\n\t\t\t\t\t\t© 2014 茂名市第一中学灵动计算机社<br>\n\t\t\t\t\t\tPowered by <a href=\"http://zespia.tw/hexo/\" target=\"_blank\">Hexo</a>, Hosted by <a href=\"https://gitcafe.com/\" target=\"_blank\">GitCafe</a>.\n\t\t\t\t\t</div>\n\t\t\t\t</div>\n\t\t\t</footer>\n\t</div>\n\n\t<nav id=\"mobile-nav\">\n\t\t\t<a href=\"/\" class=\"mobile-nav-link\">首页</a>\n\t\t\t<a href=\"/about\" class=\"mobile-nav-link\">关于</a>\n\t\t\t<a href=\"/archives\" class=\"mobile-nav-link\">存档</a>\n\t\t\t<a href=\"http://www.mmyz.net/\" class=\"mobile-nav-link\">学校网站</a>\n\t\t</nav>\n\n\t<script src=\"/js/jquery.min.js\"></script>\n\t<script type=\"text/javascript\" src=\"/js/script.js\"></script>\n </div>\n</body>\n</html>","mtime":1405826791000,"source":"source/404.html","_id":"xh7cm36njg4l511v"},"h962pvgtqvalb72j":{"content":"layout: false\n--------\nPYcHNWo5eg","mtime":1405826791000,"source":"source/baidu_verify_PYcHNWo5eg.html","_id":"h962pvgtqvalb72j"},"p991hpei9pmm0j39":{"content":"layout: false\n--------\ngoogle-site-verification: google2b6cffa7d543d91d.html","mtime":1405826791000,"source":"source/google2b6cffa7d543d91d.html","_id":"p991hpei9pmm0j39"},"5ig88nqj13pqc2il":{"content":"title: 装电脑!装电脑!\ndate: 2014-03-01\ncategories: \n- 活动\n- 教学\ntags:\n- 硬件\n- 社团嘉年华\n- 社团文化节\ndescription: 灵动计算机社举办台式计算机组装教学实践活动的台前幕后。\nkeywords: 组装电脑,硬件,社团嘉年华,社团文化节\n---\n\n\n\n<!-- more -->\n\n-----\n\n### “蓄谋已久”\n\n这,是一次“蓄谋已久”的活动。\n\n[社团嘉年华](http://www.mmyz.net/Item/858.aspx),是茂名一中社团联合会的盛典。在嘉年华这一天里,一中各大社团齐聚一堂,共同举办活动。为了办好本学年里社联的这件头等大事,在上个学期,计社的工作人员们便开始策划本活动。为了让更多的同学能够了解计算机硬件,我们决定办一次电脑组装教学。\n\n-----\n\n### 器材准备\n\n既然是举办组装电脑的活动,那自然得有电脑主机嘛。我们借用了5台主机,2套显示器键盘鼠标来举办这次活动,非常感谢曾美霞老师对我们的帮助。\n\n此外,我们还购买了螺丝刀、散热硅脂等,自己动手制作了5个用来区分不同螺丝的盒子。慢着,好像有点问题:螺丝刀不够长,数量好像不太够;散热硅脂一次买太多了,有些浪费。毕竟是第一次搞这样的活动,我们策划得还不够好,望同学们见谅。希望计社以后能够改善这些细节。\n\n-----\n\n### 组装学习\n\n在这次活动里,计社的工作人员们要教会大家如何组装。但事实上,并不是每一位工作人员都懂得如何组装。幸好,我们有对此比较擅长的社干,所以就相互教啦。\n\n在活动前一周的星期六下午和晚上,我们高一的社干们放弃了自己的活动和电影时间,到信息楼里,学习如何组装我们活动所用的电脑。我们还尽可能地想办法了解主板上那些比较明显的芯片的作用,以便在活动中能更好地教大家。\n\n\n\n\n\n-----\n\n### 《电脑安装手册》\n\n为了方便参加活动的同学学习组装电脑,我们还制作了《电脑安装手册》,并印制出来。\n印刷质量不是很好,在这里给大家附上电子版下载地址:<http://pan.baidu.com/s/1mg9bJBU>\n\n-----\n\n### 布置场地\n\n星期五的下午,也就是活动的前一天,工作人员们便12张书桌和8张椅子从高一教学楼北楼搬到了图书馆门前东侧的空地上,那里是我们将要举办活动的地方。搞完活动后还得搬回去呢。一个字——“累”。\n\n星期六清晨,天还没亮,我们就赶到了活动地点,搭起了帐篷。\n\n接着,我们又从信息楼里搬来电脑、显示器等,摆好桌椅,接好电线,分配好每一桌所需的器材等。不知不觉地,一个多小时便过去了,本次活动开始了。\n\n\n\n-----\n\n### 活动进行时\n\n想要获得本次活动通关贴纸的同学,需要完成:\n\n* 把拆散的主机部件组装起来\n* 对组装好的电脑进行通电测试,并排除问题\n\n活动如火如荼地进行着,活动吸引了许多同学前来参与。同学们都十分享受自己动手组装的过程,本次活动得到了许多同学的称赞。\n\n\n\n\n\n-----\n\n### 累,但值得!\n\n为了举办这次活动,计社人付出了许多汗水,也面临过不少困难。但当我们洋溢在看到同学们的笑容时,我们都会觉得:这一切,都是值得的!","mtime":1405826791000,"source":"source/_posts/assemble_computers.md","_id":"5ig88nqj13pqc2il"},"oi3z87wv3sqpadqp":{"content":"title: 语音室活动守则\ndate: 2014-05-16 14:17:07\ncategories: 规章\ntags: 语音室\ndescription: 灵动计算机社语音室活动守则。\nkeywords: 活动守则\n---\n\n我们本次 Photoshop 图像处理基础教学课程在语音室中进行。为了让同学们合理使用语音室设备,保证活动的顺利进行,我们制订了这个活动守则。希望同学们自觉遵守,营造一个良好的学习环境。\n\n1. 在上课前进行签到登记,进入语音室。\n2. 不携带食品进入语音室。\n3. 上课期间,需遵守课堂纪律,按照活动主题进行操作,不下载、安装或运行任何与课堂无关的程序,不浏览与课程无关的网页,不使用手机、MP3、MP4等无关设备。\n4. 爱护语音室的硬件设施,不搬动电脑主机、显示器,严禁破坏电脑主机、显示器、耳机、麦克风、鼠标、键盘等硬件设备,违者需进行赔偿并被取消参加本活动的资格。\n5. 不运行或传播计算机病毒或木马程序,不入侵或破坏计算机软件系统。\n6. 活动结束后应带走自己的物品、垃圾,整理好原有的物品,并及时离开,以防被锁在信息楼中。","mtime":1405826791000,"source":"source/_posts/computer_room_rules.md","_id":"oi3z87wv3sqpadqp"},"u9qxmkzbdel97h73":{"content":"title: 学会了 C 语言真的可以开发出很多东西吗?- 转自知乎\ndate: 2014-06-29 17:58:12\ncategories: 分享\ntags:\n- C\n- 编程\ndescription: 转载知乎上涛吴对问题“学会了 C 语言真的可以开发出很多东西吗?”的回答。\nkeywords: C,编程,编程学习,知乎\n---\n\n发表于知乎,作者:[涛吴](http://www.zhihu.com/people/Metaphox)\n原文地址:<http://www.zhihu.com/question/23844552/answer/25880226>\n\n---\n\n### 提问:\n> __学会了 C 语言真的可以开发出很多东西吗?__\n> 我现在c语言入门,基本靠自学,就看网上的那种教程,但是我怎么觉得它就是只能做下数学题,我觉得它并不能编辑出一个啥子游戏或者软件出来噢……初学者,见谅。\n\n### 涛吴的回答:\n\n\n什么是马里奥?一个装着 16 × 32 个小色块的长方形,其中一些色块填着颜色,另一些没有。什么是花?一个 16 × 16 的正方形。什么是「变身」?把马里奥这个方块里面代表衣服的褐色变成红色,代表背带裤的红色变成白色。什么是褐色?暂且说它是 0x887000 这个数字。什么是「碰到」?马里奥的长方形与花朵的正方形有所重叠。什么是「重叠」?假设马里奥的这个方块占据屏幕(什么是屏幕?一个能装下 256 × 240 个小色块的矩形)中 X 方向 101 到 116、Y 方向 21 到 52 之间的区域,那么只要这个区域内有一点或更多点也被花朵所占据(比如花朵处在 X 116 到 131、Y 21 到 36 之间的区域内),我们就认为两者有所重叠。\n\n<!-- more -->\n\n若给定以八个数值代表的两个矩形区域,请写出判断两个区域是否有重叠的 C 语言程序。如果你能写出来,那么祝贺你,如果有朝一日你想自己做一遍 NES 版本的《超级马里奥》,你至少知道让他变身需要做什么了。\n\n是的,C 语言也许「只能」做数学题。可是,绝大多数游戏的运行过程就是不停地做数学题,而所谓编写游戏,也就是把游戏的规则和游戏的效果转化为数学题而已。其中不少题目电脑都已经知道怎么解——是别的程序员事先告诉它的——比如「求一堆散落在三维直角座标系之中的多面体体在 8(x−3)−10(y+1)−11(z−1)=0 这个平面上一个给定范围内的投影」或者「给定一些彼此相连的顶点,求任意两点之间的最短路径」之类的数学题,它只需要千万分之一秒就能给你解好。这种能力有什么用?电脑上 FPS 游戏的本质活动就是不停地求三维座标系下的多面体经过变换之后在二维平面上的投影,不停地判断两个多面体是否彼此重叠,以及不停地寻找两个顶点之间的最短路径,最终达到让怪物冲到你面前咬你一口的目的。不止游戏如此,其他软件也都差不多,每一个细节都是某种数学题——比如知乎页面顶端的蓝色导航条背景,就是 CSS 描述的一个浅蓝到深蓝的渐变——渐变是怎么回事呢?给出两个数字分别代表两种颜色,以及第三个数字代表一段距离,求一系列颜色的数值以及次序,使得这段距离中两种相邻颜色之间的变化最小。数学题。别说 C 语言,一切编程语言最终都只能做数学题,根据给定的数据,算出另一些数据,算出更多的数据,然后存贮、发送或者呈现算出的数据。\n\n不过我能理解你的困惑。投入大量时间看完教程,结果只能在黑框里输出一串数字。这是在学编程还是在向七十年代致敬?编程是这样无法给人成就感的活动吗?是,也不是。看你的表述,应该不是小孩子了,因为小孩子不会因为初学编程能做的事情很少而没有成就感,或者说,觉得这样做没有成就感的小孩子根本不会继续学下去。最初学编程的成就感单纯来自于「我居然可以指挥机器做一些事」,至少我小时候用中华学习机编一个程序帮我算暑假作业上的四则运算题时是这样感觉的。写出这些程序并用它解题虽然远比自己动笔去把题目算出来费时,却让人乐此不疲。那时候我还不知道马里奥碰到花会变身这种事情其实也是靠编程编出来,所以我也不会去想学编程「并不能做什么」。\n\n无奈大多数人过了一定年纪就很难再靠「我能指挥机器」这种简单原始的快乐来驱动自己学编程。见过世面,听过传言,欲望和野心变得复杂而庞大,你想要图形界面,音乐音效,人工智能,云端同步,可是你闷头学了几堂课,还是只学会在黑框里显示一串数字。你怀疑这是学 C 语言的错,于是你到知乎上来问了这个问题。\n\n你的疑惑是有道理的。\n\n如果能把编程学下去,日后你就会明白,任何程序都是一座冰山,最终用户能看到的界面和使用的功能,只是程序浮在水面上的十分之一。知乎这个网站其实也是个运行在某台电脑上的程序,你能看到的十分之一是用什么编写的呢?HTML,CSS,JavaScript,或者 Objective-C。而你看不到的那十分之九是用什么编写的呢?Python。这些你无法直接观测到的 Python 程序运行在世界某个角落的某些计算机上,隔着光缆、双绞线和无线基站,为你面前或掌上的用户界面注入生命。\n\n\n\n([xkcd.com/353/](http://xkcd.com/353/))\n\n……可是 Python 是用什么编写的呢?C 语言(当然,这么说并不严谨,Python 理论上可以用任何其他语言实现,实际上也已经被用很多其他语言实现了,不过这并不是重点)。任何编程语言都是实现某个功能的工具,Python 实现了知乎这个网站的大部分功能,而 C 实现了「用 Python 写程序」这个功能。为什么是 C?\n\n> C 很别扭又缺陷重重,却异常成功。固然有历史的巧合推波助澜,可也的确是因为它能满足对于这样一种系统实现语言的需要:既有相当的效率来取代汇编语言,且又足够地抽象而流畅,能够用于描述各种各样的环境之下的算法与交互。\n> C is quirky, flawed, and an enormous success. Although accidents of history surely helped, it evidently satisfied a need for a system implementation language efficient enough to displace assembly language, yet sufficiently abstract and fluent to describe algorithms and interactions in a wide variety of environments.\n> ——C 语言之父,Dennis M. Ritchie\n\nC 是初代程序员所使用的语言,那时候硬件很贵,软件必须高效;而计算机的用户都是职业程序员,对于硬件有足够的理解。C 贴近硬件,就意味着它容易译成机器能懂的语言,而它的设计者也并不需要操心普通人学起来可能会比较困难——而且,说真的,其实也不很难。但是,这么多年过去之后,软件规模变得越来越大,C 就像锤子和手锯,修小木屋得心应手,造摩天楼就比较力不从心;但 C 语言可以用来造出其他更适合建造摩天楼的工具,乃至组成摩天楼的预制件,就好比用锤子和手锯造出挖掘机和吊车、混凝土板和一体门窗一样(当然,这个类比并不十分贴切。可是没有什么类比能贴切地描述软件工程,因为软件工程像许多东西,却又什么东西都不像)。\n\n所以,回到你的问题上来,是的,学会 C 计算机语言真的可以开发出很多东西,但除非内力深厚,场合适当,并且闲得蛋疼,大多数人不会拿 C 或者只拿 C 来开发太大的东西。如果你只是想要一门能够让你「编辑出一个啥子游戏或者软件出来」的语言,而且你用 Windows,那建议你转去学学 C#。它长得和 C 挺像,但却能迅速地写出至少是带有图形界面的程序,用起来也很方便,鼠标点一点就能让你对自己的程序看起来什么样有个比较直观的印象。还有,在国内,C# 的教材也相当容易找到。当然 Python 也是一个很好的选择。\n\n\n\n另外,还有一件事你必须弄明白:现代的所谓编程这一活动,其实大部分时候是在「合理地堆砌别人已经实现的功能来实现新的功能」,C 语言莫不如是,比如 printf 这个东西,是别人做出来的「把一些数据按照指定格式输出到屏幕上」这一功能。而别人还做出来许多其他功能,比如「在发现用户短时间内连续两次按下鼠标又松开的时候调用你写好的一个函数」。学会怎样在 C 或者其他任何程序语言中使用这些既有功能,也是学习编程的一门重头戏。等你弄明白这一点,你也就找到了你问题的答案。","mtime":1405826791000,"source":"source/_posts/coule_c_do_a_lot.md","_id":"u9qxmkzbdel97h73"},"5l0nlqpiwzkilqi6":{"content":"title: Hello World\ndate: 1998-9\ntags: C\nkeywords: C,C语言\n---\n\n你好,世界!\n\n\t#include <stdio.h>\n\tint main(void)\n\t{\n\t\tprintf(\"Hello World!\\n\");\n\t\treturn 0;\n\t}","mtime":1405826791000,"source":"source/_posts/hello_world.md","_id":"5l0nlqpiwzkilqi6"},"qfiqt201lk78whty":{"content":"title: LingDong openSUSE - 为灵动而定制\ndate: 2014-05-03\ncategories: 分享\ntags:\n- 操作系统\n- Linux\n- 新鲜玩意儿\ndescription: LingDong openSUSE,为灵动计算机社定制的 Linux 桌面系统。\nkeywords: LingDong openSUSE,SUSE Studio,Linux,操作系统\n---\n\n喜欢尝新的同学们,来体验一下 LingDong openSUSE 吧。\n\n这是子勤为灵动计算机社定制的一款 Linux 桌面系统,基于 [openSUSE 13.1](http://software.opensuse.org/131/zh_CN) i686,使用 [SUSE Studio](https://susestudio.com/) 构建,简体中文界面。\n\n<!-- more -->\n\n### 搭载软件包括:\n\n* 内核:[Linux Kernel](https://www.kernel.org/) 3.11\n* 桌面环境:[KDE](http://www.kde.org/) 4\n* 浏览器:[Mozilla Firefox](https://www.mozilla.org/zh-CN/firefox/new/) 28\n* 办公软件:\n - [WPS Office for Linux](http://linux.wps.cn/) Alpha 12 p4\n - [Okular 文档查看器](http://okular.kde.org/)\n* 多媒体:\n - [VLC 播放器](http://www.videolan.org/vlc/) (及各种解码器) (可播放大多数常见视频格式)\n - [FFMPEG](http://www.ffmpeg.org/) (强大的编/解码器)\n - Flash Player\n* 开发工具:\n - [GCC](http://gcc.gnu.org/) 4.8\n - [Free Pascal](http://www.freepascal.org/) 2.6.4\n - [Go](http://golang.org/)\n - [GDB](http://www.sourceware.org/gdb/)\n - [Vim](http://www.vim.org/) 文本编辑器\n - [Git](http://git-scm.com) 版本控制管理软件\n - [Indent](http://www.gnu.org/software/indent/) C代码风格转换工具\n - [Python](https://www.python.org/) 2.7\n* 其他工具:\n - [Fcitx](https://code.google.com/p/fcitx/) 中文输入法\n - [Ark](http://www.kde.org/applications/utilities/ark/) 存档工具 (支持 tar, gzip, bzip2, zip, 7z, rar 等格式的解压缩)\n - [KTorrent](http://www.kde.org/applications/internet/ktorrent/) 点对点下载工具\n - [GParted](http://gparted.org/) 磁盘分区管理工具\n - [SuSE Studio 镜像写入器](http://software.opensuse.org/package/imagewriter)\n\n这个系统能够满足许多场合的需求,不过,想用它玩游戏的孩子可能会受到打击。小编觉得,它挺适合搞 OI 的同学。\n\n### 下载\n下载 LingDong openSUSE 13.1.i686-0.0.9:<http://pan.baidu.com/s/1kT3FsiF>\n\n### 使用方法\n\n##### 1. 将 ISO 镜像烧入光盘或者写入 U 盘中\n\n这里介绍一下写入将 LingDong openSUSE 镜像写入 U 盘的方法。\n\n***注意:以下操作会删除 U 盘上原有的数据,请做好备份工作。***\n\n* 在 Linux 系统中,我们可以用 `dd` 命令把它写入 U 盘:\n\n\n\t# umount /dev/sdX\n\t# dd if=/镜/像/路/径/文件名.iso of=/dev/sdX bs=4M\n\n上面的命令请以 `root/sudo` 权限执行,其中的 `sdX` 请用你的 U 盘的实际标志代替,`/镜/像/路/径/文件名.iso` 请用所下载的文件的实际路径名代替。我们需要确保 U 盘未被挂载,即 `umount /dev/sdX`,才能执行 `dd` 命令。\n\n* 在 Windows 系统中,我们可以用 SuSE Studio 镜像写入器把它写入 U 盘。\n\n首先,下载 SuSE Studio 镜像写入器:<https://github.com/downloads/openSUSE/kiwi/ImageWriter.exe>\n然后,把 LingDong openSUSE 镜像的扩展名由 `iso` 改为 `raw`\t\n接着,以管理员权限运行 `ImageWriter.exe`,按照界面提示操作即可把镜像写入 U 盘。\n\n##### 2. 用上面制作好的介质启动电脑\n\n这一步的操作方法在不同的机器上会有所不同,所以,请善用[搜索](http://www.lmgtfy.com/?q=%E4%BB%8EU%E7%9B%98%E5%90%AF%E5%8A%A8)。\n\n### 尽情享受吧\n\n登录 LingDong openSUSE 的时候,会提示输入用户名和密码:\n\n用户名:cptsct\n密码:cptsct\n\n用户名:root\n密码:linux\n\n一般情况下,请使用 `cptsct` 用户登录。 (觉得很难记?其实就是 ComPuTer SoCieTy)\n\n也许,你刚开始使用它的时候会有些不习惯,但如果能坚持尝试的话,你会发现,LingDong openSUSE 也是非常优雅地使用的。希望 LingDong openSUSE 能成为引导你踏入 Linux 世界的第一步。\n\n你甚至还可以把这个系统安装到硬盘上,安装方法请自行探索。对于安装 Linux 系统缺乏经验的同学,请做好心理准备,小心,小心,再小心点哦。\n\n-----\n\n希望同学们能在下面的评论框里写下你对 LingDong openSUSE 的想法,以便我们能够不断改进它。\n小编先来一条:未整合截屏工具","mtime":1405826791000,"source":"source/_posts/lingdong_opensuse.md","_id":"qfiqt201lk78whty"},"tsuc8mh3tbzt8ztt":{"content":"title: 网络基础知识讲座\ndate: 2013-12-21\ncategories:\n- 活动\n- 讲座\ntags:\n- 网络\n- IP\ndescription: 灵动计算机社举办网络基础知识讲座,由指导老师曾美霞为我们讲解计算机网络较为底层的知识,主要讲了计算机网络IP的性质、发展历程以及相关运算的含义和方法。\nkeywords: 网络,IP,讲座\n---\n\n\n\n星期六下午,我们举办了“网络基础知识讲座”,由指导老师曾美霞为我们主讲。她为我们讲解了计算机网络较为底层的知识,主要讲了计算机网络IP的性质、发展历程以及相关运算的含义和方法等。\n\n曾老师为了给我们准备这次讲座,付出了许多时间和精力;而且她在中途不休息的情况下,坚持为我们连续地讲了两堂,持续了共两个多小时。在此,我们向曾老师诚挚地道一声:“老师,您辛苦了!”\n\n<!-- more -->\n\n\n\n\n\n这次活动也是自茂名一中搬迁到新校区以来,计算机社首次在电脑室举办的活动。尽管参加本次活动的同学不算多,但计社的社干们都非常认真、努力地把自己的工作做好。我们忘不了,在活动结束后,社干们拖着疲惫的身躯吃方便面时,脸上流露出的那温暖的笑容。","mtime":1405826791000,"source":"source/_posts/network_fundamentals_lecture.md","_id":"tsuc8mh3tbzt8ztt"},"crfljxyen0ux5d8m":{"content":"title: Ps 大赛进行时 + 用 Python 在局域网内共享文件的方法\r\ndate: 2014-06-15\r\ncategories: \r\n- 活动\r\n- 比赛\r\ntags:\r\n- Ps\r\n- 网络\r\n- Python\r\ndescription: 灵动计算机社举办的 Photoshop 平面设计大赛的比赛现场。\r\nkeywords: Ps,Photoshop,平面设计大赛,平面设计\r\n---\r\n\r\n### Photoshop 平面设计大赛进行时\r\n\r\n今天下午,“我爱一中”·Photoshop 平面设计大赛在信息楼语音室中开赛了,得到了不少同学的支持,共有 23 名选手参加了比赛。下面上图:\r\n\r\n\r\n\r\n<!-- more -->\r\n\r\n\r\n\r\n\r\n\r\n小编当时没能参加到这场比赛,没机会玩 Ps(快来安慰我 T_T)。所以,小编只好事后 P 了一下上面几张图片补偿一下,要是不小心 P 丑了,请不要打我。\r\n\r\n---\r\n\r\n### 用 Python 在局域网内共享文件\r\n\r\n那小编当时到底干嘛去了呢?其实只有一件重要的事:“传文件!”\r\n\r\n要知道,我们提供的素材包将近半G啊,又没有提前拷贝好。怎样在短时间内将这个大文件传到二十多台电脑上对我们来说是个不小的考验。用 U 盘复制?U 盘不够多呀,而且速度不快。看在语音室电脑的网卡还不错的份上,我们决定架设一个 HTTP 服务器,用内网来传输,让同学们用浏览器下载。\r\n\r\n不过,架设 HTTP 服务器不是一件轻松的事情,需要一定的时间来配置。可我们得尽快呀,因为参赛的同学们已经陆陆续续地来到了!幸好我们早有准备,那就是—— Python 的 `SimpleHTTPServer`。\r\n\r\n小编在此分享一下这个用 Python 在局域网内共享文件的方法吧(事实上,这个方法对于外网也是可以的,不过貌似没有什么优势):\r\n\r\n- __先装个 Python 2.x 的最新版__\r\nTips: Linux 系统中都通常预装 Python,一般可以跳过这步\r\n 1. 下载选择与系统相应的版本:[python.org/downloads](https://www.python.org/downloads/)\r\n 2. 安装的时候记得把可执行文件的目录添加到环境变量 `path` 里(Windows 系统下的设置方法如图),这样可以方便后面的操作。\r\n\r\n\r\n\r\n- __在命令行中定位到要共享的目录__\r\n例如,在 Windows 中,要定位到 D:\\Path\\To\\Your\\Dir\\,需要:\r\n 1. 打开命令提示符,输入 `D:` 并回车,就定位到 D 盘的根目录了;\r\n 2. 输入 `cd Path\\To\\Your\\Dir` 并回车,就定位好了。\r\n\r\n- __用 Python 共享这个文件夹__\r\n在刚才那个完成定位的命令提示符窗口中,运行\r\n\t\tpython -m SimpleHTTPServer 80\r\n然后,在本机访问 <http://127.0.0.1/> 就可以看到效果了,而局域网中的其他设备要访问时,只需要把上面的 `127.0.0.1` 改成这台机子的内网 IP 即可。如果该目录中有 `index.html` 文件,则默认会展示这一文件;如果没有,则会显示一份文件列表,如图所示:\r\n\r\n\r\n上面的命令中,`80` 表示的是端口。当然,也可以用其他的端口,不过,访问的时候就要记得加上端口号,例如 <http://127.0.0.1:8000/>。\r\n\r\n小编觉得,这个在内网共享文件的方法不算复杂吧。希望对你有所帮助。","mtime":1405826791000,"source":"source/_posts/photoshop_contest.md","_id":"crfljxyen0ux5d8m"},"vsbr7qlnnspyit0y":{"content":"title: “我爱一中”·Photoshop 平面设计大赛素材预览版放送\ndate: 2014-06-13 20:52:16\ncategories:\n- 活动\n- 比赛\ntags:\n- Ps\ndescription: 灵动计算机社 Photoshop 平面设计大赛素材预览。\nkeywords: Ps,平面设计大赛,茂名一中图片\n---\n\n想向大家展示你的创意吗?想赢取丰厚的奖品吗?不要错过,不要错过,机会来了!\n在接下来的星期天下午,也就是 6 月 15 日 14:30 ~ 17:00,我们将在信息楼语音室举办主题为“我爱一中”的 Photoshop 平面设计大赛。\n\n### 比赛规则:\n\n1. 各参赛者运用 Photoshop 自由创作切合主题的平面设计作品,例如宣传海报、明信片、图片封面、创意宣传单等。作品要求主题明确、内容丰富、构思新颖、健康向上,内容和定位有独到创新之处。\n2. 参赛者可自由选择“钟楼”、“学海”、“小山坡”、“博学广场”以及“学校外景”中的一种或多种作为创作素材。灵动计算机社会提供上述图片素材,参赛者也可自带素材,但主要素材应为我们社团提供的图片。参赛作品长宽不限。\n3. 比赛在信息楼语音室进行,为每位参赛选手提供一台安装有Adobe Photoshop CS6的电脑。比赛时长为两小时,可提前上交作品。上交参赛作品时,需上交PSD源文件。\n4. 参赛作品不退稿,请自行备份。参加本次比赛,即代表同意将作品的使用权免费授予灵动计算机社。\n5. 本次活动面向高一高二级全体同学。参赛者可个人参赛,也可组队参赛(每组不超过两人)。组队参赛者,每组只有机会获得一份奖品。比赛奖品将在赛后择期颁发。\n6. 作品由指导老师和灵动计算机社社干共同评分。灵动计算机社保留对本次活动的解释权。\n\n### 本次比赛奖品丰厚:\n\n* 一等奖(1名):无线鼠标\n* 二等奖(2名):移动电源\n* 三等奖(3名):灵动计算机社纪念杯子(会变色哦)\n\n不仅如此,我们还会向提交作品的每位选手送出一份小礼品。\n\n### 评分标准:\n\n1. 图像处理 40分(差:0-10分;一般:11-20分;良好:21-30分;优秀:31-40分)\n2. 视觉效果 30分(差:0-7分;一般:8-15分;良好:16-22分;优秀:23-30分)\n3. 创意思维 30分(差:0-7分;一般:8-15分;良好:16-22分;优秀:23-30分)\n\n加分标准:\n1. 作品内容与主题相符,并在体现主题的基础上创意新颖,有鲜明特色。\n2. 作品画面、色彩搭配好,衔接紧凑自然。\n3. 作品富有美感,内容丰富,感染力强。\n\n比赛报名方式请留意教学楼公告栏。当然,也可以现场即时报名。希望同学们多多支持、踊跃参加呀!\n\n下面为大家放出我们提供的主要素材的预览版本,供同学们构思。(我们会在比赛现场提供更加清晰的版本)\n\n\n\n<!-- more -->\n\n\n\n\n\n\n\n\n\n\n\n\n\n\n\n\n\n\n\n\n\n\n\n\n\n\n\n\n\n\n\n\n\n\n\n\n\n","mtime":1405826791000,"source":"source/_posts/photoshop_contest_material.md","_id":"vsbr7qlnnspyit0y"},"br2qkbks5x1qczdo":{"content":"title: Photoshop 平面设计大赛结果出来啦!\ndate: 2014-06-19\ncategories:\n- 活动\n- 比赛\ntags:\n- Ps\ndescription: 展示灵动计算机社举办的 Photoshop 平面设计大赛的获奖作品。\nkeywords: Ps,Photoshop,平面设计大赛,平面设计\n---\n\n上个星期天下午,我们举办了[“我爱一中”·Photoshop 平面设计大赛](/2014/06/photoshop_contest/),得到了不少同学的支持。\n\n本周的星期二,我社指导老师和社干共同对参赛同学现场制作并提交的作品进行了评分工作,评选出了本次比赛的获奖作品。(小编吐槽:话说评分工作,那叫一个 #.@!$%^&*>_?< 5GB多的作品源文件啊下午放学后才能去评分啊还要吃饭啊还要上晚修啊.. 所以难免有点“草菅图命”,望同学们多多体谅)\n\n### 获奖名单\n\n* 一等奖:廖健-高一(31)班\n* 二等奖:罗昭恒-高一(4)班 李奕雅-高二(12)班\n* 三等奖:车晓雨-高一(2)班 钟沛泉-高一(31)班 朱芷谊、车晓雨(组合)-高一(2)班\n\n奖状和奖品也已经发到获奖同学的手上啦。(小编表示好喜欢三等奖的杯子)\nCongratulations!\n\n由于评分规则的限制,评选结果可能与您的感受略有出入。希望未获奖的同学不要灰心,相信自己,继续加油!\n\n### 作品展示\n\n\n\n<!-- more -->\n\n\n\n\n\n\n\n\n\n\n\n---\n\n小编也挑选了部分未获奖的作品,与大家共同分享:(排名不分先后)\n\n\n\n\n\n\n\n\n\n\n\n\n\n\n\n\n\n\n\n欢迎同学们到评论框里赞叹/吐槽。","mtime":1405826791000,"source":"source/_posts/photoshop_contest_result.md","_id":"br2qkbks5x1qczdo"},"g6882j6cfvwqrrv3":{"content":"title: Photoshop课程学习资料(第1节)\ndate: 2014-05-17\ncategories:\n- 活动\n- 教学\ntags:\n- Ps\n- 多媒体\ndescription: 灵动计算机社 Photoshop 课程学习资料(第1节)。\nkeywords: Ps,Photoshop,资源分享,教程,教程视频,多媒体,课程\n---\n\n星期五下午,在信息楼三楼的语音室里,我们开办了第 1 节 Photoshop 课程。\n同学们非常热情,一下课便迅速赶往语音室。来参加活动的同学比较多,差不多把84个座位的语音室给坐满了。\n\n上课之前,副社长王子勤首先和同学们寒暄了几句,然后向同学们宣读了《语音室活动守则》。接下来,就是同学们所期待的课堂了。\n在这节课里,曾老师带领前来参加活动的同学们一起:\n\n<!-- more -->\n\n1. 认识 Adobe Photoshop\n * Photoshop 的应用领域\n * 工作界面\n2. 学习图像的原理\n * 像素与分辨率\n * 位图与矢量图\n * 图像文件格式\n3. 学习 Photoshop 的基本操作\n 下面是我们这节课的学习任务:\n * 新建文件、打开文件、保存文件\n * 修改像素尺寸和画布大小(实战练习3.11.1~3.11.2)\n * 裁剪图像(实战练习3.12.2~3.12.5)\n * 拷贝与粘贴\n * 复制文档\n * 图像的变换与变形操作(实战练习3.15.3~3.15.10)\n * 用历史记录面板还原操作(实战练习3.18.2)\n\n---\n\n教程视频下载: <http://pan.baidu.com/s/1kTLrJ75>\n提取密码: 5m4v\n\n---\n\n希望同学们利用课余时间多多练习 Photoshop 的操作。","mtime":1405826791000,"source":"source/_posts/photoshop_lesson1.md","_id":"g6882j6cfvwqrrv3"},"1r888hbya2o09loy":{"content":"title: Photoshop课程学习资料(第2节)\ndate: 2014-05-22\ncategories:\n- 活动\n- 教学\ntags:\n- Ps\n- 多媒体\ndescription: 灵动计算机社 Photoshop 课程学习资料(第2节)。\nkeywords: Ps,Photoshop,资源分享,教程,教程视频,多媒体,课程\n---\n\n星期四的下午,我们的第二节 Phtoshop 课程在语音室中如约举行了。\n\n\n\n<!-- more -->\n\n在这节课里,同学们一起学习了 Ps 选区与抠图的操作。而与上一节课不同的是,来参加这节课的有高二年级的同学。\n\n话不多说,让我们赶紧放出资料下载方式:\n\n---\n\n教程视频下载: <http://pan.baidu.com/s/1c0qyI68>\n提取密码: rxeu\n\n---\n\n有的同学由于没有参加第一节课的课程,可能不太熟悉缩放操作。没关系,我们可以下载[之前的学习资料](/2014/05/photoshop_lesson1)来补充学习。\n\n希望同学们在课余时间多操作 Ps,这样才能更好地熟悉、掌握它。","mtime":1405826791000,"source":"source/_posts/photoshop_lesson2.md","_id":"1r888hbya2o09loy"},"zq1h7sr8aib3b3hf":{"content":"title: Photoshop课程学习资料(第3节)\ndate: 2014-05-29\ncategories:\n- 活动\n- 教学\ntags:\n- Ps\n- 多媒体\ndescription: 灵动计算机社 Photoshop 课程学习资料(第3节)。\nkeywords: Ps,Photoshop,资源分享,教程,教程视频,多媒体,课程\n---\n\n\n\n\n\n在我们 Ps 课程的第三节课上,同学们学习了照片的修饰与调整。\n认真听课的同学们,趁着放假,赶紧行动起来吧,用神奇的 Ps 把平日里刻苦努力挑灯夜战积累下来的痘痘、斑纹、黑眼圈,还有飘过的路人甲轻轻抹掉,让本节的知识帮助你实现华丽大转身。\n\n<!-- more -->\n\n没有来听这节课的同学也不必灰心,因为你可以利用假期的时间实现“逆袭”。在下面,你可以下载到教学视频以及练习素材。好好珍惜哦!\n\n---\n\n教程视频下载: <http://pan.baidu.com/s/1hqijupY>\n提取密码: df17\n\n---\n\n在周末假期里,希望同学们能够抽空把课堂上剩余的训练任务完成。","mtime":1405826791000,"source":"source/_posts/photoshop_lesson3.md","_id":"zq1h7sr8aib3b3hf"},"ru3l3z2hp1wohxri":{"content":"title: Photoshop课程学习资料(第4节)\ndate: 2014-06-11\ncategories:\n- 活动\n- 教学\ntags:\n- Ps\n- 多媒体\ndescription: 灵动计算机社 Photoshop 课程学习资料(第4节)。\nkeywords: Ps,Photoshop,资源分享,教程,教程视频,多媒体,课程\n---\n\n这一节课我们本次 Photoshop 课程的最后一节课了。我们一同学习了 Photoshop 中的图层和文字功能。\n\n\n\n“我要下载资料!我要下载资料!”\n别急,下面就是啦:\n\n<!-- more -->\n\n---\n\n教程视频下载: <http://pan.baidu.com/s/1bnoz6Zt>\n提取密码: 4awv\n\n---\n\n本次课程旨在让同学们学会上手 Photoshop,培养对 Ps 的兴趣。不知大家是否因此爱上了 Ps 呢?关于 Ps,还有许许多多好玩的东西等待大家探索。愿同学们能够利用自己的空余时间,进一步地深入学习。","mtime":1405826791000,"source":"source/_posts/photoshop_lesson4.md","_id":"ru3l3z2hp1wohxri"},"s2ooefdq3rlxemym":{"content":"title: Photoshop图像处理基础教学就要开课啦!\ndate: 2014-05-11\ncategories:\n- 活动\n- 教学\ntags:\n - Ps\n - 多媒体\ndescription: 灵动计算机社将开展 Photoshop 图像处理基础教学课程。\nkeywords: Ps,Photoshop,多媒体,课程\n---\n\n\n\n你是否还记得,上个学期的那张调查问卷?\n也许,在你的脑海中,已经消了它的颜色,散了它的芬芳。但是,我们从未忘记。\n告诉你一个消息:__我们的 Ps 课程就要开课了!!!__\n\n<!-- more -->\n\n-----\n\nPs 是啥?能吃吗?\n`Ps` 是 `Photoshop` 的简称,它是由 Adobe 公司发行的一款优秀的图像处理软件。我们可以用它来进行创意设计、修复照片、制作海报、绘制 Logo、辅助网页设计等等等等。有了 Ps 的帮助,我们可以化腐朽为神奇。至于 Ps 好不好吃,那就不知道啦。\n\n我们开展这个课程,旨在引导大家踏进 Ps 的大门,学会 Ps 的基础操作方式,培养同学们对计算机图像编辑处理技术的兴趣。\n\n本课程开设4节,由指导老师曾美霞为我们上课。我们在本课程中学习的为基础内容,所以,强大的高手们,请自觉飘过吧。实践是学习的最好方法,在课堂上,我们会把更多的时间留给大家动手操作。\n\n-----\n\n**时间:** 第14~17周 星期四 17:10~17:50\n (17:00签到,17:10准时上课,同学们要提前点到哦)\n (具体时间若有调整,我们会在公告栏通知,请同学们留意)\n**地点:** 信息楼三楼语音室\n**面向:** 全体同学\n**报名方式:**\n高一(2)班 王子勤 男D208\n高一(8)班 林士杰 男A212\n高一(11)班 庞 翔 男A323\n高一(13)班 陈子维 男D305\n高一(16)班 刘永州 男B304\n高一(19)班 黎晓君 女C314\n高一(21)班 杨礼杰 男D405\n高一(31)班 廖 健 男D503\n\n北楼的同学们,要麻烦你们走多几步路了。\n由于座位有限,同学们可得抓紧报名哦,报完即止哦。\n\n_报了名的同学,你们可千万要来哦!哦,还有,要认真听课,不要搞小动作哦。_","mtime":1405826791000,"source":"source/_posts/photoshop_lessons.md","_id":"s2ooefdq3rlxemym"},"wxa6famub3b7ahvu":{"content":"title: Pro Git 来了!\ndate: 2014-06-08\ncategories: 分享\ntags: Git\ndescription: Scott Chacon 所著的 Git 入门书籍《Pro Git》的第 1 至 3 章。\nkeywords: Pro Git,git\n---\n\nGit 是一款流行的版本控制软件,我们的这个博客就是用 Git 进行管理的。现在,Git 入门书籍《Pro Git》的第 1 至 3 章可以在灵动博客上线了。感兴趣的同学们可以在此阅读。\n\n\n\n请猛击 [阅读链接](/progit)。","mtime":1405826791000,"source":"source/_posts/progit.md","_id":"wxa6famub3b7ahvu"},"frgj4slnprybadpz":{"content":"title: 计算机社2013年招新\ndate: 2013-09-15\ncategories: 活动\ntags: 招新\ndescription: 计算机社2013年招新概况。\nkeywords: 招新\n---\n\n新学期,新同学,新社员。开学以来的第三个周末,便是我们招新的时候了。\n\n根据社联的安排\n我们的位置:高一教学楼中楼的东边\n报名时间为:2013年9月15日(星期日)14:45-17:30\n\n\n\n<!-- more -->\n\n为了能够广泛吸收新力量,在招新的前一天,也就是星期六的晚上,两位代理社长把高一级44个班都跑了一遍(有一个班没让进去),做社团宣传。真的挺辛苦的。\n\n由于种种原因,计算机社未能出现在社联宣传视频里,在招新之前,有许多同学甚至不知道我们一中有计算机社。所以两位代理社长跑得特别勤快,还诚挚握手邀请了超过30个班的电教员加入。星期天下午,前来报名加入计算机社的高一同学共计177人,汗水终于换来了收获。\n\n","mtime":1405826791000,"source":"source/_posts/recruit_new.md","_id":"frgj4slnprybadpz"},"ayz0n6mayqeadhb3":{"content":"title: 每周电脑小知识 第1期\ndate: 2013-11-04\ncategories: 活动\ntags: \n- 电脑小知识\n- Excel\n- Windows Tips\ndescription: 计算机社举办“每周电脑小知识”征稿&展示活动。这里是第1期《每周小知识》。\nkeywords: 电脑小知识,Excel,Windows\n---\n\n想和大家一起分享你所了解的计算机知识吗?为丰富同学们的计算机知识,计算机社会长期开展“每周电脑小知识”活动,欢迎同学们积极投稿。\n\n下面是第1期《每周小知识》:\n","mtime":1405826791000,"source":"source/_posts/weekly_tip_1.md","_id":"ayz0n6mayqeadhb3"},"jvrdtggff8lqbv1p":{"content":"title: 每周电脑小知识 第2期\ndate: 2013-11-18\ncategories: 活动\ntags: \n- 电脑小知识\n- Windows Tips\n- 新鲜玩意儿\ndescription: 计算机社举办“每周电脑小知识”征稿&展示活动。这里是第2期《每周小知识》。\nkeywords: 电脑小知识,Windows\n---\n\n第2期《每周小知识》出炉啦!\n\n感谢廖健、王子勤、刘永洲同学的投稿。\n\n<!-- more -->\n\n","mtime":1405826791000,"source":"source/_posts/weekly_tip_2.md","_id":"jvrdtggff8lqbv1p"},"kys8qu9af68ntcfp":{"content":"title: 每周电脑小知识 第3期\ndate: 2013-12-02\ncategories: 活动\ntags: \n- 电脑小知识\n- Windows Tips\ndescription: 计算机社举办“每周电脑小知识”征稿&展示活动。这里是第3期《每周小知识》。\nkeywords: 电脑小知识,Windows\n---\n\n第3期《每周小知识》发布!\n\n感谢倪伟智、黎晓君、李锡泽同学的投稿。\n\n","mtime":1405826791000,"source":"source/_posts/weekly_tip_3.md","_id":"kys8qu9af68ntcfp"},"72e99y6yk2izmfy1":{"content":"title: 每周电脑小知识 第4期\ndate: 2013-12-09\ncategories: 活动\ntags: \n- 电脑小知识\n- Word\n- 新鲜玩意儿\ndescription: 计算机社举办“每周电脑小知识”征稿&展示活动。这里是第4期《每周小知识》。\nkeywords: 电脑小知识,Word\n---\n\n本期我们`换个颜色`吧!\n\n感谢李锡泽、陈子维、黄泓锦同学的投稿。\n\n<!-- more -->\n\n","mtime":1405826791000,"source":"source/_posts/weekly_tip_4.md","_id":"72e99y6yk2izmfy1"},"u3q8prycsflhsy1p":{"content":"title: 每周电脑小知识 第5期\ndate: 2014-01-06\ncategories: 活动\ntags: \n- 电脑小知识\n- Windows Tips\ndescription: 计算机社举办“每周电脑小知识”征稿&展示活动。这里是第5期《每周小知识》。\nkeywords: 电脑小知识,Windows\n---\n\n速速围观第5期《每周小知识》!\n\n感谢梁行健、吕飞、陈翼先同学的投稿。\n\n","mtime":1405826791000,"source":"source/_posts/weekly_tip_5.md","_id":"u3q8prycsflhsy1p"},"smz84yf6uglu8l9u":{"content":"title: 每周电脑小知识 第6期\ndate: 2014-01-13\ncategories: 活动\ntags: \n- 电脑小知识\n- Ps\n- Windows Tips\ndescription: 灵动计算机社举办“每周电脑小知识”征稿&展示活动。这里是第6期《每周小知识》。\nkeywords: 电脑小知识,Ps,Windows\n---\n\n这里是第6期《每周小知识》。\n\n感谢王子勤、倪伟智同学的投稿。\n\n这也是本学期最后一期《每周小知识》了。\n非常感谢积极参与本次活动的同学们。\n\n我们打包了本学期的6期《每周小知识》,方便大家下载。\n传送门:<http://pan.baidu.com/s/1c08B0MO>\n\n<!-- more -->\n\n","mtime":1405826791000,"source":"source/_posts/weekly_tip_6.md","_id":"smz84yf6uglu8l9u"},"n7npnrv1tkrxyl13":{"content":"title: 你的 WiFi 安全了吗?\ndate: 2014-03-13\ncategories: \n- 活动\n- 讲座\ntags: \n- 无线网络\n- WiFi\n- 网络\n- 安全\n- 社团文化节\ndescription: 灵动计算计社举办“你的 WiFi 安全了吗”无线网络安全防范知识讲座。本次讲座由社干廖健主讲,首先和同学们学习了无线网络的基本概念,然后讲解了 WiFi 加密的相关原理,分析黑客破解 WiFi 的过程,并教会大家对应的防范方法。\nkeywords: 无线网络,WiFi,网络,安全,讲座,社团文化节\n---\n\n\n\n<!-- more -->\n\n星期四下午,在图书馆东边的小报告厅里,我们举办了无线网络安全防范知识讲座。这次讲座题为“你的 WiFi 安全了吗”,由社干廖健主讲。廖健同学首先和同学们学习了无线网络的基本概念,然后讲解了 WiFi 加密的相关原理,分析黑客破解 WiFi 的过程,并教会大家对应的防范方法。\n\n这次讲座主题具有不小的吸引力,来参加这次讲座的同学中也有一些非社员。讲座开始的时间比预期迟了15分钟,但在场的同学们都能做到细心、耐心地听讲。在此我们要感谢同学们积极的参与与配合。\n\n为了准备这次讲座,廖健同学利用自己的课余时间,做策划、查资料、设计讲座内容、制作演示文稿,付出了许多努力。这次讲座的成功举办,离不开他的付出,也离不开计社全体社干们积极、主动的工作。鲜花和掌声送给他们。\n\n\n\n","mtime":1405826791000,"source":"source/_posts/wireless_network_security_lecture.md","_id":"n7npnrv1tkrxyl13"},"uvdmivbmfs9kfajc":{"content":"title: 关于\ndate: 2014-05-01\ndescription: 关于灵动计算机社、这个博客,以及我们的联系方式。\n---\n\n### 灵动计算机社\n\n茂名市第一中学灵动计算机社由热爱计算机技术的茂名一中学生组成的学生社团。在这里,我们学习、分享与交流计算机技术,共同探讨计算机软硬件知识。我们开展计算机作品创作相关活动和竞赛,丰富同学们的计算机知识,提高大家的计算机技能,享受计算机带给我们的快乐。\n\n* 1998年,[茂名市第一中学计算机协会](http://mmyzjixie.blog.163.com/)成立了。她是灵动计算机社的前身。\n* 后来,茂名一中成立了学生社团联合会,计协改称计社。\n* 2013年12月25日,我们给计社取了个新名字,叫做“灵动”。“灵”取自“灵感”,“动”强调“动手实践”。希望这个名字的含义能指引计社更好地发展。\n\n页面右侧的 Logo 是灵动计算机社的社徽。\n\n-----\n\n### 博客\n\n计社的成长,伴随着许许多多的故事。在此,我们用博客的方式把这些记录下来,给青春留下一份美好的回忆。\n\n我们还会在此发表技术性文章,和大家共同分享,展示我们茂名一中学子的风采。\n\n-----\n\n### 联系我们\n\nEmail: <[email protected]>\nQQ群: [240696962](http://shang.qq.com/wpa/qunwpa?idkey=e365083a81eab47f1c53bfb6841ba8f926bad68e84b154c3252e42df5be72486)","mtime":1405826791000,"source":"source/about/index.md","_id":"uvdmivbmfs9kfajc"},"xn1bmmt3dabxn1ub":{"content":"title: Pro Git\ndate: 2014-06-07\nkeywords: Pro Git,git\n------\n\nScott Chacon 所著的 Git 入门书籍《Pro Git》的第 1 至 3 章现在可以在灵动博客查看了。\n\n\n\n1. [起步](/progit/01-introduction)\n * 关于版本控制\n * Git 简史\n * Git 基础\n * 安装 Git\n * 初次运行 Git 前的配置\n * 获取帮助\n * 小结\n2. [Git 基础](/progit/02-git-basics)\n * 取得项目的 Git 仓库\n * 记录每次更新到仓库\n * 查看提交历史\n * 撤销操作\n * 远程仓库的使用\n * 打标签\n * 技巧和窍门\n * 小结\n3. [Git 分支](/progit/03-git-branching)\n * 何谓分支\n * 分支的新建与合并\n * 分支的管理\n * 利用分支进行开发的工作流程\n * 远程分支\n * 分支的衍合\n * 小结\n\n本书采用 [Creative Commons 署名-非商业性使用-相同方式共享 3.0 未本地化版本协议](http://creativecommons.org/licenses/by-nc-sa/3.0/deed.zh) 发布。\n原始地址: <http://git-scm.com/book/zh>\n\n下载: [PDF文档](http://cptsct.qiniudn.com/progit_1-3.pdf)","mtime":1405826791000,"source":"source/progit/index.md","_id":"xn1bmmt3dabxn1ub"},"o9ollf1obe4lnn5j":{"content":"title: Pro Git - 1. 起步\ndate: 2014-06-07\nkeywords: Pro Git,git\n---\n\n本章介绍开始使用 Git 前的相关知识。我们会先了解一些版本控制工具的历史背景,然后试着让 Git 在你的系统上跑起来,直到最后配置好,可以正常开始开发工作。读完本章,你就会明白为什么 Git 会如此流行,为什么你应该立即开始使用它。\n\n---\n\n## 关于版本控制 ##\n\n什么是版本控制?我为什么要关心它呢?版本控制是一种记录一个或若干文件内容变化,以便将来查阅特定版本修订情况的系统。在本书所展示的例子中,我们仅对保存着软件源代码的文本文件作版本控制管理,但实际上,你可以对任何类型的文件进行版本控制。\n\n如果你是位图形或网页设计师,可能会需要保存某一幅图片或页面布局文件的所有修订版本(这或许是你非常渴望拥有的功能)。采用版本控制系统(VCS)是个明智的选择。有了它你就可以将某个文件回溯到之前的状态,甚至将整个项目都回退到过去某个时间点的状态。你可以比较文件的变化细节,查出最后是谁修改了哪个地方,从而找出导致怪异问题出现的原因,又是谁在何时报告了某个功能缺陷等等。使用版本控制系统通常还意味着,就算你乱来一气把整个项目中的文件改的改删的删,你也照样可以轻松恢复到原先的样子。但额外增加的工作量却微乎其微。\n\n### 本地版本控制系统 ###\n\n许多人习惯用复制整个项目目录的方式来保存不同的版本,或许还会改名加上备份时间以示区别。这么做唯一的好处就是简单。不过坏处也不少:有时候会混淆所在的工作目录,一旦弄错文件丢了数据就没法撤销恢复。\n\n为了解决这个问题,人们很久以前就开发了许多种本地版本控制系统,大多都是采用某种简单的数据库来记录文件的历次更新差异(见图 1-1)。\n\n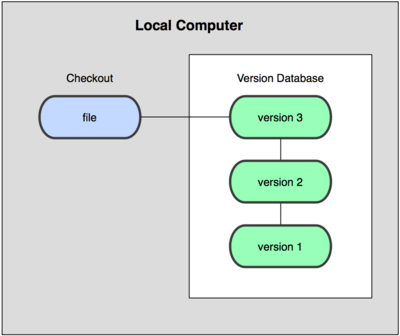\n\n其中最流行的一种叫做 rcs,现今许多计算机系统上都还看得到它的踪影。甚至在流行的 Mac OS X 系统上安装了开发者工具包之后,也可以使用 rcs 命令。它的工作原理基本上就是保存并管理文件补丁(patch)。文件补丁是一种特定格式的文本文件,记录着对应文件修订前后的内容变化。所以,根据每次修订后的补丁,rcs 可以通过不断打补丁,计算出各个版本的文件内容。\n\n### 集中化的版本控制系统 ###\n\n接下来人们又遇到一个问题,如何让在不同系统上的开发者协同工作?于是,集中化的版本控制系统( Centralized Version Control Systems,简称 CVCS )应运而生。这类系统,诸如 CVS,Subversion 以及 Perforce 等,都有一个单一的集中管理的服务器,保存所有文件的修订版本,而协同工作的人们都通过客户端连到这台服务器,取出最新的文件或者提交更新。多年以来,这已成为版本控制系统的标准做法(见图 1-2)。\n\n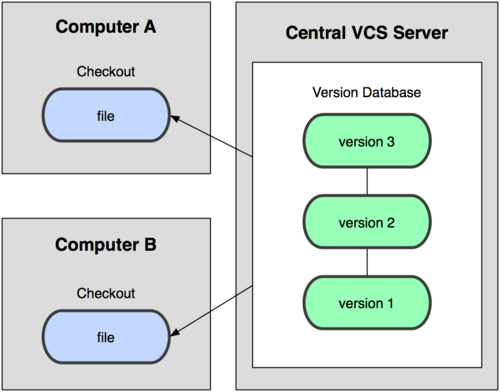\n\n这种做法带来了许多好处,特别是相较于老式的本地 VCS 来说。现在,每个人都可以在一定程度上看到项目中的其他人正在做些什么。而管理员也可以轻松掌控每个开发者的权限,并且管理一个 CVCS 要远比在各个客户端上维护本地数据库来得轻松容易。\n\n事分两面,有好有坏。这么做最显而易见的缺点是中央服务器的单点故障。如果宕机一小时,那么在这一小时内,谁都无法提交更新,也就无法协同工作。要是中央服务器的磁盘发生故障,碰巧没做备份,或者备份不够及时,就会有丢失数据的风险。最坏的情况是彻底丢失整个项目的所有历史更改记录,而被客户端偶然提取出来的保存在本地的某些快照数据就成了恢复数据的希望。但这样的话依然是个问题,你不能保证所有的数据都已经有人事先完整提取出来过。本地版本控制系统也存在类似问题,只要整个项目的历史记录被保存在单一位置,就有丢失所有历史更新记录的风险。\n\n### 分布式版本控制系统 ###\n\n于是分布式版本控制系统( Distributed Version Control System,简称 DVCS )面世了。在这类系统中,像 Git,Mercurial,Bazaar 以及 Darcs 等,客户端并不只提取最新版本的文件快照,而是把代码仓库完整地镜像下来。这么一来,任何一处协同工作用的服务器发生故障,事后都可以用任何一个镜像出来的本地仓库恢复。因为每一次的提取操作,实际上都是一次对代码仓库的完整备份(见图 1-3)。\n\n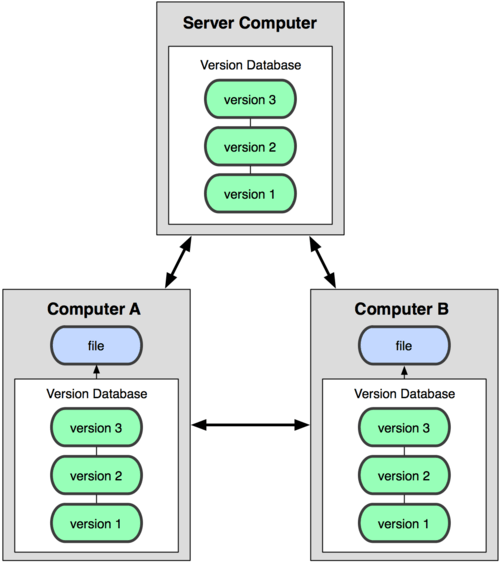\n\n更进一步,许多这类系统都可以指定和若干不同的远端代码仓库进行交互。籍此,你就可以在同一个项目中,分别和不同工作小组的人相互协作。你可以根据需要设定不同的协作流程,比如层次模型式的工作流,而这在以前的集中式系统中是无法实现的。\n\n---\n\n## Git 简史 ##\n\n同生活中的许多伟大事件一样,Git 诞生于一个极富纷争大举创新的年代。Linux 内核开源项目有着为数众广的参与者。绝大多数的 Linux 内核维护工作都花在了提交补丁和保存归档的繁琐事务上(1991-2002年间)。到 2002 年,整个项目组开始启用分布式版本控制系统 BitKeeper 来管理和维护代码。\n\n到了 2005 年,开发 BitKeeper 的商业公司同 Linux 内核开源社区的合作关系结束,他们收回了免费使用 BitKeeper 的权力。这就迫使 Linux 开源社区(特别是 Linux 的缔造者 Linus Torvalds )不得不吸取教训,只有开发一套属于自己的版本控制系统才不至于重蹈覆辙。他们对新的系统制订了若干目标:\n\n*\t速度\n*\t简单的设计\n*\t对非线性开发模式的强力支持(允许上千个并行开发的分支)\n*\t完全分布式\n*\t有能力高效管理类似 Linux 内核一样的超大规模项目(速度和数据量)\n\n自诞生于 2005 年以来,Git 日臻成熟完善,在高度易用的同时,仍然保留着初期设定的目标。它的速度飞快,极其适合管理大项目,它还有着令人难以置信的非线性分支管理系统(见第三章),可以应付各种复杂的项目开发需求。\n\n---\n\n## Git 基础 ##\n\n那么,简单地说,Git 究竟是怎样的一个系统呢?请注意,接下来的内容非常重要,若是理解了 Git 的思想和基本工作原理,用起来就会知其所以然,游刃有余。在开始学习 Git 的时候,请不要尝试把各种概念和其他版本控制系统(诸如 Subversion 和 Perforce 等)相比拟,否则容易混淆每个操作的实际意义。Git 在保存和处理各种信息的时候,虽然操作起来的命令形式非常相近,但它与其他版本控制系统的做法颇为不同。理解这些差异将有助于你准确地使用 Git 提供的各种工具。\n\n### 直接记录快照,而非差异比较 ###\n\nGit 和其他版本控制系统的主要差别在于,Git 只关心文件数据的整体是否发生变化,而大多数其他系统则只关心文件内容的具体差异。这类系统(CVS,Subversion,Perforce,Bazaar 等等)每次记录有哪些文件作了更新,以及都更新了哪些行的什么内容,请看图 1-4。\n\n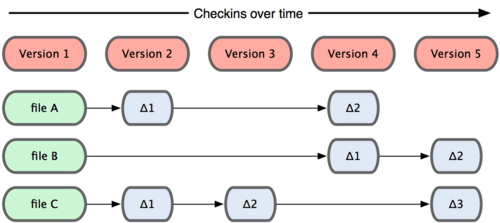\n\nGit 并不保存这些前后变化的差异数据。实际上,Git 更像是把变化的文件作快照后,记录在一个微型的文件系统中。每次提交更新时,它会纵览一遍所有文件的指纹信息并对文件作一快照,然后保存一个指向这次快照的索引。为提高性能,若文件没有变化,Git 不会再次保存,而只对上次保存的快照作一链接。Git 的工作方式就像图 1-5 所示。\n\n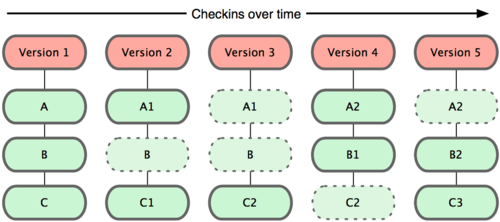\n\n这是 Git 同其他系统的重要区别。它完全颠覆了传统版本控制的套路,并对各个环节的实现方式作了新的设计。Git 更像是个小型的文件系统,但它同时还提供了许多以此为基础的超强工具,而不只是一个简单的 VCS。稍后在第三章讨论 Git 分支管理的时候,我们会再看看这样的设计究竟会带来哪些好处。\n\n### 近乎所有操作都是本地执行 ###\n\n在 Git 中的绝大多数操作都只需要访问本地文件和资源,不用连网。但如果用 CVCS 的话,差不多所有操作都需要连接网络。因为 Git 在本地磁盘上就保存着所有当前项目的历史更新,所以处理起来速度飞快。\n\n举个例子,如果要浏览项目的历史更新摘要,Git 不用跑到外面的服务器上去取数据回来,而直接从本地数据库读取后展示给你看。所以任何时候你都可以马上翻阅,无需等待。如果想要看当前版本的文件和一个月前的版本之间有何差异,Git 会取出一个月前的快照和当前文件作一次差异运算,而不用请求远程服务器来做这件事,或是把老版本的文件拉到本地来作比较。\n\n用 CVCS 的话,没有网络或者断开 VPN 你就无法做任何事情。但用 Git 的话,就算你在飞机或者火车上,都可以非常愉快地频繁提交更新,等到了有网络的时候再上传到远程仓库。同样,在回家的路上,不用连接 VPN 你也可以继续工作。换作其他版本控制系统,这么做几乎不可能,抑或非常麻烦。比如 Perforce,如果不连到服务器,几乎什么都做不了(译注:默认无法发出命令 `p4 edit file` 开始编辑文件,因为 Perforce 需要联网通知系统声明该文件正在被谁修订。但实际上手工修改文件权限可以绕过这个限制,只是完成后还是无法提交更新。);如果是 Subversion 或 CVS,虽然可以编辑文件,但无法提交更新,因为数据库在网络上。看上去好像这些都不是什么大问题,但实际体验过之后,你就会惊喜地发现,这其实是会带来很大不同的。\n\n### 时刻保持数据完整性 ###\n\n在保存到 Git 之前,所有数据都要进行内容的校验和(checksum)计算,并将此结果作为数据的唯一标识和索引。换句话说,不可能在你修改了文件或目录之后,Git 一无所知。这项特性作为 Git 的设计哲学,建在整体架构的最底层。所以如果文件在传输时变得不完整,或者磁盘损坏导致文件数据缺失,Git 都能立即察觉。\n\nGit 使用 SHA-1 算法计算数据的校验和,通过对文件的内容或目录的结构计算出一个 SHA-1 哈希值,作为指纹字符串。该字串由 40 个十六进制字符(0-9 及 a-f)组成,看起来就像是:\n\n\t24b9da6552252987aa493b52f8696cd6d3b00373\n\nGit 的工作完全依赖于这类指纹字串,所以你会经常看到这样的哈希值。实际上,所有保存在 Git 数据库中的东西都是用此哈希值来作索引的,而不是靠文件名。 \n\n### 多数操作仅添加数据 ###\n\n常用的 Git 操作大多仅仅是把数据添加到数据库。因为任何一种不可逆的操作,比如删除数据,都会使回退或重现历史版本变得困难重重。在别的 VCS 中,若还未提交更新,就有可能丢失或者混淆一些修改的内容,但在 Git 里,一旦提交快照之后就完全不用担心丢失数据,特别是养成定期推送到其他仓库的习惯的话。\n\n这种高可靠性令我们的开发工作安心不少,尽管去做各种试验性的尝试好了,再怎样也不会弄丢数据。至于 Git 内部究竟是如何保存和恢复数据的,我们会在第九章讨论 Git 内部原理时再作详述。\n\n### 文件的三种状态 ###\n\n好,现在请注意,接下来要讲的概念非常重要。对于任何一个文件,在 Git 内都只有三种状态:已提交(committed),已修改(modified)和已暂存(staged)。已提交表示该文件已经被安全地保存在本地数据库中了;已修改表示修改了某个文件,但还没有提交保存;已暂存表示把已修改的文件放在下次提交时要保存的清单中。\n\n由此我们看到 Git 管理项目时,文件流转的三个工作区域:Git 的工作目录,暂存区域,以及本地仓库。\n\n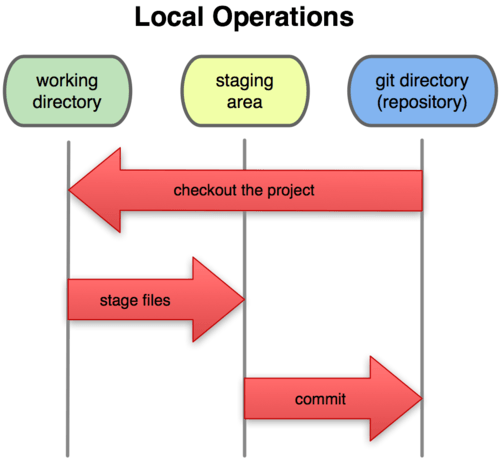\n\n每个项目都有一个 Git 目录(译注:如果 `git clone` 出来的话,就是其中 `.git` 的目录;如果 `git clone --bare` 的话,新建的目录本身就是 Git 目录。),它是 Git 用来保存元数据和对象数据库的地方。该目录非常重要,每次克隆镜像仓库的时候,实际拷贝的就是这个目录里面的数据。\n\n从项目中取出某个版本的所有文件和目录,用以开始后续工作的叫做工作目录。这些文件实际上都是从 Git 目录中的压缩对象数据库中提取出来的,接下来就可以在工作目录中对这些文件进行编辑。\n\n所谓的暂存区域只不过是个简单的文件,一般都放在 Git 目录中。有时候人们会把这个文件叫做索引文件,不过标准说法还是叫暂存区域。\n\n基本的 Git 工作流程如下:\n\n1. 在工作目录中修改某些文件。\n2. 对修改后的文件进行快照,然后保存到暂存区域。\n3. 提交更新,将保存在暂存区域的文件快照永久转储到 Git 目录中。\n\n所以,我们可以从文件所处的位置来判断状态:如果是 Git 目录中保存着的特定版本文件,就属于已提交状态;如果作了修改并已放入暂存区域,就属于已暂存状态;如果自上次取出后,作了修改但还没有放到暂存区域,就是已修改状态。到第二章的时候,我们会进一步了解其中细节,并学会如何根据文件状态实施后续操作,以及怎样跳过暂存直接提交。\n\n---\n\n## 安装 Git ##\n\n是时候动手尝试下 Git 了,不过得先安装好它。有许多种安装方式,主要分为两种,一种是通过编译源代码来安装;另一种是使用为特定平台预编译好的安装包。\n\n### 从源代码安装 ###\n\n若是条件允许,从源代码安装有很多好处,至少可以安装最新的版本。Git 的每个版本都在不断尝试改进用户体验,所以能通过源代码自己编译安装最新版本就再好不过了。有些 Linux 版本自带的安装包更新起来并不及时,所以除非你在用最新的 distro 或者 backports,那么从源代码安装其实该算是最佳选择。\n\nGit 的工作需要调用 curl,zlib,openssl,expat,libiconv 等库的代码,所以需要先安装这些依赖工具。在有 yum 的系统上(比如 Fedora)或者有 apt-get 的系统上(比如 Debian 体系),可以用下面的命令安装:\n\n\t$ yum install curl-devel expat-devel gettext-devel \\\n\t openssl-devel zlib-devel\n\n\t$ apt-get install libcurl4-gnutls-dev libexpat1-dev gettext \\\n\t libz-dev libssl-dev\n\n之后,从下面的 Git 官方站点下载最新版本源代码:\n\n\thttp://git-scm.com/download\n\n然后编译并安装:\n\n\t$ tar -zxf git-1.7.2.2.tar.gz\n\t$ cd git-1.7.2.2\n\t$ make prefix=/usr/local all\n\t$ sudo make prefix=/usr/local install\n\n现在已经可以用 `git` 命令了,用 `git` 把 Git 项目仓库克隆到本地,以便日后随时更新:\n\n\t$ git clone git://git.kernel.org/pub/scm/git/git.git\n\n### 在 Linux 上安装 ###\n\n如果要在 Linux 上安装预编译好的 Git 二进制安装包,可以直接用系统提供的包管理工具。在 Fedora 上用 yum 安装:\n\n\t$ yum install git-core\n\n在 Ubuntu 这类 Debian 体系的系统上,可以用 apt-get 安装:\n\n\t$ apt-get install git\n\n### 在 Mac 上安装 ###\n\n在 Mac 上安装 Git 有两种方式。最容易的当属使用图形化的 Git 安装工具,界面如图 1-7,下载地址在:\n\n\thttp://sourceforge.net/projects/git-osx-installer/\n\n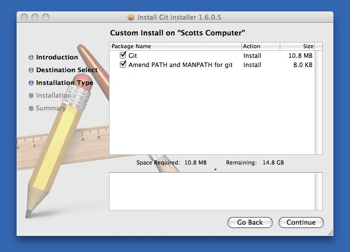\n\n另一种是通过 MacPorts (`http://www.macports.org`) 安装。如果已经装好了 MacPorts,用下面的命令安装 Git:\n\n\t$ sudo port install git-core +svn +doc +bash_completion +gitweb\n\n这种方式就不需要再自己安装依赖库了,Macports 会帮你搞定这些麻烦事。一般上面列出的安装选项已经够用,要是你想用 Git 连接 Subversion 的代码仓库,还可以加上 +svn 选项,具体将在第八章作介绍。(译注:还有一种是使用 homebrew(`https://github.com/mxcl/homebrew`):`brew install git`。)\n\n### 在 Windows 上安装 ###\n\n在 Windows 上安装 Git 同样轻松,有个叫做 msysGit 的项目提供了安装包,可以到 GitHub 的页面上下载 exe 安装文件并运行:\n\n\thttp://msysgit.github.com/\n\n完成安装之后,就可以使用命令行的 `git` 工具(已经自带了 ssh 客户端)了,另外还有一个图形界面的 Git 项目管理工具。\n\n给 Windows 用户的敬告:你应该在 msysGit 提供的 Unix 风格的 shell 来运行 Git。在 Unix 风格的 shell 中,可以使用本书中提及的复杂多行的命令。对于那些需要在 Windows 命令行中使用 Git 的用户,必须注意:在参数中间有空格的时候,必须使用双引号将参数括起来(在 Linux 中是单引号);另外,如果扬抑符(^)作为参数的结尾,并且作为这一行的最后一个字符,则这个参数也需要用双引号括起来。因为扬抑符在 Windows 命令行中表示续行(译注:即下一行为这一行命令的继续)。\n\n---\n\n## 初次运行 Git 前的配置 ##\n\n一般在新的系统上,我们都需要先配置下自己的 Git 工作环境。配置工作只需一次,以后升级时还会沿用现在的配置。当然,如果需要,你随时可以用相同的命令修改已有的配置。\n\nGit 提供了一个叫做 `git config` 的工具(译注:实际是 `git-config` 命令,只不过可以通过 `git` 加一个名字来呼叫此命令。),专门用来配置或读取相应的工作环境变量。而正是由这些环境变量,决定了 Git 在各个环节的具体工作方式和行为。这些变量可以存放在以下三个不同的地方:\n\n*\t`/etc/gitconfig` 文件:系统中对所有用户都普遍适用的配置。若使用 `git config` 时用 ` --system` 选项,读写的就是这个文件。\n*\t`~/.gitconfig` 文件:用户目录下的配置文件只适用于该用户。若使用 `git config` 时用 ` --global` 选项,读写的就是这个文件。\n*\t当前项目的 Git 目录中的配置文件(也就是工作目录中的 `.git/config` 文件):这里的配置仅仅针对当前项目有效。每一个级别的配置都会覆盖上层的相同配置,所以 `.git/config` 里的配置会覆盖 `/etc/gitconfig` 中的同名变量。\n\n在 Windows 系统上,Git 会找寻用户主目录下的 `.gitconfig` 文件。主目录即 `$HOME` 变量指定的目录,一般都是 `C:\\Documents and Settings\\$USER`。此外,Git 还会尝试找寻 `/etc/gitconfig` 文件,只不过看当初 Git 装在什么目录,就以此作为根目录来定位。\n\n### 用户信息 ###\n\n第一个要配置的是你个人的用户名称和电子邮件地址。这两条配置很重要,每次 Git 提交时都会引用这两条信息,说明是谁提交了更新,所以会随更新内容一起被永久纳入历史记录:\n\n\t$ git config --global user.name \"John Doe\"\n\t$ git config --global user.email [email protected]\n\n如果用了 `--global` 选项,那么更改的配置文件就是位于你用户主目录下的那个,以后你所有的项目都会默认使用这里配置的用户信息。如果要在某个特定的项目中使用其他名字或者电邮,只要去掉 `--global` 选项重新配置即可,新的设定保存在当前项目的 `.git/config` 文件里。\n\n### 文本编辑器 ###\n\n接下来要设置的是默认使用的文本编辑器。Git 需要你输入一些额外消息的时候,会自动调用一个外部文本编辑器给你用。默认会使用操作系统指定的默认编辑器,一般可能会是 Vi 或者 Vim。如果你有其他偏好,比如 Emacs 的话,可以重新设置:\n\n\t$ git config --global core.editor emacs\n\n### 差异分析工具 ###\n\n还有一个比较常用的是,在解决合并冲突时使用哪种差异分析工具。比如要改用 vimdiff 的话:\n\n\t$ git config --global merge.tool vimdiff\n\nGit 可以理解 kdiff3,tkdiff,meld,xxdiff,emerge,vimdiff,gvimdiff,ecmerge,和 opendiff 等合并工具的输出信息。当然,你也可以指定使用自己开发的工具,具体怎么做可以参阅第七章。\n\n### 查看配置信息 ###\n\n要检查已有的配置信息,可以使用 `git config --list` 命令:\n\n\t$ git config --list\n\tuser.name=Scott Chacon\n\[email protected]\n\tcolor.status=auto\n\tcolor.branch=auto\n\tcolor.interactive=auto\n\tcolor.diff=auto\n\t...\n\n有时候会看到重复的变量名,那就说明它们来自不同的配置文件(比如 `/etc/gitconfig` 和 `~/.gitconfig`),不过最终 Git 实际采用的是最后一个。\n\n也可以直接查阅某个环境变量的设定,只要把特定的名字跟在后面即可,像这样:\n\n\t$ git config user.name\n\tScott Chacon\n\n---\n\n## 获取帮助 ##\n\n想了解 Git 的各式工具该怎么用,可以阅读它们的使用帮助,方法有三:\n\n\t$ git help <verb>\n\t$ git <verb> --help\n\t$ man git-<verb>\n\n比如,要学习 config 命令可以怎么用,运行:\n\n\t$ git help config\n\n我们随时都可以浏览这些帮助信息而无需连网。\n不过,要是你觉得还不够,可以到 Freenode IRC 服务器(irc.freenode.net)上的 `#git` 或 `#github` 频道寻求他人帮助。这两个频道上总有着上百号人,大多都有着丰富的 git 知识,并且乐于助人。\n\n---\n\n## 小结 ##\n\n至此,你该对 Git 有了点基本认识,包括它和以前你使用的 CVCS 之间的差别。现在,在你的系统上应该已经装好了 Git,设置了自己的名字和电邮。接下来让我们继续学习 Git 的基础知识。\n\n---\n\n本书采用 [Creative Commons 署名-非商业性使用-相同方式共享 3.0 未本地化版本协议](http://creativecommons.org/licenses/by-nc-sa/3.0/deed.zh)发布。\n\n[下一章](/progit/02-git-basics) / [返回](/progit)","mtime":1405826791000,"source":"source/progit/01-introduction/index.markdown","_id":"o9ollf1obe4lnn5j"},"9oap2yjt0fnr0ee0":{"content":"title: Pro Git - 2. Git 基础\ndate: 2014-06-07\nkeywords: Pro Git,git\n---\n\n读完本章你就能上手使用 Git 了。本章将介绍几个最基本的,也是最常用的 Git 命令,以后绝大多数时间里用到的也就是这几个命令。读完本章,你就能初始化一个新的代码仓库,做一些适当配置;开始或停止跟踪某些文件;暂存或提交某些更新。我们还会展示如何让 Git 忽略某些文件,或是名称符合特定模式的文件;如何既快且容易地撤消犯下的小错误;如何浏览项目的更新历史,查看某两次更新之间的差异;以及如何从远程仓库拉数据下来或者推数据上去。\n\n---\n\n## 取得项目的 Git 仓库 ##\n\n有两种取得 Git 项目仓库的方法。第一种是在现存的目录下,通过导入所有文件来创建新的 Git 仓库。第二种是从已有的 Git 仓库克隆出一个新的镜像仓库来。\n\n### 在工作目录中初始化新仓库 ###\n\n要对现有的某个项目开始用 Git 管理,只需到此项目所在的目录,执行:\n\n\t$ git init\n\n初始化后,在当前目录下会出现一个名为 .git 的目录,所有 Git 需要的数据和资源都存放在这个目录中。不过目前,仅仅是按照既有的结构框架初始化好了里边所有的文件和目录,但我们还没有开始跟踪管理项目中的任何一个文件。(在第九章我们会详细说明刚才创建的 `.git` 目录中究竟有哪些文件,以及都起些什么作用。)\n\n如果当前目录下有几个文件想要纳入版本控制,需要先用 `git add` 命令告诉 Git 开始对这些文件进行跟踪,然后提交:\n\n\t$ git add *.c\n\t$ git add README\n\t$ git commit -m 'initial project version'\n\n稍后我们再逐一解释每条命令的意思。不过现在,你已经得到了一个实际维护着若干文件的 Git 仓库。\n\n### 从现有仓库克隆 ###\n\n如果想对某个开源项目出一份力,可以先把该项目的 Git 仓库复制一份出来,这就需要用到 `git clone` 命令。如果你熟悉其他的 VCS 比如 Subversion,你可能已经注意到这里使用的是 `clone` 而不是 `checkout`。这是个非常重要的差别,Git 收取的是项目历史的所有数据(每一个文件的每一个版本),服务器上有的数据克隆之后本地也都有了。实际上,即便服务器的磁盘发生故障,用任何一个克隆出来的客户端都可以重建服务器上的仓库,回到当初克隆时的状态(虽然可能会丢失某些服务器端的挂钩设置,但所有版本的数据仍旧还在,有关细节请参考第四章)。\n\n克隆仓库的命令格式为 `git clone [url]`。比如,要克隆 Ruby 语言的 Git 代码仓库 Grit,可以用下面的命令:\n\n\t$ git clone git://github.com/schacon/grit.git\n\n这会在当前目录下创建一个名为`grit`的目录,其中包含一个 `.git` 的目录,用于保存下载下来的所有版本记录,然后从中取出最新版本的文件拷贝。如果进入这个新建的 `grit` 目录,你会看到项目中的所有文件已经在里边了,准备好后续的开发和使用。如果希望在克隆的时候,自己定义要新建的项目目录名称,可以在上面的命令末尾指定新的名字:\n\n\t$ git clone git://github.com/schacon/grit.git mygrit\n\n唯一的差别就是,现在新建的目录成了 `mygrit`,其他的都和上边的一样。\n\nGit 支持许多数据传输协议。之前的例子使用的是 `git://` 协议,不过你也可以用 `http(s)://` 或者 `user@server:/path.git` 表示的 SSH 传输协议。我们会在第四章详细介绍所有这些协议在服务器端该如何配置使用,以及各种方式之间的利弊。\n\n---\n\n## 记录每次更新到仓库 ##\n\n现在我们手上已经有了一个真实项目的 Git 仓库,并从这个仓库中取出了所有文件的工作拷贝。接下来,对这些文件作些修改,在完成了一个阶段的目标之后,提交本次更新到仓库。\n\n请记住,工作目录下面的所有文件都不外乎这两种状态:已跟踪或未跟踪。已跟踪的文件是指本来就被纳入版本控制管理的文件,在上次快照中有它们的记录,工作一段时间后,它们的状态可能是未更新,已修改或者已放入暂存区。而所有其他文件都属于未跟踪文件。它们既没有上次更新时的快照,也不在当前的暂存区域。初次克隆某个仓库时,工作目录中的所有文件都属于已跟踪文件,且状态为未修改。\n\n在编辑过某些文件之后,Git 将这些文件标为已修改。我们逐步把这些修改过的文件放到暂存区域,直到最后一次性提交所有这些暂存起来的文件,如此重复。所以使用 Git 时的文件状态变化周期如图 2-1 所示。\n\n\n\n### 检查当前文件状态 ###\n\n要确定哪些文件当前处于什么状态,可以用 `git status` 命令。如果在克隆仓库之后立即执行此命令,会看到类似这样的输出:\n\n\t$ git status\n\tOn branch master\n\tnothing to commit, working directory clean\n\n这说明你现在的工作目录相当干净。换句话说,所有已跟踪文件在上次提交后都未被更改过。此外,上面的信息还表明,当前目录下没有出现任何处于未跟踪的新文件,否则 Git 会在这里列出来。最后,该命令还显示了当前所在的分支是 `master`,这是默认的分支名称,实际是可以修改的,现在先不用考虑。下一章我们就会详细讨论分支和引用。\n\n现在让我们用 vim 创建一个新文件 README,保存退出后运行 `git status` 会看到该文件出现在未跟踪文件列表中:\n\n\t$ vim README\n\t$ git status\n\tOn branch master\n\tUntracked files:\n\t (use \"git add <file>...\" to include in what will be committed)\n\t\n\t README\n\n\tnothing added to commit but untracked files present (use \"git add\" to track)\n\n在状态报告中可以看到新建的`README`文件出现在“Untracked files”下面。未跟踪的文件意味着Git在之前的快照(提交)中没有这些文件;Git 不会自动将之纳入跟踪范围,除非你明明白白地告诉它“我需要跟踪该文件”,因而不用担心把临时文件什么的也归入版本管理。不过现在的例子中,我们确实想要跟踪管理 README 这个文件。\n\n### 跟踪新文件 ###\n\n使用命令 `git add` 开始跟踪一个新文件。所以,要跟踪 README 文件,运行:\n\n\t$ git add README\n\n此时再运行 `git status` 命令,会看到 README 文件已被跟踪,并处于暂存状态:\n\n\t$ git status\n\tOn branch master\n\tChanges to be committed:\n\t (use \"git reset HEAD <file>...\" to unstage)\n\t\n\t new file: README\n\t\n\n只要在 “Changes to be committed” 这行下面的,就说明是已暂存状态。如果此时提交,那么该文件此时此刻的版本将被留存在历史记录中。你可能会想起之前我们使用 `git init` 后就运行了 `git add` 命令,开始跟踪当前目录下的文件。在 `git add` 后面可以指明要跟踪的文件或目录路径。如果是目录的话,就说明要递归跟踪该目录下的所有文件。(译注:其实 `git add` 的潜台词就是把目标文件快照放入暂存区域,也就是 add file into staged area,同时未曾跟踪过的文件标记为需要跟踪。这样就好理解后续 add 操作的实际意义了。)\n\n### 暂存已修改文件 ###\n\n现在我们修改下之前已跟踪过的文件 `benchmarks.rb`,然后再次运行 `status` 命令,会看到这样的状态报告:\n\n\t$ git status\n\tOn branch master\n\tChanges to be committed:\n\t (use \"git reset HEAD <file>...\" to unstage)\n\t\n\t new file: README\n\n\tChanges not staged for commit:\n\t (use \"git add <file>...\" to update what will be committed)\n\t (use \"git checkout -- <file>...\" to discard changes in working directory)\n\t\n\t modified: benchmarks.rb\n\t\n\n文件 `benchmarks.rb` 出现在 “Changes not staged for commit” 这行下面,说明已跟踪文件的内容发生了变化,但还没有放到暂存区。要暂存这次更新,需要运行 `git add` 命令(这是个多功能命令,根据目标文件的状态不同,此命令的效果也不同:可以用它开始跟踪新文件,或者把已跟踪的文件放到暂存区,还能用于合并时把有冲突的文件标记为已解决状态等)。现在让我们运行 `git add` 将 benchmarks.rb 放到暂存区,然后再看看 `git status` 的输出:\n\n\t$ git add benchmarks.rb\n\t$ git status\n\tOn branch master\n\tChanges to be committed:\n\t (use \"git reset HEAD <file>...\" to unstage)\n\t\n\t new file: README\n\t modified: benchmarks.rb\n\t\n\n现在两个文件都已暂存,下次提交时就会一并记录到仓库。假设此时,你想要在 `benchmarks.rb` 里再加条注释,重新编辑存盘后,准备好提交。不过且慢,再运行 `git status` 看看:\n\n\t$ vim benchmarks.rb\n\t$ git status\n\tOn branch master\n\tChanges to be committed:\n\t (use \"git reset HEAD <file>...\" to unstage)\n\t\n\t new file: README\n\t modified: benchmarks.rb\n\t\n\tChanges not staged for commit:\n\t (use \"git add <file>...\" to update what will be committed)\n\t (use \"git checkout -- <file>...\" to discard changes in working directory)\n\t\n\t modified: benchmarks.rb\n\t\n\n怎么回事? `benchmarks.rb` 文件出现了两次!一次算未暂存,一次算已暂存,这怎么可能呢?好吧,实际上 Git 只不过暂存了你运行 `git add` 命令时的版本,如果现在提交,那么提交的是添加注释前的版本,而非当前工作目录中的版本。所以,运行了 `git add` 之后又作了修订的文件,需要重新运行 `git add` 把最新版本重新暂存起来:\n\n\t$ git add benchmarks.rb\n\t$ git status\n\tOn branch master\n\tChanges to be committed:\n\t (use \"git reset HEAD <file>...\" to unstage)\n\t\n\t new file: README\n\t modified: benchmarks.rb\n\t\n\n### 忽略某些文件 ###\n\n一般我们总会有些文件无需纳入 Git 的管理,也不希望它们总出现在未跟踪文件列表。通常都是些自动生成的文件,比如日志文件,或者编译过程中创建的临时文件等。我们可以创建一个名为 `.gitignore` 的文件,列出要忽略的文件模式。来看一个实际的例子:\n\n\t$ cat .gitignore\n\t*.[oa]\n\t*~\n\n第一行告诉 Git 忽略所有以 `.o` 或 `.a` 结尾的文件。一般这类对象文件和存档文件都是编译过程中出现的,我们用不着跟踪它们的版本。第二行告诉 Git 忽略所有以波浪符(`~`)结尾的文件,许多文本编辑软件(比如 Emacs)都用这样的文件名保存副本。此外,你可能还需要忽略 `log`,`tmp` 或者 `pid` 目录,以及自动生成的文档等等。要养成一开始就设置好 `.gitignore` 文件的习惯,以免将来误提交这类无用的文件。\n\n文件 `.gitignore` 的格式规范如下:\n\n* 所有空行或者以注释符号 `#` 开头的行都会被 Git 忽略。\n* 可以使用标准的 glob 模式匹配。\n* 匹配模式最后跟反斜杠(`/`)说明要忽略的是目录。\n* 要忽略指定模式以外的文件或目录,可以在模式前加上惊叹号(`!`)取反。\n\n所谓的 glob 模式是指 shell 所使用的简化了的正则表达式。星号(`*`)匹配零个或多个任意字符;`[abc]` 匹配任何一个列在方括号中的字符(这个例子要么匹配一个 a,要么匹配一个 b,要么匹配一个 c);问号(`?`)只匹配一个任意字符;如果在方括号中使用短划线分隔两个字符,表示所有在这两个字符范围内的都可以匹配(比如 `[0-9]` 表示匹配所有 0 到 9 的数字)。\n\n我们再看一个 `.gitignore` 文件的例子:\n\n\t# 此为注释 – 将被 Git 忽略\n\t# 忽略所有 .a 结尾的文件\n\t*.a\n\t# 但 lib.a 除外\n\t!lib.a\n\t# 仅仅忽略项目根目录下的 TODO 文件,不包括 subdir/TODO\n\t/TODO\n\t# 忽略 build/ 目录下的所有文件\n\tbuild/\n\t# 会忽略 doc/notes.txt 但不包括 doc/server/arch.txt\n\tdoc/*.txt\n\t# ignore all .txt files in the doc/ directory\n\tdoc/**/*.txt\n\nA `**/` pattern is available in Git since version 1.8.2.\n\n### 查看已暂存和未暂存的更新 ###\n\n实际上 `git status` 的显示比较简单,仅仅是列出了修改过的文件,如果要查看具体修改了什么地方,可以用 `git diff` 命令。稍后我们会详细介绍 `git diff`,不过现在,它已经能回答我们的两个问题了:当前做的哪些更新还没有暂存?有哪些更新已经暂存起来准备好了下次提交? `git diff` 会使用文件补丁的格式显示具体添加和删除的行。\n\n假如再次修改 `README` 文件后暂存,然后编辑 `benchmarks.rb` 文件后先别暂存,运行 `status` 命令将会看到:\n\n\t$ git status\n\tOn branch master\n\tChanges to be committed:\n\t (use \"git reset HEAD <file>...\" to unstage)\n\t\n\t new file: README\n\t\n\tChanges not staged for commit:\n\t (use \"git add <file>...\" to update what will be committed)\n\t (use \"git checkout -- <file>...\" to discard changes in working directory)\n\t\n\t modified: benchmarks.rb\n\t\n\n要查看尚未暂存的文件更新了哪些部分,不加参数直接输入 `git diff`:\n\n\t$ git diff\n\tdiff --git a/benchmarks.rb b/benchmarks.rb\n\tindex 3cb747f..da65585 100644\n\t--- a/benchmarks.rb\n\t+++ b/benchmarks.rb\n\t@@ -36,6 +36,10 @@ def main\n\t @commit.parents[0].parents[0].parents[0]\n\t end\n\n\t+ run_code(x, 'commits 1') do\n\t+ git.commits.size\n\t+ end\n\t+\n\t run_code(x, 'commits 2') do\n\t log = git.commits('master', 15)\n\t log.size\n\n此命令比较的是工作目录中当前文件和暂存区域快照之间的差异,也就是修改之后还没有暂存起来的变化内容。\n\n若要看已经暂存起来的文件和上次提交时的快照之间的差异,可以用 `git diff --cached` 命令。(Git 1.6.1 及更高版本还允许使用 `git diff --staged`,效果是相同的,但更好记些。)来看看实际的效果:\n\n\t$ git diff --cached\n\tdiff --git a/README b/README\n\tnew file mode 100644\n\tindex 0000000..03902a1\n\t--- /dev/null\n\t+++ b/README2\n\t@@ -0,0 +1,5 @@\n\t+grit\n\t+ by Tom Preston-Werner, Chris Wanstrath\n\t+ http://github.com/mojombo/grit\n\t+\n\t+Grit is a Ruby library for extracting information from a Git repository\n\n请注意,单单 `git diff` 不过是显示还没有暂存起来的改动,而不是这次工作和上次提交之间的差异。所以有时候你一下子暂存了所有更新过的文件后,运行 `git diff` 后却什么也没有,就是这个原因。\n\n像之前说的,暂存 benchmarks.rb 后再编辑,运行 `git status` 会看到暂存前后的两个版本:\n\n\t$ git add benchmarks.rb\n\t$ echo '# test line' >> benchmarks.rb\n\t$ git status\n\tOn branch master\n\tChanges to be committed:\n\t (use \"git reset HEAD <file>...\" to unstage)\n\t\n\t modified: benchmarks.rb\n\t\n\tChanges not staged for commit:\n\t (use \"git add <file>...\" to update what will be committed)\n\t (use \"git checkout -- <file>...\" to discard changes in working directory)\n\t\n\t modified: benchmarks.rb\n\t\n\n现在运行 `git diff` 看暂存前后的变化:\n\n\t$ git diff\n\tdiff --git a/benchmarks.rb b/benchmarks.rb\n\tindex e445e28..86b2f7c 100644\n\t--- a/benchmarks.rb\n\t+++ b/benchmarks.rb\n\t@@ -127,3 +127,4 @@ end\n\t main()\n\n\t ##pp Grit::GitRuby.cache_client.stats\n\t+# test line\n\n然后用 `git diff --cached` 查看已经暂存起来的变化:\n\n\t$ git diff --cached\n\tdiff --git a/benchmarks.rb b/benchmarks.rb\n\tindex 3cb747f..e445e28 100644\n\t--- a/benchmarks.rb\n\t+++ b/benchmarks.rb\n\t@@ -36,6 +36,10 @@ def main\n\t @commit.parents[0].parents[0].parents[0]\n\t end\n\n\t+ run_code(x, 'commits 1') do\n\t+ git.commits.size\n\t+ end\n\t+\n\t run_code(x, 'commits 2') do\n\t log = git.commits('master', 15)\n\t log.size\n\n### 提交更新 ###\n\n现在的暂存区域已经准备妥当可以提交了。在此之前,请一定要确认还有什么修改过的或新建的文件还没有 `git add` 过,否则提交的时候不会记录这些还没暂存起来的变化。所以,每次准备提交前,先用 `git status` 看下,是不是都已暂存起来了,然后再运行提交命令 `git commit`:\n\n\t$ git commit\n\n这种方式会启动文本编辑器以便输入本次提交的说明。(默认会启用 shell 的环境变量 `$EDITOR` 所指定的软件,一般都是 vim 或 emacs。当然也可以按照第一章介绍的方式,使用 `git config --global core.editor` 命令设定你喜欢的编辑软件。)\n\n编辑器会显示类似下面的文本信息(本例选用 Vim 的屏显方式展示):\n\n\t# Please enter the commit message for your changes. Lines starting\n\t# with '#' will be ignored, and an empty message aborts the commit.\n\t# On branch master\n\t# Changes to be committed:\n\t# new file: README\n\t# modified: benchmarks.rb\n\t#\n\t~\n\t~\n\t~\n\t\".git/COMMIT_EDITMSG\" 10L, 283C\n\n可以看到,默认的提交消息包含最后一次运行 `git status` 的输出,放在注释行里,另外开头还有一空行,供你输入提交说明。你完全可以去掉这些注释行,不过留着也没关系,多少能帮你回想起这次更新的内容有哪些。(如果觉得这还不够,可以用 `-v` 选项将修改差异的每一行都包含到注释中来。)退出编辑器时,Git 会丢掉注释行,将说明内容和本次更新提交到仓库。\n\n另外也可以用 -m 参数后跟提交说明的方式,在一行命令中提交更新:\n\n\t$ git commit -m \"Story 182: Fix benchmarks for speed\"\n\t[master 463dc4f] Story 182: Fix benchmarks for speed\n\t 2 files changed, 3 insertions(+)\n\t create mode 100644 README\n\n好,现在你已经创建了第一个提交!可以看到,提交后它会告诉你,当前是在哪个分支(master)提交的,本次提交的完整 SHA-1 校验和是什么(`463dc4f`),以及在本次提交中,有多少文件修订过,多少行添改和删改过。\n\n记住,提交时记录的是放在暂存区域的快照,任何还未暂存的仍然保持已修改状态,可以在下次提交时纳入版本管理。每一次运行提交操作,都是对你项目作一次快照,以后可以回到这个状态,或者进行比较。\n\n### 跳过使用暂存区域 ###\n\n尽管使用暂存区域的方式可以精心准备要提交的细节,但有时候这么做略显繁琐。Git 提供了一个跳过使用暂存区域的方式,只要在提交的时候,给 `git commit` 加上 `-a` 选项,Git 就会自动把所有已经跟踪过的文件暂存起来一并提交,从而跳过 `git add` 步骤:\n\n\t$ git status\n\tOn branch master\n\tChanges not staged for commit:\n\t (use \"git add <file>...\" to update what will be committed)\n\t (use \"git checkout -- <file>...\" to discard changes in working directory)\n\t\n\t modified: benchmarks.rb\n\t\n\tno changes added to commit (use \"git add\" and/or \"git commit -a\")\n\t$ git commit -a -m 'added new benchmarks'\n\t[master 83e38c7] added new benchmarks\n\t 1 files changed, 5 insertions(+)\n\n看到了吗?提交之前不再需要 `git add` 文件 benchmarks.rb 了。\n\n### 移除文件 ###\n\n要从 Git 中移除某个文件,就必须要从已跟踪文件清单中移除(确切地说,是从暂存区域移除),然后提交。可以用 `git rm` 命令完成此项工作,并连带从工作目录中删除指定的文件,这样以后就不会出现在未跟踪文件清单中了。\n\n如果只是简单地从工作目录中手工删除文件,运行 `git status` 时就会在 “Changes not staged for commit” 部分(也就是_未暂存_清单)看到:\n\n\t$ rm grit.gemspec\n\t$ git status\n\tOn branch master\n\tChanges not staged for commit:\n\t (use \"git add/rm <file>...\" to update what will be committed)\n\t (use \"git checkout -- <file>...\" to discard changes in working directory)\n\t\n\t deleted: grit.gemspec\n\t\n\tno changes added to commit (use \"git add\" and/or \"git commit -a\")\n\n然后再运行 `git rm` 记录此次移除文件的操作:\n\n\t$ git rm grit.gemspec\n\trm 'grit.gemspec'\n\t$ git status\n\tOn branch master\n\tChanges to be committed:\n\t (use \"git reset HEAD <file>...\" to unstage)\n\t\n\t deleted: grit.gemspec\n\t\n\n最后提交的时候,该文件就不再纳入版本管理了。如果删除之前修改过并且已经放到暂存区域的话,则必须要用强制删除选项 `-f`(译注:即 force 的首字母),以防误删除文件后丢失修改的内容。\n\n另外一种情况是,我们想把文件从 Git 仓库中删除(亦即从暂存区域移除),但仍然希望保留在当前工作目录中。换句话说,仅是从跟踪清单中删除。比如一些大型日志文件或者一堆 `.a` 编译文件,不小心纳入仓库后,要移除跟踪但不删除文件,以便稍后在 `.gitignore` 文件中补上,用 `--cached` 选项即可:\n\n\t$ git rm --cached readme.txt\n\n后面可以列出文件或者目录的名字,也可以使用 glob 模式。比方说:\n\n\t$ git rm log/\\*.log\n\n注意到星号 `*` 之前的反斜杠 `\\`,因为 Git 有它自己的文件模式扩展匹配方式,所以我们不用 shell 来帮忙展开(译注:实际上不加反斜杠也可以运行,只不过按照 shell 扩展的话,仅仅删除指定目录下的文件而不会递归匹配。上面的例子本来就指定了目录,所以效果等同,但下面的例子就会用递归方式匹配,所以必须加反斜杠。)。此命令删除所有 `log/` 目录下扩展名为 `.log` 的文件。类似的比如:\n\n\t$ git rm \\*~\n\n会递归删除当前目录及其子目录中所有 `~` 结尾的文件。\n\n### 移动文件 ###\n\n不像其他的 VCS 系统,Git 并不跟踪文件移动操作。如果在 Git 中重命名了某个文件,仓库中存储的元数据并不会体现出这是一次改名操作。不过 Git 非常聪明,它会推断出究竟发生了什么,至于具体是如何做到的,我们稍后再谈。\n\n既然如此,当你看到 Git 的 `mv` 命令时一定会困惑不已。要在 Git 中对文件改名,可以这么做:\n\n\t$ git mv file_from file_to\n\n它会恰如预期般正常工作。实际上,即便此时查看状态信息,也会明白无误地看到关于重命名操作的说明:\n\n\t$ git mv README.txt README\n\t$ git status\n\tOn branch master\n\tChanges to be committed:\n\t (use \"git reset HEAD <file>...\" to unstage)\n\t\n\t renamed: README.txt -> README\n\t\n\n其实,运行 `git mv` 就相当于运行了下面三条命令:\n\n\t$ mv README.txt README\n\t$ git rm README.txt\n\t$ git add README\n\n如此分开操作,Git 也会意识到这是一次改名,所以不管何种方式都一样。当然,直接用 `git mv` 轻便得多,不过有时候用其他工具批处理改名的话,要记得在提交前删除老的文件名,再添加新的文件名。\n\n---\n\n## 查看提交历史 ##\n\n在提交了若干更新之后,又或者克隆了某个项目,想回顾下提交历史,可以使用 `git log` 命令查看。\n\n接下来的例子会用我专门用于演示的 simplegit 项目,运行下面的命令获取该项目源代码:\n\n\tgit clone git://github.com/schacon/simplegit-progit.git\n\n然后在此项目中运行 `git log`,应该会看到下面的输出:\n\n\t$ git log\n\tcommit ca82a6dff817ec66f44342007202690a93763949\n\tAuthor: Scott Chacon <[email protected]>\n\tDate: Mon Mar 17 21:52:11 2008 -0700\n\n\t changed the version number\n\n\tcommit 085bb3bcb608e1e8451d4b2432f8ecbe6306e7e7\n\tAuthor: Scott Chacon <[email protected]>\n\tDate: Sat Mar 15 16:40:33 2008 -0700\n\n\t removed unnecessary test code\n\n\tcommit a11bef06a3f659402fe7563abf99ad00de2209e6\n\tAuthor: Scott Chacon <[email protected]>\n\tDate: Sat Mar 15 10:31:28 2008 -0700\n\n\t first commit\n\n默认不用任何参数的话,`git log` 会按提交时间列出所有的更新,最近的更新排在最上面。看到了吗,每次更新都有一个 SHA-1 校验和、作者的名字和电子邮件地址、提交时间,最后缩进一个段落显示提交说明。\n\n`git log` 有许多选项可以帮助你搜寻感兴趣的提交,接下来我们介绍些最常用的。\n\n我们常用 `-p` 选项展开显示每次提交的内容差异,用 `-2` 则仅显示最近的两次更新:\n\n\t$ git log -p -2\n\tcommit ca82a6dff817ec66f44342007202690a93763949\n\tAuthor: Scott Chacon <[email protected]>\n\tDate: Mon Mar 17 21:52:11 2008 -0700\n\n\t changed the version number\n\n\tdiff --git a/Rakefile b/Rakefile\n\tindex a874b73..8f94139 100644\n\t--- a/Rakefile\n\t+++ b/Rakefile\n\t@@ -5,5 +5,5 @@ require 'rake/gempackagetask'\n\t spec = Gem::Specification.new do |s|\n\t s.name = \"simplegit\"\n\t- s.version = \"0.1.0\"\n\t+ s.version = \"0.1.1\"\n\t s.author = \"Scott Chacon\"\n\t s.email = \"[email protected]\n\n\tcommit 085bb3bcb608e1e8451d4b2432f8ecbe6306e7e7\n\tAuthor: Scott Chacon <[email protected]>\n\tDate: Sat Mar 15 16:40:33 2008 -0700\n\n\t removed unnecessary test code\n\n\tdiff --git a/lib/simplegit.rb b/lib/simplegit.rb\n\tindex a0a60ae..47c6340 100644\n\t--- a/lib/simplegit.rb\n\t+++ b/lib/simplegit.rb\n\t@@ -18,8 +18,3 @@ class SimpleGit\n\t end\n\n\t end\n\t-\n\t-if $0 == __FILE__\n\t- git = SimpleGit.new\n\t- puts git.show\n\t-end\n\t\\ No newline at end of file\n\n该选项除了显示基本信息之外,还在附带了每次 commit 的变化。当进行代码审查,或者快速浏览某个搭档提交的 commit 的变化的时候,这个参数就非常有用了。\n\n某些时候,单词层面的对比,比行层面的对比,更加容易观察。Git 提供了 `--word-diff` 选项。我们可以将其添加到 `git log -p` 命令的后面,从而获取单词层面上的对比。在程序代码中进行单词层面的对比常常是没什么用的。不过当你需要在书籍、论文这种很大的文本文件上进行对比的时候,这个功能就显出用武之地了。下面是一个简单的例子:\n\n\t$ git log -U1 --word-diff\n\tcommit ca82a6dff817ec66f44342007202690a93763949\n\tAuthor: Scott Chacon <[email protected]>\n\tDate: Mon Mar 17 21:52:11 2008 -0700\n\n\t changed the version number\n\n\tdiff --git a/Rakefile b/Rakefile\n\tindex a874b73..8f94139 100644\n\t--- a/Rakefile\n\t+++ b/Rakefile\n\t@@ -7,3 +7,3 @@ spec = Gem::Specification.new do |s|\n\t s.name = \"simplegit\"\n\t s.version = [-\"0.1.0\"-]{+\"0.1.1\"+}\n\t s.author = \"Scott Chacon\"\n\n如你所见,这里并没有平常看到的添加行或者删除行的信息。这里的对比显示在行间。新增加的单词被 `{+ +}` 括起来,被删除的单词被 `[- -]` 括起来。在进行单词层面的对比的时候,你可能希望上下文( context )行数从默认的 3 行,减为 1 行,那么可以使用 `-U1` 选项。上面的例子中,我们就使用了这个选项。 \n\n另外,`git log` 还提供了许多摘要选项可以用,比如 `--stat`,仅显示简要的增改行数统计:\n\n\t$ git log --stat\n\tcommit ca82a6dff817ec66f44342007202690a93763949\n\tAuthor: Scott Chacon <[email protected]>\n\tDate: Mon Mar 17 21:52:11 2008 -0700\n\n\t changed the version number\n\n\t Rakefile | 2 +-\n\t 1 file changed, 1 insertion(+), 1 deletion(-)\n\n\tcommit 085bb3bcb608e1e8451d4b2432f8ecbe6306e7e7\n\tAuthor: Scott Chacon <[email protected]>\n\tDate: Sat Mar 15 16:40:33 2008 -0700\n\n\t removed unnecessary test code\n\n\t lib/simplegit.rb | 5 -----\n\t 1 file changed, 5 deletions(-)\n\n\tcommit a11bef06a3f659402fe7563abf99ad00de2209e6\n\tAuthor: Scott Chacon <[email protected]>\n\tDate: Sat Mar 15 10:31:28 2008 -0700\n\n\t first commit\n\n\t README | 6 ++++++\n\t Rakefile | 23 +++++++++++++++++++++++\n\t lib/simplegit.rb | 25 +++++++++++++++++++++++++\n\t 3 files changed, 54 insertions(+)\n\n每个提交都列出了修改过的文件,以及其中添加和移除的行数,并在最后列出所有增减行数小计。\n还有个常用的 `--pretty` 选项,可以指定使用完全不同于默认格式的方式展示提交历史。比如用 `oneline` 将每个提交放在一行显示,这在提交数很大时非常有用。另外还有 `short`,`full` 和 `fuller` 可以用,展示的信息或多或少有些不同,请自己动手实践一下看看效果如何。\n\n\t$ git log --pretty=oneline\n\tca82a6dff817ec66f44342007202690a93763949 changed the version number\n\t085bb3bcb608e1e8451d4b2432f8ecbe6306e7e7 removed unnecessary test code\n\ta11bef06a3f659402fe7563abf99ad00de2209e6 first commit\n\n但最有意思的是 `format`,可以定制要显示的记录格式,这样的输出便于后期编程提取分析,像这样:\n\n\t$ git log --pretty=format:\"%h - %an, %ar : %s\"\n\tca82a6d - Scott Chacon, 11 months ago : changed the version number\n\t085bb3b - Scott Chacon, 11 months ago : removed unnecessary test code\n\ta11bef0 - Scott Chacon, 11 months ago : first commit\n\n表 2-1 列出了常用的格式占位符写法及其代表的意义。\n\n<!-- Attention to translators: this is a table declaration.\nThe lines must be formatted as follows\n<TAB><First column text><TAB><Second column text>\n-->\n\n\t选项\t 说明\n\t%H\t提交对象(commit)的完整哈希字串\n\t%h\t提交对象的简短哈希字串\n\t%T\t树对象(tree)的完整哈希字串\n\t%t\t树对象的简短哈希字串\n\t%P\t父对象(parent)的完整哈希字串\n\t%p\t父对象的简短哈希字串\n\t%an\t作者(author)的名字\n\t%ae\t作者的电子邮件地址\n\t%ad\t作者修订日期(可以用 -date= 选项定制格式)\n\t%ar\t作者修订日期,按多久以前的方式显示\n\t%cn\t提交者(committer)的名字\n\t%ce\t提交者的电子邮件地址\n\t%cd\t提交日期\n\t%cr\t提交日期,按多久以前的方式显示\n\t%s\t提交说明\n\n你一定奇怪_作者(author)_和_提交者(committer)_之间究竟有何差别,其实作者指的是实际作出修改的人,提交者指的是最后将此工作成果提交到仓库的人。所以,当你为某个项目发布补丁,然后某个核心成员将你的补丁并入项目时,你就是作者,而那个核心成员就是提交者。我们会在第五章再详细介绍两者之间的细微差别。\n\n用 oneline 或 format 时结合 `--graph` 选项,可以看到开头多出一些 ASCII 字符串表示的简单图形,形象地展示了每个提交所在的分支及其分化衍合情况。在我们之前提到的 Grit 项目仓库中可以看到:\n\n\t$ git log --pretty=format:\"%h %s\" --graph\n\t* 2d3acf9 ignore errors from SIGCHLD on trap\n\t* 5e3ee11 Merge branch 'master' of git://github.com/dustin/grit\n\t|\\\n\t| * 420eac9 Added a method for getting the current branch.\n\t* | 30e367c timeout code and tests\n\t* | 5a09431 add timeout protection to grit\n\t* | e1193f8 support for heads with slashes in them\n\t|/\n\t* d6016bc require time for xmlschema\n\t* 11d191e Merge branch 'defunkt' into local\n\n以上只是简单介绍了一些 `git log` 命令支持的选项。表 2-2 还列出了一些其他常用的选项及其释义。\n\n<!-- Attention to translators: this is a table declaration.\nThe lines must be formatted as follows\n<TAB><First column text><TAB><Second column text>\n-->\n\n\t选项\t说明\n\t-p\t按补丁格式显示每个更新之间的差异。\n\t--word-diff\t按 word diff 格式显示差异。\n\t--stat\t显示每次更新的文件修改统计信息。\n\t--shortstat\t只显示 --stat 中最后的行数修改添加移除统计。\n\t--name-only\t仅在提交信息后显示已修改的文件清单。\n\t--name-status\t显示新增、修改、删除的文件清单。\n\t--abbrev-commit\t仅显示 SHA-1 的前几个字符,而非所有的 40 个字符。\n\t--relative-date\t使用较短的相对时间显示(比如,“2 weeks ago”)。\n\t--graph\t显示 ASCII 图形表示的分支合并历史。\n\t--pretty\t使用其他格式显示历史提交信息。可用的选项包括 oneline,short,full,fuller 和 format(后跟指定格式)。\n\t--oneline\t`--pretty=oneline --abbrev-commit` 的简化用法。\n\n### 限制输出长度 ###\n\n除了定制输出格式的选项之外,`git log` 还有许多非常实用的限制输出长度的选项,也就是只输出部分提交信息。之前我们已经看到过 `-2` 了,它只显示最近的两条提交,实际上,这是 `-<n>` 选项的写法,其中的 `n` 可以是任何自然数,表示仅显示最近的若干条提交。不过实践中我们是不太用这个选项的,Git 在输出所有提交时会自动调用分页程序(less),要看更早的更新只需翻到下页即可。\n\n另外还有按照时间作限制的选项,比如 `--since` 和 `--until`。下面的命令列出所有最近两周内的提交:\n\n\t$ git log --since=2.weeks\n\n你可以给出各种时间格式,比如说具体的某一天(“2008-01-15”),或者是多久以前(“2 years 1 day 3 minutes ago”)。\n\n还可以给出若干搜索条件,列出符合的提交。用 `--author` 选项显示指定作者的提交,用 `--grep` 选项搜索提交说明中的关键字。(请注意,如果要得到同时满足这两个选项搜索条件的提交,就必须用 `--all-match` 选项。否则,满足任意一个条件的提交都会被匹配出来)\n\n另一个真正实用的`git log`选项是路径(path),如果只关心某些文件或者目录的历史提交,可以在 `git log` 选项的最后指定它们的路径。因为是放在最后位置上的选项,所以用两个短划线(`--`)隔开之前的选项和后面限定的路径名。\n\n表 2-3 还列出了其他常用的类似选项。\n\n<!-- Attention to translators: this is a table declaration.\nThe lines must be formatted as follows\n<TAB><First column text><TAB><Second column text>\n-->\n\n\t选项\t说明\n\t-(n)\t仅显示最近的 n 条提交\n\t--since, --after\t仅显示指定时间之后的提交。\n\t--until, --before\t仅显示指定时间之前的提交。\n\t--author\t仅显示指定作者相关的提交。\n\t--committer\t仅显示指定提交者相关的提交。\n\n来看一个实际的例子,如果要查看 Git 仓库中,2008 年 10 月期间,Junio Hamano 提交的但未合并的测试脚本(位于项目的 t/ 目录下的文件),可以用下面的查询命令:\n\n\t$ git log --pretty=\"%h - %s\" --author=gitster --since=\"2008-10-01\" \\\n\t --before=\"2008-11-01\" --no-merges -- t/\n\t5610e3b - Fix testcase failure when extended attribute\n\tacd3b9e - Enhance hold_lock_file_for_{update,append}()\n\tf563754 - demonstrate breakage of detached checkout wi\n\td1a43f2 - reset --hard/read-tree --reset -u: remove un\n\t51a94af - Fix \"checkout --track -b newbranch\" on detac\n\tb0ad11e - pull: allow \"git pull origin $something:$cur\n\nGit 项目有 20,000 多条提交,但我们给出搜索选项后,仅列出了其中满足条件的 6 条。\n\n### 使用图形化工具查阅提交历史 ###\n\n有时候图形化工具更容易展示历史提交的变化,随 Git 一同发布的 gitk 就是这样一种工具。它是用 Tcl/Tk 写成的,基本上相当于 `git log` 命令的可视化版本,凡是 `git log` 可以用的选项也都能用在 gitk 上。在项目工作目录中输入 gitk 命令后,就会启动图 2-2 所示的界面。\n\n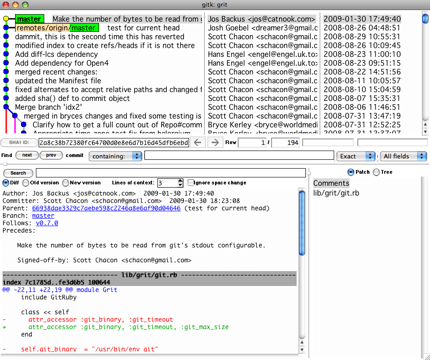\n\n上半个窗口显示的是历次提交的分支祖先图谱,下半个窗口显示当前点选的提交对应的具体差异。\n\n---\n\n## 撤消操作 ##\n\n任何时候,你都有可能需要撤消刚才所做的某些操作。接下来,我们会介绍一些基本的撤消操作相关的命令。请注意,有些撤销操作是不可逆的,所以请务必谨慎小心,一旦失误,就有可能丢失部分工作成果。\n\n### 修改最后一次提交 ###\n\n有时候我们提交完了才发现漏掉了几个文件没有加,或者提交信息写错了。想要撤消刚才的提交操作,可以使用 `--amend` 选项重新提交:\n\n\t$ git commit --amend\n\n此命令将使用当前的暂存区域快照提交。如果刚才提交完没有作任何改动,直接运行此命令的话,相当于有机会重新编辑提交说明,但将要提交的文件快照和之前的一样。\n\n启动文本编辑器后,会看到上次提交时的说明,编辑它确认没问题后保存退出,就会使用新的提交说明覆盖刚才失误的提交。\n\n如果刚才提交时忘了暂存某些修改,可以先补上暂存操作,然后再运行 `--amend` 提交:\n\n\t$ git commit -m 'initial commit'\n\t$ git add forgotten_file\n\t$ git commit --amend\n\n上面的三条命令最终只是产生一个提交,第二个提交命令修正了第一个的提交内容。\n\n### 取消已经暂存的文件 ###\n\n接下来的两个小节将演示如何取消暂存区域中的文件,以及如何取消工作目录中已修改的文件。不用担心,查看文件状态的时候就提示了该如何撤消,所以不需要死记硬背。来看下面的例子,有两个修改过的文件,我们想要分开提交,但不小心用 `git add .` 全加到了暂存区域。该如何撤消暂存其中的一个文件呢?其实,`git status` 的命令输出已经告诉了我们该怎么做:\n\n\t$ git add .\n\t$ git status\n\tOn branch master\n\tChanges to be committed:\n\t (use \"git reset HEAD <file>...\" to unstage)\n\t\n\t modified: README.txt\n\t modified: benchmarks.rb\n\t\n\n就在 “Changes to be committed” 下面,括号中有提示,可以使用 `git reset HEAD <file>...` 的方式取消暂存。好吧,我们来试试取消暂存 benchmarks.rb 文件:\n\n\t$ git reset HEAD benchmarks.rb\n\tUnstaged changes after reset:\n\tM benchmarks.rb\n\t$ git status\n\tOn branch master\n\tChanges to be committed:\n\t (use \"git reset HEAD <file>...\" to unstage)\n\t\n\t modified: README.txt\n\t\n\tChanges not staged for commit:\n\t (use \"git add <file>...\" to update what will be committed)\n\t (use \"git checkout -- <file>...\" to discard changes in working directory)\n\t\n\t modified: benchmarks.rb\n\t\n\n这条命令看起来有些古怪,先别管,能用就行。现在 benchmarks.rb 文件又回到了之前已修改未暂存的状态。\n\n### 取消对文件的修改 ###\n\n如果觉得刚才对 benchmarks.rb 的修改完全没有必要,该如何取消修改,回到之前的状态(也就是修改之前的版本)呢?`git status` 同样提示了具体的撤消方法,接着上面的例子,现在未暂存区域看起来像这样:\n\n\tChanges not staged for commit:\n\t (use \"git add <file>...\" to update what will be committed)\n\t (use \"git checkout -- <file>...\" to discard changes in working directory)\n\t\n\t modified: benchmarks.rb\n\t\n\n在第二个括号中,我们看到了抛弃文件修改的命令(至少在 Git 1.6.1 以及更高版本中会这样提示,如果你还在用老版本,我们强烈建议你升级,以获取最佳的用户体验),让我们试试看:\n\n\t$ git checkout -- benchmarks.rb\n\t$ git status\n\tOn branch master\n\tChanges to be committed:\n\t (use \"git reset HEAD <file>...\" to unstage)\n\t\n\t modified: README.txt\n\t\n\n可以看到,该文件已经恢复到修改前的版本。你可能已经意识到了,这条命令有些危险,所有对文件的修改都没有了,因为我们刚刚把之前版本的文件复制过来重写了此文件。所以在用这条命令前,请务必确定真的不再需要保留刚才的修改。如果只是想回退版本,同时保留刚才的修改以便将来继续工作,可以用下章介绍的 stashing 和分支来处理,应该会更好些。\n\n记住,任何已经提交到 Git 的都可以被恢复。即便在已经删除的分支中的提交,或者用 `--amend` 重新改写的提交,都可以被恢复(关于数据恢复的内容见第九章)。所以,你可能失去的数据,仅限于没有提交过的,对 Git 来说它们就像从未存在过一样。\n\n---\n\n## 远程仓库的使用 ##\n\n要参与任何一个 Git 项目的协作,必须要了解该如何管理远程仓库。远程仓库是指托管在网络上的项目仓库,可能会有好多个,其中有些你只能读,另外有些可以写。同他人协作开发某个项目时,需要管理这些远程仓库,以便推送或拉取数据,分享各自的工作进展。\n管理远程仓库的工作,包括添加远程库,移除废弃的远程库,管理各式远程库分支,定义是否跟踪这些分支,等等。本节我们将详细讨论远程库的管理和使用。\n\n### 查看当前的远程库 ###\n\n要查看当前配置有哪些远程仓库,可以用 `git remote` 命令,它会列出每个远程库的简短名字。在克隆完某个项目后,至少可以看到一个名为 origin 的远程库,Git 默认使用这个名字来标识你所克隆的原始仓库:\n\n\t$ git clone git://github.com/schacon/ticgit.git\n\tCloning into 'ticgit'...\n\tremote: Reusing existing pack: 1857, done.\n\tremote: Total 1857 (delta 0), reused 0 (delta 0)\n\tReceiving objects: 100% (1857/1857), 374.35 KiB | 193.00 KiB/s, done.\n\tResolving deltas: 100% (772/772), done.\n\tChecking connectivity... done.\n\t$ cd ticgit\n\t$ git remote\n\torigin\n\n也可以加上 `-v` 选项(译注:此为 `--verbose` 的简写,取首字母),显示对应的克隆地址:\n\n\t$ git remote -v\n\torigin git://github.com/schacon/ticgit.git (fetch)\n\torigin git://github.com/schacon/ticgit.git (push)\n\n如果有多个远程仓库,此命令将全部列出。比如在我的 Grit 项目中,可以看到:\n\n\t$ cd grit\n\t$ git remote -v\n\tbakkdoor git://github.com/bakkdoor/grit.git\n\tcho45 git://github.com/cho45/grit.git\n\tdefunkt git://github.com/defunkt/grit.git\n\tkoke git://github.com/koke/grit.git\n\torigin [email protected]:mojombo/grit.git\n\n这样一来,我就可以非常轻松地从这些用户的仓库中,拉取他们的提交到本地。请注意,上面列出的地址只有 origin 用的是 SSH URL 链接,所以也只有这个仓库我能推送数据上去(我们会在第四章解释原因)。\n\n### 添加远程仓库 ###\n\n要添加一个新的远程仓库,可以指定一个简单的名字,以便将来引用,运行 `git remote add [shortname] [url]`:\n\n\t$ git remote\n\torigin\n\t$ git remote add pb git://github.com/paulboone/ticgit.git\n\t$ git remote -v\n\torigin\tgit://github.com/schacon/ticgit.git\n\tpb\tgit://github.com/paulboone/ticgit.git\n\n现在可以用字符串 `pb` 指代对应的仓库地址了。比如说,要抓取所有 Paul 有的,但本地仓库没有的信息,可以运行 `git fetch pb`:\n\n\t$ git fetch pb\n\tremote: Counting objects: 58, done.\n\tremote: Compressing objects: 100% (41/41), done.\n\tremote: Total 44 (delta 24), reused 1 (delta 0)\n\tUnpacking objects: 100% (44/44), done.\n\tFrom git://github.com/paulboone/ticgit\n\t * [new branch] master -> pb/master\n\t * [new branch] ticgit -> pb/ticgit\n\n现在,Paul 的主干分支(master)已经完全可以在本地访问了,对应的名字是 `pb/master`,你可以将它合并到自己的某个分支,或者切换到这个分支,看看有些什么有趣的更新。\n\n### 从远程仓库抓取数据 ###\n\n正如之前所看到的,可以用下面的命令从远程仓库抓取数据到本地:\n\n\t$ git fetch [remote-name]\n\n此命令会到远程仓库中拉取所有你本地仓库中还没有的数据。运行完成后,你就可以在本地访问该远程仓库中的所有分支,将其中某个分支合并到本地,或者只是取出某个分支,一探究竟。(我们会在第三章详细讨论关于分支的概念和操作。)\n\n如果是克隆了一个仓库,此命令会自动将远程仓库归于 origin 名下。所以,`git fetch origin` 会抓取从你上次克隆以来别人上传到此远程仓库中的所有更新(或是上次 fetch 以来别人提交的更新)。有一点很重要,需要记住,fetch 命令只是将远端的数据拉到本地仓库,并不自动合并到当前工作分支,只有当你确实准备好了,才能手工合并。\n\n如果设置了某个分支用于跟踪某个远端仓库的分支(参见下节及第三章的内容),可以使用 `git pull` 命令自动抓取数据下来,然后将远端分支自动合并到本地仓库中当前分支。在日常工作中我们经常这么用,既快且好。实际上,默认情况下 `git clone` 命令本质上就是自动创建了本地的 master 分支用于跟踪远程仓库中的 master 分支(假设远程仓库确实有 master 分支)。所以一般我们运行 `git pull`,目的都是要从原始克隆的远端仓库中抓取数据后,合并到工作目录中的当前分支。\n\n### 推送数据到远程仓库 ###\n\n项目进行到一个阶段,要同别人分享目前的成果,可以将本地仓库中的数据推送到远程仓库。实现这个任务的命令很简单: `git push [remote-name] [branch-name]`。如果要把本地的 master 分支推送到 `origin` 服务器上(再次说明下,克隆操作会自动使用默认的 master 和 origin 名字),可以运行下面的命令:\n\n\t$ git push origin master\n\n只有在所克隆的服务器上有写权限,或者同一时刻没有其他人在推数据,这条命令才会如期完成任务。如果在你推数据前,已经有其他人推送了若干更新,那你的推送操作就会被驳回。你必须先把他们的更新抓取到本地,合并到自己的项目中,然后才可以再次推送。有关推送数据到远程仓库的详细内容见第三章。\n\n### 查看远程仓库信息 ###\n\n我们可以通过命令 `git remote show [remote-name]` 查看某个远程仓库的详细信息,比如要看所克隆的 `origin` 仓库,可以运行:\n\n\t$ git remote show origin\n\t* remote origin\n\t URL: git://github.com/schacon/ticgit.git\n\t Remote branch merged with 'git pull' while on branch master\n\t master\n\t Tracked remote branches\n\t master\n\t ticgit\n\n除了对应的克隆地址外,它还给出了许多额外的信息。它友善地告诉你如果是在 master 分支,就可以用 `git pull` 命令抓取数据合并到本地。另外还列出了所有处于跟踪状态中的远端分支。\n\n上面的例子非常简单,而随着使用 Git 的深入,`git remote show` 给出的信息可能会像这样:\n\n\t$ git remote show origin\n\t* remote origin\n\t URL: [email protected]:defunkt/github.git\n\t Remote branch merged with 'git pull' while on branch issues\n\t issues\n\t Remote branch merged with 'git pull' while on branch master\n\t master\n\t New remote branches (next fetch will store in remotes/origin)\n\t caching\n\t Stale tracking branches (use 'git remote prune')\n\t libwalker\n\t walker2\n\t Tracked remote branches\n\t acl\n\t apiv2\n\t dashboard2\n\t issues\n\t master\n\t postgres\n\t Local branch pushed with 'git push'\n\t master:master\n\n它告诉我们,运行 `git push` 时缺省推送的分支是什么(译注:最后两行)。它还显示了有哪些远端分支还没有同步到本地(译注:第六行的 `caching` 分支),哪些已同步到本地的远端分支在远端服务器上已被删除(译注:`Stale tracking branches` 下面的两个分支),以及运行 `git pull` 时将自动合并哪些分支(译注:前四行中列出的 `issues` 和 `master` 分支)。\n\n### 远程仓库的删除和重命名 ###\n\n在新版 Git 中可以用 `git remote rename` 命令修改某个远程仓库在本地的简称,比如想把 `pb` 改成 `paul`,可以这么运行:\n\n\t$ git remote rename pb paul\n\t$ git remote\n\torigin\n\tpaul\n\n注意,对远程仓库的重命名,也会使对应的分支名称发生变化,原来的 `pb/master` 分支现在成了 `paul/master`。\n\n碰到远端仓库服务器迁移,或者原来的克隆镜像不再使用,又或者某个参与者不再贡献代码,那么需要移除对应的远端仓库,可以运行 `git remote rm` 命令:\n\n\t$ git remote rm paul\n\t$ git remote\n\torigin\n\n---\n\n## 打标签 ##\n\n同大多数 VCS 一样,Git 也可以对某一时间点上的版本打上标签。人们在发布某个软件版本(比如 v1.0 等等)的时候,经常这么做。本节我们一起来学习如何列出所有可用的标签,如何新建标签,以及各种不同类型标签之间的差别。\n\n### 列显已有的标签 ###\n\n列出现有标签的命令非常简单,直接运行 `git tag` 即可:\n\n\t$ git tag\n\tv0.1\n\tv1.3\n\n显示的标签按字母顺序排列,所以标签的先后并不表示重要程度的轻重。\n\n我们可以用特定的搜索模式列出符合条件的标签。在 Git 自身项目仓库中,有着超过 240 个标签,如果你只对 1.4.2 系列的版本感兴趣,可以运行下面的命令:\n\n\t$ git tag -l 'v1.4.2.*'\n\tv1.4.2.1\n\tv1.4.2.2\n\tv1.4.2.3\n\tv1.4.2.4\n\n### 新建标签 ###\n\nGit 使用的标签有两种类型:轻量级的(lightweight)和含附注的(annotated)。轻量级标签就像是个不会变化的分支,实际上它就是个指向特定提交对象的引用。而含附注标签,实际上是存储在仓库中的一个独立对象,它有自身的校验和信息,包含着标签的名字,电子邮件地址和日期,以及标签说明,标签本身也允许使用 GNU Privacy Guard (GPG) 来签署或验证。一般我们都建议使用含附注型的标签,以便保留相关信息;当然,如果只是临时性加注标签,或者不需要旁注额外信息,用轻量级标签也没问题。\n\n### 含附注的标签 ###\n\n创建一个含附注类型的标签非常简单,用 `-a` (译注:取 `annotated` 的首字母)指定标签名字即可:\n\n\t$ git tag -a v1.4 -m 'my version 1.4'\n\t$ git tag\n\tv0.1\n\tv1.3\n\tv1.4\n\n而 `-m` 选项则指定了对应的标签说明,Git 会将此说明一同保存在标签对象中。如果没有给出该选项,Git 会启动文本编辑软件供你输入标签说明。\n\n可以使用 `git show` 命令查看相应标签的版本信息,并连同显示打标签时的提交对象。\n\n\t$ git show v1.4\n\ttag v1.4\n\tTagger: Scott Chacon <[email protected]>\n\tDate: Mon Feb 9 14:45:11 2009 -0800\n\n\tmy version 1.4\n\n\tcommit 15027957951b64cf874c3557a0f3547bd83b3ff6\n\tMerge: 4a447f7... a6b4c97...\n\tAuthor: Scott Chacon <[email protected]>\n\tDate: Sun Feb 8 19:02:46 2009 -0800\n\n\t Merge branch 'experiment'\n\n我们可以看到在提交对象信息上面,列出了此标签的提交者和提交时间,以及相应的标签说明。\n\n### 签署标签 ###\n\n如果你有自己的私钥,还可以用 GPG 来签署标签,只需要把之前的 `-a` 改为 `-s` (译注: 取 `signed` 的首字母)即可:\n\n\t$ git tag -s v1.5 -m 'my signed 1.5 tag'\n\tYou need a passphrase to unlock the secret key for\n\tuser: \"Scott Chacon <[email protected]>\"\n\t1024-bit DSA key, ID F721C45A, created 2009-02-09\n\n现在再运行 `git show` 会看到对应的 GPG 签名也附在其内:\n\n\t$ git show v1.5\n\ttag v1.5\n\tTagger: Scott Chacon <[email protected]>\n\tDate: Mon Feb 9 15:22:20 2009 -0800\n\n\tmy signed 1.5 tag\n\t-----BEGIN PGP SIGNATURE-----\n\tVersion: GnuPG v1.4.8 (Darwin)\n\n\tiEYEABECAAYFAkmQurIACgkQON3DxfchxFr5cACeIMN+ZxLKggJQf0QYiQBwgySN\n\tKi0An2JeAVUCAiJ7Ox6ZEtK+NvZAj82/\n\t=WryJ\n\t-----END PGP SIGNATURE-----\n\tcommit 15027957951b64cf874c3557a0f3547bd83b3ff6\n\tMerge: 4a447f7... a6b4c97...\n\tAuthor: Scott Chacon <[email protected]>\n\tDate: Sun Feb 8 19:02:46 2009 -0800\n\n\t Merge branch 'experiment'\n\n稍后我们再学习如何验证已经签署的标签。\n\n### 轻量级标签 ###\n\n轻量级标签实际上就是一个保存着对应提交对象的校验和信息的文件。要创建这样的标签,一个 `-a`,`-s` 或 `-m` 选项都不用,直接给出标签名字即可:\n\n\t$ git tag v1.4-lw\n\t$ git tag\n\tv0.1\n\tv1.3\n\tv1.4\n\tv1.4-lw\n\tv1.5\n\n现在运行 `git show` 查看此标签信息,就只有相应的提交对象摘要:\n\n\t$ git show v1.4-lw\n\tcommit 15027957951b64cf874c3557a0f3547bd83b3ff6\n\tMerge: 4a447f7... a6b4c97...\n\tAuthor: Scott Chacon <[email protected]>\n\tDate: Sun Feb 8 19:02:46 2009 -0800\n\n\t Merge branch 'experiment'\n\n### 验证标签 ###\n\n可以使用 `git tag -v [tag-name]` (译注:取 `verify` 的首字母)的方式验证已经签署的标签。此命令会调用 GPG 来验证签名,所以你需要有签署者的公钥,存放在 keyring 中,才能验证:\n\n\t$ git tag -v v1.4.2.1\n\tobject 883653babd8ee7ea23e6a5c392bb739348b1eb61\n\ttype commit\n\ttag v1.4.2.1\n\ttagger Junio C Hamano <[email protected]> 1158138501 -0700\n\n\tGIT 1.4.2.1\n\n\tMinor fixes since 1.4.2, including git-mv and git-http with alternates.\n\tgpg: Signature made Wed Sep 13 02:08:25 2006 PDT using DSA key ID F3119B9A\n\tgpg: Good signature from \"Junio C Hamano <[email protected]>\"\n\tgpg: aka \"[jpeg image of size 1513]\"\n\tPrimary key fingerprint: 3565 2A26 2040 E066 C9A7 4A7D C0C6 D9A4 F311 9B9A\n\n若是没有签署者的公钥,会报告类似下面这样的错误:\n\n\tgpg: Signature made Wed Sep 13 02:08:25 2006 PDT using DSA key ID F3119B9A\n\tgpg: Can't check signature: public key not found\n\terror: could not verify the tag 'v1.4.2.1'\n\n### 后期加注标签 ###\n\n你甚至可以在后期对早先的某次提交加注标签。比如在下面展示的提交历史中:\n\n\t$ git log --pretty=oneline\n\t15027957951b64cf874c3557a0f3547bd83b3ff6 Merge branch 'experiment'\n\ta6b4c97498bd301d84096da251c98a07c7723e65 beginning write support\n\t0d52aaab4479697da7686c15f77a3d64d9165190 one more thing\n\t6d52a271eda8725415634dd79daabbc4d9b6008e Merge branch 'experiment'\n\t0b7434d86859cc7b8c3d5e1dddfed66ff742fcbc added a commit function\n\t4682c3261057305bdd616e23b64b0857d832627b added a todo file\n\t166ae0c4d3f420721acbb115cc33848dfcc2121a started write support\n\t9fceb02d0ae598e95dc970b74767f19372d61af8 updated rakefile\n\t964f16d36dfccde844893cac5b347e7b3d44abbc commit the todo\n\t8a5cbc430f1a9c3d00faaeffd07798508422908a updated readme\n\n我们忘了在提交 “updated rakefile” 后为此项目打上版本号 v1.2,没关系,现在也能做。只要在打标签的时候跟上对应提交对象的校验和(或前几位字符)即可:\n\n\t$ git tag -a v1.2 9fceb02\n\n可以看到我们已经补上了标签:\n\n\t$ git tag\n\tv0.1\n\tv1.2\n\tv1.3\n\tv1.4\n\tv1.4-lw\n\tv1.5\n\n\t$ git show v1.2\n\ttag v1.2\n\tTagger: Scott Chacon <[email protected]>\n\tDate: Mon Feb 9 15:32:16 2009 -0800\n\n\tversion 1.2\n\tcommit 9fceb02d0ae598e95dc970b74767f19372d61af8\n\tAuthor: Magnus Chacon <[email protected]>\n\tDate: Sun Apr 27 20:43:35 2008 -0700\n\n\t updated rakefile\n\t...\n\n### 分享标签 ###\n\n默认情况下,`git push` 并不会把标签传送到远端服务器上,只有通过显式命令才能分享标签到远端仓库。其命令格式如同推送分支,运行 `git push origin [tagname]` 即可: \n\n\t$ git push origin v1.5\n\tCounting objects: 50, done.\n\tCompressing objects: 100% (38/38), done.\n\tWriting objects: 100% (44/44), 4.56 KiB, done.\n\tTotal 44 (delta 18), reused 8 (delta 1)\n\tTo [email protected]:schacon/simplegit.git\n\t* [new tag] v1.5 -> v1.5\n\n如果要一次推送所有本地新增的标签上去,可以使用 `--tags` 选项:\n\n\t$ git push origin --tags\n\tCounting objects: 50, done.\n\tCompressing objects: 100% (38/38), done.\n\tWriting objects: 100% (44/44), 4.56 KiB, done.\n\tTotal 44 (delta 18), reused 8 (delta 1)\n\tTo [email protected]:schacon/simplegit.git\n\t * [new tag] v0.1 -> v0.1\n\t * [new tag] v1.2 -> v1.2\n\t * [new tag] v1.4 -> v1.4\n\t * [new tag] v1.4-lw -> v1.4-lw\n\t * [new tag] v1.5 -> v1.5\n\n现在,其他人克隆共享仓库或拉取数据同步后,也会看到这些标签。\n\n---\n\n## 技巧和窍门 ##\n\n在结束本章之前,我还想和大家分享一些 Git 使用的技巧和窍门。很多使用 Git 的开发者可能根本就没用过这些技巧,我们也不是说在读过本书后非得用这些技巧不可,但至少应该有所了解吧。说实话,有了这些小窍门,我们的工作可以变得更简单,更轻松,更高效。\n\n### 自动补全 ###\n\n如果你用的是 Bash shell,可以试试看 Git 提供的自动补全脚本。下载 Git 的源代码,进入 `contrib/completion` 目录,会看到一个 `git-completion.bash` 文件。将此文件复制到你自己的用户主目录中(译注:按照下面的示例,还应改名加上点:`cp git-completion.bash ~/.git-completion.bash`),并把下面一行内容添加到你的 `.bashrc` 文件中:\n\n\tsource ~/.git-completion.bash\n\n也可以为系统上所有用户都设置默认使用此脚本。Mac 上将此脚本复制到 `/opt/local/etc/bash_completion.d` 目录中,Linux 上则复制到 `/etc/bash_completion.d/` 目录中。这两处目录中的脚本,都会在 Bash 启动时自动加载。\n\n如果在 Windows 上安装了 msysGit,默认使用的 Git Bash 就已经配好了这个自动补全脚本,可以直接使用。\n\n在输入 Git 命令的时候可以敲两次跳格键(Tab),就会看到列出所有匹配的可用命令建议:\n\n\t$ git co<tab><tab>\n\tcommit config\n\n此例中,键入 git co 然后连按两次 Tab 键,会看到两个相关的建议(命令) commit 和 config。继而输入 `m<tab>` 会自动完成 `git commit` 命令的输入。\n\n命令的选项也可以用这种方式自动完成,其实这种情况更实用些。比如运行 `git log` 的时候忘了相关选项的名字,可以输入开头的几个字母,然后敲 Tab 键看看有哪些匹配的:\n\n\t$ git log --s<tab>\n\t--shortstat --since= --src-prefix= --stat --summary\n\n这个技巧不错吧,可以节省很多输入和查阅文档的时间。\n\n### Git 命令别名 ###\n\nGit 并不会推断你输入的几个字符将会是哪条命令,不过如果想偷懒,少敲几个命令的字符,可以用 `git config` 为命令设置别名。来看看下面的例子:\n\n\t$ git config --global alias.co checkout\n\t$ git config --global alias.br branch\n\t$ git config --global alias.ci commit\n\t$ git config --global alias.st status\n\n现在,如果要输入 `git commit` 只需键入 `git ci` 即可。而随着 Git 使用的深入,会有很多经常要用到的命令,遇到这种情况,不妨建个别名提高效率。\n\n使用这种技术还可以创造出新的命令,比方说取消暂存文件时的输入比较繁琐,可以自己设置一下:\n\n\t$ git config --global alias.unstage 'reset HEAD --'\n\n这样一来,下面的两条命令完全等同:\n\n\t$ git unstage fileA\n\t$ git reset HEAD fileA\n\n显然,使用别名的方式看起来更清楚。另外,我们还经常设置 `last` 命令:\n\n\t$ git config --global alias.last 'log -1 HEAD'\n\n然后要看最后一次的提交信息,就变得简单多了:\n\n\t$ git last\n\tcommit 66938dae3329c7aebe598c2246a8e6af90d04646\n\tAuthor: Josh Goebel <[email protected]>\n\tDate: Tue Aug 26 19:48:51 2008 +0800\n\n\t test for current head\n\n\t Signed-off-by: Scott Chacon <[email protected]>\n\n可以看出,实际上 Git 只是简单地在命令中替换了你设置的别名。不过有时候我们希望运行某个外部命令,而非 Git 的子命令,这个好办,只需要在命令前加上 `!` 就行。如果你自己写了些处理 Git 仓库信息的脚本的话,就可以用这种技术包装起来。作为演示,我们可以设置用 `git visual` 启动 `gitk`:\n\n\t$ git config --global alias.visual '!gitk'\n\n---\n\n## 小结 ##\n\n到目前为止,你已经学会了最基本的 Git 本地操作:创建和克隆仓库,做出修改,暂存并提交这些修改,以及查看所有历史修改记录。接下来,我们将学习 Git 的必杀技特性:分支模型。\n\n---\n\n本书采用 [Creative Commons 署名-非商业性使用-相同方式共享 3.0 未本地化版本协议](http://creativecommons.org/licenses/by-nc-sa/3.0/deed.zh)发布。\n\n[上一章](/progit/01-introduction) / [下一章](/progit/03-git-branching) / [返回](/progit)","mtime":1405826791000,"source":"source/progit/02-git-basics/index.markdown","_id":"9oap2yjt0fnr0ee0"},"wxxafongj9bv8mgz":{"content":"title: Pro Git - 3. Git 分支\ndate: 2014-06-07\nkeywords: Pro Git,git branch,git\n---\n\n几乎每一种版本控制系统都以某种形式支持分支。使用分支意味着你可以从开发主线上分离开来,然后在不影响主线的同时继续工作。在很多版本控制系统中,这是个昂贵的过程,常常需要创建一个源代码目录的完整副本,对大型项目来说会花费很长时间。\n\n有人把 Git 的分支模型称为“必杀技特性”,而正是因为它,将 Git 从版本控制系统家族里区分出来。Git 有何特别之处呢?Git 的分支可谓是难以置信的轻量级,它的新建操作几乎可以在瞬间完成,并且在不同分支间切换起来也差不多一样快。和许多其他版本控制系统不同,Git 鼓励在工作流程中频繁使用分支与合并,哪怕一天之内进行许多次都没有关系。理解分支的概念并熟练运用后,你才会意识到为什么 Git 是一个如此强大而独特的工具,并从此真正改变你的开发方式。\n\n---\n\n## 何谓分支 ##\n\n为了理解 Git 分支的实现方式,我们需要回顾一下 Git 是如何储存数据的。或许你还记得第一章的内容,Git 保存的不是文件差异或者变化量,而只是一系列文件快照。\n\n在 Git 中提交时,会保存一个提交(commit)对象,该对象包含一个指向暂存内容快照的指针,包含本次提交的作者等相关附属信息,包含零个或多个指向该提交对象的父对象指针:首次提交是没有直接祖先的,普通提交有一个祖先,由两个或多个分支合并产生的提交则有多个祖先。\n\n为直观起见,我们假设在工作目录中有三个文件,准备将它们暂存后提交。暂存操作会对每一个文件计算校验和(即第一章中提到的 SHA-1 哈希字串),然后把当前版本的文件快照保存到 Git 仓库中(Git 使用 blob 类型的对象存储这些快照),并将校验和加入暂存区域:\n\n\t$ git add README test.rb LICENSE\n\t$ git commit -m 'initial commit of my project'\n\n当使用 `git commit` 新建一个提交对象前,Git 会先计算每一个子目录(本例中就是项目根目录)的校验和,然后在 Git 仓库中将这些目录保存为树(tree)对象。之后 Git 创建的提交对象,除了包含相关提交信息以外,还包含着指向这个树对象(项目根目录)的指针,如此它就可以在将来需要的时候,重现此次快照的内容了。\n\n现在,Git 仓库中有五个对象:三个表示文件快照内容的 blob 对象;一个记录着目录树内容及其中各个文件对应 blob 对象索引的 tree 对象;以及一个包含指向 tree 对象(根目录)的索引和其他提交信息元数据的 commit 对象。概念上来说,仓库中的各个对象保存的数据和相互关系看起来如图 3-1 所示:\n\n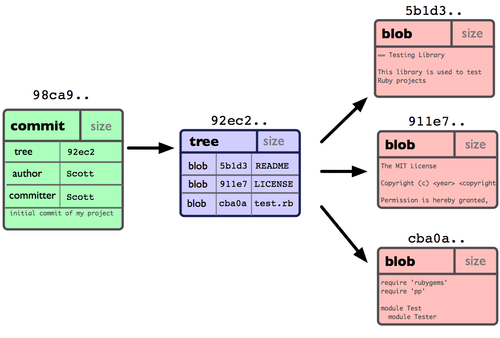\n\n作些修改后再次提交,那么这次的提交对象会包含一个指向上次提交对象的指针(译注:即下图中的 parent 对象)。两次提交后,仓库历史会变成图 3-2 的样子:\n\n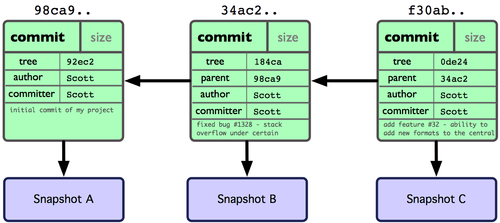\n\n现在来谈分支。Git 中的分支,其实本质上仅仅是个指向 commit 对象的可变指针。Git 会使用 master 作为分支的默认名字。在若干次提交后,你其实已经有了一个指向最后一次提交对象的 master 分支,它在每次提交的时候都会自动向前移动。\n\n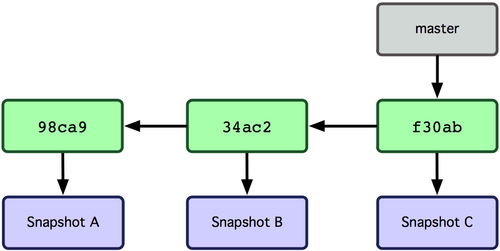\n\n那么,Git 又是如何创建一个新的分支的呢?答案很简单,创建一个新的分支指针。比如新建一个 testing 分支,可以使用 `git branch` 命令:\n\n\t$ git branch testing\n\n这会在当前 commit 对象上新建一个分支指针(见图 3-4)。\n\n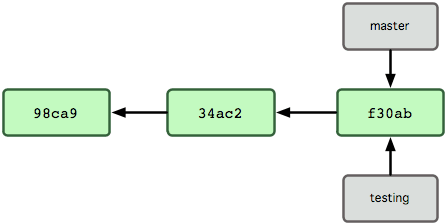\n\n那么,Git 是如何知道你当前在哪个分支上工作的呢?其实答案也很简单,它保存着一个名为 HEAD 的特别指针。请注意它和你熟知的许多其他版本控制系统(比如 Subversion 或 CVS)里的 HEAD 概念大不相同。在 Git 中,它是一个指向你正在工作中的本地分支的指针(译注:将 HEAD 想象为当前分支的别名。)。运行 `git branch` 命令,仅仅是建立了一个新的分支,但不会自动切换到这个分支中去,所以在这个例子中,我们依然还在 master 分支里工作(参考图 3-5)。\n\n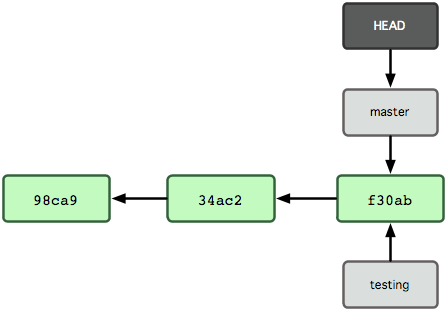\n\n要切换到其他分支,可以执行 `git checkout` 命令。我们现在转换到新建的 testing 分支:\n\n\t$ git checkout testing\n\n这样 HEAD 就指向了 testing 分支(见图3-6)。\n\n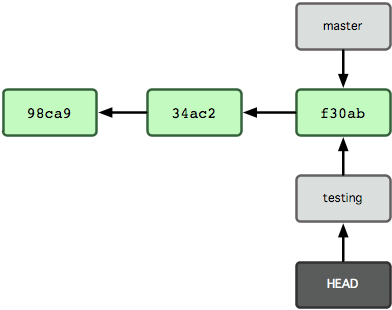\n\n这样的实现方式会给我们带来什么好处呢?好吧,现在不妨再提交一次:\n\n\t$ vim test.rb\n\t$ git commit -a -m 'made a change'\n\n图 3-7 展示了提交后的结果。\n\n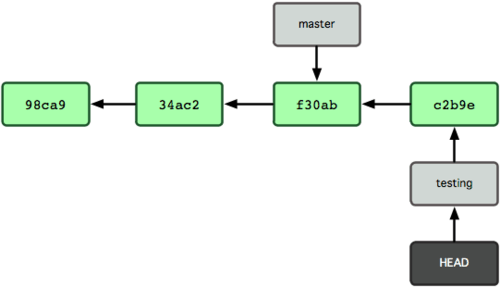\n\n非常有趣,现在 testing 分支向前移动了一格,而 master 分支仍然指向原先 `git checkout` 时所在的 commit 对象。现在我们回到 master 分支看看:\n\n\t$ git checkout master\n\n图 3-8 显示了结果。\n\n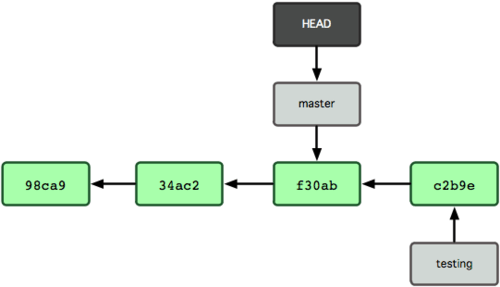\n\n这条命令做了两件事。它把 HEAD 指针移回到 master 分支,并把工作目录中的文件换成了 master 分支所指向的快照内容。也就是说,现在开始所做的改动,将始于本项目中一个较老的版本。它的主要作用是将 testing 分支里作出的修改暂时取消,这样你就可以向另一个方向进行开发。\n\n我们作些修改后再次提交:\n\n\t$ vim test.rb\n\t$ git commit -a -m 'made other changes'\n\n现在我们的项目提交历史产生了分叉(如图 3-9 所示),因为刚才我们创建了一个分支,转换到其中进行了一些工作,然后又回到原来的主分支进行了另外一些工作。这些改变分别孤立在不同的分支里:我们可以在不同分支里反复切换,并在时机成熟时把它们合并到一起。而所有这些工作,仅仅需要 `branch` 和 `checkout` 这两条命令就可以完成。\n\n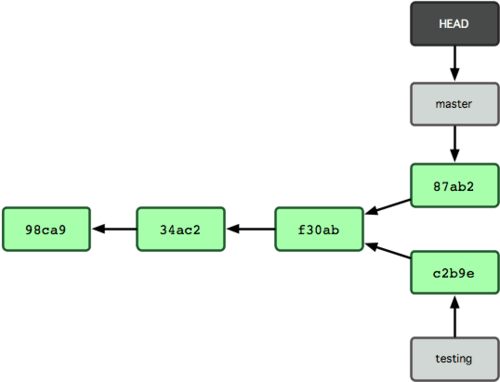\n\n由于 Git 中的分支实际上仅是一个包含所指对象校验和(40 个字符长度 SHA-1 字串)的文件,所以创建和销毁一个分支就变得非常廉价。说白了,新建一个分支就是向一个文件写入 41 个字节(外加一个换行符)那么简单,当然也就很快了。\n\n这和大多数版本控制系统形成了鲜明对比,它们管理分支大多采取备份所有项目文件到特定目录的方式,所以根据项目文件数量和大小不同,可能花费的时间也会有相当大的差别,快则几秒,慢则数分钟。而 Git 的实现与项目复杂度无关,它永远可以在几毫秒的时间内完成分支的创建和切换。同时,因为每次提交时都记录了祖先信息(译注:即 `parent` 对象),将来要合并分支时,寻找恰当的合并基础(译注:即共同祖先)的工作其实已经自然而然地摆在那里了,所以实现起来非常容易。Git 鼓励开发者频繁使用分支,正是因为有着这些特性作保障。\n\n接下来看看,我们为什么应该频繁使用分支。\n\n---\n\n## 分支的新建与合并 ##\n\n现在让我们来看一个简单的分支与合并的例子,实际工作中大体也会用到这样的工作流程:\n\n1. 开发某个网站。\n2. 为实现某个新的需求,创建一个分支。\n3. 在这个分支上开展工作。\n\n假设此时,你突然接到一个电话说有个很严重的问题需要紧急修补,那么可以按照下面的方式处理:\n\n1. 返回到原先已经发布到生产服务器上的分支。\n2. 为这次紧急修补建立一个新分支,并在其中修复问题。\n3. 通过测试后,回到生产服务器所在的分支,将修补分支合并进来,然后再推送到生产服务器上。\n4. 切换到之前实现新需求的分支,继续工作。\n\n### 分支的新建与切换 ###\n\n首先,我们假设你正在项目中愉快地工作,并且已经提交了几次更新(见图 3-10)。\n\n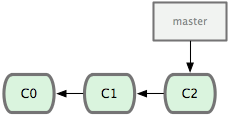\n\n现在,你决定要修补问题追踪系统上的 #53 问题。顺带说明下,Git 并不同任何特定的问题追踪系统打交道。这里为了说明要解决的问题,才把新建的分支取名为 iss53。要新建并切换到该分支,运行 `git checkout` 并加上 `-b` 参数:\n\n\t$ git checkout -b iss53\n\tSwitched to a new branch 'iss53'\n\n这相当于执行下面这两条命令:\n\n\t$ git branch iss53\n\t$ git checkout iss53\n\n图 3-11 示意该命令的执行结果。\n\n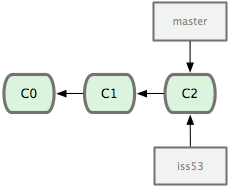\n\n接着你开始尝试修复问题,在提交了若干次更新后,`iss53` 分支的指针也会随着向前推进,因为它就是当前分支(换句话说,当前的 `HEAD` 指针正指向 `iss53`,见图 3-12):\n\n\t$ vim index.html\n\t$ git commit -a -m 'added a new footer [issue 53]'\n\n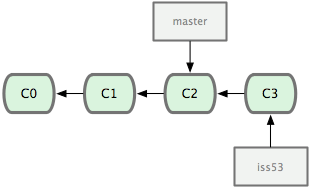\n\n现在你就接到了那个网站问题的紧急电话,需要马上修补。有了 Git ,我们就不需要同时发布这个补丁和 `iss53` 里作出的修改,也不需要在创建和发布该补丁到服务器之前花费大力气来复原这些修改。唯一需要的仅仅是切换回 `master` 分支。\n\n不过在此之前,留心你的暂存区或者工作目录里,那些还没有提交的修改,它会和你即将检出的分支产生冲突从而阻止 Git 为你切换分支。切换分支的时候最好保持一个清洁的工作区域。稍后会介绍几个绕过这种问题的办法(分别叫做 stashing 和 commit amending)。目前已经提交了所有的修改,所以接下来可以正常转换到 `master` 分支:\n\n\t$ git checkout master\n\tSwitched to branch 'master'\n\n此时工作目录中的内容和你在解决问题 #53 之前一模一样,你可以集中精力进行紧急修补。这一点值得牢记:Git 会把工作目录的内容恢复为检出某分支时它所指向的那个提交对象的快照。它会自动添加、删除和修改文件以确保目录的内容和你当时提交时完全一样。\n\n接下来,你得进行紧急修补。我们创建一个紧急修补分支 `hotfix` 来开展工作,直到搞定(见图 3-13):\n\n\t$ git checkout -b hotfix\n\tSwitched to a new branch 'hotfix'\n\t$ vim index.html\n\t$ git commit -a -m 'fixed the broken email address'\n\t[hotfix 3a0874c] fixed the broken email address\n\t 1 files changed, 1 deletion(-)\n\n\n\n在那个超级重要的修补发布以后,你想要回到被打扰之前的工作。由于当前 `hotfix` 分支和 `master` 都指向相同的提交对象,所以 `hotfix` 已经完成了历史使命,可以删掉了。使用 `git branch` 的 `-d` 选项执行删除操作:\n\n\t$ git branch -d hotfix\n\tDeleted branch hotfix (was 3a0874c).\n\n现在回到之前未完成的 #53 问题修复分支上继续工作(图 3-15):\n\n\t$ git checkout iss53\n\tSwitched to branch 'iss53'\n\t$ vim index.html\n\t$ git commit -a -m 'finished the new footer [issue 53]'\n\t[iss53 ad82d7a] finished the new footer [issue 53]\n\t 1 file changed, 1 insertion(+)\n\n\n\n值得注意的是之前 `hotfix` 分支的修改内容尚未包含到 `iss53` 中来。如果需要纳入此次修补,可以用 `git merge master` 把 master 分支合并到 `iss53`;或者等 `iss53` 完成之后,再将 `iss53` 分支中的更新并入 `master`。\n\n### 分支的合并 ###\n\n在问题 #53 相关的工作完成之后,可以合并回 `master` 分支。实际操作同前面合并 `hotfix` 分支差不多,只需回到 `master` 分支,运行 `git merge` 命令指定要合并进来的分支:\n\n\t$ git checkout master\n\t$ git merge iss53\n\tAuto-merging README\n\tMerge made by the 'recursive' strategy.\n\t README | 1 +\n\t 1 file changed, 1 insertion(+)\n\n请注意,这次合并操作的底层实现,并不同于之前 `hotfix` 的并入方式。因为这次你的开发历史是从更早的地方开始分叉的。由于当前 `master` 分支所指向的提交对象(C4)并不是 `iss53` 分支的直接祖先,Git 不得不进行一些额外处理。就此例而言,Git 会用两个分支的末端(C4 和 C5)以及它们的共同祖先(C2)进行一次简单的三方合并计算。图 3-16 用红框标出了 Git 用于合并的三个提交对象:\n\n\n\n这次,Git 没有简单地把分支指针右移,而是对三方合并后的结果重新做一个新的快照,并自动创建一个指向它的提交对象(C6)(见图 3-17)。这个提交对象比较特殊,它有两个祖先(C4 和 C5)。\n\n值得一提的是 Git 可以自己裁决哪个共同祖先才是最佳合并基础;这和 CVS 或 Subversion(1.5 以后的版本)不同,它们需要开发者手工指定合并基础。所以此特性让 Git 的合并操作比其他系统都要简单不少。\n\n\n\n既然之前的工作成果已经合并到 `master` 了,那么 `iss53` 也就没用了。你可以就此删除它,并在问题追踪系统里关闭该问题。\n\n\t$ git branch -d iss53\n\n### 遇到冲突时的分支合并 ###\n\n有时候合并操作并不会如此顺利。如果在不同的分支中都修改了同一个文件的同一部分,Git 就无法干净地把两者合到一起(译注:逻辑上说,这种问题只能由人来裁决。)。如果你在解决问题 #53 的过程中修改了 `hotfix` 中修改的部分,将得到类似下面的结果:\n\n\t$ git merge iss53\n\tAuto-merging index.html\n\tCONFLICT (content): Merge conflict in index.html\n\tAutomatic merge failed; fix conflicts and then commit the result.\n\nGit 作了合并,但没有提交,它会停下来等你解决冲突。要看看哪些文件在合并时发生冲突,可以用 `git status` 查阅:\n\n\t$ git status\n\tOn branch master\n\tYou have unmerged paths.\n\t (fix conflicts and run \"git commit\")\n\t\n\tUnmerged paths:\n\t (use \"git add <file>...\" to mark resolution)\n\t\n\t both modified: index.html\n\t\n\tno changes added to commit (use \"git add\" and/or \"git commit -a\")\n\n任何包含未解决冲突的文件都会以未合并(unmerged)的状态列出。Git 会在有冲突的文件里加入标准的冲突解决标记,可以通过它们来手工定位并解决这些冲突。可以看到此文件包含类似下面这样的部分:\n\n\t<<<<<<< HEAD\n\t<div id=\"footer\">contact : [email protected]</div>\n\t=======\n\t<div id=\"footer\">\n\t please contact us at [email protected]\n\t</div>\n\t>>>>>>> iss53\n\n可以看到 `=======` 隔开的上半部分,是 `HEAD`(即 `master` 分支,在运行 `merge` 命令时所切换到的分支)中的内容,下半部分是在 `iss53` 分支中的内容。解决冲突的办法无非是二者选其一或者由你亲自整合到一起。比如你可以通过把这段内容替换为下面这样来解决:\n\n\t<div id=\"footer\">\n\tplease contact us at [email protected]\n\t</div>\n\n这个解决方案各采纳了两个分支中的一部分内容,而且我还删除了 `<<<<<<<`,`=======` 和 `>>>>>>>` 这些行。在解决了所有文件里的所有冲突后,运行 `git add` 将把它们标记为已解决状态(译注:实际上就是来一次快照保存到暂存区域。)。因为一旦暂存,就表示冲突已经解决。如果你想用一个有图形界面的工具来解决这些问题,不妨运行 `git mergetool`,它会调用一个可视化的合并工具并引导你解决所有冲突:\n\n\t$ git mergetool\n\n\tThis message is displayed because 'merge.tool' is not configured.\n\tSee 'git mergetool --tool-help' or 'git help config' for more details.\n\t'git mergetool' will now attempt to use one of the following tools:\n\topendiff kdiff3 tkdiff xxdiff meld tortoisemerge gvimdiff diffuse diffmerge ecmerge p4merge araxis bc3 codecompare vimdiff emerge\n\tMerging:\n\tindex.html\n\n\tNormal merge conflict for 'index.html':\n\t {local}: modified file\n\t {remote}: modified file\n\tHit return to start merge resolution tool (opendiff):\n\n如果不想用默认的合并工具(Git 为我默认选择了 `opendiff`,因为我在 Mac 上运行了该命令),你可以在上方\"merge tool candidates\"里找到可用的合并工具列表,输入你想用的工具名。我们将在第七章讨论怎样改变环境中的默认值。\n\n退出合并工具以后,Git 会询问你合并是否成功。如果回答是,它会为你把相关文件暂存起来,以表明状态为已解决。\n\n再运行一次 `git status` 来确认所有冲突都已解决:\n\n\t$ git status\n\tOn branch master\n\tChanges to be committed:\n\t (use \"git reset HEAD <file>...\" to unstage)\n\t\n\t modified: index.html\n\t\n\n如果觉得满意了,并且确认所有冲突都已解决,也就是进入了暂存区,就可以用 `git commit` 来完成这次合并提交。提交的记录差不多是这样:\n\n\tMerge branch 'iss53'\n\n\tConflicts:\n\t index.html\n\t#\n\t# It looks like you may be committing a merge.\n\t# If this is not correct, please remove the file\n\t# .git/MERGE_HEAD\n\t# and try again.\n\t#\n\n如果想给将来看这次合并的人一些方便,可以修改该信息,提供更多合并细节。比如你都作了哪些改动,以及这么做的原因。有时候裁决冲突的理由并不直接或明显,有必要略加注解。\n\n---\n\n## 分支的管理 ##\n\n到目前为止,你已经学会了如何创建、合并和删除分支。除此之外,我们还需要学习如何管理分支,在日后的常规工作中会经常用到下面介绍的管理命令。\n\n`git branch` 命令不仅仅能创建和删除分支,如果不加任何参数,它会给出当前所有分支的清单:\n\n\t$ git branch\n\t iss53\n\t* master\n\t testing\n\n注意看 `master` 分支前的 `*` 字符:它表示当前所在的分支。也就是说,如果现在提交更新,`master` 分支将随着开发进度前移。若要查看各个分支最后一个提交对象的信息,运行 `git branch -v`:\n\n\t$ git branch -v\n\t iss53 93b412c fix javascript issue\n\t* master 7a98805 Merge branch 'iss53'\n\t testing 782fd34 add scott to the author list in the readmes\n\n要从该清单中筛选出你已经(或尚未)与当前分支合并的分支,可以用 `--merged` 和 `--no-merged` 选项(Git 1.5.6 以上版本)。比如用 `git branch --merged` 查看哪些分支已被并入当前分支(译注:也就是说哪些分支是当前分支的直接上游。):\n\n\t$ git branch --merged\n\t iss53\n\t* master\n\n之前我们已经合并了 `iss53`,所以在这里会看到它。一般来说,列表中没有 `*` 的分支通常都可以用 `git branch -d` 来删掉。原因很简单,既然已经把它们所包含的工作整合到了其他分支,删掉也不会损失什么。\n\n另外可以用 `git branch --no-merged` 查看尚未合并的工作:\n\n\t$ git branch --no-merged\n\t testing\n\n它会显示还未合并进来的分支。由于这些分支中还包含着尚未合并进来的工作成果,所以简单地用 `git branch -d` 删除该分支会提示错误,因为那样做会丢失数据:\n\n\t$ git branch -d testing\n\terror: The branch 'testing' is not fully merged.\n\tIf you are sure you want to delete it, run 'git branch -D testing'.\n\n不过,如果你确实想要删除该分支上的改动,可以用大写的删除选项 `-D` 强制执行,就像上面提示信息中给出的那样。\n\n---\n\n## 利用分支进行开发的工作流程 ##\n\n现在我们已经学会了新建分支和合并分支,可以(或应该)用它来做点什么呢?在本节,我们会介绍一些利用分支进行开发的工作流程。而正是由于分支管理的便捷,才衍生出了这类典型的工作模式,你可以根据项目的实际情况选择一种用用看。\n\n### 长期分支 ###\n\n由于 Git 使用简单的三方合并,所以就算在较长一段时间内,反复多次把某个分支合并到另一分支,也不是什么难事。也就是说,你可以同时拥有多个开放的分支,每个分支用于完成特定的任务,随着开发的推进,你可以随时把某个特性分支的成果并到其他分支中。\n\n许多使用 Git 的开发者都喜欢用这种方式来开展工作,比如仅在 `master` 分支中保留完全稳定的代码,即已经发布或即将发布的代码。与此同时,他们还有一个名为 `develop` 或 `next` 的平行分支,专门用于后续的开发,或仅用于稳定性测试 — 当然并不是说一定要绝对稳定,不过一旦进入某种稳定状态,便可以把它合并到 `master` 里。这样,在确保这些已完成的特性分支(短期分支,比如之前的 `iss53` 分支)能够通过所有测试,并且不会引入更多错误之后,就可以并到主干分支中,等待下一次的发布。\n\n本质上我们刚才谈论的,是随着提交对象不断右移的指针。稳定分支的指针总是在提交历史中落后一大截,而前沿分支总是比较靠前(见图 3-18)。\n\n\n\n或者把它们想象成工作流水线,或许更好理解一些,经过测试的提交对象集合被遴选到更稳定的流水线(见图 3-19)。\n\n\n\n你可以用这招维护不同层次的稳定性。某些大项目还会有个 `proposed`(建议)或 `pu`(proposed updates,建议更新)分支,它包含着那些可能还没有成熟到进入 `next` 或 `master` 的内容。这么做的目的是拥有不同层次的稳定性:当这些分支进入到更稳定的水平时,再把它们合并到更高层分支中去。再次说明下,使用多个长期分支的做法并非必需,不过一般来说,对于特大型项目或特复杂的项目,这么做确实更容易管理。\n\n### 特性分支 ###\n\n在任何规模的项目中都可以使用特性(Topic)分支。一个特性分支是指一个短期的,用来实现单一特性或与其相关工作的分支。可能你在以前的版本控制系统里从未做过类似这样的事情,因为通常创建与合并分支消耗太大。然而在 Git 中,一天之内建立、使用、合并再删除多个分支是常见的事。\n\n我们在上节的例子里已经见过这种用法了。我们创建了 `iss53` 和 `hotfix` 这两个特性分支,在提交了若干更新后,把它们合并到主干分支,然后删除。该技术允许你迅速且完全的进行语境切换 — 因为你的工作分散在不同的流水线里,每个分支里的改变都和它的目标特性相关,浏览代码之类的事情因而变得更简单了。你可以把作出的改变保持在特性分支中几分钟,几天甚至几个月,等它们成熟以后再合并,而不用在乎它们建立的顺序或者进度。\n\n现在我们来看一个实际的例子。请看图 3-20,由下往上,起先我们在 `master` 工作到 C1,然后开始一个新分支 `iss91` 尝试修复 91 号缺陷,提交到 C6 的时候,又冒出一个解决该问题的新办法,于是从之前 C4 的地方又分出一个分支 `iss91v2`,干到 C8 的时候,又回到主干 `master` 中提交了 C9 和 C10,再回到 `iss91v2` 继续工作,提交 C11,接着,又冒出个不太确定的想法,从 `master` 的最新提交 C10 处开了个新的分支 `dumbidea` 做些试验。\n\n\n\n现在,假定两件事情:我们最终决定使用第二个解决方案,即 `iss91v2` 中的办法;另外,我们把 `dumbidea` 分支拿给同事们看了以后,发现它竟然是个天才之作。所以接下来,我们准备抛弃原来的 `iss91` 分支(实际上会丢弃 C5 和 C6),直接在主干中并入另外两个分支。最终的提交历史将变成图 3-21 这样:\n\n\n\n请务必牢记这些分支全部都是本地分支,这一点很重要。当你在使用分支及合并的时候,一切都是在你自己的 Git 仓库中进行的 — 完全不涉及与服务器的交互。\n\n---\n\n## 远程分支 ##\n\n远程分支(remote branch)是对远程仓库中的分支的索引。它们是一些无法移动的本地分支;只有在 Git 进行网络交互时才会更新。远程分支就像是书签,提醒着你上次连接远程仓库时上面各分支的位置。 \n\n我们用 `(远程仓库名)/(分支名)` 这样的形式表示远程分支。比如我们想看看上次同 `origin` 仓库通讯时 `master` 分支的样子,就应该查看 `origin/master` 分支。如果你和同伴一起修复某个问题,但他们先推送了一个 `iss53` 分支到远程仓库,虽然你可能也有一个本地的 `iss53` 分支,但指向服务器上最新更新的却应该是 `origin/iss53` 分支。\n\n可能有点乱,我们不妨举例说明。假设你们团队有个地址为 `git.ourcompany.com` 的 Git 服务器。如果你从这里克隆,Git 会自动为你将此远程仓库命名为 `origin`,并下载其中所有的数据,建立一个指向它的 `master` 分支的指针,在本地命名为 `origin/master`,但你无法在本地更改其数据。接着,Git 建立一个属于你自己的本地 `master` 分支,始于 `origin` 上 `master` 分支相同的位置,你可以就此开始工作(见图 3-22):\n\n\n\n如果你在本地 `master` 分支做了些改动,与此同时,其他人向 `git.ourcompany.com` 推送了他们的更新,那么服务器上的 `master` 分支就会向前推进,而于此同时,你在本地的提交历史正朝向不同方向发展。不过只要你不和服务器通讯,你的 `origin/master` 指针仍然保持原位不会移动(见图 3-23)。\n\n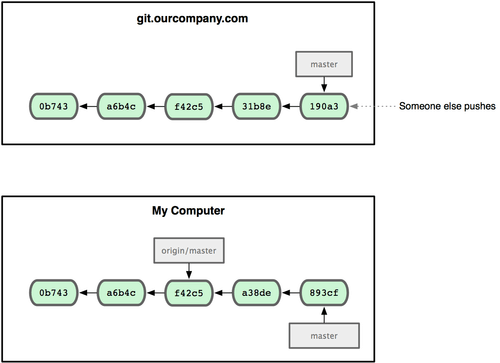\n\n可以运行 `git fetch origin` 来同步远程服务器上的数据到本地。该命令首先找到 `origin` 是哪个服务器(本例为 `git.ourcompany.com`),从上面获取你尚未拥有的数据,更新你本地的数据库,然后把 `origin/master` 的指针移到它最新的位置上(见图 3-24)。\n\n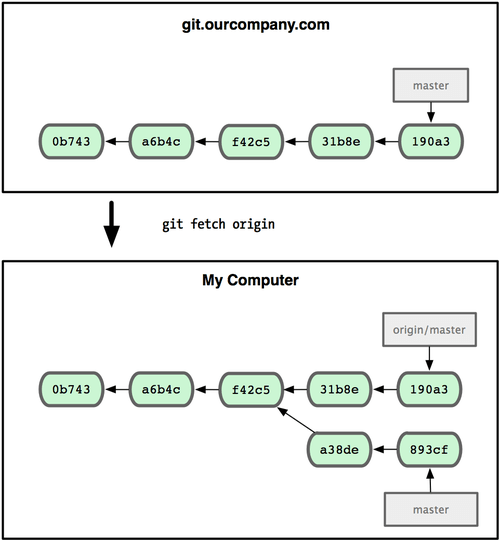\n\n为了演示拥有多个远程分支(在不同的远程服务器上)的项目是如何工作的,我们假设你还有另一个仅供你的敏捷开发小组使用的内部服务器 `git.team1.ourcompany.com`。可以用第二章中提到的 `git remote add` 命令把它加为当前项目的远程分支之一。我们把它命名为 `teamone`,以便代替完整的 Git URL 以方便使用(见图 3-25)。\n\n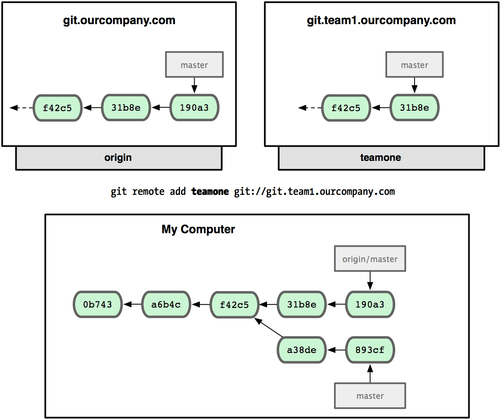\n\n现在你可以用 `git fetch teamone` 来获取小组服务器上你还没有的数据了。由于当前该服务器上的内容是你 `origin` 服务器上的子集,Git 不会下载任何数据,而只是简单地创建一个名为 `teamone/master` 的远程分支,指向 `teamone` 服务器上 `master` 分支所在的提交对象 `31b8e`(见图 3-26)。\n\n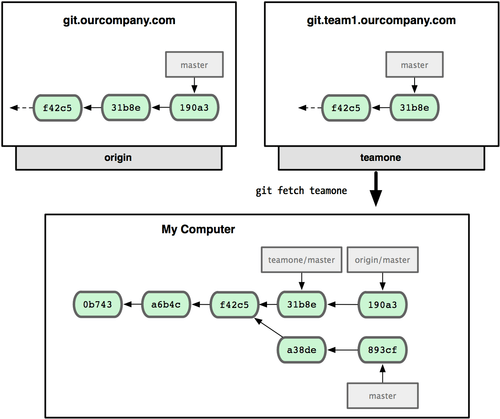\n\n### 推送本地分支 ###\n\n要想和其他人分享某个本地分支,你需要把它推送到一个你拥有写权限的远程仓库。你创建的本地分支不会因为你的写入操作而被自动同步到你引入的远程服务器上,你需要明确地执行推送分支的操作。换句话说,对于无意分享的分支,你尽管保留为私人分支好了,而只推送那些协同工作要用到的特性分支。\n\n如果你有个叫 `serverfix` 的分支需要和他人一起开发,可以运行 `git push (远程仓库名) (分支名)`:\n\n\t$ git push origin serverfix\n\tCounting objects: 20, done.\n\tCompressing objects: 100% (14/14), done.\n\tWriting objects: 100% (15/15), 1.74 KiB, done.\n\tTotal 15 (delta 5), reused 0 (delta 0)\n\tTo [email protected]:schacon/simplegit.git\n\t * [new branch] serverfix -> serverfix\n\n这里其实走了一点捷径。Git 自动把 `serverfix` 分支名扩展为 `refs/heads/serverfix:refs/heads/serverfix`,意为“取出我在本地的 serverfix 分支,推送到远程仓库的 serverfix 分支中去”。我们将在第九章进一步介绍 `refs/heads/` 部分的细节,不过一般使用的时候都可以省略它。也可以运行 `git push origin serverfix:serverfix` 来实现相同的效果,它的意思是“上传我本地的 serverfix 分支到远程仓库中去,仍旧称它为 serverfix 分支”。通过此语法,你可以把本地分支推送到某个命名不同的远程分支:若想把远程分支叫作 `awesomebranch`,可以用 `git push origin serverfix:awesomebranch` 来推送数据。\n\n接下来,当你的协作者再次从服务器上获取数据时,他们将得到一个新的远程分支 `origin/serverfix`,并指向服务器上 `serverfix` 所指向的版本:\n\n\t$ git fetch origin\n\tremote: Counting objects: 20, done.\n\tremote: Compressing objects: 100% (14/14), done.\n\tremote: Total 15 (delta 5), reused 0 (delta 0)\n\tUnpacking objects: 100% (15/15), done.\n\tFrom [email protected]:schacon/simplegit\n\t * [new branch] serverfix -> origin/serverfix\n\n值得注意的是,在 `fetch` 操作下载好新的远程分支之后,你仍然无法在本地编辑该远程仓库中的分支。换句话说,在本例中,你不会有一个新的 `serverfix` 分支,有的只是一个你无法移动的 `origin/serverfix` 指针。\n\n如果要把该远程分支的内容合并到当前分支,可以运行 `git merge origin/serverfix`。如果想要一份自己的 `serverfix` 来开发,可以在远程分支的基础上分化出一个新的分支来:\n\n\t$ git checkout -b serverfix origin/serverfix\n\tBranch serverfix set up to track remote branch serverfix from origin.\n\tSwitched to a new branch 'serverfix'\n\n这会切换到新建的 `serverfix` 本地分支,其内容同远程分支 `origin/serverfix` 一致,这样你就可以在里面继续开发了。\n\n### 跟踪远程分支 ###\n\n从远程分支 `checkout` 出来的本地分支,称为 _跟踪分支_ (tracking branch)。跟踪分支是一种和某个远程分支有直接联系的本地分支。在跟踪分支里输入 `git push`,Git 会自行推断应该向哪个服务器的哪个分支推送数据。同样,在这些分支里运行 `git pull` 会获取所有远程索引,并把它们的数据都合并到本地分支中来。\n\n在克隆仓库时,Git 通常会自动创建一个名为 `master` 的分支来跟踪 `origin/master`。这正是 `git push` 和 `git pull` 一开始就能正常工作的原因。当然,你可以随心所欲地设定为其它跟踪分支,比如 `origin` 上除了 `master` 之外的其它分支。刚才我们已经看到了这样的一个例子:`git checkout -b [分支名] [远程名]/[分支名]`。如果你有 1.6.2 以上版本的 Git,还可以用 `--track` 选项简化:\n\n\t$ git checkout --track origin/serverfix\n\tBranch serverfix set up to track remote branch serverfix from origin.\n\tSwitched to a new branch 'serverfix'\n\n要为本地分支设定不同于远程分支的名字,只需在第一个版本的命令里换个名字:\n\n\t$ git checkout -b sf origin/serverfix\n\tBranch sf set up to track remote branch serverfix from origin.\n\tSwitched to a new branch 'sf'\n\n现在你的本地分支 `sf` 会自动将推送和抓取数据的位置定位到 `origin/serverfix` 了。\n\n### 删除远程分支 ###\n\n如果不再需要某个远程分支了,比如搞定了某个特性并把它合并进了远程的 `master` 分支(或任何其他存放稳定代码的分支),可以用这个非常无厘头的语法来删除它:`git push [远程名] :[分支名]`。如果想在服务器上删除 `serverfix` 分支,运行下面的命令:\n\n\t$ git push origin :serverfix\n\tTo [email protected]:schacon/simplegit.git\n\t - [deleted] serverfix\n\n咚!服务器上的分支没了。你最好特别留心这一页,因为你一定会用到那个命令,而且你很可能会忘掉它的语法。有种方便记忆这条命令的方法:记住我们不久前见过的 `git push [远程名] [本地分支]:[远程分支]` 语法,如果省略 `[本地分支]`,那就等于是在说“在这里提取空白然后把它变成`[远程分支]`”。\n\n---\n\n## 分支的衍合 ##\n\n把一个分支中的修改整合到另一个分支的办法有两种:`merge` 和 `rebase`(译注:`rebase` 的翻译暂定为“衍合”,大家知道就可以了。)。在本章我们会学习什么是衍合,如何使用衍合,为什么衍合操作如此富有魅力,以及我们应该在什么情况下使用衍合。\n\n### 基本的衍合操作 ###\n\n请回顾之前有关合并的一节(见图 3-27),你会看到开发进程分叉到两个不同分支,又各自提交了更新。\n\n\n\n之前介绍过,最容易的整合分支的方法是 `merge` 命令,它会把两个分支最新的快照(C3 和 C4)以及二者最新的共同祖先(C2)进行三方合并,合并的结果是产生一个新的提交对象(C5)。如图 3-28 所示:\n\n\n\n其实,还有另外一个选择:你可以把在 C3 里产生的变化补丁在 C4 的基础上重新打一遍。在 Git 里,这种操作叫做_衍合(rebase)_。有了 `rebase` 命令,就可以把在一个分支里提交的改变移到另一个分支里重放一遍。\n\n在上面这个例子中,运行:\n\n\t$ git checkout experiment\n\t$ git rebase master\n\tFirst, rewinding head to replay your work on top of it...\n\tApplying: added staged command\n\n它的原理是回到两个分支最近的共同祖先,根据当前分支(也就是要进行衍合的分支 `experiment`)后续的历次提交对象(这里只有一个 C3),生成一系列文件补丁,然后以基底分支(也就是主干分支 `master`)最后一个提交对象(C4)为新的出发点,逐个应用之前准备好的补丁文件,最后会生成一个新的合并提交对象(C3'),从而改写 `experiment` 的提交历史,使它成为 `master` 分支的直接下游,如图 3-29 所示:\n\n\n\n现在回到 `master` 分支,进行一次快进合并(见图 3-30):\n\n\n\n现在的 C3' 对应的快照,其实和普通的三方合并,即上个例子中的 C5 对应的快照内容一模一样了。虽然最后整合得到的结果没有任何区别,但衍合能产生一个更为整洁的提交历史。如果视察一个衍合过的分支的历史记录,看起来会更清楚:仿佛所有修改都是在一根线上先后进行的,尽管实际上它们原本是同时并行发生的。\n\n一般我们使用衍合的目的,是想要得到一个能在远程分支上干净应用的补丁 — 比如某些项目你不是维护者,但想帮点忙的话,最好用衍合:先在自己的一个分支里进行开发,当准备向主项目提交补丁的时候,根据最新的 `origin/master` 进行一次衍合操作然后再提交,这样维护者就不需要做任何整合工作(译注:实际上是把解决分支补丁同最新主干代码之间冲突的责任,化转为由提交补丁的人来解决。),只需根据你提供的仓库地址作一次快进合并,或者直接采纳你提交的补丁。\n\n请注意,合并结果中最后一次提交所指向的快照,无论是通过衍合,还是三方合并,都会得到相同的快照内容,只不过提交历史不同罢了。衍合是按照每行的修改次序重演一遍修改,而合并是把最终结果合在一起。\n\n### 有趣的衍合 ###\n\n衍合也可以放到其他分支进行,并不一定非得根据分化之前的分支。以图 3-31 的历史为例,我们为了给服务器端代码添加一些功能而创建了特性分支 `server`,然后提交 C3 和 C4。然后又从 C3 的地方再增加一个 `client` 分支来对客户端代码进行一些相应修改,所以提交了 C8 和 C9。最后,又回到 `server` 分支提交了 C10。\n\n\n\n假设在接下来的一次软件发布中,我们决定先把客户端的修改并到主线中,而暂缓并入服务端软件的修改(因为还需要进一步测试)。这个时候,我们就可以把基于 `client` 分支而非 `server` 分支的改变(即 C8 和 C9),跳过 `server` 直接放到 `master` 分支中重演一遍,但这需要用 `git rebase` 的 `--onto` 选项指定新的基底分支 `master`:\n\n\t$ git rebase --onto master server client\n\n这好比在说:“取出 `client` 分支,找出 `client` 分支和 `server` 分支的共同祖先之后的变化,然后把它们在 `master` 上重演一遍”。是不是有点复杂?不过它的结果如图 3-32 所示,非常酷(译注:虽然 `client` 里的 C8, C9 在 C3 之后,但这仅表明时间上的先后,而非在 C3 修改的基础上进一步改动,因为 `server` 和 `client` 这两个分支对应的代码应该是两套文件,虽然这么说不是很严格,但应理解为在 C3 时间点之后,对另外的文件所做的 C8,C9 修改,放到主干重演。):\n\n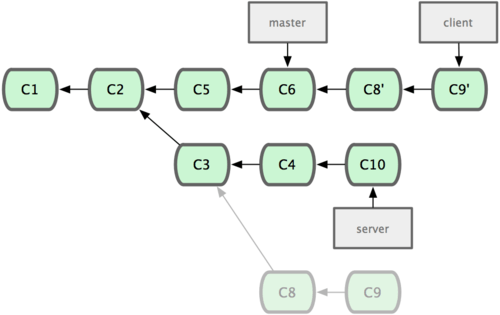\n\n现在可以快进 `master` 分支了(见图 3-33):\n\n\t$ git checkout master\n\t$ git merge client\n\n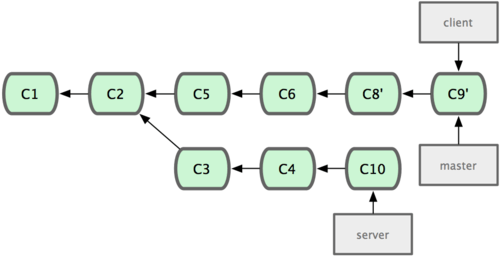\n\n现在我们决定把 `server` 分支的变化也包含进来。我们可以直接把 `server` 分支衍合到 `master`,而不用手工切换到 `server` 分支后再执行衍合操作 — `git rebase [主分支] [特性分支]` 命令会先取出特性分支 `server`,然后在主分支 `master` 上重演:\n\n\t$ git rebase master server\n\n于是,`server` 的进度应用到 `master` 的基础上,如图 3-34 所示:\n\n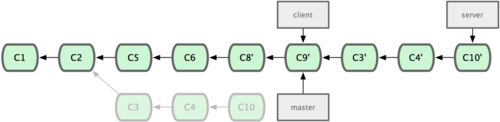\n\n然后就可以快进主干分支 `master` 了:\n\n\t$ git checkout master\n\t$ git merge server\n\n现在 `client` 和 `server` 分支的变化都已经集成到主干分支来了,可以删掉它们了。最终我们的提交历史会变成图 3-35 的样子:\n\n\t$ git branch -d client\n\t$ git branch -d server\n\n\n\n### 衍合的风险 ###\n\n呃,奇妙的衍合也并非完美无缺,要用它得遵守一条准则:\n\n**一旦分支中的提交对象发布到公共仓库,就千万不要对该分支进行衍合操作。**\n\n如果你遵循这条金科玉律,就不会出差错。否则,人民群众会仇恨你,你的朋友和家人也会嘲笑你,唾弃你。\n\n在进行衍合的时候,实际上抛弃了一些现存的提交对象而创造了一些类似但不同的新的提交对象。如果你把原来分支中的提交对象发布出去,并且其他人更新下载后在其基础上开展工作,而稍后你又用 `git rebase` 抛弃这些提交对象,把新的重演后的提交对象发布出去的话,你的合作者就不得不重新合并他们的工作,这样当你再次从他们那里获取内容时,提交历史就会变得一团糟。\n\n下面我们用一个实际例子来说明为什么公开的衍合会带来问题。假设你从一个中央服务器克隆然后在它的基础上搞了一些开发,提交历史类似图 3-36 所示:\n\n\n\n现在,某人在 C1 的基础上做了些改变,并合并他自己的分支得到结果 C6,推送到中央服务器。当你抓取并合并这些数据到你本地的开发分支中后,会得到合并结果 C7,历史提交会变成图 3-37 这样:\n\n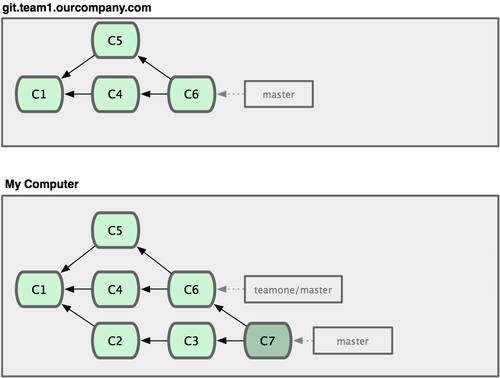\n\n接下来,那个推送 C6 上来的人决定用衍合取代之前的合并操作;继而又用 `git push --force` 覆盖了服务器上的历史,得到 C4'。而之后当你再从服务器上下载最新提交后,会得到:\n\n\n\n下载更新后需要合并,但此时衍合产生的提交对象 C4' 的 SHA-1 校验值和之前 C4 完全不同,所以 Git 会把它们当作新的提交对象处理,而实际上此刻你的提交历史 C7 中早已经包含了 C4 的修改内容,于是合并操作会把 C7 和 C4' 合并为 C8(见图 3-39):\n\n\n\nC8 这一步的合并是迟早会发生的,因为只有这样你才能和其他协作者提交的内容保持同步。而在 C8 之后,你的提交历史里就会同时包含 C4 和 C4',两者有着不同的 SHA-1 校验值,如果用 `git log` 查看历史,会看到两个提交拥有相同的作者日期与说明,令人费解。而更糟的是,当你把这样的历史推送到服务器后,会再次把这些衍合后的提交引入到中央服务器,进一步困扰其他人(译注:这个例子中,出问题的责任方是那个发布了 C6 后又用衍合发布 C4' 的人,其他人会因此反馈双重历史到共享主干,从而混淆大家的视听。)。\n\n如果把衍合当成一种在推送之前清理提交历史的手段,而且仅仅衍合那些尚未公开的提交对象,就没问题。如果衍合那些已经公开的提交对象,并且已经有人基于这些提交对象开展了后续开发工作的话,就会出现叫人沮丧的麻烦。\n\n---\n\n## 小结 ##\n\n读到这里,你应该已经学会了如何创建分支并切换到新分支,在不同分支间转换,合并本地分支,把分支推送到共享服务器上,使用共享分支与他人协作,以及在分享之前进行衍合。\n\n---\n\n本书采用 [Creative Commons 署名-非商业性使用-相同方式共享 3.0 未本地化版本协议](http://creativecommons.org/licenses/by-nc-sa/3.0/deed.zh)发布。\n\n[上一章](/progit/02-git-basics) / [返回](/progit)","mtime":1405826791000,"source":"source/progit/03-git-branching/index.markdown","_id":"wxxafongj9bv8mgz"},"orhk036iv1n7onve":{"content":"title: 社团工作\ndate: 2014-07-16\n---\n\n### 规章制度\n\n* [章程](/work/articles_of_cptsct/)\n* [语音室活动守则](/2014/05/computer_room_rules/)\n\n---\n\n### 历届工作人员\n\n* [2014-2015 届](/work/2014-2015/)\n* [2013-2014 届](/work/2013-2014/)\n* [2012-2013 届](/work/2012-2013/)\n* [2011-2012 届](/work/2011-2012/)\n* (资料正在补充中……)","mtime":1405826791000,"source":"source/work/index.md","_id":"orhk036iv1n7onve"},"yju4t5a2rmkqulja":{"content":"title: 灵动计算机社 2011-2012 届工作人员\ndate: 2014-07-16\n---\n\n资料正在补充中……","mtime":1405826791000,"source":"source/work/2011-2012/index.md","_id":"yju4t5a2rmkqulja"},"1xalcfmtfphgd0fn":{"content":"title: 灵动计算机社 2012-2013 届工作人员\ndate: 2014-07-16\n---\n\n资料正在补充中……","mtime":1405826791000,"source":"source/work/2012-2013/index.md","_id":"1xalcfmtfphgd0fn"},"jvn9b94eqq5n64l1":{"content":"title: 灵动计算机社 2013-2014 届工作人员\ndate: 2014-07-16\n---\n\n* 李超颖\n职务:正社长\n班别:高二(22)班\n微博:[@李_超颖Rain](http://weibo.com/u/2010295323)\n\n* 王子勤\n职务:副社长\n班别:高一(2)班\nEmail: <[email protected]>\n微博:[@子勤](http://t.qq.com/wangziqin8323)\n博客:[子勤的小天地](http://ziqin.gitcafe.com/)\n\n* 黄泓锦\n职务:社团干部\n班别:高一(7)班\n\n* 冯泰雄\n职务:社团干部\n班别:高一(7)班\n\n* 林士杰\n职务:社团干部\n班别:高一(8)班\n\n* 庞 翔\n职务:社团干部\n班别:高一(11)班\n\n* 陈子维\n职务:社团干部\n班别:高一(13)班\n\n* 刘永洲\n职务:社团干部\n班别:高一(16)班\n\n* 黎晓君\n职务:社团干部\n班别:高一(19)班\n\n* 杨礼杰\n职务:社团干部\n班别:高一(21)班\n\n* 廖 健\n职务:社团干部\n班别:高一(31)班\n\n* 潘俊毅\n职务:社团干部\n班别:高二(18)班\n\n* 李锡泽\n职务:社团干部\n班别:高二(21)班\n博客:[泽爷工作室](http://www.zeyes.org/)","mtime":1405826791000,"source":"source/work/2013-2014/index.md","_id":"jvn9b94eqq5n64l1"},"tuz3qiph0b3nanex":{"content":"title: 灵动计算机社 2014-2015 届工作人员\ndate: 2014-07-16\n---\n\n* 廖健\n职务:正社长\n班别:高一(31)班\n\n* 黄泓锦\n职务:副社长\n班别:高一(7)班","mtime":1405826791000,"source":"source/work/2014-2015/index.md","_id":"tuz3qiph0b3nanex"},"tk9ozx02yu7y29oi":{"content":"title: 茂名市第一中学灵动计算机社章程(草案)\ndate: 2014-07-16\ndescription: 茂名市第一中学灵动计算机社的社团章程草案。\n---\n\n### 第一章 总则\n\n##### 第一条\n茂名市第一中学灵动计算机社(英文名称为Computer Society of Maoming No.1 High School,以下简称“本社团”)是由茂名市第一中学(以下简称“我校”)在籍学生因为共同爱好计算机技术而自愿组成的非营利性社团团体,属于学术科技类学生社团。\n\n##### 第二条 组织原则\n(一)本社团隶属于茂名市第一中学学生社团联合会(以下简称“社联”),接受社联职能部门的管理与监督,在政治上受中国共产主义青年团茂名市第一中学委员会(以下简称“校团委”)领导。\n(二)本社团遵守中华人民共和国宪法、法律、法规,遵守茂名市第一中学的规章制度,遵守社会道德风尚。\n\n##### 第三条 宗旨\n本社团旨在通过开展各类社团活动,在我校营造一个学习、分享与交流计算机相关技术的友好环境,丰富我校学生的计算机知识,提高其计算机技能并从中感受计算机技术的乐趣。本社团与我校其他社团共同致力于丰富校园文化生活,开阔我校学生的视野,提高其综合素质。\n\n---\n\n### 第二章 社员\n\n##### 第四条\n具有茂名市第一中学正式学籍的学生,承认本社团的章程,有加入本社团的意愿,并且愿意履行社员义务、积极参加社团活动的,可以申请加入本社团,经社团负责人(关于“社团负责人”详见第三章)登记审核入社人员名单并上报社联职能部门备案后,即成为本社团的社员。\n\n##### 第五条 社员享有下列权利:\n(一)参加本社团开展的各类活动。\n(二)优先使用本社团的资源,优先接受本社团的服务。\n(三)对本社团的工作提出批评和建议。\n(四)监督社团负责人和社团干部(关于“社团干部”详见第三章)的工作。\n(五)知晓本社团的详细财务状况。\n\n##### 第六条 社员需要履行下列义务:\n(一)执行本社团的决议。\n(二)维护本社团的合法权益。\n(三)努力完成本社团交办的任务。\n(四)按规定交纳社费。\n\n##### 第七条\n社员有退出本社团的自由。社员要求退社需要向社团负责人提出申请,由社团负责人决定除名并上报社联备案后即退出本社团。退出本社团后,可重新申请加入本社团。\n\n##### 第八条\n社员如有严重违反本社团章程的行为,经社干大会(关于“社干大会”详见第三章)表决通过后会予以除名,即被退出本社。当事者如对除名有异议,需要在表决通过之后的三日内(不含表决之日)向社团负责人提交书面申诉。社团负责人需要在收到该申诉后的七个工作日内组织召开社干大会,对是否除名进行复议并再次表决。如果复议表决驳回该当事者的申诉,则不再接受该当事者的此类申诉。\n\n---\n\n### 第三章 社员大会、社团负责人、社团干部、社干大会\n\n##### 第九条\n本社团的社员大会为本社团的最高权力机关,由社团负责人、社团干部和社员构成,行使下列职权:\n(一)制定和修改本社团的章程。\n(二)讨论和决定本社团的工作方针和计划,审议社团负责人代表社干大会所作的工作报告和财务报告。\n(三)罢免社团负责人。\n(四)决定本社团的终止。\n(五)决定其他重要事项。\n\n##### 第十条\n由社团负责人、社干大会或五分之一以上(含五分之一)的社员提出,可以组织召开社员大会,且必须有二分之一以上(含二分之一)的社员参加出席方能召开,其决议须经到会社员半数以上表决通过方能生效。\n\n##### 第十一条\n本社团的负责人(即“社长”)为本社团的行政管理核心,对本社团的工作负全面责任,对社员大会负责,对外代表整个社团。\n\n##### 第十二条\n社团负责人的行使下列职权:\n(一)召开和主持社员大会、社干大会。\n(二)主持开展本社团的日常工作,执行社员大会和社干大会的决议。\n(三)任免社团干部。\n(四)代表本社团签署有关本社团的重要文件。\n(五)协调本社团与其他团体或个人的关系,协调本社团内部人员之间的关系。\n(六)处理其他日常事务。\n\n##### 第十三条\n社团负责人必须具备以下条件:\n(一)具有良好的组织策划能力,工作努力、负责。\n(二)在计算机技能方面有一定的修养。\n(三)身体健康,能坚持正常工作。\n\n##### 第十四条\n社团负责人根据《茂名市第一中学学生社团联合会总章程》的规定选出和更换。更换社团负责人时,原社团负责人应向新社团负责人交付社团资料,完成工作交接。\n\n##### 第十五条\n本社团的干部(即“社干”)为本社团的主要工作者,和社团负责人共同执行社员大会和社干大会的决议,对社团负责人负责,协助社团负责人工作,其具体职责由社团负责人规定和解释。\n\n##### 第十六条\n社团干部必须具备以下条件:\n(一)具有良好的社团活动工作能力,工作努力、负责。\n(二)了解一些计算机基础知识。\n(三)身体健康,能坚持正常工作。\n\n##### 第十七条\n社团干部由社团负责人根据本章程的规定,结合具体情况选出,并报社联运营部备案。\n\n##### 第十八条\n本社团的社干大会是本社团的执行机构,由社团负责人和社团干部构成,行使以下职权:\n(一)执行社员大会的决议。\n(二)处理本社团的日常事务。\n(三)筹备召开社员大会。\n(四)向社员大会报告工作和财务状况。\n(五)策划社团日常活动。\n(六)制定内部管理制度。\n(七)成立专项工作小组。\n(八)决定社员的除名。\n(九)商议其他重要事项。\n\n##### 第十九条\n由社团负责人或五分之一以上(含五分之一)的社团干部提出,可以组织召开社干大会,且必须有二分之一以上(含二分之一)的社团干部参加出席方能召开,其决议须经到会社团干部半数以上表决通过方能生效。\n\n##### 第二十条\n社干大会每学期至少召开一次,情况特殊下采用在线通讯形式召开。\n\n---\n\n### 第四章 社团活动\n\n##### 第二十一条 本社团的活动范围\n(一)计算机及其周边设备的软件硬件的应用与开发相关技术的教学、宣传、交流、比赛活动。\n(二)关注、收集、研究与计算机技术相关的新兴领域的信息。\n(三)建设、维护本社团的博客,用以展示社团活动情况和发布计算机技术方面的文章。\n(四)为我校其他学生社团提供技术支持。\n(五)承担校团委和社联委托的事项。\n\n---\n\n### 第五章 社团资产\n\n#####第二十二条 本社团的资产包括:\n(一)社员交纳的社费。\n(二)赞助单位提供的资金或物资。\n(三)在标准的范围内开展活动或服务的收入。\n(四)历届遗留的资产。\n(五)其他合法收入。\n\n##### 第二十三条\n本社团的社费按照社联有关规定收取和管理,任何单位、个人不得侵占、私分或挪用。\n\n##### 第二十四条\n本社团活动需要使用社团经费时,须按照社联规定申请并本着节约的原则使用。\n\n##### 第二十五条\n本社团资产用于本社团章程规定的活动范围和事业的发展,不在社团负责人、社团干部或社员之间分配。\n\n---\n\n### 第六章 社团章程的修改程序\n\n##### 第二十六条\n本社团章程的修改,由社团负责人起草,经社员大会表决通过并生效。\n\n##### 第二十七条\n修改后的章程,须在社员大会表决通过后的15个工作日内,报社联运营部备案。\n\n---\n\n### 第七章 社团终止程序\n\n##### 第二十八条\n本社团因难以维持或由于分立、合并等原因,征得三分之二以上(含三分之二)的社员同意后,可以向社联运营部提交终止申请。\n\n##### 第二十九条\n本社团终止前,须在社联及有关组织指导下成立清算组织,清理债权债务,处理善后事宜。清算期间,不开展清算以外的活动。\n\n##### 第三十条\n自终止申请经社联运营部审批通过起,本社团即为终止。\n\n##### 第三十一条\n本社团终止后的剩余财产,在社联的监督下,按照社联的有关规定用于发展与本社团宗旨相关的事业。\n\n---\n\n### 第八章 附则\n\n##### 第三十二条\n本章程的解释权在法律允许的范围内归社团负责人所有。\n\n---\n\n茂名市第一中学灵动计算机社","mtime":1405826791000,"source":"source/work/articles_of_cptsct/index.md","_id":"tk9ozx02yu7y29oi"},"d19bvkhv0grufmns":{"content":"<%- partial('_partial/archive', {pagination: config.archive, index: true}) %>","mtime":1405826791000,"source":"themes/ld_landscape/layout/archive.ejs","_id":"d19bvkhv0grufmns"},"vygk9adjfwgs5ni9":{"content":"<%- partial('_partial/archive', {pagination: config.category, index: true}) %>","mtime":1405826791000,"source":"themes/ld_landscape/layout/category.ejs","_id":"vygk9adjfwgs5ni9"},"wt750jq21j746qef":{"content":"<%- partial('_partial/archive', {pagination: 2, index: true}) %>","mtime":1405826791000,"source":"themes/ld_landscape/layout/index.ejs","_id":"wt750jq21j746qef"},"bzwtx3ub6rp77kcz":{"content":"<%- partial('_partial/head') %>\n<body>\n <div id=\"container\">\n <div id=\"wrap\">\n <%- partial('_partial/header') %>\n <div class=\"outer\">\n <section id=\"main\"><%- body %></section>\n <% if (theme.sidebar && theme.sidebar !== 'bottom'){ %>\n <%- partial('_partial/sidebar') %>\n <% } %>\n </div>\n <%- partial('_partial/footer') %>\n </div>\n <%- partial('_partial/mobile-nav') %>\n <%- partial('_partial/after-footer') %>\n </div>\n</body>\n</html>","mtime":1405826791000,"source":"themes/ld_landscape/layout/layout.ejs","_id":"bzwtx3ub6rp77kcz"},"tstsczszulvpr6yx":{"content":"<%- partial('_partial/article', {post: page, index: false}) %>","mtime":1405826791000,"source":"themes/ld_landscape/layout/page.ejs","_id":"tstsczszulvpr6yx"},"y6b7xvddivewgdfa":{"content":"<%- partial('_partial/article', {post: page, index: false}) %>","mtime":1405826791000,"source":"themes/ld_landscape/layout/post.ejs","_id":"y6b7xvddivewgdfa"},"d0r7lyyb093dz5i0":{"content":"<%- partial('_partial/archive', {pagination: config.tag, index: true}) %>","mtime":1405826791000,"source":"themes/ld_landscape/layout/tag.ejs","_id":"d0r7lyyb093dz5i0"},"tafovccrtz87c45f":{"content":"<% if (site.posts.length){ %>\n <div class=\"widget-wrap\">\n <h3 class=\"widget-title\">存档</h3>\n <div class=\"widget\">\n <%- list_archives() %>\n </div>\n </div>\n<% } %>","mtime":1405826791000,"source":"themes/ld_landscape/layout/_widget/archive.ejs","_id":"tafovccrtz87c45f"},"iu178h7fb5i12d4x":{"content":"<div class=\"widget-wrap\">\n\t<h3 class=\"widget-title\">友情链接</h3>\n\t<div class=\"widget\">\n\t\t<ul>\n\t\t\t<li><a href=\"http://mmyzjixie.blog.163.com/\" title=\"曾经的计算机协会\" target=\"_blank\">茂名一中计协 - 网易博客</a></li>\n\t\t\t<li><a href=\"http://weibo.com/mmyzsau/\" title=\"茂名一中社团联合会 - 微博\" target=\"_blank\">茂名一中社团联合会 - 微博</a></li>\n\t\t\t<li><a href=\"http://tieba.baidu.com/f?kw=%E8%8C%82%E5%90%8D%E5%B8%82%E7%AC%AC%E4%B8%80%E4%B8%AD%E5%AD%A6%E7%A4%BE%E5%9B%A2%E8%81%94%E5%90%88%E4%BC%9A\" title=\"社联贴吧\" target=\"_blank\">茂名一中社团联合会 - 百度贴吧</a></li>\n\t\t\t<li><a href=\"http://www.ewics.net/\" title=\"艺睿(E-WI)计算机社团\" target=\"_blank\">艺睿(E-WI)计算机社团</a></li>\n\t\t</ul>\n\t</div>\n</div> \n","mtime":1405827873000,"source":"themes/ld_landscape/layout/_widget/blogroll.ejs","_id":"iu178h7fb5i12d4x"},"dxwolkw1td0rbyja":{"content":"<% if (site.categories.length){ %>\n <div class=\"widget-wrap\">\n <h3 class=\"widget-title\">分类</h3>\n <div class=\"widget\">\n <%- list_categories() %>\n </div>\n </div>\n<% } %>","mtime":1405826791000,"source":"themes/ld_landscape/layout/_widget/category.ejs","_id":"dxwolkw1td0rbyja"},"c88hmojm118bn6hr":{"content":"<div class=\"widget-wrap\">\n\t<h3 class=\"widget-title\">灵动计算机社</h3>\n\t<div class=\"widget\">\n\t\t<div>\n\t\t\t前世计协九八始 汇聚挚友茂一中<br />\n\t\t\t技术日新源于灵 能力提升寓于动<br />\n\t\t\t设计开发论精巧 管理操作各不同<br />\n\t\t\t信息科学有奥秘 与君一道乐其中<br />\n\t\t</div>\n\t\t<hr />\n\t\t\n\t\tQQ群: <a target=\"_blank\" href=\"http://shang.qq.com/wpa/qunwpa?idkey=e365083a81eab47f1c53bfb6841ba8f926bad68e84b154c3252e42df5be72486\">240696962</a><br />\n\t\tEmail: <a href=\"mailto:mmyzcptsct@126.com\">mmyzcptsct@126.com</a>\n\t</div>\n</div> \n","mtime":1405826791000,"source":"themes/ld_landscape/layout/_widget/info.ejs","_id":"c88hmojm118bn6hr"},"ihzip41f5wh2j2le":{"content":"<div class=\"widget-wrap\">\n\t<img src=\"/img/cptsct.png\" alt=\"茂名市第一中学灵动计算机社社徽\" style=\"border:0; border-radius:90px; height:180px; width:180px; padding: 0; margin: 10px auto 10px auto; display: block; box-shadow: 0 0 20px #999;\" />\n</div>\n","mtime":1405826791000,"source":"themes/ld_landscape/layout/_widget/logo.ejs","_id":"ihzip41f5wh2j2le"},"l2wophffm4cm8rty":{"content":"<% if (site.posts.length){ %>\n <div class=\"widget-wrap\">\n <h3 class=\"widget-title\">最近更新</h3>\n <div class=\"widget\">\n <ul>\n <% site.posts.sort('date', -1).limit(5).each(function(post){ %>\n <li>\n <a href=\"<%- config.root %><%- post.path %>\"><%= post.title || '(no title)' %></a>\n </li>\n <% }) %>\n </ul>\n </div>\n </div>\n<% } %>","mtime":1405826791000,"source":"themes/ld_landscape/layout/_widget/recent_posts.ejs","_id":"l2wophffm4cm8rty"},"f871d3dxvacvnlg2":{"content":"<% if (site.tags.length){ %>\n <div class=\"widget-wrap\">\n <h3 class=\"widget-title\">标签</h3>\n <div class=\"widget\">\n <%- list_tags() %>\n </div>\n </div>\n<% } %>","mtime":1405826791000,"source":"themes/ld_landscape/layout/_widget/tag.ejs","_id":"f871d3dxvacvnlg2"},"f5lz3qh4gns4rfsb":{"content":"<% if (site.tags.length){ %>\n <div class=\"widget-wrap\">\n <h3 class=\"widget-title\">标签</h3>\n <div class=\"widget tagcloud\">\n <%- tagcloud() %>\n </div>\n </div>\n<% } %>","mtime":1405826791000,"source":"themes/ld_landscape/layout/_widget/tagcloud.ejs","_id":"f5lz3qh4gns4rfsb"},"3vzdxhj6km2l89sb":{"content":"<% if (config.disqus_shortname){ %>\n<script>\n var disqus_shortname = '<%= config.disqus_shortname %>';\n <% if (page.permalink){ %>\n var disqus_url = '<%= page.permalink %>';\n <% } %>\n (function(){\n var dsq = document.createElement('script');\n dsq.type = 'text/javascript';\n dsq.async = true;\n dsq.src = '//go.disqus.com/<% if (page.comments){ %>embed.js<% } else { %>count.js<% } %>';\n (document.getElementsByTagName('head')[0] || document.getElementsByTagName('body')[0]).appendChild(dsq);\n })();\n</script>\n<% } %>\n\n<script src=\"/js/jquery.min.js\"></script>\n\n<% if (theme.fancybox){ %>\n<link rel=\"stylesheet\" href=\"<%- config.root %>fancybox/jquery.fancybox.css\" media=\"screen\" type=\"text/css\">\n<script src=\"<%- config.root %>fancybox/jquery.fancybox.pack.js\"></script>\n<% } %>\n\n<%- js('js/script') %>","mtime":1405826791000,"source":"themes/ld_landscape/layout/_partial/after-footer.ejs","_id":"3vzdxhj6km2l89sb"},"dl0o45q7otzi3ibn":{"content":"<article class=\"archive-article archive-type-<%= post.layout %>\">\n <div class=\"archive-article-inner\">\n <header class=\"archive-article-header\">\n <%- partial('post/date', {class_name: 'archive-article-date', date_format: 'MMM D'}) %>\n <%- partial('post/title', {class_name: 'archive-article-title'}) %>\n </header>\n </div>\n</article>","mtime":1405826791000,"source":"themes/ld_landscape/layout/_partial/archive-post.ejs","_id":"dl0o45q7otzi3ibn"},"hgtd2ntp091ei4e7":{"content":"<% if (pagination == 2){ %>\n <% page.posts.each(function(post){ %>\n <%- partial('article', {post: post, index: true}) %>\n <% }) %>\n <% if (page.total > 1){ %>\n <nav id=\"page-nav\">\n <%- paginator({\n prev_text: '« Prev',\n next_text: 'Next »'\n }) %>\n </nav>\n <% } %>\n<% } else { %>\n <% var last; %>\n <% page.posts.each(function(post, i){ %>\n <% var year = post.date.year(); %>\n <% if (last != year){ %>\n <% if (last != null){ %>\n </div></section>\n <% } %>\n <% last = year; %>\n <section class=\"archives-wrap\">\n <div class=\"archive-year-wrap\">\n <a href=\"<%- config.root %>archives/<%= year %>\" class=\"archive-year\"><%= year %></a>\n </div>\n <div class=\"archives\">\n <% } %>\n <%- partial('archive-post', {post: post, even: i % 2 == 0}) %>\n <% }) %>\n <% if (page.posts.length){ %>\n </div></section>\n <% } %>\n<% } %>","mtime":1405826791000,"source":"themes/ld_landscape/layout/_partial/archive.ejs","_id":"hgtd2ntp091ei4e7"},"fxblq6c8224tbsf5":{"content":"<article id=\"<%= post.layout %>-<%= post.slug %>\" class=\"article article-type-<%= post.layout %>\" itemscope itemprop=\"blogPost\">\n <div class=\"article-meta\">\n <%- partial('post/date', {class_name: 'article-date', date_format: null}) %>\n <%- partial('post/category') %>\n </div>\n <div class=\"article-inner\">\n <%- partial('post/gallery') %>\n <% if (post.link || post.title){ %>\n <header class=\"article-header\">\n <%- partial('post/title', {class_name: 'article-title'}) %>\n </header>\n <% } %>\n <div class=\"article-entry\" itemprop=\"articleBody\">\n <% if (post.excerpt && index){ %>\n <%- post.excerpt %>\n <% if (theme.excerpt_link){ %>\n <p class=\"article-more-link\">\n <a href=\"<%- config.root %><%- post.path %>#more\"><%= theme.excerpt_link %></a>\n </p>\n <% } %>\n <% } else { %>\n <%- post.content %>\n <% } %>\n </div>\n <footer class=\"article-footer\">\n <a data-url=\"<%- post.permalink %>\" data-id=\"<%= post._id %>\" class=\"article-share-link\">分享</a>\n <% if (post.comments && config.disqus_shortname){ %>\n <a href=\"<%- post.permalink %>#disqus_thread\" class=\"article-comment-link\">Comments</a>\n <% } %>\n <%- partial('post/tag') %>\n \n \n <% if (!index && post.comments){ %>\n<section id=\"comments\">\n<!-- 多说评论框 start -->\n\t<div class=\"ds-thread\" data-thread-key=\"<%= page.title %>\" data-title=\"<%= page.title %>\" data-url=\"<%= post.permalink %>\"></div>\n<!--\t<div class=\"ds-thread\"></div> -->\n<!-- 多说评论框 end -->\n<!-- 多说公共JS代码 start (一个网页只需插入一次) -->\n<script type=\"text/javascript\">\nvar duoshuoQuery = {short_name:\"cptsct\"};\n\t(function() {\n\t\tvar ds = document.createElement('script');\n\t\tds.type = 'text/javascript';ds.async = true;\n\t\tds.src = (document.location.protocol == 'https:' ? 'https:' : 'http:') + '//static.duoshuo.com/embed.js';\n\t\tds.charset = 'UTF-8';\n\t\t(document.getElementsByTagName('head')[0] \n\t\t || document.getElementsByTagName('body')[0]).appendChild(ds);\n\t})();\n\t</script>\n<!-- 多说公共JS代码 end -->\n</section>\n<% } %>\n\n </footer>\n </div>\n\n <% if (!index){ %>\n <%- partial('post/nav') %>\n <% } %>\n\n</article>\n\n\n","mtime":1405826791000,"source":"themes/ld_landscape/layout/_partial/article.ejs","_id":"fxblq6c8224tbsf5"},"j8y9nnph2lfu51w6":{"content":"<article id=\"<%= post.layout %>-<%= post.slug %>\" class=\"article article-type-<%= post.layout %>\" itemscope itemprop=\"blogPost\">\n <div class=\"article-meta\">\n <%- partial('post/date', {class_name: 'article-date', date_format: null}) %>\n <%- partial('post/category') %>\n </div>\n <div class=\"article-inner\">\n <%- partial('post/gallery') %>\n <% if (post.link || post.title){ %>\n <header class=\"article-header\">\n <%- partial('post/title', {class_name: 'article-title'}) %>\n </header>\n <% } %>\n <div class=\"article-entry\" itemprop=\"articleBody\">\n <% if (post.excerpt && index){ %>\n <%- post.excerpt %>\n <% if (theme.excerpt_link){ %>\n <p class=\"article-more-link\">\n <a href=\"<%- config.root %><%- post.path %>#more\"><%= theme.excerpt_link %></a>\n </p>\n <% } %>\n <% } else { %>\n <%- post.content %>\n <% } %>\n </div>\n <footer class=\"article-footer\">\n <a data-url=\"<%- post.permalink %>\" data-id=\"<%= post._id %>\" class=\"article-share-link\">Share</a>\n <% if (post.comments && config.disqus_shortname){ %>\n <a href=\"<%- post.permalink %>#disqus_thread\" class=\"article-comment-link\">Comments</a>\n <% } %>\n <%- partial('post/tag') %>\n </footer>\n </div>\n <% if (!index){ %>\n <%- partial('post/nav') %>\n <% } %>\n</article>\n\n<% if (!index && post.comments && config.disqus_shortname){ %>\n<section id=\"comments\">\n <div id=\"disqus_thread\">\n <noscript>Please enable JavaScript to view the <a href=\"//disqus.com/?ref_noscript\">comments powered by Disqus.</a></noscript>\n </div>\n</section>\n<% } %>\n","mtime":1405826791000,"source":"themes/ld_landscape/layout/_partial/article.ejs_backup","_id":"j8y9nnph2lfu51w6"},"5zsviionl854tlwj":{"content":"<script type=\"text/javascript\">\nvar _hmt = _hmt || [];\n(function() {\n var hm = document.createElement(\"script\");\n hm.src = \"//hm.baidu.com/hm.js?<%= theme.baidu_tongji %>\";\n var s = document.getElementsByTagName(\"script\")[0]; \n s.parentNode.insertBefore(hm, s);\n})();\n</script>\n","mtime":1405826791000,"source":"themes/ld_landscape/layout/_partial/baidu_tongji.ejs","_id":"5zsviionl854tlwj"},"wb5w5fu9c7so9fz4":{"content":"<footer id=\"footer\">\n <% if (theme.sidebar === 'bottom'){ %>\n <%- partial('_partial/sidebar') %>\n <% } %>\n <div class=\"outer\">\n <div id=\"footer-info\" class=\"inner\">\n © <%= date(new Date(), 'YYYY') %> <%= config.author || config.title %><br>\n Powered by <a href=\"http://zespia.tw/hexo/\" target=\"_blank\">Hexo</a>, Hosted by <a href=\"https://gitcafe.com/\" target=\"_blank\">GitCafe</a>.\n </div>\n </div>\n</footer>","mtime":1405826791000,"source":"themes/ld_landscape/layout/_partial/footer.ejs","_id":"wb5w5fu9c7so9fz4"},"m6fx4w0ospua58lp":{"content":"<% if (theme.google_analytics){ %>\n<script type=\"text/javascript\">\n var _gaq = _gaq || [];\n _gaq.push(['_setAccount', '<%= theme.google_analytics %>']);\n _gaq.push(['_trackPageview']);\n\n (function() {\n var ga = document.createElement('script'); ga.type = 'text/javascript'; ga.async = true;\n ga.src = ('https:' == document.location.protocol ? 'https://ssl' : 'http://www') + '.google-analytics.com/ga.js';\n var s = document.getElementsByTagName('script')[0]; s.parentNode.insertBefore(ga, s);\n })();\n</script>\n<% } %>","mtime":1405826791000,"source":"themes/ld_landscape/layout/_partial/google-analytics.ejs","_id":"m6fx4w0ospua58lp"},"w6c5myn1eh8wvxaq":{"content":"<!DOCTYPE html>\n<html>\n<head>\n <meta charset=\"utf-8\">\n <%\n var title = page.title;\n\n if (is_archive()){\n title = 'Archives';\n\n if (is_month()){\n title += ': ' + page.year + '/' + page.month;\n } else if (is_year()){\n title += ': ' + page.year;\n }\n } else if (is_category()){\n title = 'Category: ' + page.category;\n } else if (is_tag()){\n title = 'Tag: ' + page.tag;\n }\n %>\n <title><% if (title){ %><%= title %> | <% } %><%= config.title %></title>\n <meta name=\"viewport\" content=\"width=device-width, initial-scale=1, maximum-scale=1\">\n <%\n var keywords = \"\";\n if (page.keywords) {\n keywords += page.keywords;\n if (config.keywords) {\n keywords += ',' + config.keywords;\n }\n } else {\n if (config.keywords) {\n keywords += config.keywords;\n }\n }\n %>\n <meta name=\"keywords\" content=\"<%= keywords %>\">\n <%- open_graph({twitter_id: theme.twitter, google_plus: theme.google_plus, fb_admins: theme.fb_admins, fb_app_id: theme.fb_app_id}) %>\n <% if (theme.rss){ %>\n <link rel=\"alternative\" href=\"<%- theme.rss %>\" title=\"<%= config.title %>\" type=\"application/atom+xml\">\n <% } %>\n <% if (theme.favicon){ %>\n <link rel=\"icon\" href=\"<%- theme.favicon %>\">\n <% } %>\n <link rel=\"icon\" type=\"image/x-icon\" href=\"<%- config.root %>favicon.ico\">\n <link href=\"/css/source_code_pro.css\" rel=\"stylesheet\" type=\"text/css\">\n <%- css('css/style') %>\n <%- partial('google-analytics') %>\n <% if (config.baidu_tongji){ %>\n <%- partial('baidu_tongji') %>\n <% } %>\n</head>","mtime":1405826791000,"source":"themes/ld_landscape/layout/_partial/head.ejs","_id":"w6c5myn1eh8wvxaq"},"usg2s7u237q1h4lu":{"content":"<header id=\"header\">\n <div id=\"banner\"></div>\n <div id=\"header-outer\" class=\"outer\">\n <div id=\"header-title\" class=\"inner\">\n <h1 id=\"logo-wrap\">\n <a href=\"<%- config.root %>\" id=\"logo\"><%= config.title %></a>\n </h1>\n <% if (theme.subtitle){ %>\n <h2 id=\"subtitle-wrap\">\n <a href=\"<%- config.root %>\" id=\"subtitle\"><%= theme.subtitle %></a>\n </h2>\n <% } %>\n </div>\n <div id=\"header-inner\" class=\"inner\">\n <nav id=\"main-nav\">\n <a id=\"main-nav-toggle\" class=\"nav-icon\"></a>\n <% for (var i in theme.menu){ %>\n <a class=\"main-nav-link\" href=\"<%- theme.menu[i] %>\"><%= i %></a>\n <% } %>\n </nav>\n <nav id=\"sub-nav\">\n <% if (theme.rss){ %>\n <a id=\"nav-rss-link\" class=\"nav-icon\" href=\"<%- theme.rss %>\" title=\"RSS Feed\"></a>\n <% } %>\n <a id=\"nav-search-btn\" class=\"nav-icon\" title=\"Search\"></a>\n </nav>\n <div id=\"search-form-wrap\">\n <%- search_form({button: ''}) %>\n </div>\n </div>\n </div>\n</header>","mtime":1405826791000,"source":"themes/ld_landscape/layout/_partial/header.ejs","_id":"usg2s7u237q1h4lu"},"z92ha874y2o3cjoj":{"content":"<nav id=\"mobile-nav\">\n <% for (var i in theme.menu){ %>\n <a href=\"<%- theme.menu[i] %>\" class=\"mobile-nav-link\"><%= i %></a>\n <% } %>\n</nav>","mtime":1405826791000,"source":"themes/ld_landscape/layout/_partial/mobile-nav.ejs","_id":"z92ha874y2o3cjoj"},"119syvd3ds5d8fyv":{"content":"<aside id=\"sidebar\"<% if (theme.sidebar === 'bottom'){ %> class=\"outer\"<% } %>>\n <% theme.widgets.forEach(function(widget){ %>\n <%- partial('_widget/' + widget) %>\n <% }) %>\n</aside>","mtime":1405826791000,"source":"themes/ld_landscape/layout/_partial/sidebar.ejs","_id":"119syvd3ds5d8fyv"},"te1k5jwtmyphy44j":{"content":"<% if (post.categories && post.categories.length){ %>\n <div class=\"article-category\">\n <%- list_categories(post.categories, {\n show_count: false,\n class: 'article-category',\n style: 'none',\n separator: '►'\n }) %>\n </div>\n<% } %>","mtime":1405826791000,"source":"themes/ld_landscape/layout/_partial/post/category.ejs","_id":"te1k5jwtmyphy44j"},"8r50xu2afmqv5xle":{"content":"<a href=\"<%- config.root %><%- post.path %>\" class=\"<%= class_name %>\">\n <time datetime=\"<%= date_xml(post.date) %>\" itemprop=\"datePublished\"><%= date(post.date, date_format) %></time>\n</a>","mtime":1405826791000,"source":"themes/ld_landscape/layout/_partial/post/date.ejs","_id":"8r50xu2afmqv5xle"},"xqxmo6qrggkwf8nh":{"content":"<% if (post.photos && post.photos.length){ %>\n<div class=\"article-gallery\">\n <div class=\"article-gallery-photos\">\n <% post.photos.forEach(function(photo, i){ %>\n <a class=\"article-gallery-img fancybox\" href=\"<%- photo %>\" rel=\"gallery_<%= post._id %>\">\n <img src=\"<%- photo %>\" itemprop=\"image\">\n </a>\n <% }) %>\n </div>\n</div>\n<% } %>","mtime":1405826791000,"source":"themes/ld_landscape/layout/_partial/post/gallery.ejs","_id":"xqxmo6qrggkwf8nh"},"8cx42x5a5grju3m7":{"content":"<% if (post.prev || post.next){ %>\n<nav id=\"article-nav\">\n <% if (post.prev){ %>\n <a href=\"<%- config.root %><%- post.prev.path %>\" id=\"article-nav-newer\" class=\"article-nav-link-wrap\">\n <strong class=\"article-nav-caption\">Newer</strong>\n <div class=\"article-nav-title\">\n <% if (post.prev.title){ %>\n <%= post.prev.title %>\n <% } else { %>\n (no title)\n <% } %>\n </div>\n </a>\n <% } %>\n <% if (post.next){ %>\n <a href=\"<%- config.root %><%- post.next.path %>\" id=\"article-nav-older\" class=\"article-nav-link-wrap\">\n <strong class=\"article-nav-caption\">Older</strong>\n <div class=\"article-nav-title\"><%= post.next.title %></div>\n </a>\n <% } %>\n</nav>\n<% } %>","mtime":1405826791000,"source":"themes/ld_landscape/layout/_partial/post/nav.ejs","_id":"8cx42x5a5grju3m7"},"3dznnbyrf726iuhh":{"content":"<% if (post.tags && post.tags.length){ %>\n <%- list_tags(post.tags, {\n show_count: false,\n class: 'article-tag'\n }) %>\n<% } %>","mtime":1405826791000,"source":"themes/ld_landscape/layout/_partial/post/tag.ejs","_id":"3dznnbyrf726iuhh"},"ik8mgh97gbggv7es":{"content":"<% if (post.link){ %>\n <h1 itemprop=\"name\">\n <a class=\"<%= class_name %>\" href=\"<%- post.link %>\" target=\"_blank\" itemprop=\"url\"><%= post.title %></a>\n </h1>\n<% } else if (post.title){ %>\n <% if (index){ %>\n <h1 itemprop=\"name\">\n <a class=\"<%= class_name %>\" href=\"<%- config.root %><%- post.path %>\"><%= post.title %></a>\n </h1>\n <% } else { %>\n <h1 class=\"<%= class_name %>\" itemprop=\"name\">\n <%= post.title %>\n </h1>\n <% } %>\n<% } %>","mtime":1405826791000,"source":"themes/ld_landscape/layout/_partial/post/title.ejs","_id":"ik8mgh97gbggv7es"}}}