#API Connect Hands-On Labs
##Exercise 3: Generate a LoopBack application and import your APIs
Make sure you've met the following prerequisites.
Prerequisite 1 Installed the API Connect toolkit (Exercise 1)
Ensure that you are in sub-directory ex3.
cd <path-to-hol-folder>/exercises/ex3
In this exercise, we'll:
- Learn about how to create a LoopBack application
- Learn how to consume an OpenAPI specification and shape a backend LoopBack application's behavior
- Learn how to implement basic behavior around the imported API design
We'll first make an empty project directory to contain all of our work for exercise 3.
mkdir -p ./loopbackapp
Next, navigate within the empty loopbackapp folder by typing the following:
cd loopbackapp
Next, we'll leverage the apic binary to create a Loopback Application project. Execute the following command line syntax:
apic loopback
You'll want to give your application a name and select the empty-server option to create an empty LoopBack API.

This should result in a parade of files being generated within the folder that represents a skeleton LoopBack application. Next, we'll create an in-memory db datastore. This db datastore is required to help us test our new Loopback application -- specifically for create operations which use HTTP POST and PUT method calls. Without a datastore, our application will have no default place to store data sent to it.
Execute the following command:
apic create --type datasource
You'll be prompted for:
- A data-source name. Enter db.
- A connector for the db: select the default selection of In-memory db.
- A window.localStorage key for persistence. Accept the default of blank.
- A full path to file for persistence. Accept the default of blank.
This will update your applications definition file with this new datasource.
Next, we'll import our OpenAPI specification from exercise 2 to shape this application. To prepare for this, copy the downloaded OpenAPI spec json file obtained from Swagger Editor and place it within the ex3 sub-directory. As an alternative, you can also copy an unmodified swagger spec file by executing the following command:
cp ../../ex2/macreduce.mybluemix.net.json ../swagger.json
Execute the following command:
apic loopback:swagger
A series of menu prompts will display:
- Prompt: A local path or remote url to your OpenAPI specification file.
Response: Enter a path to the json file that you copied in an earlier step (e.g. ../swagger.json). - Prompt: Selection of the models to be generated.
Response: You'll select the default of swagger_api_v1. - Prompt: Selection of the data-source to attach models to.
Response: You'll select the default of db (memory)
Next, you'll confirm that our datasource is attached to our model using the API Design and Management User interface which exposes concepts such as the underlying API model and registered datasources. To do this, let's jump into the API Design and Management UI by executing the following command:
apic edit
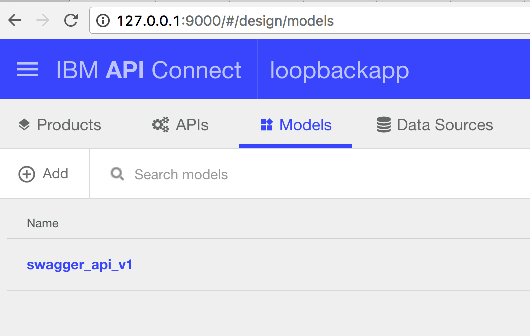
This should result in the API Design and Management UI opening within your default web browser. You'll need to sign in with your Bluemix account and browse to the Models tab ...
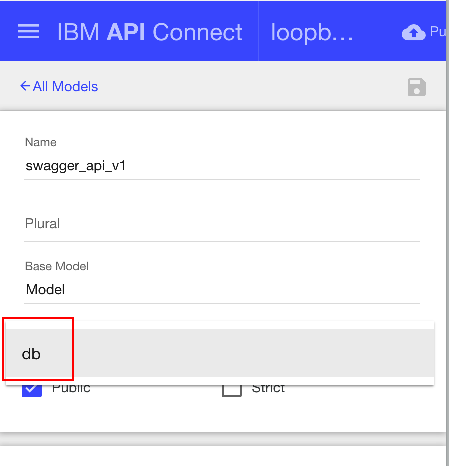
and click on our model named swagger_api_v1. This will open the properties view for the model. Click the dropdown arrow and select the datasource db. Hit the save icon in the upper right of the window and then close the browser tab. You'll also need to break out of the running apic edit process within the terminal.
Sweet! We now have a node application with endpoints defined via our OpenAPI specification. To test, let's fire up the app:
node .
We'll observe that the application is listening on port 3000. Using a browser, let's navigate to the following url: http://127.0.0.1:3000/api/api/v1/mac .
###Ughh ... a 500 response error.
###Wait, that makes total sense. We've defined endpoints via a spec but have not implemented any logic around the behavior of the resources. Let's tackle that next.
Kill your running node process within the terminal and locate the LoopBack application's model controller file swagger-api-v-1.js
ls -al ./server/models/
Within this folder, you'll notice two files:
- swagger-api-v-1.js : defines implementation logic for the generated stub APIs generated
- swagger-api-v-1.json : defines meta properties about the generated API model
To expedite the logic implementation, a handy uncommented copy of a partially implemented controller file is provided within the ex3 parent folder named swagger-api-v-1.js.uncommented. While in the project folder loopbackapp folder, execute the following command to replace the existing controller with this partial implementation:
cp ../swagger-api-v-1.js.uncommented server/models/swagger-api-v-1.js
You'll be prompted to overwrite. Respond with y (yes).
This partial implementation enables four (4) of the OpenAPI specification entries for
- GET and POST on
/mac - GET and DELETE
/mac/{macId}
If you're curious, we've also provided for comparison and inspection, a commented copy in the ex3 directory. (../swagger-api-v-1.js.commented).
Let's fire up our Loopback Application based on Swagger once again ... and try to populate it with some data.
node .
In a separate terminal window, issue the following 2 commands:
curl -X POST -H "Content-Type: application/json" -d "{\"organization\":\"IBM Corporation\",\"hex\":\"74:99:75\",\"base16\":\"749975\"}" "http://localhost:3000/api/api/v1/mac"
curl -X POST -H "Content-Type: application/json" -d "{\"organization\":\"IBM Corporation\",\"hex\":\"00:09:6B\",\"base16\":\"00096B\"}" "http://localhost:3000/api/api/v1/mac"
If all went well, you should receive a response within your terminal from your node backend API server that looks similar to:
While it continues to run, let's now fetch a record associated with an ID=2. Navigate your browser to http://localhost:3000/api/api/v1/mac/2
The result should look similar to this:
Awesome sauce! Go ahead and kill the running node process within your terminal and change directories to exercise 5.
###Summary of exericse and next steps
You've now walked through the process of quickly creating a REST API Loopback Application shaped by an OpenAPI (swagger) specification. You also learned how to modify the generated backend Loopback application to partially implement support for a couple of HTTP method types (GET and POST).
In [Exercise 4](../ex4) we'll learn how to easily create and populate a MySQL database service instance as a building block towards our ultimate goal of establishing API operations that support Create, Read, Update and Delete (CRUD) methods.


