An Image is Worth One Word: Personalizing Text-to-Image Generation using Textual Inversion
Textual Inversion is a method to train a pretrained text-to-image model to generate images of a specific unique concept, modify their appearance, or compose them in new roles and novel scenes. It does not require lots of training data, only 3-5 images of a user-provided concept. It does not update the weights of the text-to-image model to learn the new concept, but learns it through new "words" in the embedding space of a frozen text encoder. These new "words" can be composed into natural language sentences, making it plausible to generate personalized visual content.
Figure 1. The Diagram of Textual Inversion. [1]
As shown above, the textual inversion method consists of the following steps:
- First, it creates a text prompt following some template like A photo of
$S_{*}$ , where$S_{*}$ is a placeholder for the new "word" to be learned. - Then, the tokenizer will assign a unique index to this placeholder. This index corresponds to a single embedding vector
$v_{*}$ in the embedding lookup table which is trainable, while all other parameters are non-trainable. - Lastly, compute the loss function of the generator (e.g., stable diffusion model) and the gradients of the single embedding vector, then update the weights in
$v_{*}$ during training steps.
Make sure the following frameworks are installed.
- mindspore 2.1.0 (Ascend 910) / mindspore 2.2.1 (Ascend 910*)
Enter the example/stable_diffusion_v2 folder and run
pip install -r requirements.txtPretrained models will be automatically downloaded when launching the training script. See _version_cfg in train_textual_inversion.py for more information.
Since we use CLIPTokenizer from the transformers library, please also install this library using:
pip install transformers>=4.16.0In addition, please prepare the tokenizer openai/clip-vit-large-patch14 from the huggingface website for the usage of CLIPTokenizer. The directory tree of openai/ folder should be:
openai/
└── clip-vit-large-patch14
    ├── config.json
    ├── merges.txt
    ├── preprocessor_config.json
    ├── special_tokens_map.json
    ├── tokenizer_config.json
    ├── tokenizer.json
└── vocab.jsonDepending on the concept that we want the finetuned model to learn, the datasets can be divided into two groups: the datasets of the same object and the datasets of the same style.
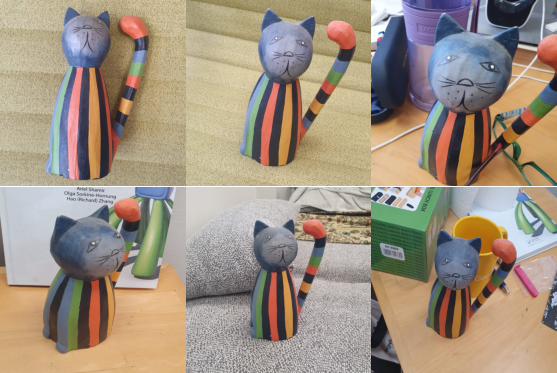
For object dataset, we use the cat-toy dataset. The dataset contains six images which are shown below.
Figure 2. The cat-toy example dataset for finetuning.
For style dataset, we use the test set of the chinese-art dataset, which contains 20 images. Some example images are shown below:
Figure 3. The example images from the test set of the chinese-art dataset
For the details of downloading chinese-art dataset, please refer to LoRA: Text-image Dataset Preparation.
The finetuning images of the same dataset should be placed under the same folder, like this:
dir-to-images
├── img1.jpg
├── img2.jpg
├── img3.jpg
├── img4.jpg
└── img5.jpg
We name the folder containing the object dataset as datasets/cat_toy, and the folder containing the test set of the chinese_art dataset as datasets/chinese_art.
The key arguments for finetuning experiments are explained as follows:
-
num_vectors: the number of trainable text embeddings for the text encoder. A larger value indicates a larger capacity. We recommend taking a grid search to find the optimal number of vectors for each training experiment. -
start_learning_rate: the initial learning rate for linear decay learning scheduler. -
max_steps: the maximum number of training steps, which overwrites the number of training epochs--epochs. -
gradient_accumulation_steps: the number of gradient accumulation steps. The default value is 4. -
placeholder_token: the token$S_{*}$ . -
initializer_token: the token used to initialize the newly added text embedding. -
learnable_property: one of ["object", "style"]. -
scale_lr: whether to scale the learning rate based on the batch size, gradient accumulation steps, and n cards.
In the following tutorial, we will use SDv1.5 as an example. The hyperparameter configuration file for SDv1.5 is configs/train/train_config_textual_inversion_v1.yaml.
We also support finetuning SDv2.0(2.1) with
configs/train/train_config_textual_inversion_v2.yaml. Compared with the hyperparameters for SDv1.5, we use a smaller learning rate (x0.5) and train more steps (x2.0) for SDv2.0 since SDv2.0 is more likely to overfit.
The optimal hyperparameters for the cat-toy dataset with SDv1.5 are num_vectors=3, start_learning_rate=1e-4, and max_steps=3000. See configs/train/train_config_textual_inversion_v1.yaml for more information.
The standalone training command for SDv1.5 finetuning on the cat-toy dataset:
python train_textual_inversion.py \
    --train_config configs/train/train_config_textual_inversion_v1.yaml  \
    --output_path="output/"
Suppose the saved checkpoint file is output/weights/SDv1.5_textual_inversion_3000_ti.ckpt, we use the following command to run inference with the newly learned text embedding.
python text_to_image.py  \
    --version "1.5" \
    --prompt "a <cat-toy> backpack" \
    --config configs/v1-train-textual-inversion.yaml  \
    --ti_ckpt_path output/weights/SDv1.5_textual_inversion_3000_ti.ckpt \
    --output_path vis/
The generated images using the prompt "a <cat-toy> backpack" are show below:
Figure 4. The generated images using the textual inversion weight.
For chinese-art dataset, we need to first change the key arguments in configs/train/train_config_textual_inversion_v1.yaml as follows:
train_data_dir: "datasets/chinese_art"
placeholder_token: "<chinese-art>"
initializer_token: "art"
learnable_property: "style"
num_vectors: 1
...
max_steps:4000
Then, we can use the following command for training:
python train_textual_inversion.py  \
    --train_config configs/train/train_config_textual_inversion_v1.yaml  \
    --output_path="output/chinese_art"
After training, suppose we have the saved checkpoint file output/chinese_art/weights/SDv1.5_textual_inversion_4000_ti.ckpt, we use the following command to run inference with the newly learned text embedding.
python text_to_image.py  \
    --version "1.5" \
    --prompt "a dog in <chinese-art> style" \
    --config configs/v1-train-textual-inversion.yaml  \
    --ti_ckpt_path output/chinese_art/weights/SDv1.5_textual_inversion_4000_ti.ckpt \
    --output_path vis/
The generated images using the prompt "a dog in <chinese-art> style" are show below:
Figure 5. The generated images using the textual inversion weight.
[1] Rinon Gal, Yuval Alaluf, Yuval Atzmon, Or Patashnik, Amit Haim Bermano, Gal Chechik, Daniel Cohen-Or: An Image is Worth One Word: Personalizing Text-to-Image Generation using Textual Inversion. ICLR 2023


