We read every piece of feedback, and take your input very seriously.
To see all available qualifiers, see our documentation.
Have a question about this project? Sign up for a free GitHub account to open an issue and contact its maintainers and the community.
By clicking “Sign up for GitHub”, you agree to our terms of service and privacy statement. We’ll occasionally send you account related emails.
Already on GitHub? Sign in to your account
npm的包安装分为本地安装(local)、全局安装(global)两种,从敲的命令行来看,差别只是有没有-g而已,比如
-g
npm install grunt # 本地安装
npm install -g grunt-cli # 全局安装
这两种安装方式有什么区别呢?从npm官方文档的说明来看,主要区别在于(后面通过具体的例子来说明): 本地安装
全局安装
比如运行下面命令
npm install grunt --save-dev
那么,就会在当前目录下发现一个node_modules目录,进去后能够看到grunt这个包
node_modules
grunt
casperchenMacBookPro:testUsemin casperchen$ ll
total 200
drwxr-xr-x  16 casperchen  staff   544B 12 14 23:17 node_modules
进入node_modules
casperchenMacBookPro:node_modules casperchen$ ll
total 0
drwxr-xr-x  16 casperchen  staff   544B 12  5 00:49 grunt
直接来个例子,我们在项目根目录下创建test.js,里面的内容很简单
test.js
var grunt = require('grunt');
grunt.log.writeln('hello grunt');
然后在控制台运行test.js
node test.js
然后就会看到如下输出
casperchenMacBookPro:testUsemin casperchen$ node test.js
hello grunt
运行如下命令
npm install -g grunt-cli
然后进入/usr/local/bin目录,就会发现grunt-cli已经被放置在下面了
/usr/local/bin
grunt-cli
casperchenMacBookPro:bin casperchen$ pwd
/usr/local/bin
casperchenMacBookPro:bin casperchen$ ll grunt
lrwxr-xr-x  1 root  admin    39B  8 18 21:43 grunt -> ../lib/node_modules/grunt-cli/bin/grunt
可见,全局模块的真实安装路径在/usr/local/lib/node_modules/下,/usr/local/bin下的可执行文件只是软链接而已
/usr/local/lib/node_modules/下
实现细节在上面其实就讲到了,通过在``/usr/local/bin`下创建软链接的方式实现。这里不赘述
下面就直接看下,当我们在项目目录下运行grunt task(task为具体的grunt任务名,自行替换)时,发生了什么事情。这里要借助node-inspector。
grunt task
node-inspector
首先,没接触过node-inspector的童鞋可以参考之前的文章了解下
运行如下命令开启调试
node-inspector &
见到如下输出
casperchenMacBookPro:tmp casperchen$ node-inspector &
[1] 14390
casperchenMacBookPro:tmp casperchen$ Node Inspector v0.6.1
   info  - socket.io started
Visit http://127.0.0.1:8080/debug?port=5858 to start debugging.
接着,在当前任务下运行grunt任务
^CcasperchenMacBookPro:testUsemin casperchen$ node --debug-brk $(which grunt) dev
debugger listening on port 5858
接着,打开chrome浏览器,输入网址http://127.0.0.1:8080/debug?port=5858,就会自动进入断点调试状态 。从一旁显示的tips可以看到,全局命令grunt其实就是/usr/local/lib/node_modules/grunt-cli/bin/grunt
http://127.0.0.1:8080/debug?port=5858
/usr/local/lib/node_modules/grunt-cli/bin/grunt
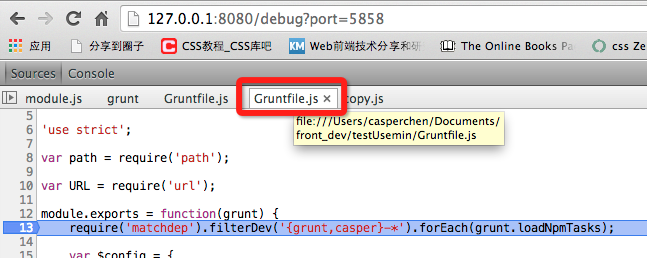
按下F8接着往下跑,就会进如Gruntfile.js,此时的grunt,是本地安装的一个node包。全局命令跟本地的包名字一样,挺有迷惑性的。
The text was updated successfully, but these errors were encountered:
No branches or pull requests
npm的包安装分为本地安装(local)、全局安装(global)两种,从敲的命令行来看,差别只是有没有
-g而已,比如这两种安装方式有什么区别呢?从npm官方文档的说明来看,主要区别在于(后面通过具体的例子来说明):
本地安装
全局安装
本地安装
1、将安装包放在 ./node_modules 下(运行npm时所在的目录)
比如运行下面命令
那么,就会在当前目录下发现一个
node_modules目录,进去后能够看到grunt这个包进入
node_modules2、可以通过 require() 来引入本地安装的包
直接来个例子,我们在项目根目录下创建
test.js,里面的内容很简单然后在控制台运行
test.js然后就会看到如下输出
全局安装
1、将安装包放在 /usr/local 下
运行如下命令
然后进入
/usr/local/bin目录,就会发现grunt-cli已经被放置在下面了可见,全局模块的真实安装路径在
/usr/local/lib/node_modules/下,/usr/local/bin下的可执行文件只是软链接而已2、可以直接在命令行里使用
实现细节在上面其实就讲到了,通过在``/usr/local/bin`下创建软链接的方式实现。这里不赘述
更直观的例子
下面就直接看下,当我们在项目目录下运行
grunt task(task为具体的grunt任务名,自行替换)时,发生了什么事情。这里要借助node-inspector。首先,没接触过
node-inspector的童鞋可以参考之前的文章了解下运行如下命令开启调试
见到如下输出
接着,在当前任务下运行grunt任务
接着,打开chrome浏览器,输入网址
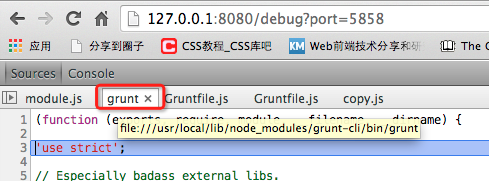
http://127.0.0.1:8080/debug?port=5858,就会自动进入断点调试状态。从一旁显示的tips可以看到,全局命令
grunt其实就是/usr/local/lib/node_modules/grunt-cli/bin/grunt按下F8接着往下跑,就会进如Gruntfile.js,此时的grunt,是本地安装的一个node包。全局命令跟本地的包名字一样,挺有迷惑性的。
The text was updated successfully, but these errors were encountered: