-
Notifications
You must be signed in to change notification settings - Fork 27
Klarna Kosma Integration
Go to Banking Settings:
-
Check Enabled
-
Fill in the Customer ID and Portal API Token you have received by email.
If you don't have an API token yet, you can get one at banking.alyf.de.
-
Click the "Save" button and you are good to go!
Before syncing your bank transactions, consider setting up "Automatic Party Matching" to improve the bank reconciliation experience. Please go through the link to determine if this feature benefits your organization.
Click on the "Link Bank and Accounts" button on the settings page, and follow the prompts.
-
Select the Company who owns the bank account
-
Set the Start Date to the current date
If you're planning to sync older transactions, please note that these will count against your transaction limit of the current billing period. If the Start Date is left empty, the start of the fiscal year will be used.
-
Click on "Continue"
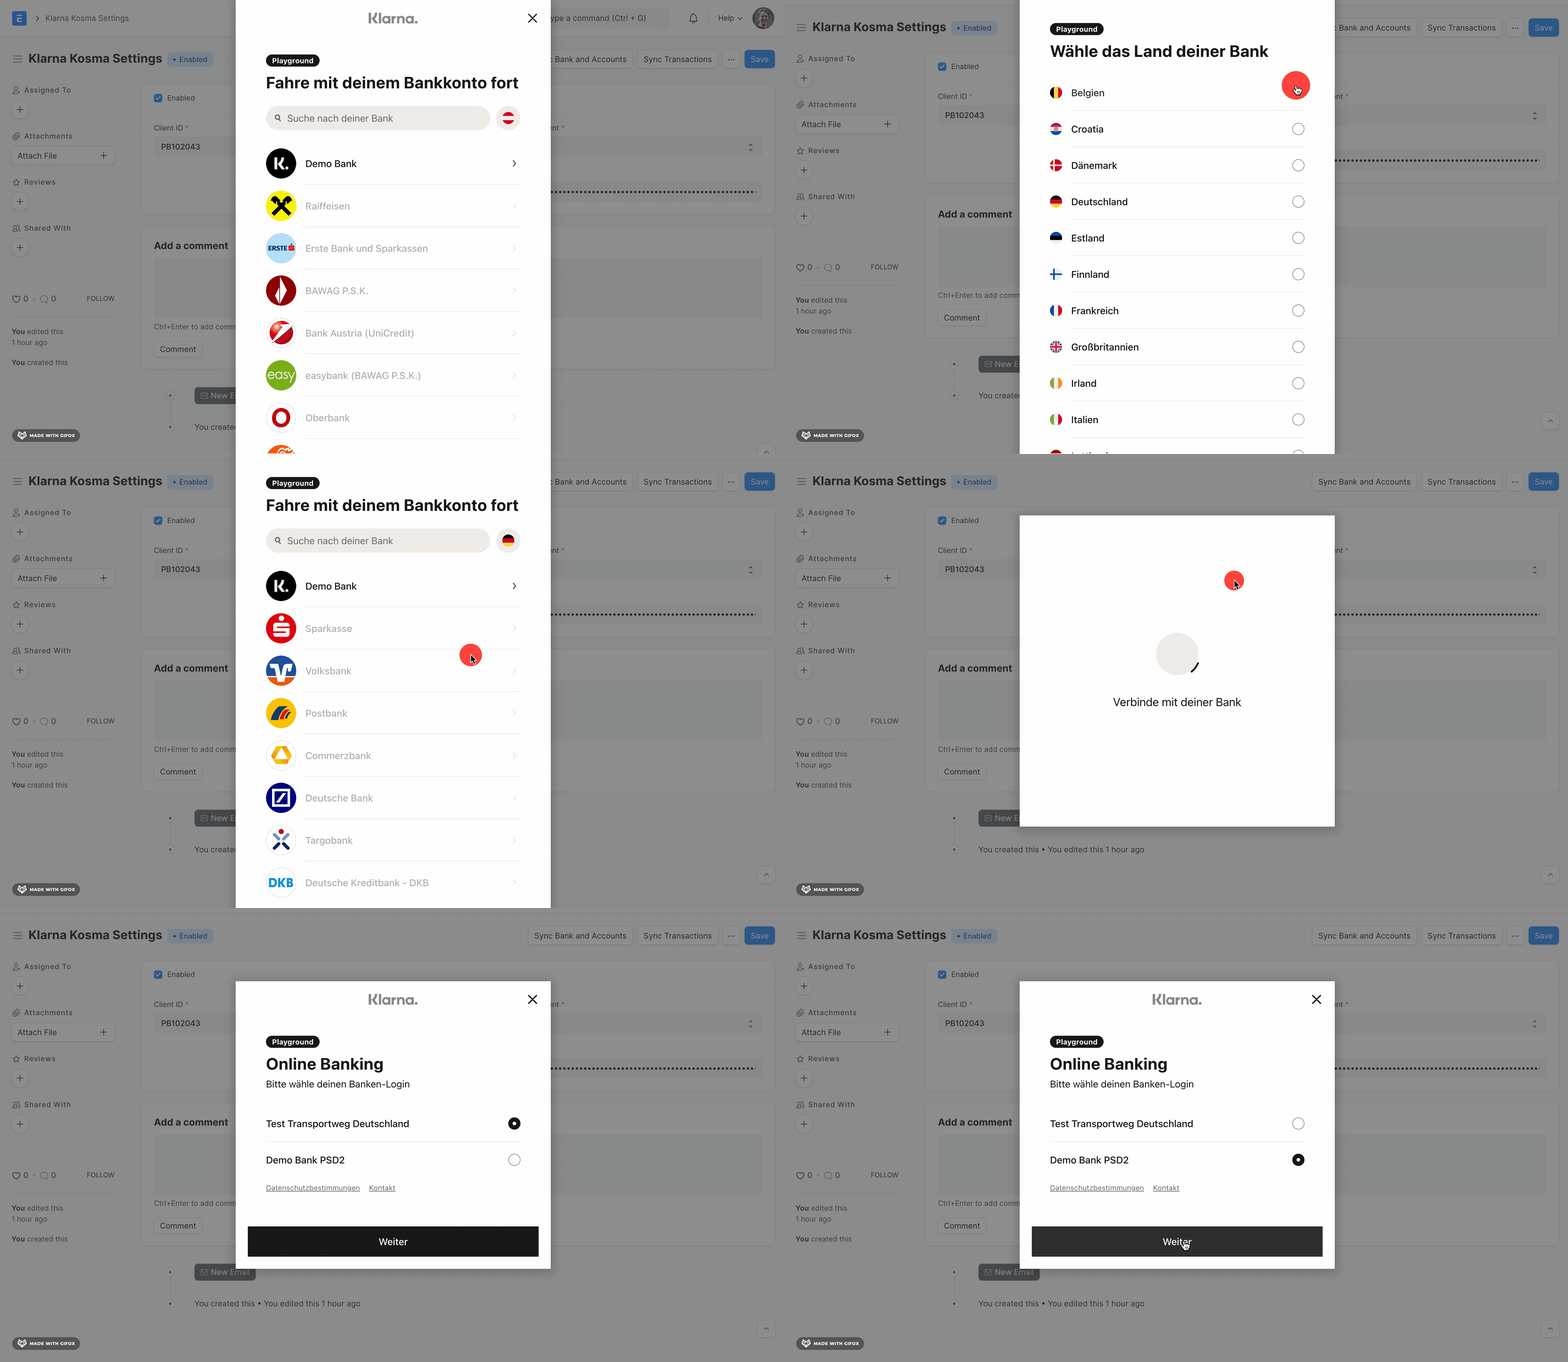
Now you should see a screen where you can select your country and bank. Then you can enter your online banking credentials.

Test values for developers
- Select the country as
Deutschland - Select
Demo Bank - Select the Online Banking method as
Demo Bank PSD2 - Username:
embedded, Password:12345 - OTP:
12345
For more test values and scenarios visit https://docs.openbanking.klarna.com/xs2a/test-bank-psd2.html
A Bank and Bank Account will be created automatically, the first time you complete the authorization flow.
Note: This entire process of authentication with the Bank will be required once every quarter. More on this below.
Bank Transactions can be manually or automatically fetched.
Manually fetching transactions is currently only supported for one account at a time.
- Open the Banking Settings
- Click on "Sync" > "Transactions"
- Select the Bank Account whose transactions should be fetched and click on "Sync".
The transactions are enqueued to be fetched in the background. This job could be time-consuming depending on the amount of transactions. After a while (not more than a few minutes), you should see new entries in your Bank Transaction list.
By default, a daily scheduled job will refresh Bank Accounts' data and fetch their transactions. This does not require any user intervention. The transactions can be seen in the Bank Transactions list.
Note: The first bank transaction sync will consider the start date set while connecting your account.
Once you finish syncing Bank and Bank Accounts by entering your bank credentials, you have given the app consent to read your bank account's data for a limited time.
Consent is stored in the form of a Bank Consent record. The expiry date of the consent is also visible in the Bank Consent record.
By providing consent, you will be sharing:
- A list of bank accounts associated with your online banking.
- Transaction details for each account (including reference numbers, account details, transaction amounts, counterparties, etc.) starting from the date you specified during initial setup.
- The balances of your bank accounts.
Your consent will remain active for 90 days from its creation date, roughly equivalent to one quarter. During this period, there's no need for additional user intervention to retrieve data.
Once the consent period concludes, you'll need to renew your authorization. This can be done by linking your Bank and Accounts via the Banking Settings.
The consent token, which facilitates ERPNext's authentication with your bank, is securely encrypted. It resides encrypted on your ERPNext instance, is always transferred through encrypted channels, and is refreshed after every transaction that employs it.
In the Bank Account, we store the Last Integration Date. When syncing transactions, we fetch only those transactions which are newer than the Last Integration Date. At the same time, the Bank Conset has a Consent Start Date. It cannot be used to fetch transactions prior to the start date. If, for some reason, the Last Integration Date is older than the Consent Start Date, you'll see this error.
You can resolve this error by adjusting the Last Integration Date in the Bank Account and/or re-connecting your bank account through Banking Settings > "Link Bank and Account".