To set your username and e-mail up, run these two commands in the Terminal, inside the project's folder:
git config --global user.name "Your user name"
git config --global user.email "[email protected]"
There are two possible ways to start a repository.
In this case, the initialization goes from local to remote.
mkdir repo_folder
cd repo_folder
git init
git remote add origin [email protected]:server_username/project-name.git
The remote direction can be obtained at the project's page at the remote server. This direction can be obtained to connect through HTTPS (Requires user and password at every push and pull) or through SSH (Recommended Does not require user and pass, but needs an SSH key to be created and uploaded)
git add .
git commit
git push -u origin master
This is the recommended command, although git push usually works well, too.
git clone [email protected]:server_username/project-name.git
cd project_folder
touch README.md
git add README.md
These two README.md commands are an example of making any changes in the project.
git commit -m "add README"
The commit message serves as a way to rapidly identify what has been changed in the project.
git push -u origin master
The command git status can be used at any moment to check if there are commits to push, changes to commit, etc. The typical workflow using a Git repository is as follows:
-
git pullin order to download anything new that has been done to the project. -
Work on the project.
-
git add files_to_commit. All files that you want to be reflected on this commit must be added here. Not necessarily all changed files must be uploaded in a single commit. -
git commitorgit commit -m "commit_message. The difference between them is that the first command opens a Terminal text editor (By default,nanoin Linux,viin Mac OS systems) and the second one gets the message written directly at the command-line.This default editor can be changed with
git config --global core.editor "chosen_editor". -
If you want to continue working on the project, do so and
git commitany other changes. If you have finished, now it is the time togit pushall these new commits to the remote server. It is advisable to push all commits at once, so the remote server is less stressed.
Remote Git servers like GitHub or GitLab allow two ways of connecting to them. One is via HTTPS, the other is SSH.
The HTTPS method is the most simple to set up. It just asks for your server username and password, and sends the data through port 443 (HTTPS default). It is advisable if your connection does not allow you to use port 22 (SSH default).
The SSH method requires a slightly more complex setup, but when pushing and pulling data, there is no user or pass to be input. It is not always available, as your connection may have blocked port 22. (Not usual in domestic connections)
-
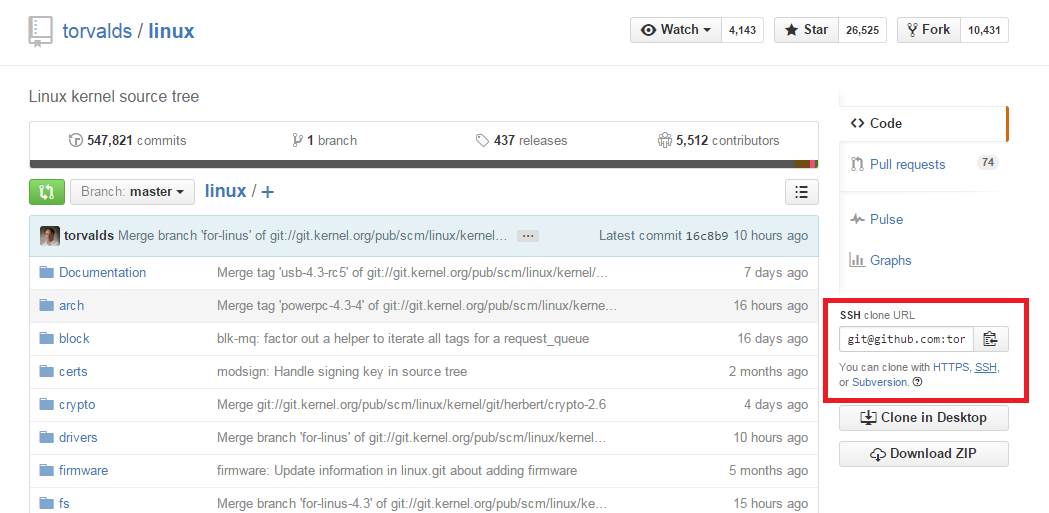
First of all, the local repository must have an SSH remote direction set up. To obtain your project's SSH direction, check its main page, select the SSH option and copy it. Below there a screenshot of the Linux kernel's GitHub page, with the SSH URL location shown:
-
Add the SSH URL to your local repository:
git remote add [shortname] [url]. When setting this URL for the first time, the[shortname]field isorigin.
An SSH key is the way the remote server has for checking the uploader's identity. To do so, first you have to link an SSH key of your computer/s with your remote server's account.
If you do not have one, you must first create an SSH key. Here are the steps:
-
First, check if your computer already has an SSH key:
cat ~/.ssh/id_rsa.pubIf you see a long string starting with ssh-rsa or ssh-dsa, you can skip the ssh-keygen step. -
Generate a new SSH key:
ssh-keygen -t rsa -C "[email protected]"This command will prompt you for a location and filename to store the key pair and for a password. When prompted for the location and filename, you can press enter to use the default. Use the command below to show your public key. The location of the key may vary if you chose a different one from the default:`cat ~/.ssh/id_rsa.pub` -
Copy the SSH into the "SSH Keys" section of your profile's settings page. To copy the key to the clipboard, there is a differend command for every OS:
-
GNU/Linux (requires xclip):
xclip -sel clip < ~/.ssh/id_rsa.pub -
Mac OS:
pbcopy < ~/.ssh/id_rsa.pub -
Windows:
clip < ~/.ssh/id_rsa.pub
-
-
The first time you connect to the server via SSH, you will be asked for the key's password. Enter it and after that, you will no longer need to input any credentials for your connections with the remote server.
