| page_type | description | products | languages | extensions | urlFragment | |||||||
|---|---|---|---|---|---|---|---|---|---|---|---|---|
sample |
This sample implements a Teams message extension that can be used within Copilot to query a database of candidates based on their skills, location and availability. The sample further demonstrates SSO and Copilot's ability to perform multi-parameter search. |
|
|
|
officedev-microsoft-teams-samples-msgext-expert-finder-js |
Using this messaging extension sample, we demonstrate two capabilities of Copilot for M365:
- To search across a database of candidates to find a relevant "expert" based on multiple parameters such as their skill, location and availability.
- Single Sign On (SSO)
On first use, a window requesting for Sign In pops-up and once SSO is completed, the user flow continues as usual.
The database of candidates is hosted in an Azure Table storage, and the app itself is a messaging extension that can be used as a plug-in within Copilot for M365.

Please find below demo manifest which is deployed on Microsoft Azure and you can try it yourself by uploading the app package (.zip file link below) to your teams and/or as a personal app. (Sideloading must be enabled for your tenant, see steps here).
Microsoft Teams Expert Finder sample app: Manifest
- Node.js 18.x
- Visual Studio Code
- Table Storage
- Teams Toolkit
- You will need a Microsoft work or school account with permissions to upload custom Teams applications. The account will also need a Microsoft Copilot for Microsoft 365 license to use the extension in Copilot.
-
Create Azure storage account: Refer to the Create azure storage account documentation to create a storage account in Azure.
-
Follow the steps mentioned to Create azure table storage inside the storage account.
-
Follow the schema as given in the below image while creating the azure table.

-
Clone the repository
git clone https://github.com/OfficeDev/Microsoft-Teams-Samples.git
-
Navigate to the
samples/msgext-expert-finder-jsfolder and open with Visual Studio Code. -
Navigate to the
samples/msgext-expert-finder-js/.localConfigsdirectory and update the values below.AZURE_TABLE_STORAGE_CONNECTION_STRING=<azure storage account connection string> (Created in step 1) AZURE_TABLE_TABLE_NAME=<azure table name> (Created in step 2)
- Note : Make sure you have followed all the earlier steps of setting up the sample and creating table storage. Make sure all connection string values are added in
samples/msgext-expert-finder-js/.localConfigsfile before running the sample in toolkit.
The simplest way to run this sample in Teams is to use Teams Toolkit for Visual Studio Code.
- Ensure you have downloaded and installed Visual Studio Code
- Install the Teams Toolkit extension
- Select File > Open Folder in VS Code and choose this samples directory from the repo
- Using the extension, sign in with your Microsoft 365 account where you have permissions to upload custom apps
- Select Debug > Start Debugging or F5 to run the app in a Teams web client.
- Go to app registrations in azure portal and search for the app registration created by toolkit automatically. You will get the resource suffix inside
samples/msgext-expert-finder-js/env/.env.localwith key asAPP_NAME_SUFFIX. This resource suffix should be used to search the created azure resources. For eg you can search the app registration with name likeexpert-finder-local
- Under Manage > Authentication > Platform Configurations > Add a Platform > Web > Redirect URIs > Add the below URI

https://token.botframework.com/.auth/web/redirect- Under implicit grant flow make sure Access token and Id token both options are selected.
- Select Configure.


- Expose API endpoint
-
Click "Expose an API" in the left rail
-
Set your Application ID URI to include your bot id in the following format -
api://botid-<AppId>, where<AppId>is the id of the bot that will be making the SSO request and can be found in.env.localfile in your sample solution.
-
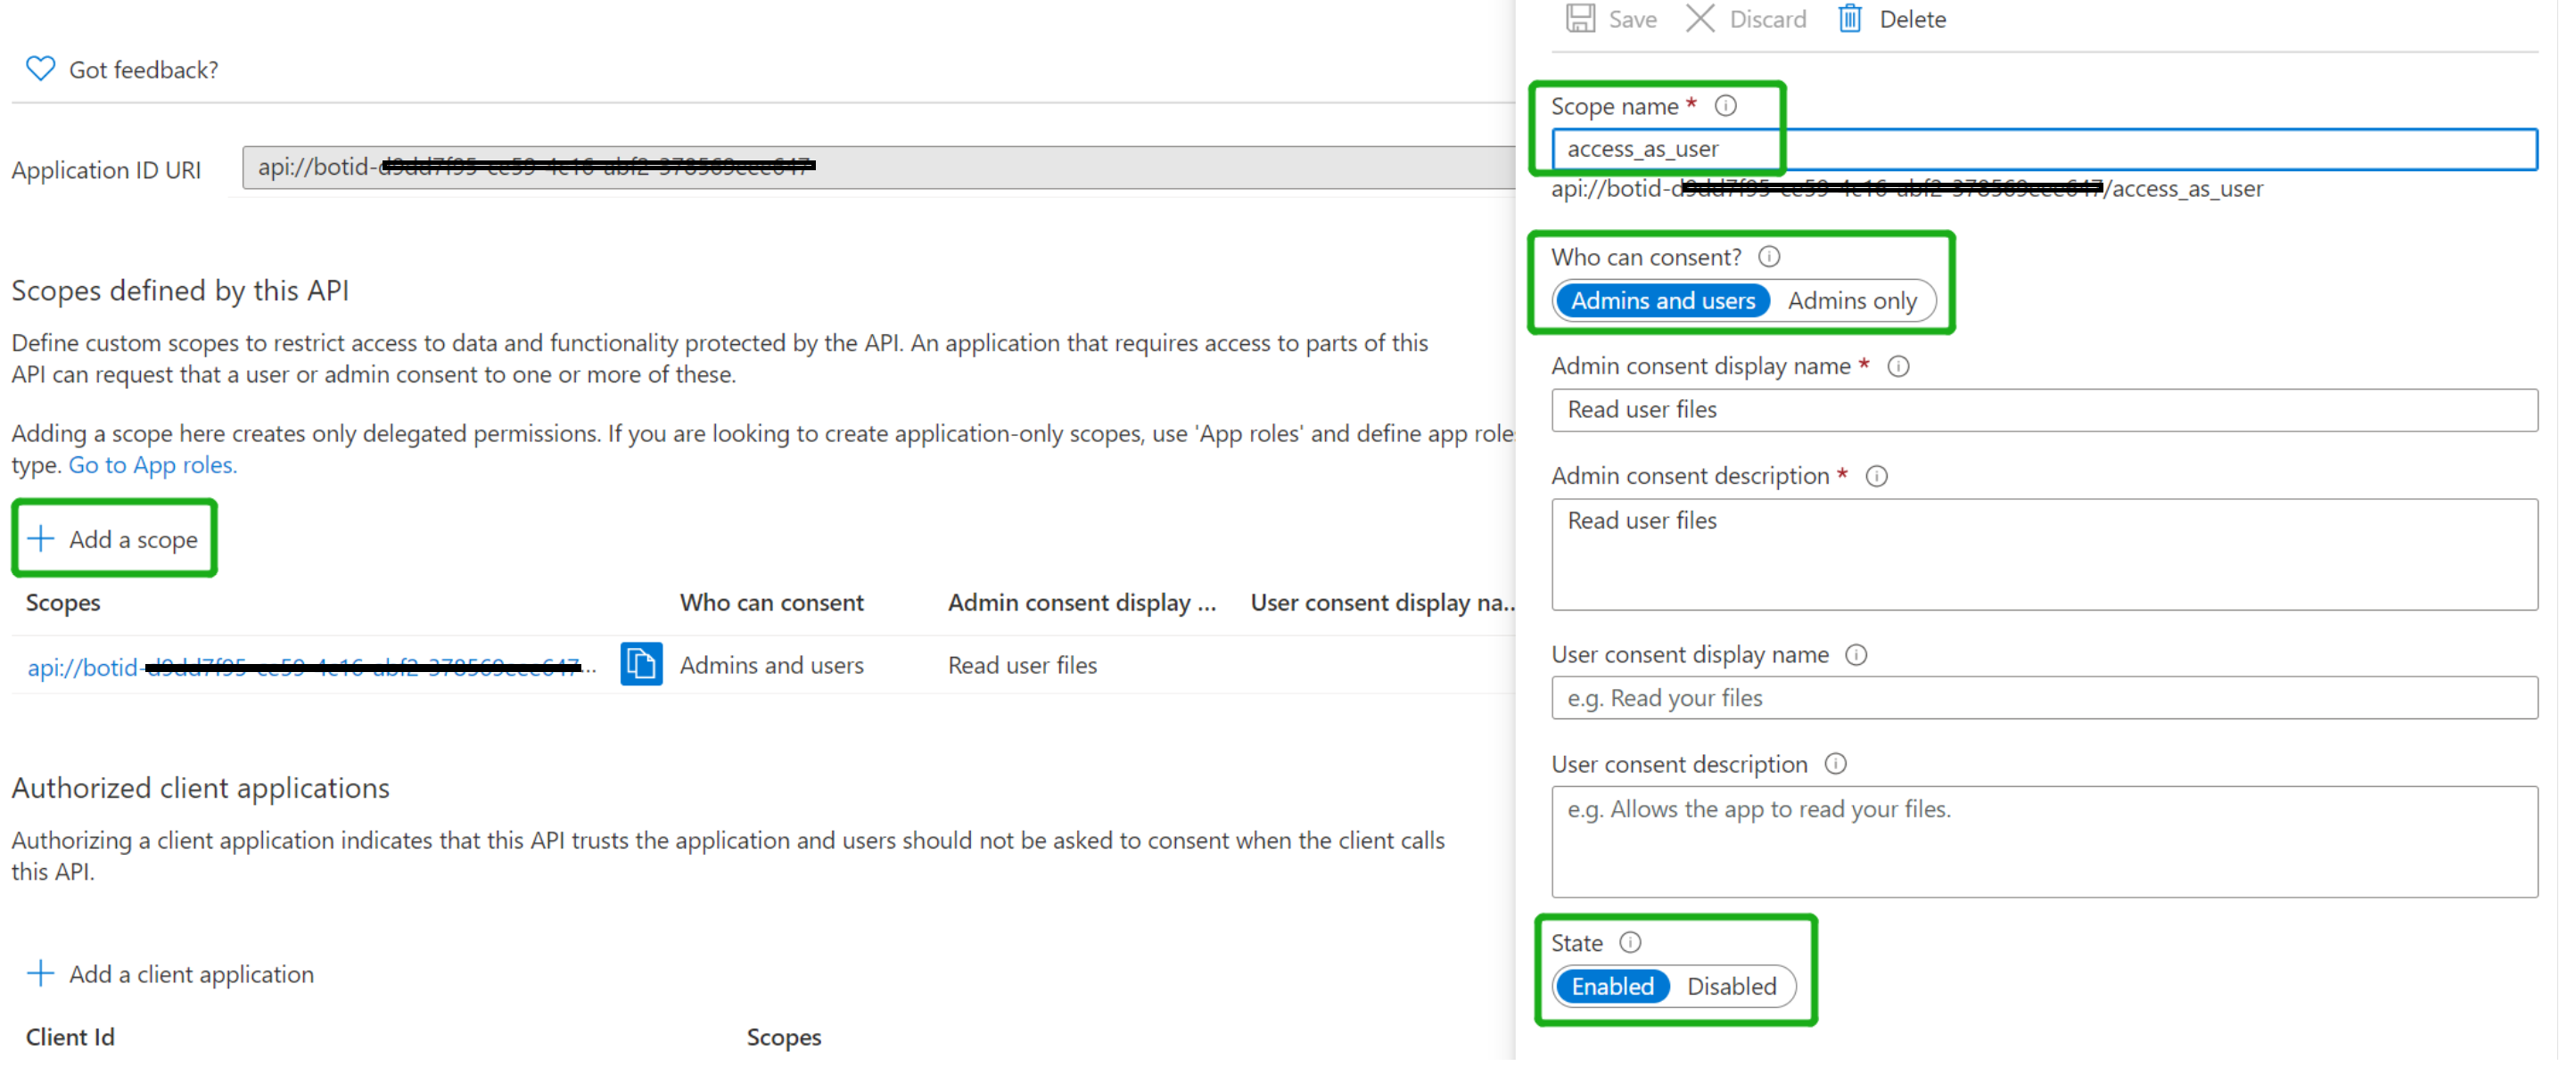
Click "Add a scope"
-
access_as_user as the Scope name.
-
Set Who can consent? to Admins and users
-
Fill in the fields for configuring the admin and user consent prompts with values that are appropriate for the access_as_user scope. Suggestions:
-
Admin consent display name: Teams can access the user’s profile
-
Admin consent description: Allows Teams to call the app’s web APIs as the current user.
-
User consent display name: Teams can access your user profile and make requests on your behalf
-
User consent description: Enable Teams to call this app’s APIs with the same rights that you have
-
-
Ensure that State is set to Enabled
-
Click on Add scope button (Note: The domain part of the Scope name displayed just below the text field should automatically match the Application ID URI set in the previous step, with /access_as_user appended to the end)
-
-
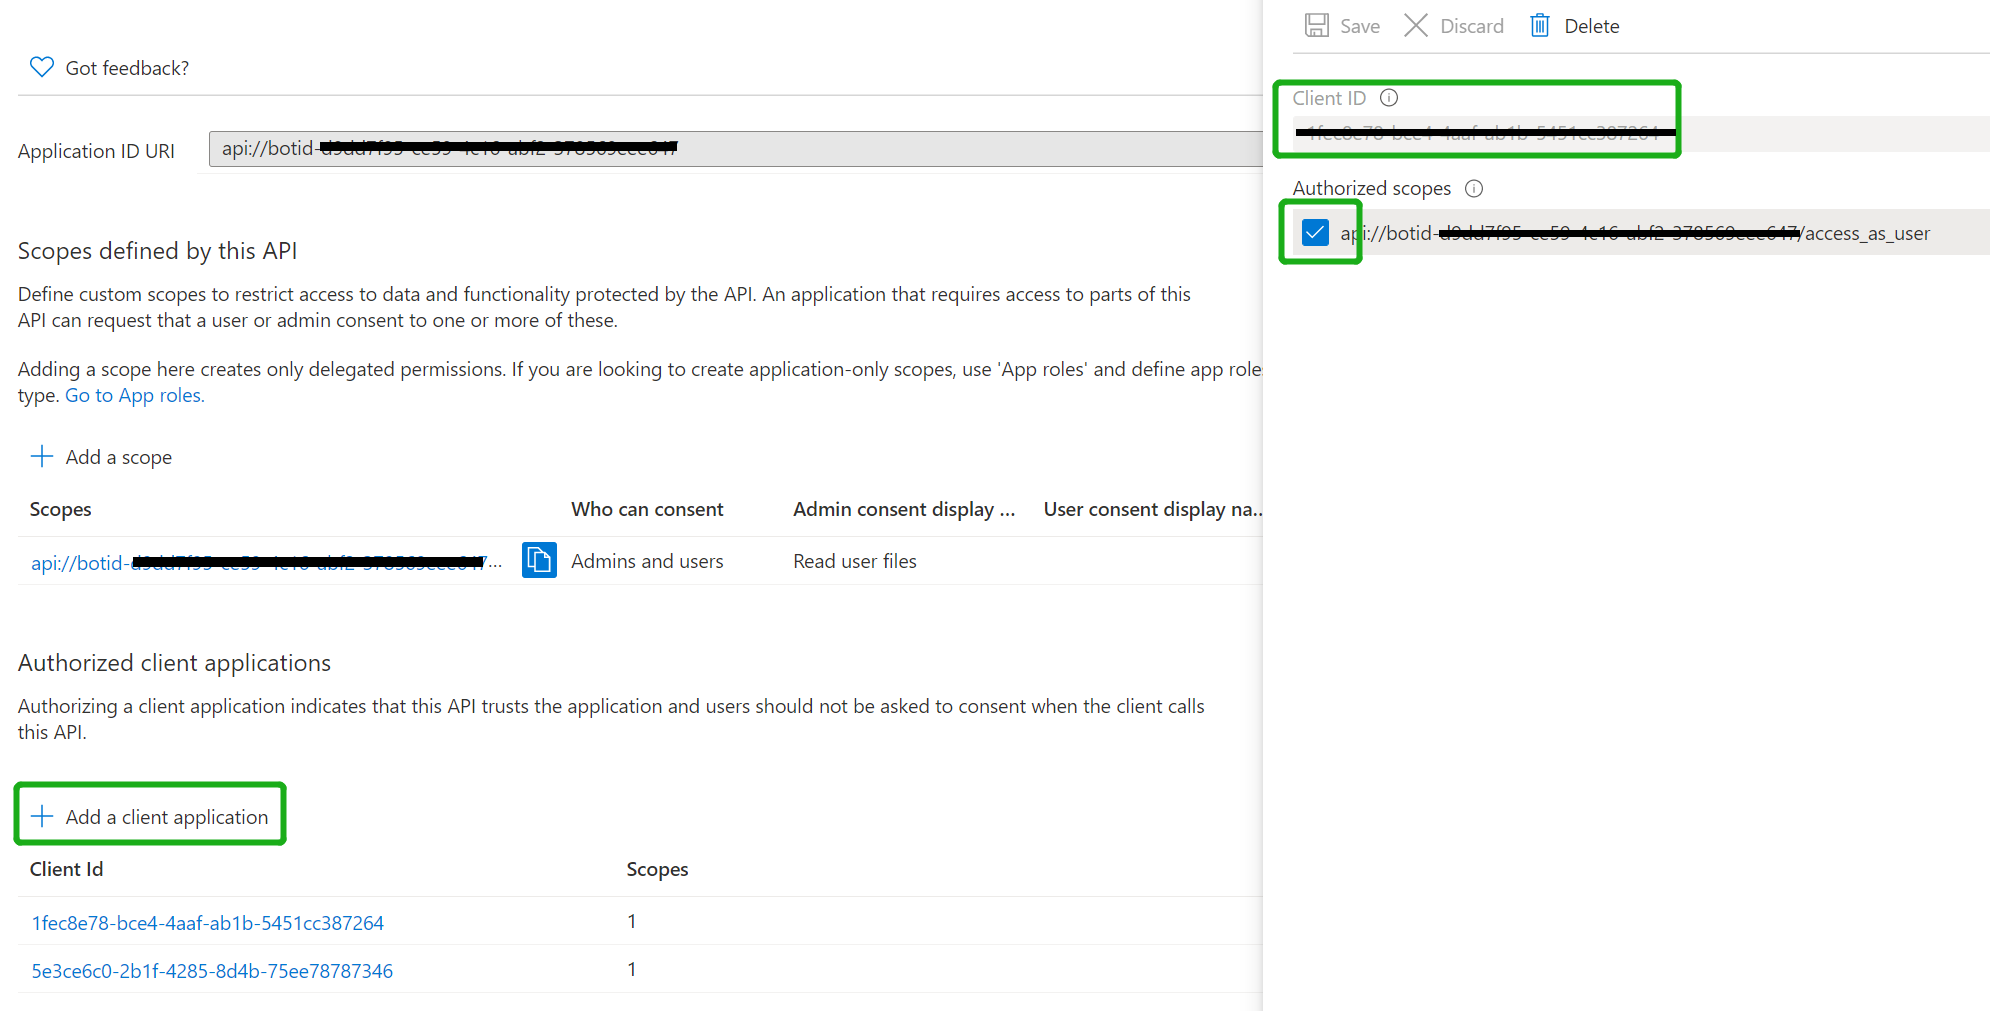
- Authorize client applications
Add the following Ids as authorized clients for your application
-
1fec8e78-bce4-4aaf-ab1b-5451cc387264 (Teams mobile/desktop application)
-
5e3ce6c0-2b1f-4285-8d4b-75ee78787346 (Teams web application)
- Setup Azure Bot Service Connection (TokenStore) Note> Azure bot will be created automatically in the selected subscription and resource group while running the sample using Toolkit.
-
In the Azure Portal, go to the resource group selected while running the sample using toolkit and navigate to the Azure Bot resource
-
Switch to the "Settings" and Configuration section and click on
Add OAuth Connection Settings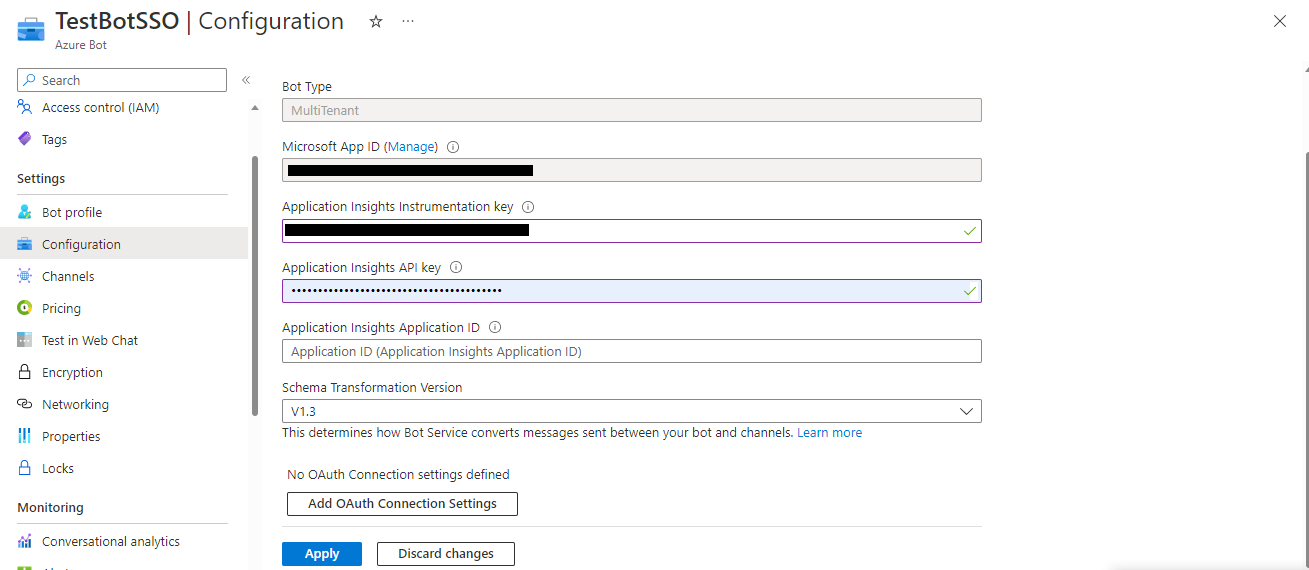
-
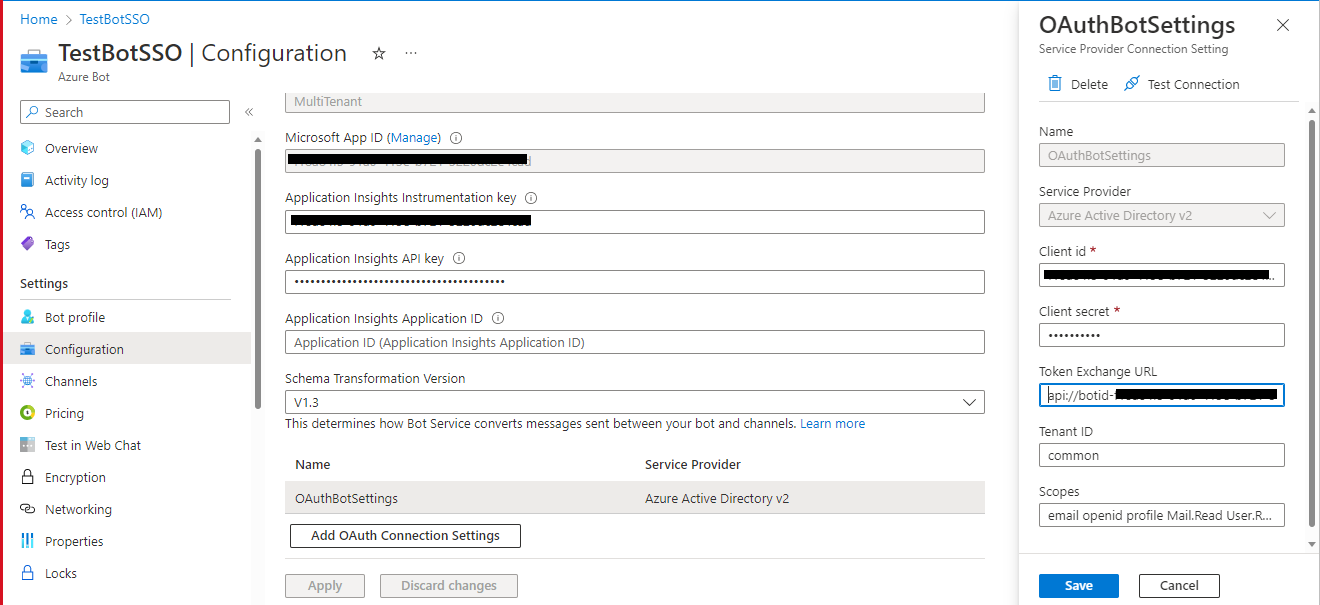
Fill out the Connection Setting form
-
Enter a name for your new Connection setting. Keep the name as
authbot. -
In the Service Provider dropdown, select
Azure Active Directory V2 -
Enter the client id and client secret generated automatically while running the sample using Toolkit.
-
For client secret navigate to
samples/msgext-expert-finder-js/env/.env.local.userand select theDecrypt secretoption to get the decrypted client secret.
-
For client id, navigate to
samples/msgext-expert-finder-js/env/.env.localand select theAPP_IDoption to get the client id. -
For the Token Exchange URL use the Application ID URI obtained in step 3. (Uri in format
api://botid-<app-id>) -
Specify "common" as the Tenant ID. If you are using Single Tenant app registration then set your tenant Id where the bot is registered.
-
Add
User.Readas scope -
Click "Save"
-

- Go to app store in teams -> Upload an app -> Upload custom/store app
- Navigate to
samples/msgext-expert-finder-js/appPackage/buildand selectappPackage.local.zipfor uploading. - Add the app and test the app as a messaging extension.


Navigate to the Microsoft Copilot for Microsoft 365 chat. Check the lower left of the chat user interface, below the compose box. You should see a plugin icon. Click this and enable the Expert-finder plugin.

- Here are some sample prompts you can try :
Find candidates with skill in Azure.Find candidates with skill in React and who are from India.Find candidates with skill in Azure and available for interview.
SSO auth with consent popup when sign in button is clicked

Search based on skills and country

Note: You can search candidates based on multiple parameters like skills, location, availability etc.