-
Notifications
You must be signed in to change notification settings - Fork 1
3. Energy monitoring
(documentation in progress)
For this version, the prototype relies on CitizenWatt application.
CitizenWatt is an open source and open hardware sensor. It is associated with a Python application, that runs on a Raspberry Pi 1. Data are stored locally and exposed through an API.
The original sources are here:
➡ Sensor : https://github.com/CitoyensCapteurs/CitizenWatt-sensor
➡ Application : https://github.com/CitoyensCapteurs/CitizenWatt-Base
CitizenWatt application has been modified to run on a Rapsberry Pi 3 and to work with other types of sensors:
➡ https://github.com/DAISEE/CitizenWatt-Base-RPI3
For now, several branches are available:
‣ master (works with CitizenWatt sensor, through NRF24, not used for this prototype),
‣ smartplug (works with AWOX Smartplug, through bluetooth, not used for this prototype),
‣ ina291 (works with INA219 sensor, directly connected to Raspberry Pi),
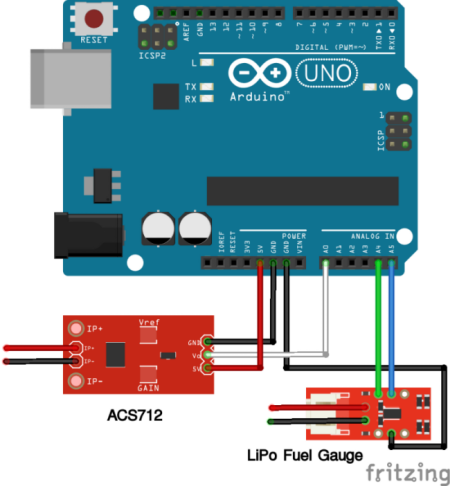
‣ acs712 and acs712-soc (works with an ACS 712-based sensor and an optional LiPo Fuel Gauge sensor connected to an Arduino).
TODO : issue DAISEE/CitizenWatt-Base-RPI3/issues/2
- connections between Raspberry Pi and and the transceiver:
| PIN | NRF24L01+ | RPI | RPi Connector |
|---|---|---|---|
| 1 | GND | rpi-gnd | (25) |
| 2 | VCC | rpi-3v3 | (17) |
| 3 | CE | rpi-gpio22 | (15) |
| 4 | CSN | rpi-gpio8 | (24) |
| 5 | SCK | rpi-sckl | (23) |
| 6 | MOSI | rpi-mosi | (19) |
| 7 | MISO | rpi-miso | (21) |
| 8 | IRQ | - | - |
Source:
➡ http://tmrh20.github.io/RF24/RPi.html
- Activate I²C in Interfacing Options
$ sudo raspi-config- Connections:
Source:
➡ http://www.rototron.info/raspberry-pi-ina219-tutorial/
-
Arduino:
Upload the following code on an Arduino: sensor_acs712.ino (or this version for LiPo fuel gauge support) -
Connections between sensor and Arduino:

Source:
➡ [FR] http://wiki.mchobby.be/index.php?title=SENSEUR-COURANT-ACS712#Brancher
- Python3 and packages installation
$ git clone https://github.com/DAISEE/CitizenWatt-Base-RPI3.git
$ sudo mv CitizenWatt-Base-RPI3/  /opt/citizenwatt/
$ cd /opt/citizenwatt/
$ sudo bash system/install_req.sh - citizenwatt-visu compilation
$ dpkg-deb --build citizenwatt-visu
$ sudo dpkg -i citizenwatt-visu.deb- Database creation
$ sudo -u postgres psql
[sudo] password for debian:
psql (9.4.9)
Type "help" for help.

postgres-# CREATE DATABASE citizenwatt;
postgres-# CREATE USER citizenwatt PASSWORD 'citizenwatt';
postgres-# GRANT ALL ON DATABASE citizenwatt TO citizenwatt;
postgres-# exit
postgres-# - Firewall configuration
$ sudo iptables -t nat -A PREROUTING -p tcp --dport 80 -j DNAT --to-destination :8080
$ sudo netfilter-persistent save- (Additional steps) for CitizenWatt sensor
$ sudo aptitude install libboost-python-dev
$ sudo ln -s /usr/lib/arm-linux-gnueabihf/libboost_python-py34.so /usr/lib/arm-linux-gnueabihf/libboost_python3.so
$ sudo aptitude install python3-setuptools
$ ./setup.py build
$ sudo ./setup.py install - (Additional steps) for AWOX Smartplug
$ sudo pip3 install bluepy- (Additional steps) for INA219 sensor
$ sudo pip3 install pi-ina219- (Additional steps) for ACS-based sensor
$ sudo pip3 install pyserialFor testing, all programs are launched manually.
$ python3 receive.py
$ python3 process.py
$ python3 visu.py
To launch these programs automatically, use the supervisor:
$ cd /opt/citizenwatt/system
$ mv supervisor_citizenwatt.conf /etc/supervisor/conf.d/supervisor_citizenwatt.conf
After launching the server, the application will be available locally (see hostname or ip).
Complete the configuration:
(if the field "Fournisseurs d'énergie" is blank, see CitizenWatt-Base-RPI3/issues/3 [FR])
If a sensor is connected, data will be displayed in the "CONSO" tab:
Data are available through an API.
Example:
/api/<sensor:int>/get/<watt_euros:watts|kwatthours|euros>/by_time/<time1:float>/<time2:float>
Returns measures between timestamps <time1> and <time2> from sensor <sensor> in watts or euros.
(to be completed)