This adapter works with the legacy Google Actions SDK and DialogFlow. A new adapter supporting the latest Actions SDK can be found here.
| Branch | Status | Recommended NuGet package version |
|---|---|---|
| master | Available via NuGet |
This is part of the Bot Builder Community project which contains Bot Framework Components and other projects / packages for use with Bot Framework Composer and the Bot Builder .NET SDK v4.
The Google Adapter allows you to add an additional endpoint to your bot for custom Google Actions. The Google endpoint can be used in conjunction with other channels meaning, for example, you can have a bot exposed on out of the box channels such as Facebook and Teams, but also via a Google Action (as well as side by side with other adapters (e.g. the Alexa adapter) also available from the Bot Builder Community Project).
Incoming Google Action requests are transformed, by the adapter, into Bot Builder Activties and then when your bot responds, the adapter transforms the outgoing Activity into a Google response.
The adapter currently supports the following scenarios;
- Support for voice based Google actions
- Support for Basic Card, Table Card and Signin Card
- Send Lists and Carousels to allow the user to select from a visual list
- Automatic conversion of Suggested Actions on outgoing activity into Google Suggestion Chips
- Full incoming request from Google is added to the incoming activity as ChannelData
Available via NuGet package Bot.Builder.Community.Adapters.Google.
Install into your project use the following command in the package manager.
PM> Install-Package Bot.Builder.Community.Adapters.Google
A Sample bot with examples of specific functionality for the legacy Actions SDK and DialogFLow (such as sending cards, lists etc.) is available here.
- Prerequisites
- Create and Configure Google Action
- Wiring up the Google adapter in your bot
- Complete configuration of your Google Action
- Testing your Google Action
- Incoming action requests to Bot Framework activity mapping
- Customising your conversation - Learn about controlling end of session and use of basic card, table card, list and carousel
In this article you will learn how to connect a bot to Google Assistant using the Google adapter. This article will walk you through modifying the EchoBot sample to connect it to a skill.
-
Access to the Actions on Google developer console with sufficient permissions to login to create / manage projects at https://console.actions.google.com/. If you do not have this you can create an account for free.
The Google adapter supports connecting to Actions on Google (the conversations webhook) or via DialogFlow. It is recommended to use Actions on Google if possible.
The following two sections describe hwo how to correctly configure your Google Action.
-
Log into the Actions on Google console and then click the New project button.
-
In the New Project popup dialog, enter a name for your project and choose your desired language and country or region, then click Create project.

- You will now be asked to choose the development experience for your project. In the More Options area below, choose Actions SDK.

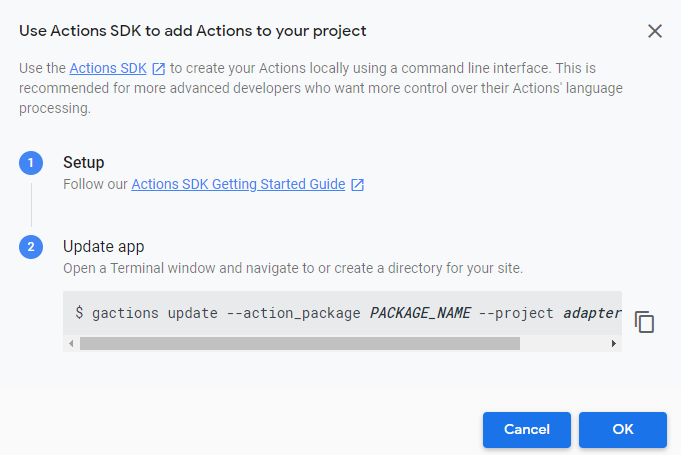
- A popup window will now be shown advising you how to Use Actions SDK to add Actions to your project. The following steps will walk you through this process. Make note of the gactions command shown, as you'll need to use this command when uploading your Action package in a later step.
-
Click the OK button, which will take you to your new project's Overview page.
-
Click the Develop tab at the top and you will be able to enter a Display Name for your new action. This Display Name will also be your action's invocation name, which people will use to talk to your action on Google Assistant. For example, if the display name was 'Adapter Helper', then people would say 'Hey Google, talk to Adapter Helper'. Enter your desired display / invocation name and click the Save button.

-
Download the gactions CLI tool for your platform from https://developers.google.com/assistant/tools/gactions-cli and save it in a location of your choice.
-
You now need to create an Action package. Open a text editor and create a file with the following content.
{
  "actions": [
    {
      "description": "Default Intent",
      "name": "MAIN",
      "fulfillment": {
        "conversationName": "bot-application"
      },
      "intent": {
        "name": "actions.intent.MAIN",
        "trigger": {
          "queryPatterns": [
            "talk to YOUR-ACTION-DISPLAY-NAME"
          ]
        }
      }
    }
  ],
  "conversations": {
    "bot-application": {
      "name": "bot-application",
      "url": ""
    }
  },
  "locale": "en"
}- You need to replace YOUR-ACTION-DISPLAY-NAME, within the trigger section of the document, with the display name that you chose in the previous step. For example, if your display name was 'Adapter Helper', then your updated trigger would look like this.
        "trigger": {
          "queryPatterns": [
            "talk to adapter helper"
          ]
}- Save your new Action package (.json) file. We will update your Actions SDK project later, using the gactions cli tool you previously downloaded, but you still need to update the URL to your bot's endpoint. To obtain the correct endpoint, you need to wire up the Google Adapter and complete configuration of your bot using the details later in this article into your bot and deploy it.
-
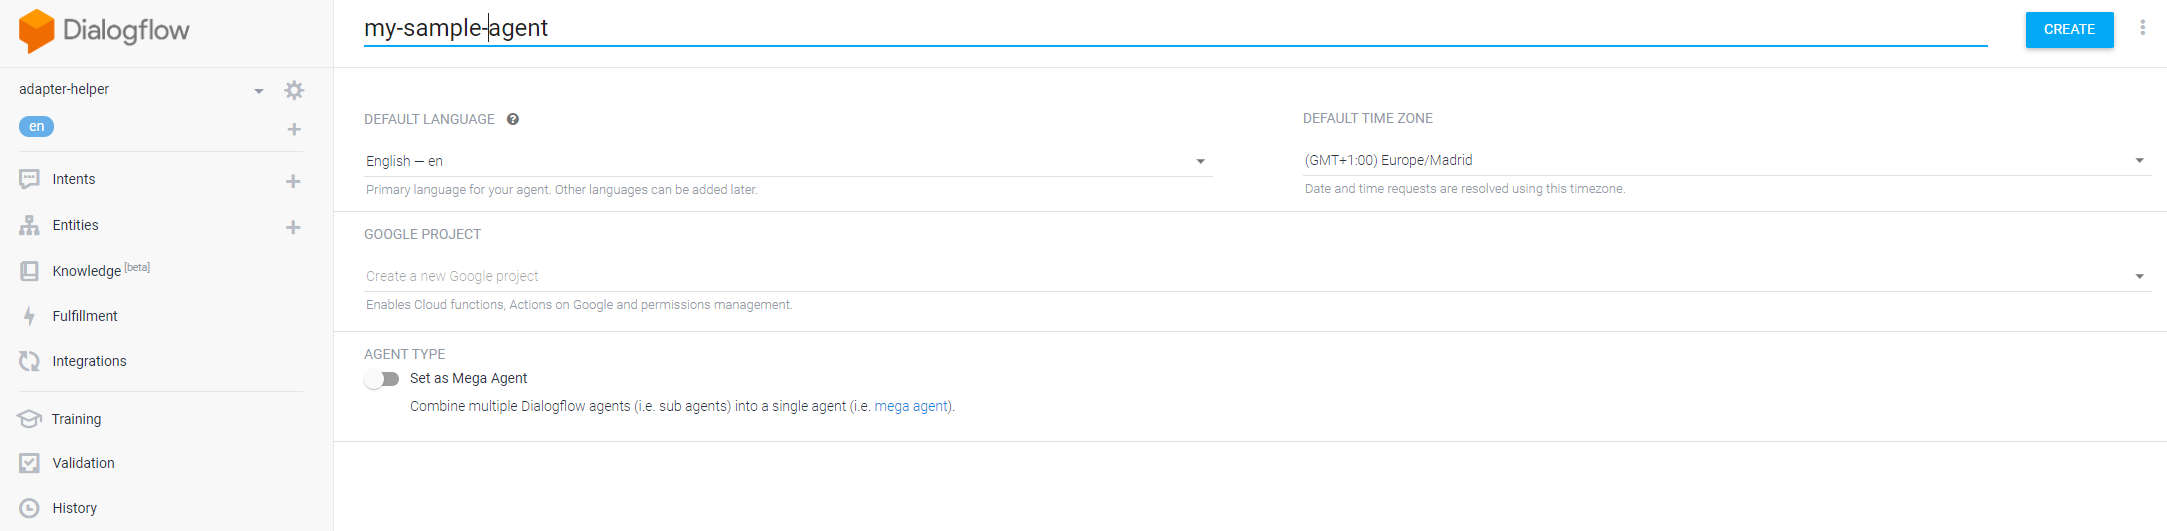
Log into the DialogFlow console and then select the dropdown at the drop of the lefthand menu and click the Create new agent button.
-
Provide a name for your agent and select appropriate language / timezone. Under the Google Project section leave this set to Create a new Google Project.
- You will then be presented with the intents screen for your new agent. Two intents have been created for you, 'Default Fallback Intent' and 'Welcome Intent'.

- Select the 'Wecome Intent' and delete this Intent, leaving the single 'Default Fallback Intent'.
You may choose, depending on your requirements to create additional intents. If you do (and you configure the fulfilment for these intents to be directed to your bot), they will be receieved by your bot as Event activities, allowing you to handle them. However, for a default setup, on the single fallback intent is required and any requests receieved by this intent will be transformed into Bot Framework activites as described later in this article.
- Select the 'Default Fallback Intent' to see the details page for this Intent. Next scroll down to the Responses section and use the delete icon to remove the default responses against this Intent.

- Scroll down to the Fulfilment section on the Intent detais page and select the toggle to enable Enable webhook call for this intent. Also ensure that the Set this intent as end of conversation toggle is set to off / false.

-
Click the Save button at the top of the page to save the changes to the Intent.
-
Navigate back to the Intents tab by selecting Intents on the left hand menu. Click the Create Intent button to add an additional intent. Give the intent the name 'Launch'. As with the Default Fallback Intent, enable webhook fulfilment for this intent and ensure the Set this intent as end of conversation toggle is set to off / false (this will be on by default).
-
Navigate to the Fulfilment tab using the left hand menu. Use the toggle to enable webhook for your agent. On this page is also where you will enter the URL for your bot's endpoint once you have it (this is how the DialogFlow agent knows to sent incoming requests to your bot). You will need to re-visit this page and update this URL once you have completed configuration of your bot, as detailed later in this article.

-
Here you should also add a header with the name 'Authoization' with a value set to a private secret that you choose. You will use this secret later on when configuring your bot to secure requests to your bot.
-
Next you need to configure the Google Assistant integration for your agent, allowing you to call your agent from Google Assistant devices / apps. Select the Integrations tab on the left hand menu and then click Integration settings under Google Assistant. On the popup dialog, select the 'Launch' intent as the intent to trigger for Explicit Invocation.

- You can now also click MANAGE ASSISTANT APP to navigate to the console for the Google Action that was created for you automatically when you created your agent. Once there you can click Decide how your action is invoked.

-
On the Invocation page, you can set the invocation name for your action (which you will need in order to complete configuration of your bot) and also choose other settings such as the voice used. Once you have defined your invocation name and amended any other settings, clikc the Save button.
-
At this stage, make a note of the Action Project ID, visible in the URL of the console. e.g. https://console.actions.google.com/project/**my-sample-agent-abcde**/overview. You will require this when configuring your bot.

Before you can complete the configuration of your Actions on Google project, you need to wire up the Google adapter into your bot.
Add the Bot.Builder.Community.Adapters.Google NuGet package. For more information on using NuGet, see Install and manage packages in Visual Studio
Create a new class that inherits from the GoogleAdapter class. This class will act as our adapter for Google Assistant. It includes error handling capabilities (much like the BotFrameworkAdapterWithErrorHandler class already in the sample, used for handling requests from Azure Bot Service).
    public class GoogleAdapterWithErrorHandler : GoogleAdapter
    {
        public GoogleAdapterWithErrorHandler(ILogger<GoogleAdapter> logger, GoogleAdapterOptions adapterOptions)
            : base(adapterOptions, logger)
        {
            OnTurnError = async (turnContext, exception) =>
            {
                // Log any leaked exception from the application.
                logger.LogError($"Exception caught : {exception.Message}");

                // Send a catch-all apology to the user.
                await turnContext.SendActivityAsync("Sorry, it looks like something went wrong.");
            };
        }
    }
You will also need to add the following using statements.
using Bot.Builder.Community.Adapters.Google;
using Microsoft.Extensions.Logging;You now need to create a new controller which will handle requests from your Google action, on a new endpoing 'api/google' instead of the default 'api/messages' used for requests from Azure Bot Service Channels. By adding an additional endpoint to your bot, you can accept requests from Bot Service channels (or additional adapters), as well as from Google, using the same bot.
[Route("api/google")]
[ApiController]
public class GoogleController : ControllerBase
{
    private readonly GoogleAdapter Adapter;
    private readonly IBot Bot;

    public GoogleController(GoogleAdapter adapter, IBot bot)
    {
        Adapter = adapter;
        Bot = bot;
    }

    [HttpPost]
    public async Task PostAsync()
    {
        // Delegate the processing of the HTTP POST to the adapter.
        // The adapter will invoke the bot.
        await Adapter.ProcessAsync(Request, Response, Bot);
    }
}
You will also need to add the following using statements.
using System.Threading.Tasks;
using Bot.Builder.Community.Adapters.Google;
using Microsoft.AspNetCore.Mvc;
using Microsoft.Bot.Builder;- Add the following code into the ConfigureServices method within your Startup.cs file, which will register your Google adapter and make it available for your new controller class. We will also create and register a GoogleAdapterOptions class, which will contain necessary information for your adapter to function correctly.
You need to set the following properties
-
WebhookType - Set this to either GoogleWebhookType.Conversation or GoogleWebhookType.DialogFlow depending on which integration method you have chosen.
-
ActionInvocationName - replace "YOUR-ACTION-DISPLAY-NAME" with the display name you gave to your action. If using Actions on Google, this will be the name specified in your action package. If using DialogFlow, this is the display name you specified on the Invocation details page for your action.
-
ActionProjectId (only required for Conversations Webhook) - The ID of your Actions on Google project.
-
DialogFlowAuthorizationHeader (only required for DialogFlow) - Set this to the private secret you set within the DialogFlow console when configuring your DialogFlow project.
-
ValidateIncomingRequests - If set to true, the adapter will use the ActionProjectId for Conversations webhook requests, or DialogFlowAuthorizationHeader for DialogFlow requests to validate that requests have been receieved from your Google project.
    // Create the Google Adapter
    services.AddSingleton<GoogleAdapter, GoogleAdapterWithErrorHandler>();

    // Create GoogleAdapterOptions
    services.AddSingleton(sp =>
    {
        return new GoogleAdapterOptions()
        {
            ActionInvocationName = "YOUR-ACTION-DISPLAY-NAME",
            ActionProjectId = "",
            DialogFlowAuthorizationHeader = "",
            ValidateIncomingRequests = true,
            WebhookType = GoogleWebhookType.Conversation // GoogleWebhookType.DialogFlow
        };
});- Once added, your ConfigureServices method shold look like this.
public void ConfigureServices(IServiceCollection services)
{
    services.AddMvc().SetCompatibilityVersion(CompatibilityVersion.Version_2_1);

    // Create the default Bot Framework Adapter (used for Azure Bot Service channels and emulator).
    services.AddSingleton<IBotFrameworkHttpAdapter, BotFrameworkAdapterWithErrorHandler>();

    // Create the Google Adapter
    services.AddSingleton<GoogleAdapter, GoogleAdapterWithErrorHandler>();

    // Create GoogleAdapterOptions
    services.AddSingleton(sp =>
    {
        return new GoogleAdapterOptions()
        {
            ActionInvocationName = "YOUR-ACTION-DISPLAY-NAME",
            ActionProjectId = "YOUR-PROJECT-ID"
            ValidateIncomingRequests = true,
            WebhookType = GoogleWebhookType.Conversation // GoogleWebhookType.DialogFlow
        };
    });

    // Create the bot as a transient. In this case the ASP Controller is expecting an IBot.
    services.AddTransient<IBot, EchoBot>();
}- You will also need to add the following using statement, in addition to those already present in the startup.cs file.
using Bot.Builder.Community.Adapters.Google;Now that you have wired up the adapter in your bot project, the final steps are to configure the endpoint, for your action, to which requests will be posted to when your action is invoked, pointing it to the correct endpoint on your bot.
To complete this step, deploy your bot to Azure and make a note of the URL to your deployed bot. Your Google messaging endpoint is the URL for your bot, which will be the URL of your deployed application (or ngrok endpoint), plus '/api/alexa' (for example, https://yourbotapp.azurewebsites.net/api/Google).
Note
If you are not ready to deploy your bot to Azure, or wish to debug your bot when using the Alexa adapter, you can use a tool such as ngrok (which you will likely already have installed if you have used the Bot Framework emulator previously) to tunnel through to your bot running locally and provide you with a publicly accessible URL for this.
If you wish create an ngrok tunnel and obtain a URL to your bot, use the following command in a terminal window (this assumes your local bot is running on port 3978, alter the port numbers in the command if your bot is not).
ngrok.exe http 3978 -host-header="localhost:3978"
- Go back to the action package you created in the text editor and replace the URL for the conversation endpoint with your bot's Google endpoint, such as https://yourbotapp.azurewebsites.net/api/google. For example, the conversation section within your action package may look like this.
  "conversations": {
    "bot-application": {
      "name": "bot-application",
      "url": "https://yourbotapp.azurewebsites.net/api/google"
}-
Save your completed action package in a location of your choice.
-
You now need to update your action using the gactions cli tool you downloaded earlier. Open a terminal and navigate to the location that you saved the gactions cli tool into earlier. You will now also require the command you made a note of earlier when creating your project. Enter this command into the terminal window, replacing PACKAGE_NAME with the location of your recently saved action package. Your command should look something like the following,
gactions update --action_package C:\your-action-package.json --project YOUR-PROJECT-ID
- Execute the command, following the instructions to authenticate with your Google account. Once completed
Within the DialogFlow portal, navigate to the Fulfilment tab on the left hand menu and set the URL property to your endpoint URL and click the Save button.
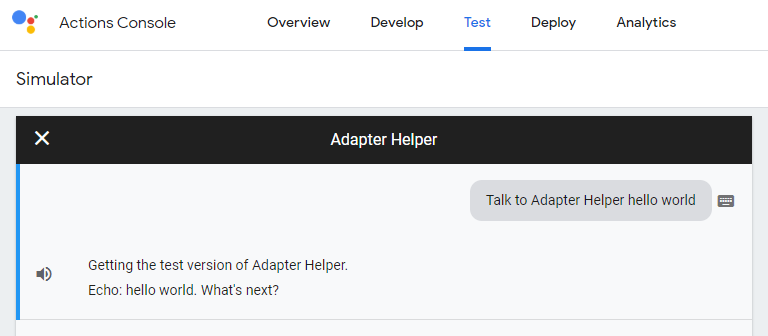
You can now test interacting with your action using the simulator.
-
Navigate to https://console.actions.google.com/ and select your action.
-
In the action dashboard navigate to the Test tab at the top of the page.
-
To perform a basic test enter "ask hello world" into the simulator input box. For example, if your action display name was 'Adapter Helper', you would type 'Talk to Adapter Helper hello world'. This should return an echo of your message.
Now that you have enabled testing for your action, you can also test your action using a physical Google assistant device or using Google assistant on an Android device. Providing you are logged into the device with the same account used to login to the Actions on Google Console (or an account that you have added as a beta tester for your action within the console).
The Google actions service can send your bot a number of different request types.
-
By default, incoming requests take the query text (the text / typed spoken by the user) and convert them to a Bot Framework Message Activity.
-
Explicit invocation -> ConversationUpdateActivity If a user invokes your action without specifying an intent / further query (e.g. OK Google, talk to My Awesome Action - where 'My Awesome Action' is your action display / invocation name), this will be to your bot as a ConversationUpdateActivity. This is mirrors the default functionality on Azure bot Service channels when a user starts a conversation.
-
actions.intent.sign_in -> Event Activity If you are using Account Linking, after you send a request for a user to sign in (by attaching a Bot Framework SigninCard to the outgoing activity), you will receieve a repsonse which contains the status of the account linking (this is likely to be OK / ERROR / CANCELLED). Your bot will recieve an Event Activity where the Name is 'actions.intent.sign_in' an the Value is a string value representing the signin status.
-
actions.intent.option -> Message Activity If you have sent the user a List or Carousel intent (using the helper intent attachments provided with the adapter), if the user selects a value from either the list or carousel, your bot will recieve a Message Activity where the Text property is set to the Display Text value for the selected item.
-
actions.intent.XXXX -> Event Activity Any actions intent requests receieved in response to helper intents not explicitly handled by the adapter (i.e. intents other than option and sign_in), will be sent to your bot as an Event activity. The name property on the Event activity will be set to the full intent name (e.g. actions.intent.permissions), with the value set to the full request payload.
By default, the Google adapter is configured to close the session following sending a response. You can explicitly indicate that Google should wait for the user to say something else, meaning Google should leave the microphone open and listen for further input, by sending an input hint of ExpectingInput on your outgoing activity.
await turnContext.SendActivityAsync("Your message text", inputHint: InputHints.ExpectingInput);You can alter the default behavior to leave the session open and listen for further input by default by setting the ShouldEndSessionByDefault setting on the GoogleAdapterOptions class within your startup.cs class.
    // Create GoogleAdapterOptions
    services.AddSingleton(sp =>
    {
        return new GoogleAdapterOptions()
        {
            ShouldEndSessionByDefault = false,
            ActionInvocationName = "YOUR-ACTION-DISPLAY-NAME",
            ActionProjectId = "YOUR-PROJECT-ID"
            ValidateIncomingRequests = true,
            WebhookType = GoogleWebhookType.Conversation // GoogleWebhookType.DialogFlow
        };
    });
If you do set ShouldEndSessionByDefault to false, then you need to explicity end the conversation when you are ready, by sending an input hint of IgnoringInput on your last outgoing activity.
await turnContext.SendActivityAsync("Your message text", inputHint: InputHints.IgnoringInput);By default, Google Actions expects a single response to each request that is sent to your bot. However, it is not uncommon for a bot to send multiple activities back in response to a request. This can cause issues, especially if you are using Google alongside other channels or adapters.
To combat this issue the adapter will automatically concatenate multiple activities into a single activity, combining the Speak and Text properties of the activities.
Note: by default, the previous version of the adapter took the last version of the activity. If you have previously deployed a bot using the adapter, you may need to consider extending the adapter and overriding the activity processing behavior shown below.
    public class GoogleAdapterEx : GoogleAdapter
    {
        public override Activity ProcessOutgoingActivities(List<Activity> activities)
        {
            return activities.Last();
        }
}-
A Bot Framework HeroCard attached to an outgoing activity, will be automatically transformed into a Google Basic Card.
-
If you have enabled Account Linking for your action, then sending a Bot Framework Signin card on your outgoing activity will be translated into a Signin Helper Intent on the response to Google, which will trigger the appropriate Signin flow.
You can include a basic Google card in your response, which is shown on devices that have a screen. To do this you include an attachment on your outgoing activity. For more information about basic cards see https://developers.google.com/assistant/conversational/responses#basic_card
    var activityWithCard = MessageFactory.Text($"Ok, I included a simple card.");

    var basicCard = GoogleCardFactory.CreateBasicCard("card title", "card subtitle", "some text for the content");
    activityWithCard.Attachments.Add(basicCard.ToAttachment());

await turnContext.SendActivityAsync(activityWithCard, cancellationToken);The following code shows how to provide a user with a list or carousel, using the provided GoogleHelperIntent factory to generate a list or carousel intent object, which can then be converted into an attachment and attached to your outgoing activity.
More information about Lists and Carousels can be found at https://developers.google.com/assistant/conversational/responses#visual_selection_responses.
Below shows an example of sending a list.
    var activityWithListAttachment = MessageFactory.Text($"Ok, I included a list.");

    var listIntent = GoogleHelperIntentFactory.CreateListIntent(
        "List title",
        new List<OptionItem>()
        {
            new OptionItem(
                "List item 1",
                "This is the List Item 1 description",
                new OptionItemInfo() {Key = "Item1", Synonyms = new List<string>() {"first"}},
                new OptionItemImage()
                {
                    AccessibilityText = "Item 1 image",
                    Url = "https://storage.googleapis.com/actionsresources/logo_assistant_2x_64dp.png"
                }),
                new OptionItem(
                "List item 2",
                "This is the List Item 2 description",
                new OptionItemInfo() {Key = "Item2", Synonyms = new List<string>() {"second"}},
                new OptionItemImage()
                {
                    AccessibilityText = "Item 2 image",
                    Url = "https://storage.googleapis.com/actionsresources/logo_assistant_2x_64dp.png"
                })
            });
    activityWithListAttachment.Attachments.Add(listIntent.ToAttachment());

await turnContext.SendActivityAsync(activityWithListAttachment, cancellationToken);You can include information formatted into a table using the Table Card. See https://developers.google.com/assistant/conversational/responses#table_cards for more information about Table Cards.
    var activityWithTableCardAttachment = MessageFactory.Text($"Ok, I included a table card.");

    var tableCard = GoogleCardFactory.CreateTableCard(
    new List<ColumnProperties>()
    {
        new ColumnProperties() { Header = "Column 1" },
        new ColumnProperties() { Header = "Column 2" }
    },
    new List<Row>()
    {
        new Row() {
            Cells = new List<Cell>
            {
                new Cell { Text = "Row 1, Item 1" },
                new Cell { Text = "Row 1, Item 2" }
            }
        },
        new Row() {
            Cells = new List<Cell>
            {
                new Cell { Text = "Row 2, Item 1" },
                new Cell { Text = "Row 2, Item 2" }
            }
        }
    },
    "Table Card Title",
    "Table card subtitle",
    new List<Button>() { new Button() { Title = "Click here", OpenUrlAction = new OpenUrlAction() { Url = "https://www.microsoft.com" }}  });

    activityWithTableCardAttachment.Attachments.Add(tableCard.ToAttachment());